ROCKVILLE RPM45 4-Channel Wood Cabinet Powered Mixer with USB
IMPORTANT SAFETY INSTRUCTIONS
- To reduce risk of electric shock, never open the unit. There are no user serviceable parts; refer service to an authorized Rockville service center.
- Do not expose this unit to any kind of moisture.
- Please ensure that the unit is situated in a properly ventilated area.
- Make sure the unit is placed on a level and stable surface.
Functions
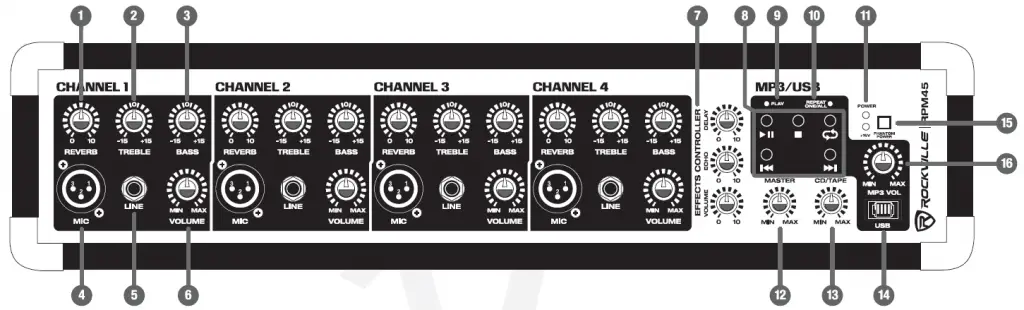
- Channel Reverb control: Controls the mount of reverb added to the input signals.
- Channel Treble control: ±15dB
- Channel Bass:±15dB
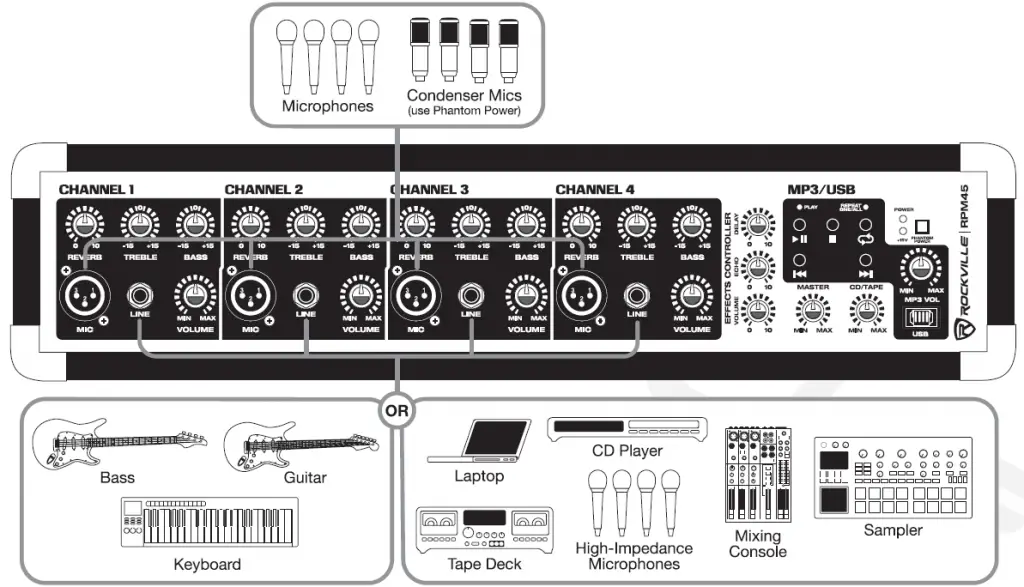
- Microphone/Low impedance XLR input: Connect balanced low-impedance microphones with an input impedance of 1K ohms. PIN 1 = shield, PIN 2 = positive (hot), PIN 3 = negative (cold)
WARNING: When using condenser microphones, make sure that Phantom power (15V) is switched on - Line/High impedance ¼” input: This input may be used as either a high-impedance microphone input or for line-level devices such as a cassette player, CD player, video projector, or laptop. Will also allow connection from an electric guitar, bass, or keyboard. It is a two-conductor input with an impedance of 10K ohms.
- Channel volume control: Volume level should be lower than the master level. This control acts as a preamp; if you are using a device that has a volume output control you will need to match levels by adjusting the level controls on each unit.
- Master EFFX controls: Volume: Controls the level of the effects added back to the master mix.
- Echo: Controls character of the reverb that is added back to the master mix. It changes the rate at which the echo decays.
- Delay: Controls the delay of the reverb that is added back to the master mix. Increasing this control will simulate the effects of a larger room.
- MP3 Player: Play button: Quickly press during play to pause; press button again to resume play.
- Stop button: Quickly press during play to stop current track.
- Repeat button: Quickly press during play to repeat current song. Press again to repeat all songs. Press again to exit repeat mode.
- Next button: Quickly press to go to next track.
- Previous button: Quickly press to go to previous track.
- Play LED indicates MP3 player is on.
- Repeat One/All LED indicates repeat mode is on.
- LED Power indicator
- Master volume: Controls overall volume of the mixer.
- CD/Tape volume: Controls volume of line input.
- USB port: Inserting a USB flash drive will set the RPM45 to USB mode and it will automatically begin to play music. Please note: The RPM45 will not recognize USB drives formatted in the NTFS format. Drives must be formatted in the FAT or FAT32 formats.
- Phantom Power ON/OFF button (Red LED indicates power on)
- MP3 volume: Controls USB input volume.

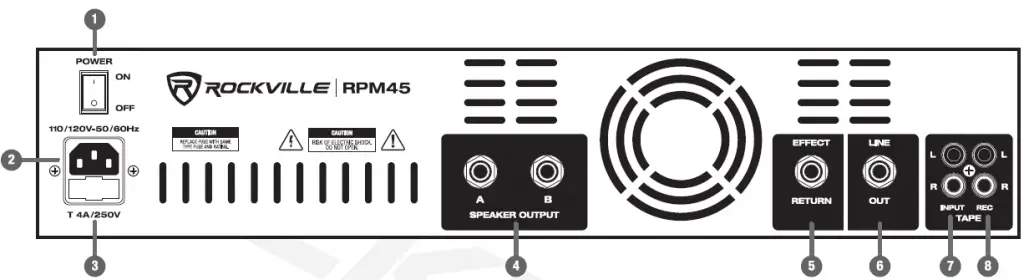
- Power switch
- IEC AC Power socket
- User serviceable fuse
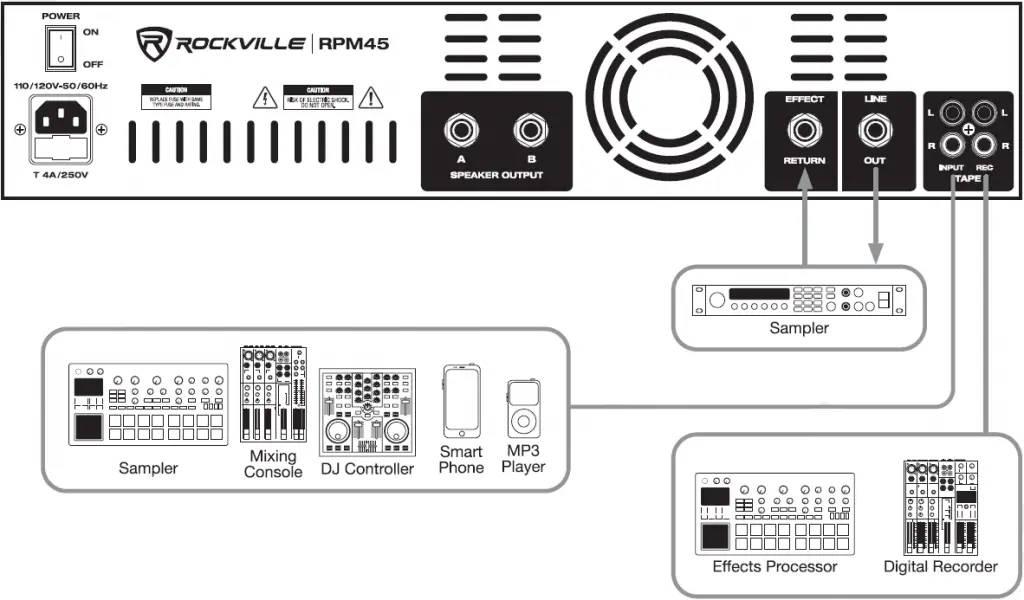
- Speaker outputs: 1/4″TRS jacks accept 4-ohm or 8-ohm speakers.
WARNING: Do not operate below rated minimum impedance. - Effect Return: 2-conductor 1/4″Iine input connects the mixer to the output of an external effects device which is receiving an unamplified main mix signal from the LINE OUT jack.
- Line Out: ¼”TRS line output is used to connect a powered subwoofer or to send the line signal to an external device.
- Tape input: Used to connect line level sources such as DJ controllers, mixers, samplers, CD players, cassette decks, DAT machines, MP3 players, etc. Mono audio sources can be connected using an RCA “Y” cable connector.
- RCA Record out: Sends signal to a recording device or any other line level device.
Setup
In this setup there is a powered sub-woofer connected to the ¼”Out jack and two 8-ohm speakers connected to the ¼”8-Ohm Speaker Outputs on the back of the unit.
In this setup there is a powered stage monitor connected to the ¼” Out jack and two 8-ohm speakers connected to the ¼” 8-Ohm Speaker Outputs on the back of the unit.
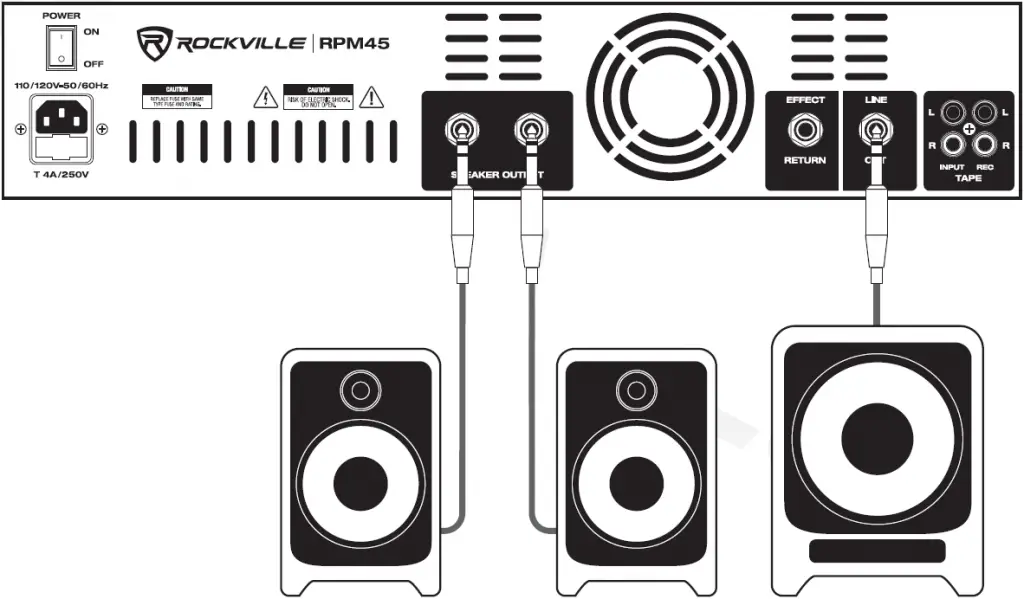
Once your speakers are hooked up, there are a variety of ways to use the RPM45’s many inputs and outputs. Diagrams for the outputs are located on the next page.
Please note: Line level consumer devices such as CD players, tape decks, etc. will require an RCA to ¼” cable.

- Individual Volume, Reverb, Bass, and Treble controls
- Adjustable effects: Echo and Delay
- USB Input
Please note: The RPM45 will not recognize USB drives formatted in the NTFS format. Drives must be formatted in the FAT or FAT32 formats. - MP3 volume control
- AUX volume control
- Master volume control
- 4 balanced XLR inputs
- 4 ¼”TS inputs
- 1 RCA UR AUX input
- 1 RCA UR Rec output
- 1 ¼” Effect loop input/output
- 2 8-ohm ¼” TRS speaker outputs
- AC Input: 120V
- + 15V phantom power
- Fan Vent Cooling System
- RMS Power Output: 225w x 2 @ 8 Ohm (parallel mono)
- Program Power Output: 450w x 2 @ 8 Ohm (parallel mono)
- Peak Power Output: 900w x 2@ 8 Ohm (parallel mono)
Troubleshooting
| Problem | Solution |
| No power |
|
| No sound |
|
| Noise |
|
| Buzzing sound | Make sure you are using a proper cable. For¼” cables, there are 3 types: instrument, TS (unbalanced), and TRS (balanced). Check the requirements of the connected gear and make sure you are using the appropriate cable. |
| No USB playback |
|
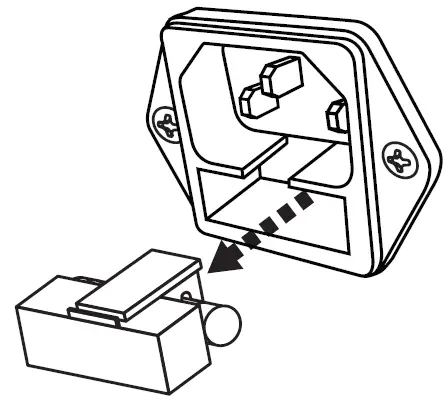
Fuse Replacement
- Use a screwdriver to release the fuse holder.
- Remove the fuse holder.
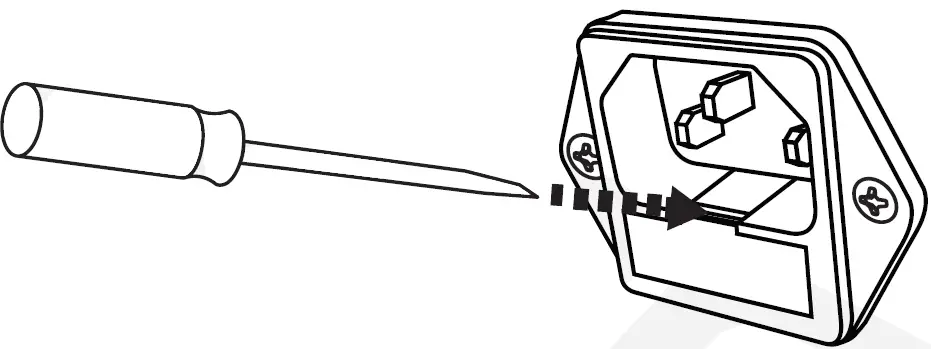
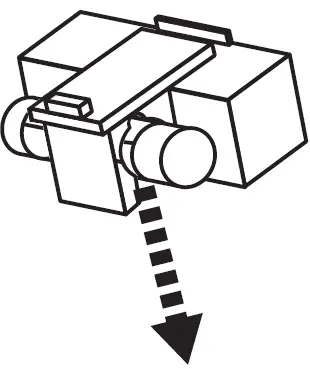
- Remove the fuse.
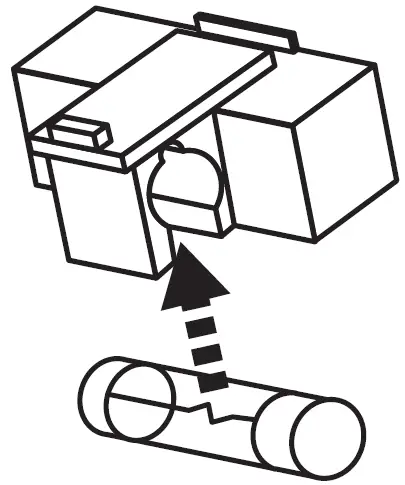
- Replace the fuse.
- Re-insert the fuse holder.
![]()