RYOBI P20103 18 Volt String Trimmer/Edger
IMPORTANT SAFETY INSTRUCTIONS
READ ALL INSTRUCTIONS
- For safe operation, read and understand all instructions before using this product. Follow all safety instructions. Failure to follow all safety instructions listed below, can result in serious personal injury.
- Do not allow children or untrained individuals to use this unit.
- Check the work area before each use. Remove all objects such as rocks, broken glass, nails, wire, or string which can be thrown or become entangled in the machine.
- Always wear eye protection with side shields marked to comply with ANSI Z87.1. Following this rule will reduce the risk of serious personal injury.
- Use Safety Glasses – Wear a face or dust mask if the operation is dusty. Always wear safety glasses with side shields. Everyday glasses have only impact resistant lenses. They are NOT safety glasses. Following this rule will reduce the risk of eye injury.
- Protect your lungs. Wear a face or dust mask if the op-eration is dusty. Following this rule will reduce the risk of serious personal injury.
- Dress Properly – Do not wear loose clothing or jewel-ery. They can be caught in moving parts. Use of rubber gloves and substantial footwear is recommended when working outdoors. Wear heavy, long pants, long sleeves, boots, and gloves. Do not wear short pants, sandals, or go barefoot. Do not wear jewelry of any kind.
- Secure long hair above shoulder level to prevent entangle-ment in moving parts.
- Keep children away – Keep all bystanders, children, and pets at least 50 ft. away.
- Stay alert – Watch what you are doing. Use common sense. Do not operate this unit when you are tired, ill, upset, or under the influence of alcohol, drugs, or medication.
- Do not operate in poor lighting.
- Keep all parts of your body away from any moving part.
- Do not operate power tools in explosive atmospheres, such as in the presence of flammable liquids, gases, or dust. Power tools create sparks which may ignite the dust or fumes.
- Avoid body contact with grounded surfaces such as pipes, radiators, ranges, and refrigerators. There is an increased risk of electric shock if your body is grounded.
- Avoid Dangerous Environments – Don’t expose appli-ance or string trimmer to rain or wet conditions. Water entering an appliance or string trimmer will increase the risk of electric shock.
- Use Right Appliance – Do not force tool. Use the correct tool for your application. The correct tool will do the job better and safer at the rate for which it is designed.
- Don’t Force Appliance – It will do the job better and with less likelihood of a risk of injury at the rate for which it was designed.
- Do not operate the equipment while barefoot or when wearing sandals or similar lightweight footwear. Wear protective footwear that will protect your feet and improve your footing on slippery surfaces.
- Do not overreach – Keep firm footing and balance. Over-reaching can result in loss of balance.
- Avoid accidental starting – Be sure switch trigger is in the locked or off position before inserting battery pack. Carrying tools with your finger on the switch trigger or inserting the battery pack into a tool with the switch on invites accidents.
- Do not use tool if switch trigger does not turn it on or off. Any tool that cannot be controlled with the switch trigger is dangerous and must be repaired.
- Disconnect battery pack – Disconnect battery pack from the appliance before servicing or changing accessories such as cutting line. Such preventive safety measures reduce the risk of starting the tool accidentally.
- Use only identical manufacturer’s replacement parts and accessories. Use of any other parts may create a hazard or cause product damage.
- Maintain appliance with care – Replace string head if cracked, chipped, or damaged in any way. Be sure the string head is properly installed and securely fastened. Failure to do so can cause serious injury. Keep handles dry, clean and free from oil and grease.
- Check for damaged parts – Before further use of the tool, any part that is damaged should be carefully checked to determine that it will operate properly and perform its intended function. Check for alignment of moving parts, binding of moving parts, breakage of parts, mounting, and any other conditions that may affect its operation. A guard or other part that is damaged should be properly repaired or replaced by an authorized service dealer.
- Make sure all guards, straps, deflectors and handles are properly and securely attached.
- Use only the manufacturer’s replacement line in the cut-ting head. Do not use any other cutting attachment, for example, metal wire, rope, or the like. To install any other brand of cutting head to this string trimmer can result in serious personal injury.
- Never operate unit without the grass deflector in place and in good condition.
- Maintain a firm grip on both handles while trimming. Keep string head below waist level. Never cut with the string head located over 30 in. or more above the ground.
- Store idle appliances indoors – When not in use, string trimmer should be stored indoors in a dry, locked place out of the reach of children.
- Never use blades, wire or rope. Unit is designed for line trimmer use only. Use of any other accessories or attach-ments will increase the risk of injury.
- Inspect area to be cut. Remove objects (rocks, broken glass, nails, wire, string, etc.) which can be thrown or become entangled in cutting head.
- Keep the air vents clean and free of debris to avoid over-heating the motor. Clean after each use.
- Stop the unit and disconnect the power source when not in use. Carry the unit with the motor stopped.
- Store out of the reach of children.
- Do not hang unit so that the switch trigger is depressed.
- Battery tools do not have to be plugged into an electrical outlet; therefore, they are always in operating condition. Be aware of possible hazards when not using your bat-tery tool or when changing accessories. Following this rule will reduce the risk of electric shock, fire, or serious personal injury.
- Under abusive conditions, liquid may be ejected from the battery; avoid contact. If contact accidentally occurs, flush with water. If liquid contacts eyes, additionally seek edical help. Liquid ejected from the battery may cause irritation or burns.
- Do not use a battery pack or appliance that is damaged or modified. Damaged or modified batteries may exhibit unpredictable behavior resulting in fire, explosion or risk of injury.
- Do not expose a battery pack or appliance to fire or excessive temperature. Exposure to fire or temperature above 265°F may cause explosion.
- Do not charge battery tool in rain, or damp or wet location. Following this rule will reduce the risk of electric shock.
- Do not use battery-operated appliance in rain.
- Never use water or any liquids to clean or rinse off your product and do not expose the product to rain or wet conditions. Store indoors in a dry area. Corrosive liquids, water, and chemicals can enter the product’s electronic components and/or battery compartment and damage electronic components and/or the battery pack, which can result in a short circuit, increased risk of fire, and serious personal injury. Remove any buildup of dirt and debris by wiping the product clean with a dry cloth occasionally.
- Remove or disconnect battery when not charging, and before servicing, cleaning, removing material from the gardening appliance, or storing.
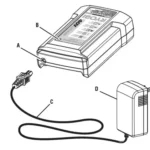
- Use battery only with charger listed. For use with 18V lithium-ion battery packs. See Tool/Appliance/Battery Pack/Charger Correlation Supplement 987000-432.
- Do not dispose of the batteries in a fire. The cell may explode. Check with local codes for possible special disposal instructions.
- Do not open or mutilate the batteries. Released electrolyte is corrosive and may cause damage to the eyes or skin. It may be toxic if swallowed.
- Do not place battery tools or their batteries near fire or heat. This will reduce the risk of explosion and possibly injury.
- Batteries can explode in the presence of a source of ignition, such as a pilot light. To reduce the risk of seri-ous personal injury, never use any cordless product in the presence of open flame. An exploded battery can propel debris and chemicals. If exposed, flush with water immediately.
- Do not crush, drop or damage battery pack. Do not use a battery pack or charger that has been dropped or received a sharp blow. A damaged battery is subject to explosion. Properly dispose of a dropped or damaged battery immediately.
- Under extreme usage or temperature conditions, battery leakage may occur. If liquid comes in contact with your skin, wash immediately with soap and water. If liquid gets into your eyes, flush them with clean water for at least 10 minutes, then seek immediate medical attention. Following this rule will reduce the risk of serious personal injury.
- Recharge only with the charger specified by the manu-facturer. A charger that is suitable for one type of battery pack may create a risk of fire when used with another battery pack.
- Use appliances only with specifically designated battery packs. Use of any other battery packs may create a risk of injury and fire.
- When battery pack is not in use, keep it away from other metal objects, like paper clips, coins, keys, nails, screws or other small metal objects, that can make a connec-tion from one terminal to another. Shorting the battery terminals together may cause burns or a fire.
- Follow all charging instructions and do not charge the battery pack or appliance outside of the temperature range specified in the instructions. Charging improperly or at mperatures outside of the specified range may damage the battery and increase the risk of fire.
- Have servicing performed by a qualified repair person using only identical replacement parts. This will ensure that the safety of the product is maintained
- Do not modify or attempt to repair the appliance or the battery pack except as indicated in the instructions for use and care.
- Save these instructions. Refer to them frequently and use them to instruct others who may use this power tool. If you loan someone this power tool, loan them these instructions also.
SYMBOLS
DANGER:
- Indicates a hazardous situation, which, if not avoided, will result in death or serious injury.
- Indicates a hazardous situation, which, if not avoided, could result in death or serious injury.
- Indicates a hazardous situation, that, if not avoided, may result in minor or moderate injury.
- (Without Safety Alert Symbol) Indicates information considered important, but not related to a potential injury (e.g. messages relating to property damage).

FEATURES
PRODUCT SPECIFICATIONS
- Motor ……………………………………………………………………………………………………………………………………………………..18 V DC
- Cutting Swath …………………………………………………………………………………………………………………………………………….. 10 in.
- Line Size …………………………………………………………………………………………….. 0.065 in. diameter round or 0.065 in. twisted
KNOW YOUR STRING TRIMMER

The safe use of this product requires an understanding of the information on the tool and in this operator’s manual as well as a knowledge of the project you are attempting. Before use of this product, familiarize yourself with all operating features and safety rules.
GRASS DEFLECTOR
The trimmer includes a grass deflector that helps protect from flying debris.
HANDLE OVERMOLD
Handle overmold provides added user comfort.
LOCK-OUT BUTTON
The lock-out button prevents accidental starting.
TRIMMER/EDGER MODE
The lower end of the tool can be locked in two different positions for edging and trimming.
ASSEMBLY
UNPACKING
This product requires assembly.
- Carefully remove the product and any accessories from the box. Make sure that all items listed in the Packing List are included.
WARNING:
Do not use this product if any parts in the Packing List are already assembled to your product when you unpack it. Parts on this list are not assembled to the product by the manufacturer and require customer installation. Use of a product that may have been improperly assembled could result in serious personal injury.
- Inspect the product carefully to make sure no breakage or damage occurred during shipping.
- Do not discard the packing material until you have care-fully inspected and satisfactorily operated the product.
- If any parts are damaged or missing, please call 1-800-525-2579 for assistance.
PACKING LIST
String Trimmer/Edger Grass Deflector Assembly with Screws Operator’s Manual
WARNING:
- If any parts are damaged or missing do not operate this product until the parts are replaced. Use of this product with damaged or missing parts could result in serious personal injury.
- To prevent accidental starting that could cause serious personal injury, always remove the battery pack from the product when assembling parts.
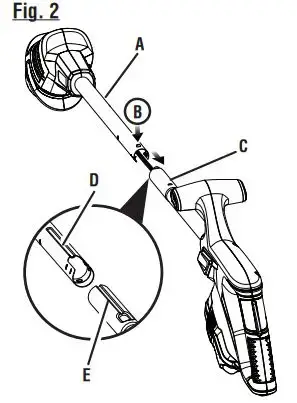
ASSEMBLING THE TOOL

- Remove the battery pack if installed.
- Align the ridge on the upper end of the tool with the groove on the lower end of the tool.
- Insert the lower end of the tool into the opening on the upper end of the tool. When the lower end of the tool is fully seated, the button will snap into place.
CAUTION:
- Be careful when sliding the two ends together to avoid pinching your hands or fingers.
- Failure to properly assemble the tool as describe above could result in the tool separating and cause serious personal injury.
ATTACHING GRASS DEFLECTOR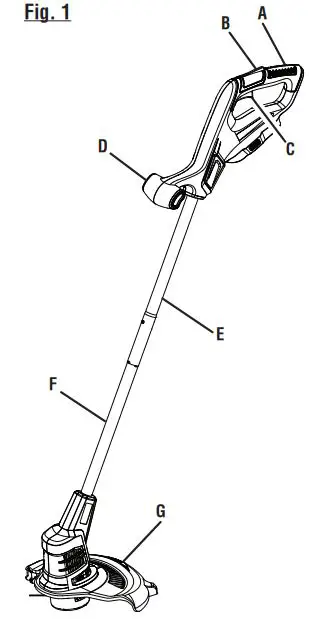
- Remove supplied screws with a Phillips screwdriver from the trimmer head.
- Line up the screw holes in the grass deflector with the holes in the trimmer head.
- Place the grass deflector onto the trimmer head.
- Install supplied screws and tighten by turning clockwise with a Phillips screwdriver.
OPERATION
WARNING:
- Do not allow familiarity with products to make you careless. Remember that a careless fraction of a second is sufficient to inflict serious injury.
- Always wear eye protection with side shields marked to comply with ANSI Z87.1. Failure to do so could result in objects being thrown into your eyes resulting in possible serious injury.
- Never use blades, wire, or rope on this product. Do not use any attachments or accessories not recommended by the manufacturer of this product. The use of attachments or accessories not recommended can result in serious personal injury.
- Before each use, inspect the entire product for damaged, missing, or loose parts such as screws, nuts, bolts, caps, etc. Tighten securely all fasteners and caps and do not operate this product until all missing or damaged parts are replaced. Please contact customer service or an authorized service center for assistance.
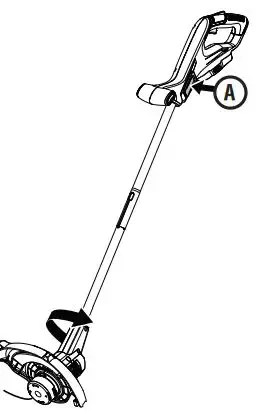
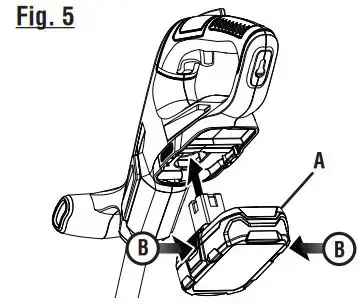
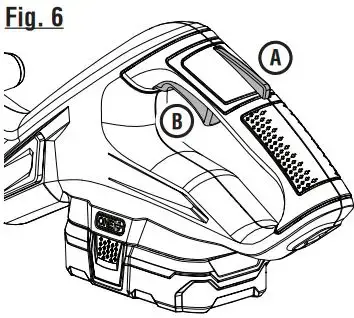
INSTALLING/REMOVING BATTERY PACK
- Insert the battery pack into the product as shown.
- Make sure the latches on each side of the battery pack snap into place and the battery pack is secured before beginning operation.
- Depress the latches on each side of the battery pack.
- Remove the battery pack.
STARTING/STOPPING THE STRING TRIMMER
- To start the string trimmer, push the lock-out button and pull the switch trigger.
- To stop the string trimmer, release the switch trigger.
OPERATING THE TRIMMER
Follow these tips when using the string trimmer:
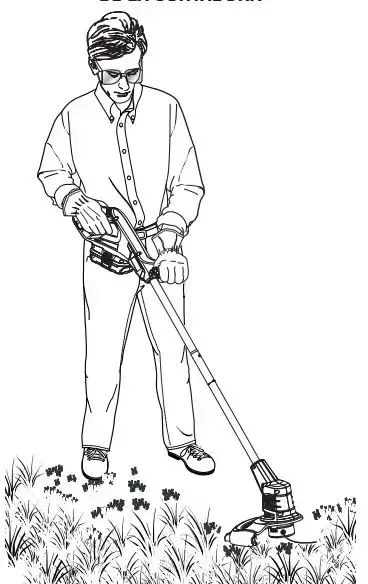
- Hold the trimmer with your right hand on the rear handle and your left hand on the front handle.
- Keep a firm grip with both hands while in operation.
- Trimmer should be held at a comfortable position with the rear handle about hip height.
- Cut tall grass from the top down. This will prevent grass from wrapping around the boom housing and string head which may cause damage from overheating.
- Remove the battery pack from the trimmer.
- Remove the grass.
CUTTING TIPS
- Keep the trimmer tilted toward the area being cut; this is the best cutting area.
- The string trimmer cuts when passing the unit from right to left. This will avoid throwing debris at the operator. Avoid cutting in the dangerous area shown in figure 8.
- Use the tip of the line to do the cutting; do not force string head into uncut grass.
- Wire and picket fences cause extra line wear, even breakage. Stone and brick walls, curbs, and wood may wear line rapidly.
- Avoid trees and shrubs. Tree bark, wood moldings, siding, and fence posts can easily be damaged by the line.
ADVANCING LINE
NOTE: The trimmer is equipped with an auto-feed head. Bumping the head to try to advance the line will damage the trimmer and void the warranty.
- With the trimmer running, release the switch trigger.
- Wait two seconds, and press the switch trigger. NOTE: The line will extend approximately 1/4 in. with each stop and start of the switch trigger until the line reaches the length of the grass deflector cut-off blade.
- Resume trimming.
ADVANCING THE LINE MANUALLY
- Remove the battery pack.
- Push the black button located on the string head while pulling on line to manually advance the line.
EDGING

- Remove the battery pack.
- Depress the button on the side of the string trimmer.
- Rotate the boom counterclockwise to the edging position.
- Make sure the button snaps into place and the boom is secured before beginning operation.
For trimmer operation:
- Remove the battery pack.
- Depress the button on the side of the string trimmer.
- Rotate the boom clockwise to the trimmer position.
- Make sure the button snaps into place and the boom is secured before beginning operation.
MAINTENANCE
WARNING:
- To avoid serious personal injury, always remove the bat-tery pack from the tool when cleaning or performing any maintenance.
- Always wear eye protection with side shields marked to comply with ANSI Z87.1. Failure to do so could result in objects being thrown into your eyes resulting in possible serious injury.
- When servicing, use only identical replacement parts. Use of any other parts may create a hazard or cause product damage.
- Never use water or any liquids to clean or rinse off your product and do not expose the product to rain or wet conditions. Store indoors in a dry area. Corrosive liquids, water, and chemicals can enter the product’s electronic components and/or battery compartment and damage electronic components and/or the battery pack, which can result in a short circuit, increased risk of fire, and seri-ous personal injury. Remove any buildup of dirt and debris by wiping the product clean with a dry cloth occasionally.
- Periodically inspect the entire product for damaged, missing, or loose parts such as screws, nuts, bolts, caps, etc. Tighten securely all fasteners and caps and do not operate this product until all missing or damaged parts are replaced. Please contact customer service or an authorized service center for assistance.
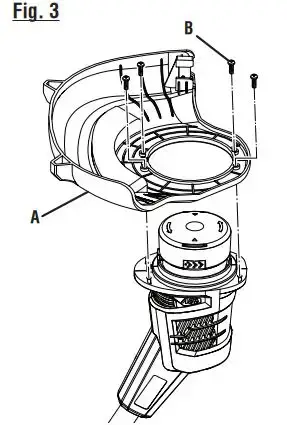
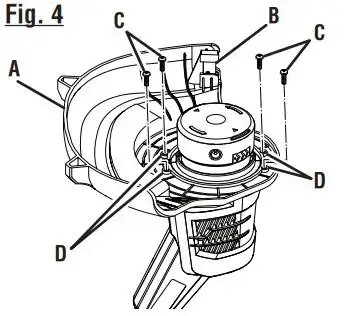
GENERAL MAINTENANCE
Avoid using solvents when cleaning plastic parts. Most plastics are susceptible to damage from various types of commercial solvents and may be damaged by their use. Use clean cloths to remove dirt, dust, oil, grease, etc.
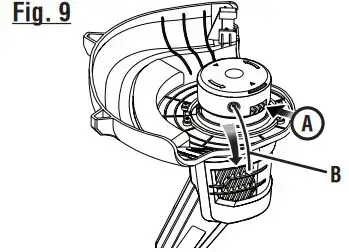
SPOOL REPLACEMENT
Use only 0.065 in. diameter round or 0.065 in. twisted monofilament line. Use original manufacturer’s replacement line for best performance.
- Remove the battery pack.
- Push in tabs on side of spool retainer.
- Pull spool retainer up to remove.
- Remove the old spool.
- To install the new spool, make sure the line is captured in the slot on the new spool. Make sure the end of the line is extended approximately 6 in. beyond the slot.
- Install the new spool so that the line and slot align with the eyelet in the string head. Thread the line into the eyelet.
- Pull the line extending from the string head so the line releases from the slot in the spool.
- Reinstall the spool retainer by depressing tabs into slots and pushing down until spool retainer clicks into place.
LINE REPLACEMENT

- Remove the battery pack.
- Remove the spool from the string head. NOTE: Remove any old line remaining on the spool.
- Cut a piece of line approximately 9 ft. long. Use only 0.065 in. diameter round or 0.065 in. twisted monofilament line.
- Insert the line into the anchor hole in the upper part of the spool. Wind the line around the upper part of the spool clockwise, as shown by the arrows on the spool. Place line in the slot on upper spool flange, leaving about 6 in. extended beyond the slot. Do not overfill. After winding the line, there should be at least 1/4 in. between the wound line and the outside edge of the spool.
- Replace the plastic retainer, spool, and the spool retainer. Refer to Spool Replacement earlier in this manual.
STORING THE TRIMMER
- Remove the battery pack from the string trimmer before storing.
- Clean all foreign material from the trimmer.
- Store it in a place that is inaccessible to children.
- Keep away from corrosive agents such as garden chemicals and de-icing salts.