
SALTER 3 in 1 Blender Set User Guide
Safety Instructions
- When using electrical appliances, basic safety precautions should always be followed.
- Check that the voltage indicated on the rating plate corresponds with that of the local network before connecting the appliance to the mains power supply.
- Children aged from 8 years and people with reduced physical, sensory or mental capabilities or lack of experience and knowledge can use this appliance, only if they have been given supervision or instruction concerning use of the appliance in a safe way and understand the hazards involved.
- Children should be supervised to ensure that they do not play with the appliance.
- Unless they are older than 8 and supervised, children should not perform cleaning or user maintenance.
- This appliance is not a toy.
- Keep the appliance and its power supply cord out of the reach of children.
- This appliance contains no user serviceable parts.
- If the power supply cord, plug or any part of the appliance is malfunctioning, or if the appliance has been dropped or damaged, only a qualified electrician should carry out repairs.
- Improper repairs may place the user at risk of harm.
- Keep the appliance and its power supply cord away from heat or sharp edges that could cause damage.
- Keep the appliance away from other heat emitting appliances.
- Keep hands, fingers, hair and any loose clothing away from the rotating tools of the appliance.
- Do not immerse the electrical components of this appliance in water or any other liquid.
- Do not operate the appliance with wet hands.
- Do not leave the appliance unattended whilst connected to the mains power supply.
- Do not remove the appliance from the mains power supply by pulling the cord; switch it off and remove the plug by hand.
- Do not pull or carry the appliance by its power supply cord.
- Do not use the appliance if it has been dropped, if there are visible signs of damage or if H is leaking.
- Do not use the appliance for anything other than its intended use.
- Do not use any accessories other than those supplied.
- Do not use any damaged accessories.
- Do not store the appliance in direct sunlight or in high humidity conditions.
- Do not place boiling water or very hot liquid in the appliance.
- Do not dry blend ingredients; always add a small amount of liquid.
- Do not overload the appliance as the mixture level may rise during blending.
- Do not touch any moving parts on this appliance during use, as this could cause injury.
- Do not touch any sections of the appliance that may become hot during use, as this could cause injury.
- Do not use broken or loose cutting or rotating blades.
- Switch off the appliance and disconnect it from the mains power supply before changing or fitting accessories.
- Always unplug the appliance after use and before any cleaning or user maintenance.
- Always use the appliance on a stable, heat-resistant surface, at a height that is comfortable for the user.
- Use of an extension cord with the appliance is not recommended.
- This appliance should not be operated by means of an external timer or separate remote control system, other than that supplied with this appliance.
- This appliance is intended for domestic use only. It should not be used for commercial purposes.
Warning: Do not touch sharp blades.
Care and Maintenance
STEP 1: Switch off and unplug the blender from the mains power supply before performing any cleaning or user maintenance.
STEP 2: Wipe the blender unit with a soft, damp cloth and allow to dry thoroughly.
STEP 3: Wash all of the accessories in warm, soapy water, then rinse and dry thoroughly. Never touch the chopping blades; using extreme caution, clean the blades with a brush and dry carefully. Do not immerse the blender base unit in water or any other liquid. Do not use harsh or abrasive detergents or scourers to clean the blender, as this could cause damage. The blender is not suitable for use in a dishwasher.
Note: The blender should be cleaned after every use.
Warning: Handle the attachments with care as the blades are sharp. Exercise caution when attaching, removing, cleaning or storing the attachments.
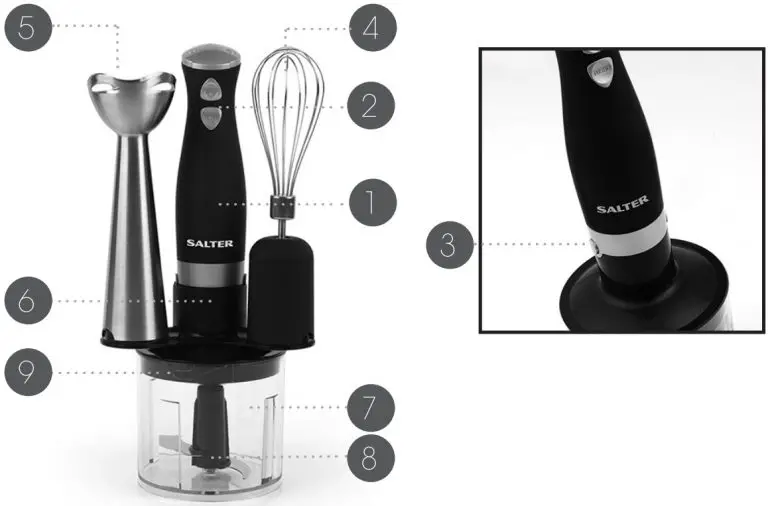
Description of Parts

- Blender Unit
- 2 Speed Buttons
- Attachment Release Buttons
- Whisk Attachment
- Blender Attachment
- Attachment Holder
- Chopping Bowl
- Chopping Blade
- Chopping Bowl Lid
Instructions for Use
Before First Use
Wash all of the attachments in warm, soapy water, then rinse and dry thoroughly. Wipe the blender unit with a soft, damp cloth and allow to dry thoroughly. Never touch the blades: the attachments should be washed using a brush and dried carefully. Do not immerse the blender unit in water or any other liquid.
Note: When using the blender for the first time, a slight odour may be emitted. This is normal and will soon subside. Allow for sufficient ventilation around the blender.
Using the 3 in 1 Blender Set
All attachments must be securely fitted before use; do not attempt to remove them until the attachment has stopped moving.
Warning: Maximum operation time is PA minutes. Allow to cool for 1 minute before using the appliance again. To release the attachment, press and hold the attachment release button while carefully pulling the attachment and blender unit apart.
With the Chopping Attachments
The chopping attachments are ideal for slicing or dicing fruit and vegetables to help to prepare delicious meals and salads.
STEP 1: Before connecting the blender to the mains power supply, carefully attach the chopping blade onto the spindle on the inside of the chopping bowl and push down until it clicks into place.
STEP 2: Place the food to be chopped into the chopping bowl. Secure the chopping bowl lid by placing it on top, aligning the guides and then twisting it in a clockwise direction until it locks.
STEP 3: To attach the blender unit, place it on top of the chopping bowl lid and secure by pushing down until it clicks into place.
STEP 4: Plug in and switch on the blender at the mains power supply.
STEP 5: Holding the chopping bowl steady, press and hold the desired speed button on the blender unit.
STEP 6: Once the food has been chopped to the required size, release the speed button and wait for the chopping blade to stop rotating before removing the chopping bowl lid.
STEP 7: Any extra food may be added to the chopped ingredients at this point by removing the chopping bowl lid, adding the ingredient(s), replacing the chopping bowl lid and repeating the chopping process.
STEP 8: To remove the blender unit from the chopping bowl lid, pull them apart whilst holding down the attachment release buttons.
Caution: Switch off and unplug the blender from the mains power supply before attempting to remove any food from the chopping bowl and before cleaning.
Warning: Do not use the chopping bowl if it is cracked or broken. Do not operate the blender when the chopping bowl is empty, as this will cause damage to the appliance.
With the Whisk Attachment
The whisk attachment is ideal for mixing light ingredients such as egg whites, cream and instant desserts. It is not suitable for mixing heavier ingredients such as margarine and sugar, as this may cause damage to the appliance.
STEP 1: Before connecting the blender to the mains power supply, carefully attach the whisk attachment onto the blender by pushing down until it clicks into place.
STEP 2: Place the food to be whisked into a mixing jug, then plug in and switch on the blender at the mains power supply.
STEP 3: Insert the whisk attachment into the mixing jug and then press and hold the desired speed button.
STEP 4: Slowly rotate the whisk attachment in a clockwise direction to avoid splashing. Take care to avoid any liquid rising above the top of the whisk attachment wires. Release the speed button once whisking is complete.
STEP 5: After use, remove the whisk attachment from the blender unit by pulling them apart whilst holding down the attachment release buttons.
Note: Whilst mixing liquid, especially hot liquid, use a tall container or whisk small quantities at a time to reduce spillage, splattering and the possibility of injury from scalding.
Warning: Do not use the whisk attachment to blend very hot or boiling liquid, as this may cause injury. When placing food into the mixing jug, take care not to overfill it in order to avoid spillages. Switch off and unplug from the mains power supply before attempting to remove the whisk attachment and before cleaning.
With the Blender Attachment
The blender attachment is ideal for blending or mashing cooked vegetables such as potatoes or carrots. It is not suitable for blending hard or uncooked foods, as this will damage the blender attachment.
STEP 1: Before connecting the blender to the mains power supply, carefully attach the blender attachment onto the blender unit by pushing down until it clicks into place.
STEP 2: Place the food to be blended into a mixing jug, and plug in and switch on the blender at the mains power supply.
STEP 3: Insert the blender attachment into the mixing jug and then press and hold the desired speed button.
STEP 4: Slowly move the blender attachment up and down in the mixture to blend the food evenly. Release the speed button once blending is complete.
STEP 5: After use, remove the blender attachment from the blender unit by pulling them apart whilst holding down the attachment release buttons.
Note: Whilst mixing liquid, especially hot liquid, use a tall container or blend small quantities at a time to reduce spillage, splattering and the possibility of injury from scalding.
Warning: Do not use the blender attachment to blend very hot or boiling liquid, as this may cause injury. When placing food into a mixing jug, take care not to overfill it in order to avoid spillages. Switch off and unplug the blender from the mains power supply before attempting to remove the blender attachment and before cleaning.
Troubleshooting
| Problem | Possible Cause | Solution |
| The blender will not operate. | The blender is not connected to the mains power supply. | Plug in and switch on the blender at the mains power supply. |
| The blades will not move when in contact with ingredients. |
The ingredients are hard vegetables such as potato, carrot and turnip, making it difficult for the blender to blend. | Only blend ingredients such as cooked vegetables or soft fruit. |
Storage
Reassemble the blender. Check that the blender is cool, clean and dry before storing in a cool, dry place. Never wrap the cord tightly around the blender; wrap it loosely to avoid causing damage.
Specifications
- Product code: EK2827
- Input: 220-240 V – 50/60 Hz
- Output: 350 W
Recipes
Raspberry Sparkle
Ingredients
- Handful of raspberries
- Gloss of sparking wine a champagne
- Frozen yoghurt or vanilla ice aeon’, to taste
Method
- Place all of the ingredients into a mixing jug and blend until smooth.
Strawberry Smoothie
- Ingredients Handful of strawberries. chopped
- I small, ripe banana
- 1 small pot of vanilla yoghurt
- 100 ml skimmed milk
Method
- Place all of the ingredients into a mixing jug and blend until smooth; garnish with a strawberry.
Fresh Pineapple Juice
Ingredients
- Approx. ‘A a pineapple, cut into chunks
Method
- Place all of the ingredients into a mixing jug and blend until smooth. If the smoothie is too thick, add water until the desired consistency is achieved.
Cold Tomato Soup
Ingredients
- 225 g sweet cherry tomatoes:
- Herbs, to season (e.g. basil or parsley)
- I garlic clove:
- Tabasco or any other chilli
- 100 ml hot water:
- sauce (optional)
- 2 tbsp soured cream:
- Salt and pepper, to taste
Method
Fill a mixing jug with the cherry tomatoes, odd the hot water and blend until smooth.
Add the garlic. herbs and soured cream and blend for o further 10 seconds. Season to taste with salt, pepper and Tabasco sauce, if desired.
Omelette
Ingredients
- 50 g grated cheese (optional):
- 2 tsp milk
- 2 medium eggs:
- Solt and pepper, to taste
- 1/2 green pepper, finely chopped
Method
Blend the eggs with the milk in a mixing jug and then pour the mixture into a greased frying pan on a low heat. stirring frequently.
Add the green pepper to the frying pan after opprox. 2 minutes and cook until the omelette is firming.
Fold the omelette in half using a non-stick, heat-resistant spatula. Season to taste with salt, pepper and cheese, if desired.
Salad Dressing
Ingredients
- 2-3 tbsp olive oil
- (or 1/2 olive oil and ‘A sunflower oil)
- 2 tsp French Dijon mustard
- 1 tsp white wine vinegar
- Salt and pepper, to taste
Method
Place all of the ingredients into a mixing jug and blend until smooth.
Connection To The Mains
Please check that the voltage indicated on the product corresponds with your supply voltage.
Important
As the colours in the mains lead of this appliance may not correspond with the coloured markings identifying the terminals in your plug, please proceed as follows: The wires in the mains lead are coloured in accordance with the following code:
Blue Neutral (N)
Brown Live (L)
FOR UK USE ONLY – Plug fitting details (where applicable).

The wire coloured BLUE is the NEUTRAL and must be connected to the terminal marked Neutral were Cable gnp N or coloured BLACK. Ouler IntelaliOn The wire coloured BROWN is the LIVE wire and must be connected to the terminal marked L or coloured RED. On no account must either the BROWN or the BLUE wire be connected to the EARTH terminal 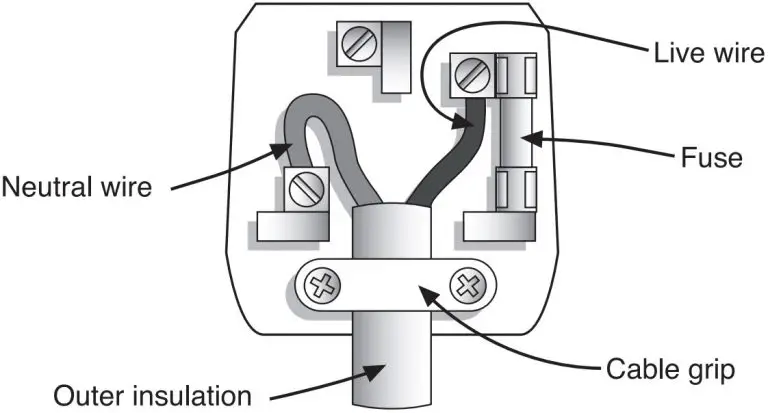 .
.
Atways ensure that the cord grip is fastened correctly. The plug must be fitted with a fuse of the same rating already fitted and conforming to BS 1362 and be ASTA opproved. If in doubt, consult a qualified electrician who will be pleased to do this for you.
Non-Rewireable Mains Plug
If your appliance is supplied with a non-rewireable plug fitted to the mains lead and should the fuse need replacing. you must use on ASTA opproved one (conforming to BS 1362 of the same rating). If in doubt, consult a qualified electrician who will be pleased to do this for you. If you need to remove the plug. DISCONNECT IT FROM THE MAINS, then cut it off the mains lead and immediately dispose of it safely. Never attempt to reuse the plug or insert it into a socket outlet as there is a danger of an electric shock.
UP Global Sourcing UK Ltd., Victoria Street, Manchester OL9 ODD. UK.
If this product does not reach you in on acceptable condition please contact our Customer Services Department at www.saltercookshop.com
Please have your delivery note to hand as details from it will be required. If you wish to return this product please return it to the retailer from where it was purchased with your receipt (subject to their terms and conditions).
Guarantee
All products purchased as new carry a manufacturer’s guarantee: the time period of the guarantee will vary dependent upon the product. Where reasonable proof of purchase can be provided. Salter will provide a standard 12 month guarantee with the retailer from the date of purchase. This is only applicable when products have been used as instructed for their intended, domestic use. Any misuse or dismantling of products will invalidate any guarantee.
Under the guarantee, we undertake to repair or replace free of any charge any parts found to be defective. In the event that we cannot provide an exact replacement, a similar product will be offered or the cost refunded. Any damages from daily wear and tear are not covered by this guarantee, nor are consumables such as plugs, fuses etc.
Please note that the above terms and conditions may be updated from time to time and we therefore recommend that you check these each time you revisit the website.
Nothing in this guarantee or in the instructions relating to this product excludes. restricts or otherwise affects your statutory rights.
 The crossed out wheelie bin symbol on this item indicates that this appliance needs to be disposed of in an environmentally friendly way when it becomes of no further use or has worn out. Contact your local authority for details of where to take the item for recycling.
Find us on 
www.facebook.com/SalterCookshop
Manufactured by:
Up Global Sourcing UK Ltd.,
Victoria Street,
Manchester OL0=9 0DD, UK.
Made in China