SALTER Egg Cooker User Guide
Please read all of the instructions carefully and retain for future reference.
Safety Instructions
- When using electrical appliances, basic safety precautions should always be followed.
- Check that the voltage indicated on the rating plate corresponds with that of the local network before connecting the appliance to the mains power supply.
- Children aged from 8 years and people with reduced physical, sensory or mental capabilities or lack of experience and knowledge can use this appliance, only if they have been given supervision or instruction concerning use of the appliance in a safe way and understand the hazards involved.
- Children should be supervised to ensure that they do not play with the appliance.
- Unless they are older than 8 and supervised, children should not perform cleaning or user maintenance.
- This appliance is not a toy.
- This appliance contains no user serviceable parts. If the power supply cord, plug or any part of the appliance is malfunctioning, or if the appliance has been dropped or damaged, only a qualified electrician should carry out repairs. Improper repairs may place the user at risk of harm.
- Keep the appliance and its power supply cord out of the reach of children.
- Keep the appliance out of the reach of children when it is switched on or cooling down.
- Keep the appliance and its power supply cord away from heat or sharp edges that could cause damage.
- Keep the power supply cord away from any parts of the appliance that may become hot during use.
- Keep the appliance away from heat emitting appliances.
- Do not immerse the appliance in water or any other liquid.
- Do not operate the appliance with wet hands.
- Do not leave the appliance unattended whilst connected to the mains power supply.
- Do not remove the appliance from the mains power supply by pulling the cord; switch it off and remove the plug by hand.
- Do not pull or carry the appliance by its power supply cord.
- Do not use the appliance for anything other than its intended use.
- Do not use any accessories other than those supplied.
- Do not use this appliance outdoors.
- Do not store the appliance in direct sunlight or in high humidity conditions.
- Do not move the appliance whilst it is in use.
- Do not place boiling water or very hot liquid in the appliance.
- Do not overload the appliance; only fill up to the maximum level marked on the appliance.
- Do not touch any sections of the appliance that may become hot or the heating components of the appliance, as this could cause injury.
- Do not use sharp or abrasive items with this appliance; use only heat-resistant plastic or wooden spatulas to avoid damaging the non-stick surface.
- Always unplug the appliance after use and before any cleaning or user maintenance.
- Always ensure that the appliance has cooled fully after use before performing any cleaning or maintenance or storing away.
- Always use the appliance on a stable, heat resistant surface, at a height that is comfortable for the user.
- Use of an extension cord with the appliance is not recommended.
- This appliance should not be operated by means of an external timer or separate remote control system, other than that supplied with this appliance.
This appliance is intended for domestic use only. It should not be used for commercial purposes. The outer surface of the appliance may get hot during operation.
Caution: Hot surface – do not touch the hot section or heating components of the appliance. The heating element will remain hot after use.
Warning: Keep the appliance away from flammable materials. Boiling water and steam can cause serious injury; exercise extreme caution when using this appliance
Care and Maintenance
STEP 1: Switch off and unplug the egg cooker from the mains power supply. Allow the egg cooker to cool fully before performing any cleaning or maintenance.
STEP 2: Wipe the egg cooker main body with a soft, damp cloth and allow to dry thoroughly.
STEP 3: Wash all of the accessories in warm, soapy water, then rinse and dry thoroughly. Never immerse the egg cooker main body in water or any other liquid.
Do not use harsh or abrasive scourers to clean the egg cooker, as this could cause damage.
Note: The egg cooker should be cleaned after each use.
Removing Limescale/Scorch Marks
Limescale/scorch marks can develop over time around the heating plate, affecting the performance and lifespan of the egg cooker. It is recommended to use a commercial descaling agent to remove limescale from the egg cooker regularly, at least once a month.
STEP 1: Add the descaling solution to the heating plate, following the manufacturer’s instructions.
STEP 2: Plug in and switch on the egg cooker at the mains power supply, then press the power button to turn on the egg cooker.
STEP 3: After approx. 15 minutes, press the power button to turn off the egg cooker. Allow it to cool before emptying the heating plate and wiping it several times with a soft, damp cloth. Leave to dry thoroughly.
Caution: This process will cause steam to escape which could cause scalding. Allow for sufficient ventilation around the egg cooker during this process.
Warning: Do not leave the egg cooker unattended whilst removing limescale.
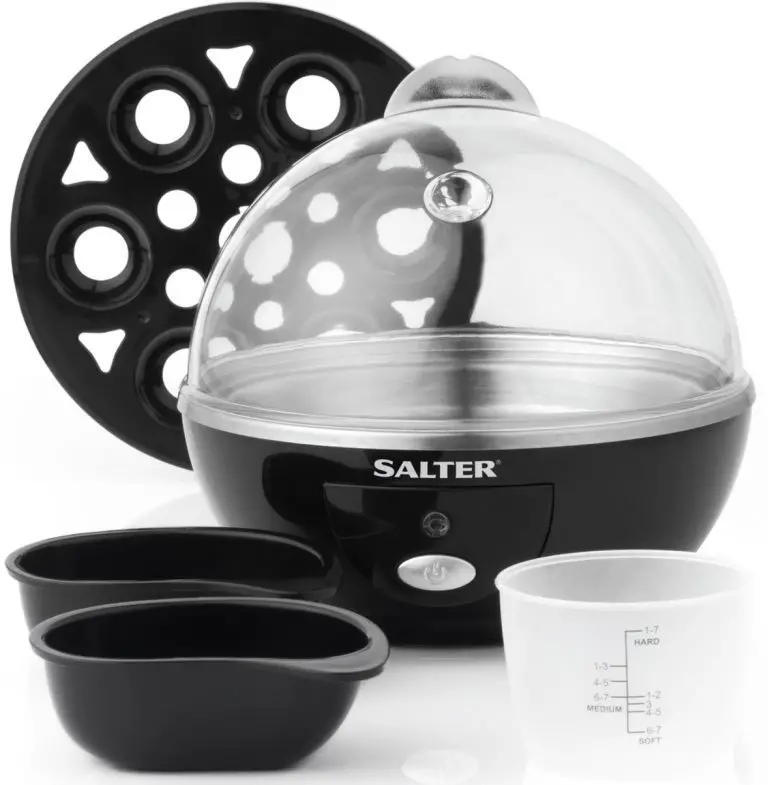
Description of Parts
- Electric Egg Cooker main body
- Lid with steam vent
- Power button
- Indicator light
- Removable egg tray
- Removable egg troy handle
- Egg poacher(s)
- Measuring cup
- Egg pierce
- Lid handle
Instructions for Use
Before First Use
Wipe the egg cooker main body with a soft, damp cloth and allow to dry thoroughly before connecting to the mains power supply.
Remove all of the accessories and wash them in warm, soapy water, then rinse and dry thoroughly.
Do not immerse the egg cooker moin body in water or any other liquid.
Never use harsh or abrasive cleaning detergents or scourers to clean the egg cooker or accessories, as this could cause damage.
Place the egg cooker onto o stable. heat-resistant surface at a height that is comfortable for the user.
Note: When using the egg cooker for the first time, a slight odour may be emitted. This is normal and will soon subside. Allow for sufficient ventilation around the egg cooker.
Using the Electric Egg Cooker
To Make Boiled Eggs
STEP 1: Check that the egg cooker is switched off and unplugged from the mains power supply and place it onto a clean, dry, stable surface, at a height that is comfortable for the user.
STEP 2: Remove the lid and take out the removable egg tray and egg poachers from the egg cooker.
STEP 3: Determine the desired consistency of the eggs to be cooked (soft. medium or hard boiled). The measuring cup has a water level for each consistency of egg; fill it to the appropriate dot with cold water. The numbered dots on the measuring cup correspond with the number of eggs: for example, for 4 soft boiled eggs, fill the measuring cup with water up to the ‘4-5 SOFT’ fill mark.
STEP 4: Pour the cold water onto the heating plate and then place the removable egg troy on top.
STEP 5: Prepare the number of eggs to be cooked (up to 6 eggs at once). Use the egg piercer to create a small hole in the larger end of each egg and then place them securely into the holes in the removable egg tray. This will prevent the eggs from breaking during the cooking process.
STEP 6: Place the lid back onto the egg cooker.
STEP 7: Plug in and switch on the egg cooker at the mains power supply.
STEP 8: Press the power button on the front of the egg cooker main body: the indicator light will illuminate and the cooking process will begin.
STEP 9: Once the water has completely evaporated and the eggs are cooked. the indicator light and egg cooker will automatically switch off.
STEP 10: Remove the lid with caution as steam will be emitted from the egg cooker. Carefully remove the eggs; they will have become hot during the cooking process.
Caution: Do not touch the lid during the cooking process, as it will become extremely hot.
Cooking Times for Boiled Eggs
Cooking times will vary depending upon the desired result. For best results use distilled water, as tap water contains minerals which con cause discoloration of the eggs.
| Consistency of Egg | Approx. Cooking Time |
| Soft | 8 mins |
| Medium | 10 mins |
| Hord | 12 mins |
To Make Poached Eggs
STEP 1: Check that the egg cooker is switched off and unplugged from the mains power supply and place it onto a clean, dry, stable surface, at a height that is comfortable for the user.
STEP 2: Remove the lid and then take out the removable egg fray and egg poachers from the egg cooker.
STEP 3: Fill the measuring cup with cold water to the ‘MEDIUM 1-3 eggs’ dot. Pour the cold water onto the heating plate.
STEP 4: Lightly coat the egg poacher(s) with oil or butter. Break one egg into each egg poacher.
STEP 5: Place the removable egg tray onto the egg cooker, place the egg poacher on top of the egg tray and then close the lid.
STEP 6: Plug in and switch on the egg cooker at the mains power supply.
STEP 7: Press the power button on the front of the egg cooker main body; the indicator light will illuminate and the cooking process will begin.
STEP 8: Once the water has completely evaporated and the eggs are cooked, the indicator light will turn off and the egg cooker will automatically switch off.
STEP 9: Using a small heat-resistant plastic or wooden spatula, carefully remove he poached eggs from the egg poacher(s). Remove the eggs immediately to prevent over-poaching.
Note: Cooking time is approx. 10 minutes to poach 2 eggs.
Storage
Check that the egg cooker is cool, clean and dry before storing in a cool, dry place.
Never wrap the cord tightly around the egg cooker; wrap it loosely to avoid causing damage.
Specifications
| Product code: | EK2783 |
| Operating voltage: | 220-240 V – 50/60 Hz |
| Power: | 360-430 W |
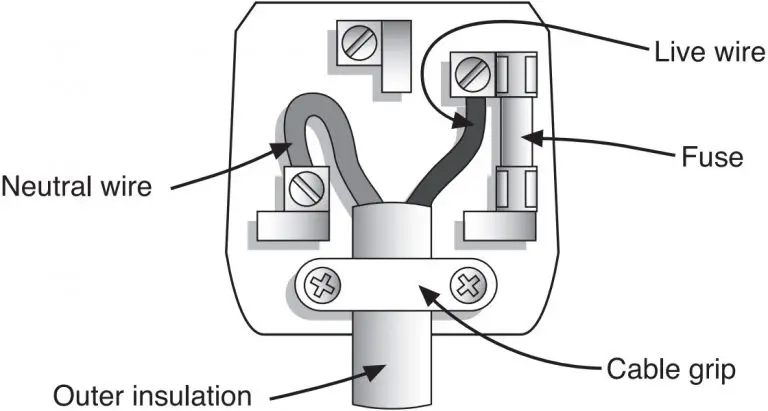
Connection To The Mains
Please check that the voltage indicated on the product corresponds with your supply voltage.
Important
As the colours in the mains lead of this appliance may not correspond with the coloured markings identifying the terminals in your plug, please proceed as follows:
The wires in the mains lead are coloured in accordance with the following code:
Blue Neutral (N)
Brown Live (I.)
FOR UK USE ONLY – Plug fitting details Fuse (where applicable).
The wire coloured BLUE is the NEUTRAL and must be connected to the terminal marked N or coloured BLACK.

The wire coloured BROWN is the LIVE wire and must be connected to the terminal marked L or coloured RED. On no account must either the BROWN or the BLUE wire be connected to the EARTH terminal 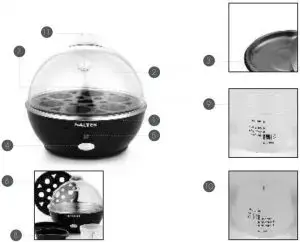 .
.
Always ensure that the cord grip is fastened correctly.
The plug must be fitted with a fuse of the same rating already fitted and conforming to BS 1362 and be ASIA approved.
If in doubt, consult a qualified electrician who will be pleased to do this for you.
Non-Rewireable Mains
Plug If your appliance is supplied with a non-rewireable plug fitted to the mains lead and should the fuse need replacing, you must use an ASTA approved one (conforming to BS 1362 of the same rating).
If in doubt, consult a qualified electrician who will be pleased to do this for you. If you need to remove the plug, DISCONNECT IT FROM THE MAINS. then cut it off the mains lead and immediately dispose of it safely. Never attempt to reuse the plug or insert it into a socket outlet as there is a danger of an electric shock.
UP Global Sourcing UK Ltd.,
If this product does not reach you in an acceptable condition please contact our Customer Services Department at www.saltercookshop.com.
Please have your delivery note to hand as details from it will be required. If you wish to return this product please return it to the retailer from where it was purchased with your receipt (subject to their terms and conditions).
Guarantee
All products purchased as new carry a manufacturer’s guarantee; the time period of the guarantee will vary dependent upon the product. Where reasonable proof of purchase can be provided, Salter will provide a standard 12 month guarantee with the retailer from the date of purchase. This is only applicable when products have been used as instructed for their intended, domestic use. Any misuse or dismantling of products will invalidate any guarantee.
Under the guarantee, we undertake to repair or replace free of any charge any parts found to be defective. In the event that we cannot provide an exact replacement, a similar product will be offered or the cost refunded. Any damages from daily wear and tear are not covered by this guarantee, nor are consumables such as plugs, fuses etc.
Please note that the above terms and conditions may be updated from time to time and we therefore recommend that you check these each time you revisit the website.
Nothing in this guarantee or in the instructions relating to this product excludes, restricts or otherwise affects your statutory rights.
The crossed out wheelie bin symbol on this item indicates that this appliance needs to be disposed of in an environmentally friendly way when it becomes of no further use or has worn out. Contact your local authority for details of where to take the item for recycling.
Find us on: www.facebook.com/salterCookshop
SALTER
Manufactured by:
Up Global Sourcing UK Ltd.,
Victoria Street
Manchester OL9 0DD. UK.