![]()

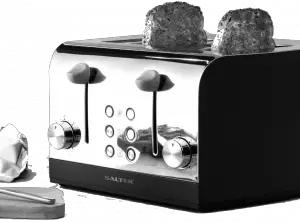
4-Slice Toaster
Stylish, Nordic-inspired design for everyday use
Please read all of the instructions carefully and retain for future reference.
Safety Instructions
When using electrical appliances, basic safety precautions should always be followed.
Check that the voltage indicated on the rating plate corresponds with that of the local network before connecting the appliance to the mains power supply.
Children aged from 8 years and people with reduced physical, sensory or mental capabilities or lack of experience and knowledge can use this appliance, only if they have been given supervision or instruction concerning use of the appliance in a safe way and understand the hazards involved.
Children should be supervised to ensure that they do not play with the appliance.
Unless they are older than 8 and supervised, children should not perform cleaning or user maintenance.
This appliance is not a toy.
This appliance contains no user serviceable parts. If the supply cord, plug or any part of the appliance is malfunctioning, or if it has been dropped or damaged, only a qualified electrician should carry out repairs. Improper repairs may place the user at risk of harm.
Keep the appliance and its power supply cord out of the reach of children.
Keep the appliance out of the reach of children when it is switched on or cooling down.
Keep the appliance and its power supply cord away from heat or sharp edges that could cause damage.
Keep the power supply cord away from any parts of the appliance that may become hot during use.
3
Keep the appliance away from other heat emitting appliances.
Do not allow the power supply cord to hang over worktops, touch hot surfaces or become twisted.
Do not immerse the electrical components of this appliance in water or any other liquid.
Do not operate the appliance with wet hands.
Do not expose the appliance to rain.
Do not leave the appliance unattended whilst connected to the mains power supply.
Do not remove the appliance from the mains power supply by pulling the cord; switch it off and remove the plug by hand.
Do not pull or carry the appliance by its power supply cord.
Do not use the appliance for anything other than its intended use.
Do not use any accessories other than those supplied.
Do not use this appliance outdoors.
Do not store the appliance in direct sunlight or in high humidity conditions.
Do not move the appliance when it is in use.
Do not touch any sections of the appliance that may become hot during use, as this may cause injury.
Always unplug the appliance after use and before any cleaning or user maintenance.
Always ensure that the appliance has cooled fully after use before performing any cleaning or maintenance or storing away.
Always use the appliance on a stable, heat-resistant surface, at a height that is comfortable for the user.
Use of an extension cord with the appliance is not recommended.
4
This appliance should not be operated by means of an external timer or separate remote control system.
This appliance is intended for domestic use only. It should not be used for commercial purposes.
The outer surface of the appliance may get hot during operation.
If this appliance falls or accidentally becomes immersed in water, unplug it from the wall outlet immediately. Do not reach into the water.
 Caution: Hot surface – do not touch the hot section or heating components of the appliance.
Take care not to pour water on the heating element.
Do not toast pastries with runny fillings or frosting.
Do not toast torn slices of bread.
Warning: Keep the appliance away from flammable materials.
5
Care and Maintenance
STEP 1: Before attempting any cleaning or maintenance, unplug the toaster from the mains power supply and allow to fully cool.
STEP 2: Wipe the toaster housing with a soft, damp cloth and dry thoroughly.
STEP 3: Remove crumbs from inside the base of the toaster by sliding open the crumb tray following the instructions in the section entitled ‘Crumb Tray’.
Do not immerse the toaster in water or any other liquid.
Never use harsh or abrasive cleaning detergents or scourers to clean the toaster, as this could damage the surface.
Caution: Never place fingers near or inside the toasting slots. Always unplug the toaster and allow it to cool thoroughly before attempting to remove any bread that has become stuck inside the toasting slot.
Take care when removing food from the toasting slot to avoid damage to the internal mechanism and heating element. Do not allow crumbs to build up inside the base of the toaster.
Do not operate the toaster without bread, as this may cause damage to the toaster.
If the toaster falls into water, unplug it from the mains power supply immediately. Do not reach into the water.
6
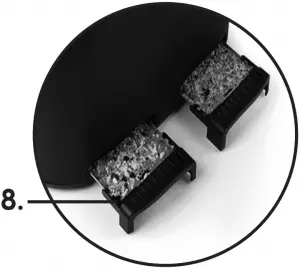
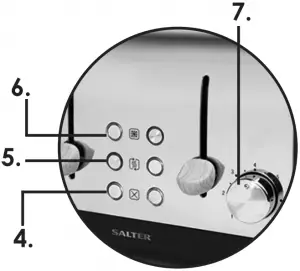
Description of Parts


1. Toaster housing 5. Reheat button(s)
2. Toasting slot(s) 6. Defrost button(s)
3. Loading lever(s) 7. Browning control dial(s)
4. Cancel button(s) 8. Slide-out crumb tray(s)
Instructions for Use
Before First Use
Before using the toaster for the first time, wipe the toaster housing with a soft, damp cloth and dry thoroughly.
Do not immerse the toaster in water or any other liquid.
Never use harsh or abrasive cleaning detergents or scourers to clean the toaster, as this could cause damage.
Note: When using the toaster for the first time, a slight smoke or odour may be emitted. This is normal and will soon subside. Allow for sufficient ventilation around the toaster.
7
Toasting Slots and Controls
There are two sets of controls and four toasting slots. The left set of controls is only for the two toasting slots on the left, and will not affect the toasting slots on the right. The right set of controls is for the two toasting slots on the right, and will not affect the toasting slots on the left. The two can be used either together or independently.
Using the Skandi 4-Slice Toaster
STEP 1: Place the toaster onto a flat, stable surface at a height that is comfortable for the user. Make sure that the crumb tray is pushed fully into the toaster and that the loading lever is in the upright position, with no bread or other objects inserted to the toasting slots.
STEP 2: Plug in and switch on the toaster at the mains power supply.
STEP 3: Turn the browning control dial to the desired setting. Select 3-4 for medium brown toast.
STEP 4: Insert the bread or toasting food into the toasting slot(s) and lower the toasting lever until it is locked into place. Toasting will begin when the lever is fully down.
STEP 5: When the bread reaches the desired browning level, the toast will pop up automatically.
STEP 6: Turn the toaster off and unplug it from the mains power supply.
STEP 7: Remove the toast and any crumbs from the toasting slot(s) using heat-resistant gloves.
Note: To interrupt toasting mid-setting, press the ‘Cancel’ button, which will be illuminated throughout the toasting cycle.
Caution: Never use a fork or sharp-edged utensil to remove toast as this may damage the heating element or cause injury.
Using the Defrost/Reheat Setting
The defrost/reheat setting allows bread to be defrosted or toasted from frozen.
STEP 1: Make sure that the crumb tray is pushed fully into the toaster and that the toasting lever is in the upright position. Check no bread or other objects are inside the toasting slots.
STEP 2: Plug in and switch on the toaster at the mains power supply.
STEP 3: Set the browning control dial to the desired setting. Setting ‘1’ will defrost frozen bread or reheat toast that has gone cold.
STEP 4: Insert the frozen bread or cold toast into the toasting slot(s) and lower the toasting lever until it is locked into position. Defrosting/reheating will begin once the lever is fully lowered and the defrost/reheat button has been pressed. The defrost/ reheat button will illuminate throughout the defrosting/reheating cycle.
STEP 5: When the defrosting/reheating setting has completed its cycle, the bread will pop up automatically.
STEP 6: If the bread has not fully defrosted or reheated fully, repeat steps 4-5. To stop the cycle, press the cancel button.
STEP 7: Switch off and unplug the toaster from the mains power supply.
STEP 8: Remove the food from the toasting slot(s) using heat-resistant gloves.
Automatic Centering Guides
Lowering the toasting lever closes the centering guides and holds the bread centrally in the toasting slots.
Note: The toasting lever will not lock down unless the toaster is plugged into a mains power supply and is switched on.
Crumb Tray
The toaster is equipped with a crumb tray, which should be periodically emptied so that the toaster operates correctly.
To remove the crumb tray, which is situated at the back of the toaster unit, pull it out by the handle.
Empty the crumb tray and then reinsert it, pushing it until it clicks back into position.
Storage
The toaster must be cool, clean and dry before storing in a cool, dry place.
Never wrap the cord tightly around the toaster; wrap it loosely to avoid causing damage.
Specifications
Product code: EK3619BLKBRMFOB/EK3619GRYBRMFOB
Input: 220-240 V ~ 50/60 Hz
Output: 1745 W
9
Brand Merchant Pty Ltd. Suite 8, 8A St Andrews Street,
Brighton Victoria 3186, Australia
If this product does not reach you in an acceptable condition please contact our Customer Services Department at www.salterhome.com.au.
Please have your delivery note to hand as details from it will be required.
If you wish to return this product, please return it to the retailer from where it was purchased with your receipt (subject to their terms and conditions).
The crossed out wheelie bin symbol on this item indicates that this appliance needs to be disposed of in an environmentally friendly way when it becomes of no further use or has worn out. Contact your local authority for details of where to take the item for recycling.
![]()
Imported and Distributed by:
Brand Merchant Pty Ltd,
Suite 8, 8a St Andrews Street,
Brighton Victoria 3186, Australia

Made In China.
CD210121MD000000/V1