Instructions Instructions

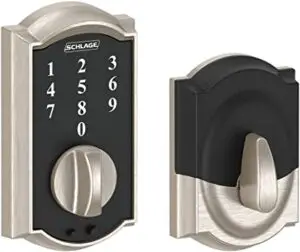
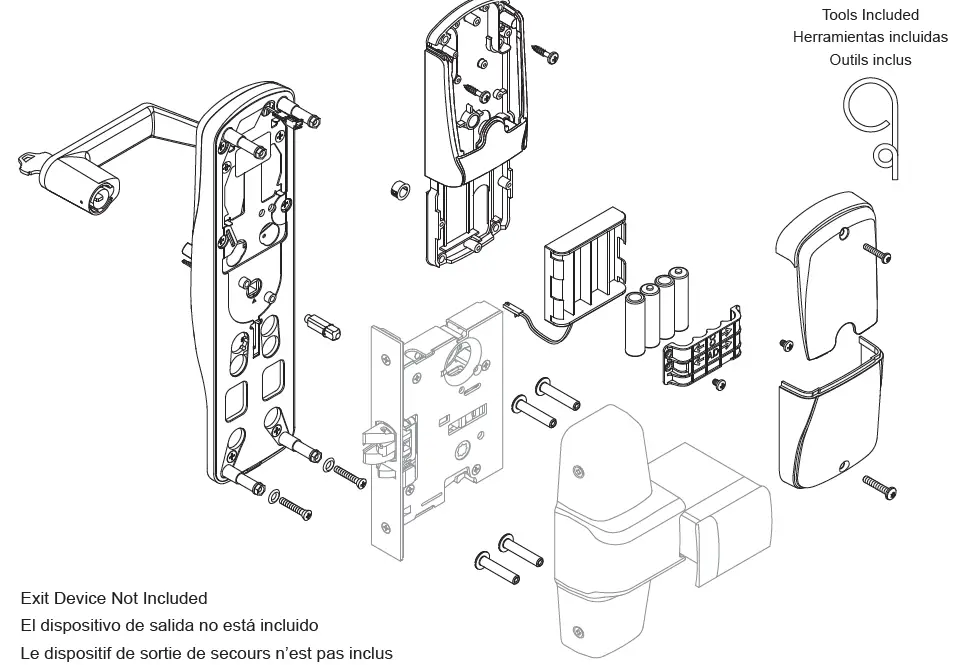
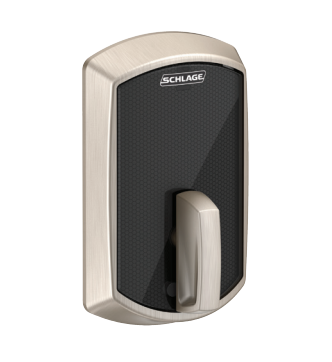
Schlage Keyless Touchscreen Deadbolt [BE375]
Keyless Touchscreen Deadbolt

Prepare for Installation
Tools Needed
- Phillips screwdriver
- Tape Measure
- Pencil
Optional
- Flathead Screwdriver
- Wood Block
- Hammer
IMPORTANT NOTES
DO NOT use a power drill for installation!
- Install and test lock with door open to avoid being locked out.
- If tailpiece is not installed, insert into slot on the back of the touchscreen and snap into place.
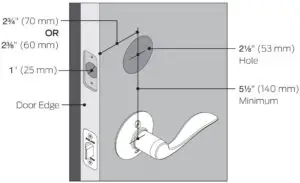
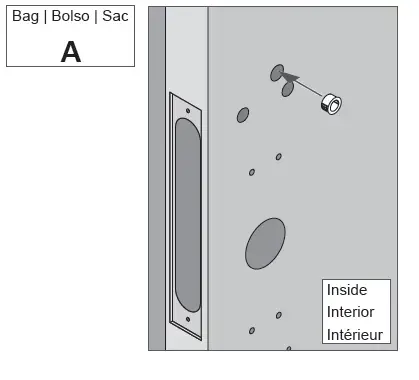
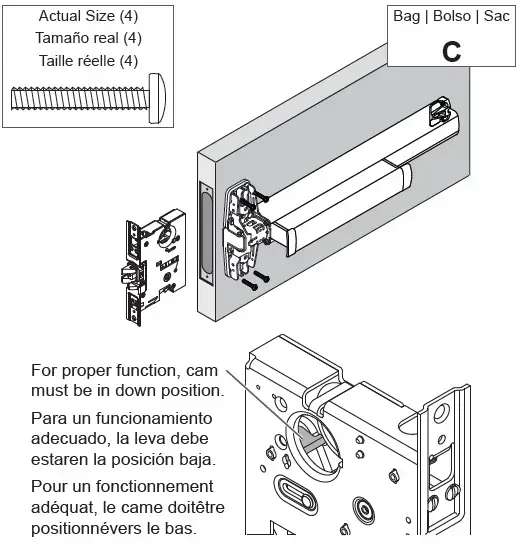
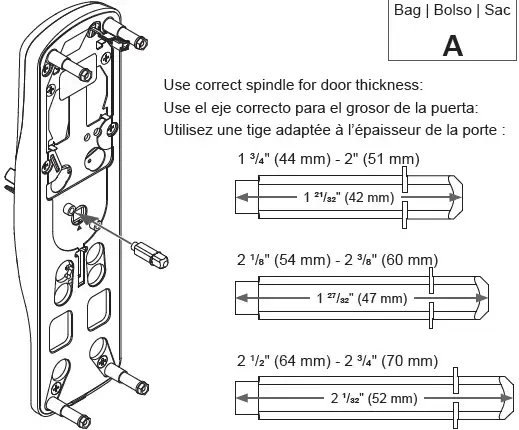
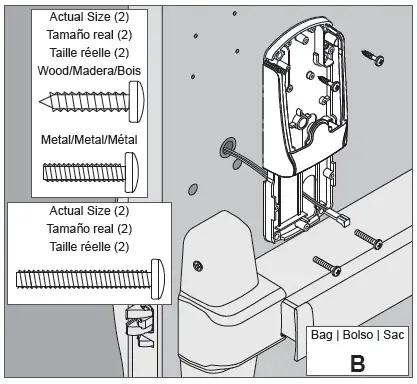
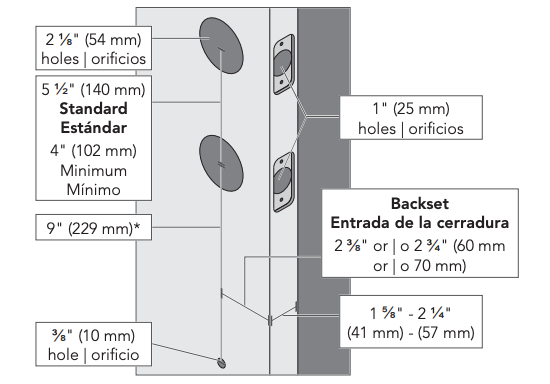
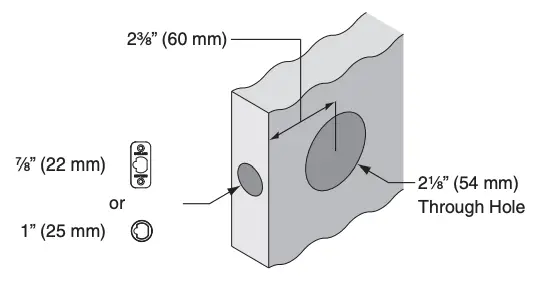
A Check door dimensions.
See consumer.schlage.com/Service-Support for door preparation instructions if dimensions are different.
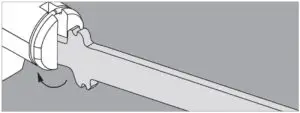
B Adjust bolt length, if necessary.
Measure the dimension shown. If the measurement is 2Cv” (70 mm), extend the bolt.
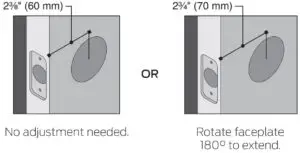
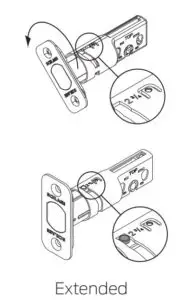
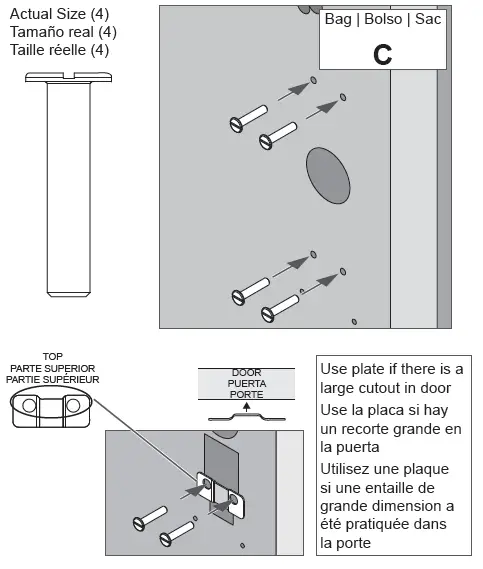
C Change faceplate, if necessary.
Choose the drawing that matches your door edge.

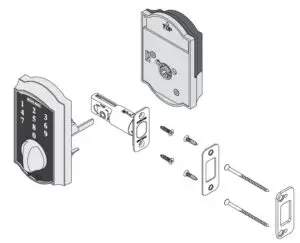
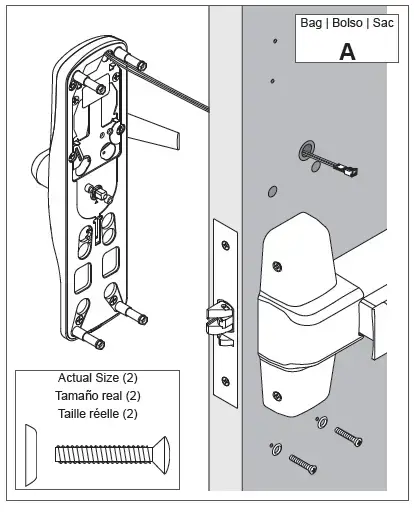
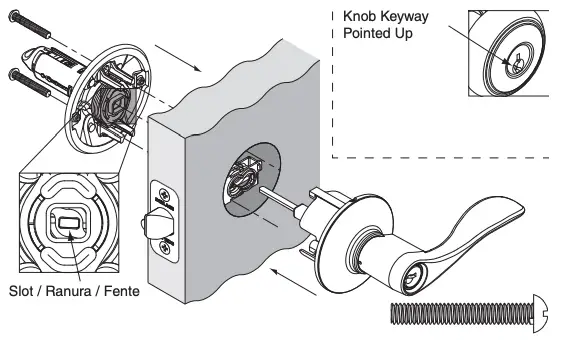
Install Lock
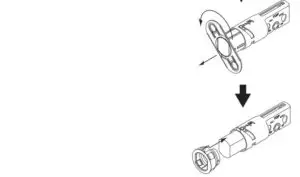
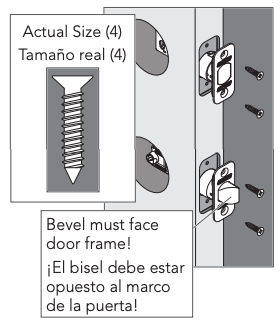
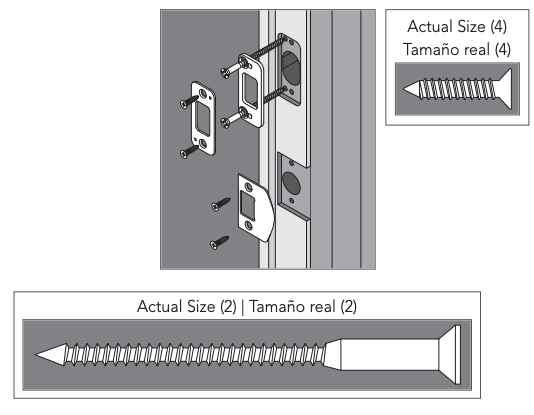
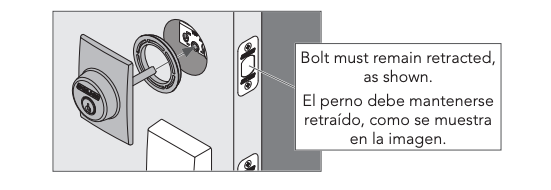
1. Install the bolt.

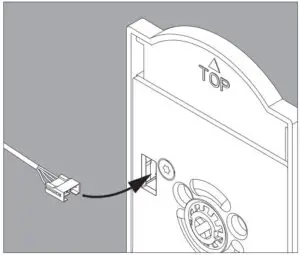
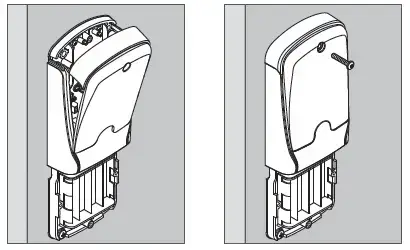
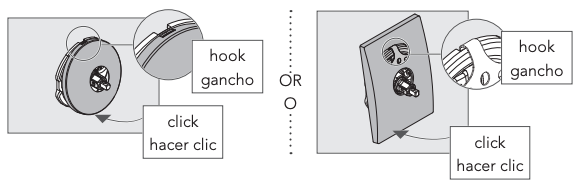
2. Install the touchscreen on the outside of the door.
Slide tailpiece through the slot in the bolt, and route wire over bolt.
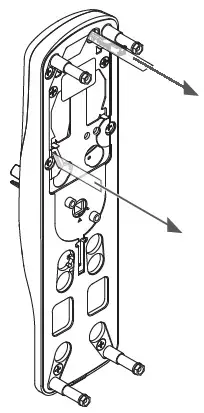
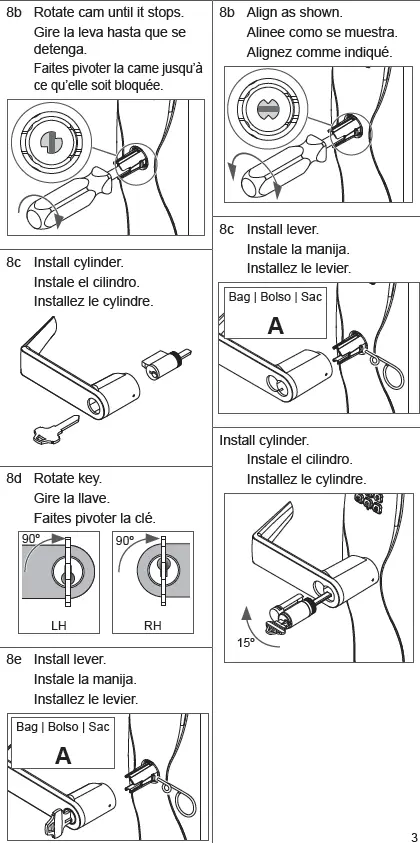
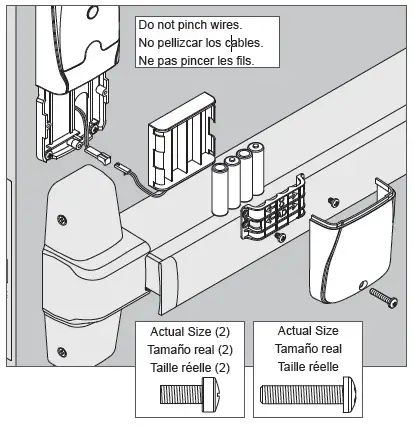
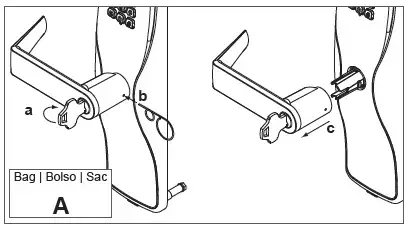
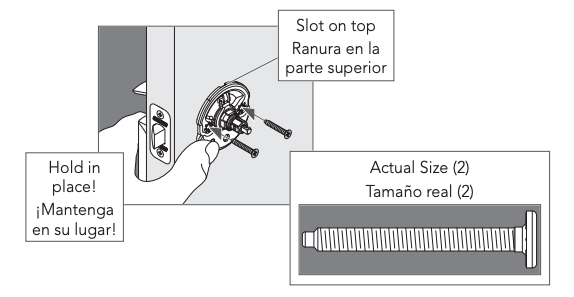
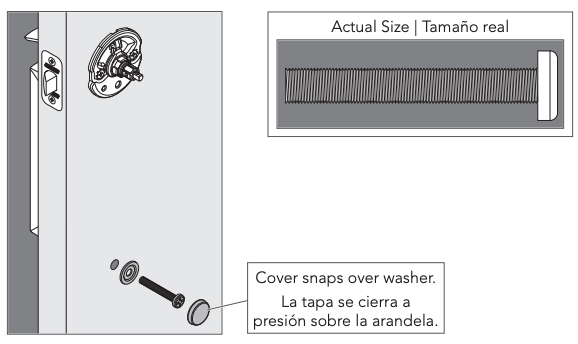
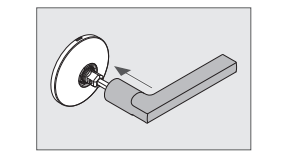
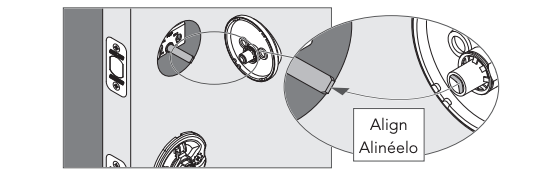
3. Install the thumbturn assembly.
3a Rotate the thumbturn to a vertical position.
3b Remove the battery cover.
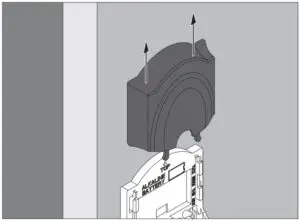
3c Route battery cable from the touchscreen through the hole in the thumbturn assembly.
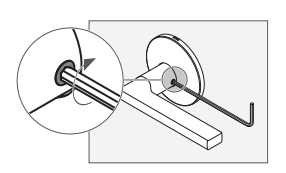
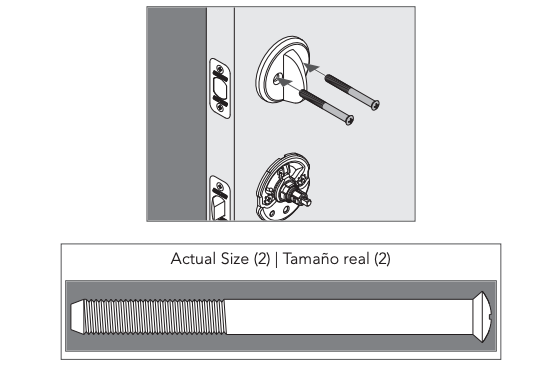
3d Place thumbturn assembly against the door and secure with two (2) screws.

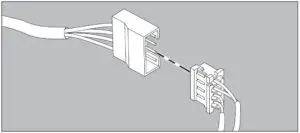
3e Connect the wires.
4 Install the included battery.
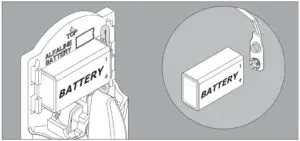
IMPORTANT
Route the battery wire so it won’t be pinched by the cover!
4a Install the battery cover. Do not pinch the wires!

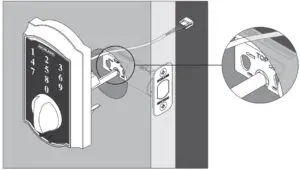
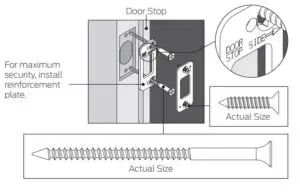
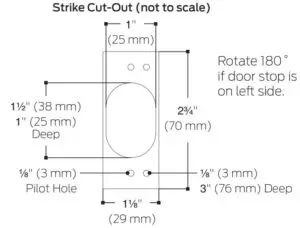
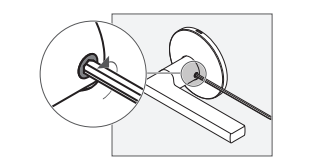
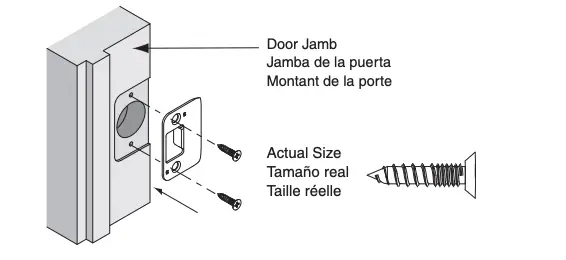
5 Install reinforcement plate and strike into door jamb.
Test Lock
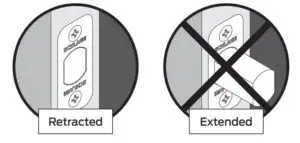
A. Extend the bolt (lock).

Did bolt extend?
B. Retract the bolt (unlock).
IMPORTANT
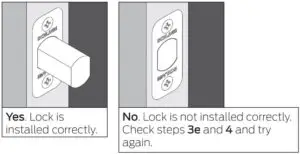
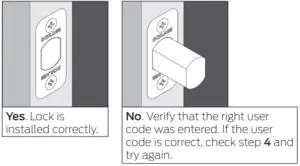
Press Schlage and rotate thumbturn away from the door edge. If the bolt retracts, the lock is not installed correctly. Pay attention to step 3a and try again.
Did bolt retract?
Program Lock
See the Schlage Touch™ User Guide that came with this lock. Go to schlage.com for videos and more. Register your product at RegisterMySchlage.com.
Lifetime Limited Mechanical and Finish Warranty and 3-Year Limited Electronics
Warranty
Subject to the terms and conditions of this warranty, Schlage extends a lifetime limited
mechanical and finish warranty and a three-year limited electronics warranty to the original
consumer user (“Original User”) of our Schlage brand product (“Product”) against defects in
material and workmanship, as long as the Original User occupies the residential premises upon
which the Product was originally installed.
What Schlage will do: Upon return of the defective Product to Schlage, Schlage’s sole
obligation, at its option, is to either repair or replace the Product, or refund the original purchase
price in exchange for the Product.
Original User: This warranty only applies to the Original User of Products. This warranty is not
transferable.
What is not covered: The following costs, expenses and damages are not covered by the provisions of this limited Warranty: (i) labor costs including, but not limited to, such costs as the removal and reinstallation of Product; (ii) shipping and freight expenses required to return Product to Schlage; and (iii) any other incidental, consequential, indirect, special and/ or punitive damages, whether based on contract, warranty, tort (including, but not limited to, strict liability or negligence), patent infringement, or otherwise, even if advised of the possibility of such damages. Some local laws do not allow the exclusion or limitation of incidental or consequential damages, so the above exclusion or limitation may not apply to you.
The provisions of this warranty do not apply to Products: (i) used in commercial applications; (ii) used in common area applications; (iii) used for purposes for which they
are not designed or intended; (iv) which have been subjected to alteration, abuse, misuse,
negligence or accident; (v) which have been improperly stored, installed, maintained or
operated; (vi) which have been used in violation of written instructions provided by Schlage;
(vii) which have been subjected to improper temperature, humidity or other environmental
conditions; or (viii) which, based on Schlage’s examination, do not disclose to Schlage’s
satisfaction non- an implied warranty lasts, so that the above limitations may not fully apply.
Refer to your local laws for your specific rights under this warranty.
Guaranteed Fit Program: Schlage products are designed to fit standard residential door preparations and retrofit existing tubular locks. Note: Mortise locks and preparations are not
considered standard and are not guaranteed under this program.
During the initial installation, if there is a problem with the Product’s performance, the Original
User may simply contact Schlage Customer Service at 888-805-9837 in the U.S. and Canada or 800-506-7866 in Mexico for assistance.Program and warranty claims: If you encounter a residential door preparation or fit issue under the Guaranteed Fit Program or have a claim under
this warranty, please contact Schlage Customer Service for repair, replacement or refund of the
original purchase price in exchange for the return of the Product to Schlage.
Schlage Customer Service
Calling From:
U.S.A.: (888) 805-9837
Canada: (800) 997-4734
Mexico: 018005067866
![]()
© Allegion 2014
Printed in U.S.A.
P516-865 Rev. 06/14-b

Can’t recall if you locked the door behind you? With the Schlage SenseTM WiFi Adapter users can lock and unlock their Schlage SenseTM Smart Deadbolt from
anywhere using iOS and AndroidTM smartphones.*
FEATURES
- Lock/unlock your Schlage Sense Smart Deadbolt from anywhere*
- Easy setup and pairing with smartphone through Schlage HomeTM app
- Get lock/unlock push notifications
- One Adapter can support up to two Schlage SenseTM Smart Deadbolts
- 1-year warranty.
*For remote capability, Schlage Sense WiFi Adapter should be plugged into power, connected to WiFi and in Bluetooth range of the Schlage Sense Smart Deadbolt (about 40 feet).


Works with iPhone®, iPad® or iPod touch® with iOS 9.3 or later. Android 5.0 or later required. Compatible with Android smartphones like Samsung Galaxy S5 or newer, Google Nexus 5 or newer, LG G3 or newer, and more. The Bluetooth® word mark and logos are registered trademarks owned by Bluetooth SIG, Inc. and
is licensed for use by Schlage. Android is a trademark of Google Inc. Google Play and the Google Play logo are trademarks of Google Inc. iPad, iPhone, iPod, iPod touch and Siri are trademarks of Apple Inc., registered in the U.S. and other countries.
NOTE: WiFi Adapter is not compatible with the Apple Home app or Siri® voice control More Schlage SenseTM Smart Deadbolt home automation options are available at Schlage.com/SensePartners
Visit Schlage.com to learn more.
About AllegionTM

Allegion (NYSE: ALLE) helps keep people safe where they live, work and visit. Allegion is pioneering safety as a provider of security solutions through more than 25 brands in more than 130 countries. For more, visit allegion.com
Read More About This User Manuals…
Schlage Sense WiFi Adapter Datasheet – Optimized PDF
Schlage Sense WiFi Adapter Datasheet – Original PDF
Questions about your Manual? Post in the comments!
References
]]>
Subject to the terms and conditions of this warranty, Schlage Lock Company LLC (Schlage”) extends a warranty against defects in material and workmanship to the original consumer user (defined below) of the products manufactured by Schlage (the “Products”) beginning from the date of purchase by the original user. Please see below for specific Product warranty periods and details.

What Schlage Will Do: Upon return of the defective Product to Schlage for inspection, free and clear of all liens and encumbrances and accompanied by the statement of defects and proof of purchase from an authorized seller, Schlage will, at its sole option, replace the Product with new or remanufactured product (as applicable) or refund the purchase price in exchange for the Product. Because Schlage cannot control the quality of products sold by unauthorized sellers, this warranty applies only to Products that were purchased from an Allegion or Schlage authorized seller, unless otherwise prohibited by law.
Original User: This warranty only applies to the original consumer user of the Products (“Original user”) as long as the Original User occupies the residential premises upon which the Product was originally installed. Except where prohibited by law (which may include the Province of Quebec), this warranty is not transferable.
What is Not Covered: The following costs, expense and damages are not covered by the provisions of this warranty: (i) back charges or labor costs including, but not limited to, such costs as the removal and reinstallation of the Product or for normal maintenance; (ii) shipping and freight expenses required to return the Product to Schlage; (iii) failures, defects or damage (including, but not limited to, any security related breach or failure or loss of data) caused by the Original User, any third party or third party products, service or system connected or used in conjunction with the Product; (iv) any incidental, consequential, indirect, special and/or punitive damages, whether based on contract, warranty, tort (including, but not limited to, strict liability or negligence), patent infringement, or otherwise, even if advised of the possibility of such damages; or (v) normal wear and tear.
The provisions of this warranty do not apply to Products: (i) used in commercial applications; (ii) used in common area applications; (iii) used for purposes for which they are not designed or intended by Schlage; (iv) which have been subjected to alteration, misuse, abuse, negligence, or accident; (v) which have been improperly stored, installed, maintained, repaired or operated; (vi) which have been used or installed in violation of written instructions provided by Schlage or which are used on nonstandard residential door preparations (NOTE: Mortise locks and preparations are not considered standard); (vii) which are not the proper size for the application or have been damaged or are defective due to improper installation or installation with improper or incorrect parts; (viii) which have been subjected to improper or harsh temperature, humidity, or other environmental conditions (i.e., corrosion); (ix) which, based on Schlage’s examination, do not disclose to Schlage’s satisfaction non-conformance to this warranty; (x) except where prohibited by law, which have been purchased through a non-authorized seller; or (xi) which are not new, including, but not limited to, returned, refurbished, or similar products. Additionally, this warranty does not cover scratches, abrasions, or deterioration due to the use of abrasive materials, paints, solvents, or other chemicals.
Finish Exclusion: Oil Rubbed Bronze finish (613) is designed to improve over time and change in appearance, creating a living finish through daily use and, thus, finish discoloration is not covered under this warranty.
Additional Terms: Schlage does not authorize any person to create for it any obligation or liability in connection with the Products. No other warranties, express or implied, are made to the Original User with respect to the Products. Any implied warranty of merchantability or fitness for a particular purpose shall be limited to the duration of this warranty, as applicable to the Product. No agent, representative, dealer, distributor, Authorized Seller or Authorized Reseller has the authority to increase or alter the obligations under this warranty. Schlage’s maximum liability hereunder is limited to the original purchase price of the Product. No action arising out of a claimed breach of this warranty by Schlage may be brought by the Original User more than one (1) year after the cause of action has arisen.
How Local Law Applies: United States: This warranty gives you specific legal rights, and you may also have other rights which vary from State to State. Some States do not allow limitations on how long an implied warranty lasts, so the above limitation may not apply to you. Some States do not allow the exclusion or limitation of incidental and consequential damages, so the above limitation or exclusion may not apply to you. Canada: This warranty gives you specific rights, and you may also have other rights as otherwise permitted by law. If this product is considered a consumer product, please be advised that some local laws do not allow limitations on incidental or consequential damages or how long an implied warranty lasts, so the above limitations may not fully apply. Refer to your local laws for your specific rights under this warranty.
Warranty Claims Process: If you encounter a claim under this warranty, please contact Schlage Customer Service as noted below for a replacement or refund of the original purchase price in exchange for the Product.
U.S. and Canada
Schlage Customer Service
2119 E. Kansas City Road
Olathe, KS 660061
1-888-805-9837 (US Phone)
1-800-900-4734 (Canada Phone)
[email protected]
Effective Date: December 7, 2020
![]() About Allegion
About Allegion
Allegion (NYSE: ALLE) is a global pioneer in seamless access, with leading brands like CISA ® , Interflex ® , LCN ® , Schlage ® , SimonsVoss ® and Von Duprin ® . Focusing on security around the door and adjacent areas, Allegion secures people and assets with a range of solutions for homes, businesses, schools and institutions. Allegion had $2.9 billion in revenue in 2019 and sells products in almost 130 countries. For more, visit www.allegion.com
![]() © 2020 Allegion
© 2020 Allegion
MR-1573 Rev. 12/20
allegion.com
Schlage Residential Limited Product Warranty Details – Optimized PDF
Schlage Residential Limited Product Warranty Details – Original PDF
References
]]>
![Schlage Keypad Lock [FE575] Image](https://manuals.plus/wp-content/uploads/2020/12/Schlage-Keypad-Lock-FE575-Image-300x229.jpg)
Schlage Keypad Lock [FE575]
Keypad Lock

Prepare for Installation
Tools Needed
- Phillips screwdriver
- Tape Measure
- Pencil
Optional
- Flathead Screwdriver
- Wood Block
- Hammer
Additional Parts

IMPORTANT NOTES
- DO NOT use a power drill for installation!
- Use a screwdriver to remove product from packaging.
- Install and test lock with door open to avoid being locked out.
A. Check door dimensions.

B. Change faceplate, if necessary.
Choose the drawing that matches your door edge. If the hole has no mortise, change to the circular faceplate.


Install Lock
1. Install latch.
Make sure latch angle faces door jamb.

2. Install strike onto door jamb.
3. Install battery.

4. Install keypad.

Bar should slide smoothly through hole in latch. If not, check door dimensions.
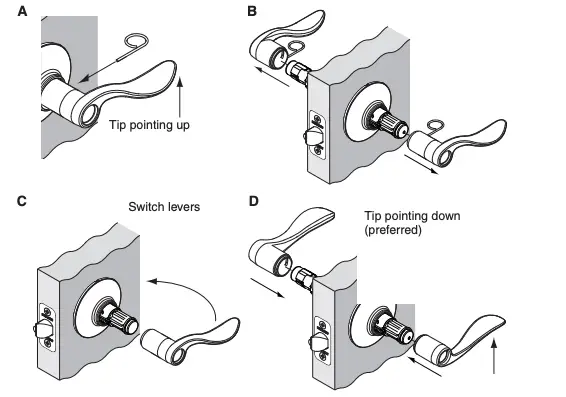
5. Install lever.

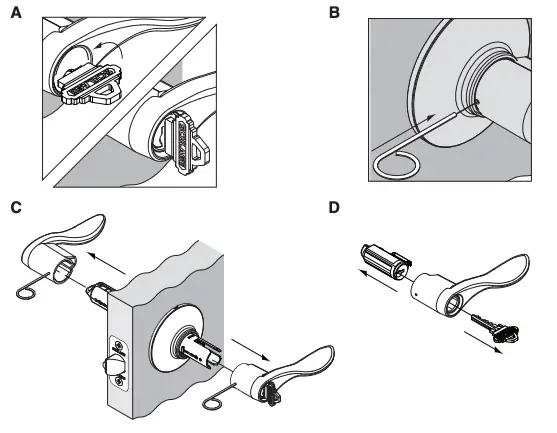
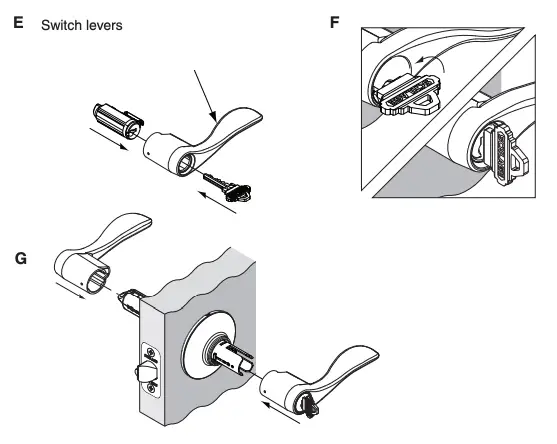
6. If needed, switch levers.


Test Lock
A. Unlock.

Program Lock
See the Keypad Locks Programming Guide that came with this lock. See the Keypad Locks User Guide for additional information.
Go to keypad.schlage.com for videos and more.
Register your product at RegisterMySchlage.com.
Lifetime Limited Mechanical and Finish Warranty and 3-Year Limited Electronics Warranty
Subject to the terms and conditions of this warranty, Schlage extends a lifetime limited mechanical and finish warranty and a three-year limited electronics warranty to the original consumer user (“Original User”) of our Schlage brand product (“Product”) against defects in material and workmanship, as long as the Original User occupies the residential premises upon which the Product was originally installed.
What Schlage will do: Upon return of the defective Product to Schlage, Schlage’s sole obligation, at its option, is to either repair or replace the Product, or refund the original purchase price in exchange for the Product.
Original User: This warranty only applies to the Original User of Products. This warranty is not transferable. What is not covered: The following costs, expenses and damages are not covered by the provisions of this limited Warranty: (i) labor costs including, but not limited to, such costs as the removal and reinstallation of Product; (ii) shipping and freight expenses required to return Product to Schlage; and (iii) any other incidental, consequential, indirect, special and/or punitive damages, whether based on contract, warranty, tort (including, but not limited to, strict liability or negligence), patent infringement, or otherwise, even if advised of the possibility of such damages. Some local laws do not allow the exclusion or limitation of incidental or consequential damages, so the above exclusion or limitation may not apply to you.
The provisions of this warranty do not apply to Products: (i) used in commercial applications; (ii) used in common area applications; (iii) used for purposes for which they are not designed or intended; (iv) which have been subjected to alteration, abuse, misuse, negligence or accident; (v) which have been improperly stored, installed, maintained or operated; (vi) which have been used in violation of written instructions provided by Schlage; (vii) which have been subjected to improper temperature, humidity or other environmental conditions; or (viii) which, based on Schlage’s examination, do not disclose to Schlage’s satisfaction non-conformance to the warranty. Additionally, this warranty DOES NOT COVER scratches, abrasions, or deterioration due to the use of paints, solvents or other chemicals.
Exclusions: Oil Rubbed Bronze finish (613) is designed to improve over time and change in appearance, creating a living finish through daily use and thus, finish discoloration is not applicable to the above warranty. Additional terms: Schlage does not authorize any person to
create for it any obligation or liability in connection with the Product. Schlage’s maximum liability hereunder is limited to the original purchase price of the Product. No action arising out of any claimed breach of this warranty by Schlage may be brought by the Original User more than one (1) year after the cause of action has arisen.
How local law applies: This warranty gives you specific legal rights, and you may also have other rights as otherwise permitted by law. If this Product is considered a consumer product, please be advised that some local laws do not allow limitations on incidental or consequential damages or how long an implied warranty lasts, so that the above limitations may not fully apply. Refer to your local laws for your specific rights under this warranty.
Guaranteed Fit Program: Schlage products are designed to fit standard residential door preparations and retrofit existing tubular locks.
Note: Mortise locks and preparations are not considered standard and are not guaranteed under this program. During the initial installation, if there is a problem with the Product’s performance, the Original User may simply contact Schlage Customer Service at 888-805- 9837 in the U.S. and Canada or 800-506-7866 in Mexico for assistance. Program and warranty claims: If you encounter a residential door preparation or fit issue under the Guaranteed Fit Program or have a claim under this warranty, please contact Schlage Customer Service for repair, replacement or refund of the original purchase price in exchange for the return of the Product to Schlage.
Schlage Customer Service
Calling From:
U.S.A.: 888-805-9837
Canada: 800-997-4734
Mexico: 018005067866
![]()
© Allegion 2014
Printed in U.S.A.
23780026 Rev. 07/14-d
Read More About This Manual & Download PDF:
Schlage Keypad Lock [FE575] User Manual – Optimized PDF
Schlage Keypad Lock [FE575] User Manual – Original PDF
Questions about your Manual? Post in the comments!
References
]]>
SCHLAGE BE489 Smart WiFi Deadbolt

How to add or delete user codes for Schlage Encode™ Smart WiFi
Deadbolt with the touchscreen (BE489)
Warning: Manual programming is disabled after your lock is programmed using the Schlage Home app. If you manually program your lock and choose to later link your lock to the app, all manually programmed user codes and the programming code are deleted.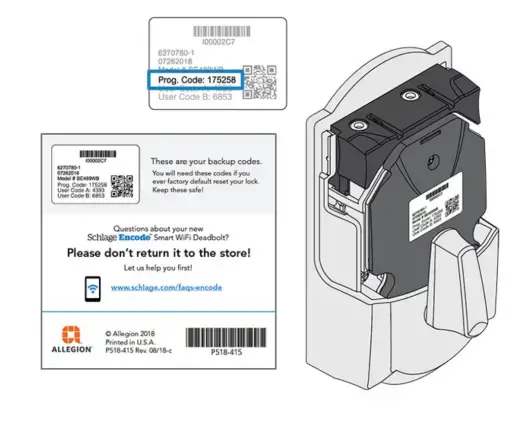
If you need to find your programming code, look inside the back of your lock. Simply remove the battery cover and you’ll see a label with your Prog. Code.
- Enter your Programming Code (6 digits)
- Enter the code you’d like to add or delete.
- Choose and press either the house button to add, or the lock button to delete:

- Enter that code again.
- Press
 (home) to exit.
PROGRAMMING GUIDE
Schlage Button Signals
The color of the Schlage button indicates the status of the lock.
Orange
- the lock is in programming mode
Green
- a correct user code was entered
- the programming process is complete
Red
- an incorrect user code was entered
- there was an error in programming
- low batteries
- red blinking indicates critically low battery
Codes
Control of the lock is simply managed via a six-digit Programming Code and four-digit User Codes.
PROGRAMMING CODE
(Six Numbers)
- The lock comes preset with one unique default Programming Code. It can be found on the stickers, one on the back of the keypad assembly
and one on the front of this User Guide. - Used to put the lock in programming mode.
- DOES NOT unlock the lock.
- The first four numbers must be different from all of the User Codes currently in the lock.
- If you forget the Programming Code, you can reset the lock to factory settings, which restores the default Programming Code. See Restore Factory
Settings on page 15.
USER CODES
(Four Numbers)
- The lock comes preset with two unique default User Codes. They may be found on the stickers, one on the back of the keypad assembly and one
on the front of this User Guide. - Used to unlock the lock.
- These four numbers must be different from the first four numbers of the Programming Code.
- Up to 19 possible User Codes can be stored in the lock at one time.
Default Code Locations
The Default User Codes and Programming Code are located in two places:
Back of the Keypad
» You must remove the Keypad from the door to see this sticker.
Front of this User Guide
Basic Controls
» Write your programming code here for easy access. Also see Record Your Codes on page 13 for space to record User Codes.
» If you make a mistake during programming, press the Schlage button repeatedly until the keypad lights blue. Then start over.
| PROGRAMMING CODE | |||||
ADDING USER CODES*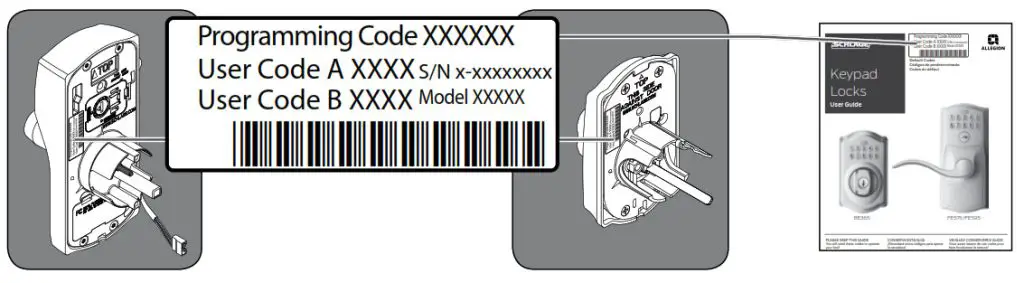
* These four numbers must be different from the first four numbers of the Programming Code.
DELETING USER CODES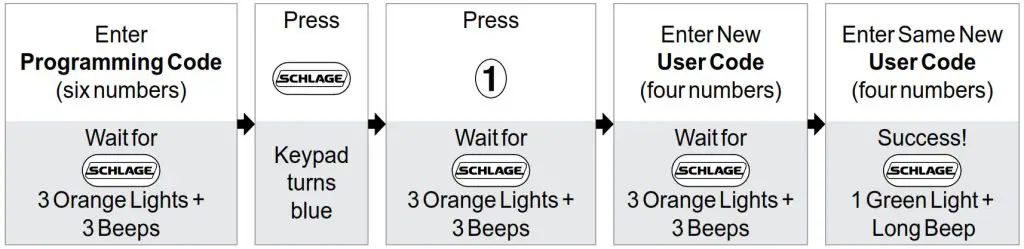
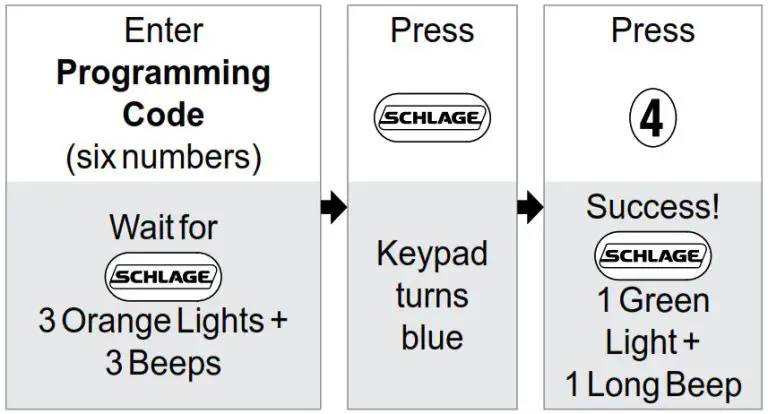
CHANGING THE PROGRAMMING CODE*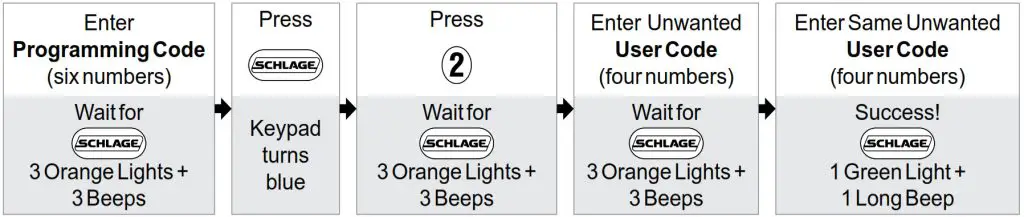
* The first four numbers must be different from all of the User Codes currently in the lock.
Want to see a video?
 Browse to answers.schlage.com and search on “How to Program Keypad Lock” for a video. Other videos and information are also available.
Enhanced Controls
Schlage’s keypad locks were designed with added features that allow you to adapt the lock to your needs.
Additional features that you can choose to use include:
ENABLE VACATION MODE

When enabled, no User Codes will unlock the door, preventing any unauthorized attempts of entry when no one is home for a prolonged period of time.
DISABLE VACATION MODE
 ENABLE OR DISABLE BEEPER
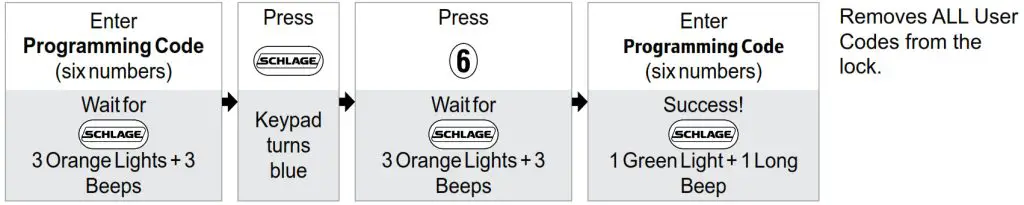
 DELETE ALL USER CODES

ENABLE OR DISABLE LOCK & LEAVE KEYPAD DEADBOLT (BE365) ONLY
Enabled by default. When enabled, the deadbolt can be locked from the outside by pressing the Schlage button and rotating the thumbturn. When disabled, a User Code must be entered before rotating the thumbturn. Disabling this feature keeps an unauthorized person from locking the door from the outside.
RECORD YOUR CODES
» KEYPAD WEAR
Consider changing your codes on a periodic basis so buttons wear evenly.
| PROGRAMMING CODE | |||||
User Codes
»Up to 19 User Codes can be stored in the lock at one time.
| NAME | USER CODE | ||||
| EXAMPLE: JOHN SMITH | 1 | 2 | 3 | 4 | 5 |
TROUBLESHOOTING
Browse to answers.schlage.com and click on Electronic Keypad Locks in the menu on the right side for videos, troubleshooting, FAQ and more.
| Lock Issue | Beeps* | Lights | Solution | |
| KEYPAD DEADBOLT ONLY | I can unlock my deadbolt by simply pushing the Schlage button. I don’t need a code. | 1 High | Green Blinking |
Your lock has been installed incorrectly and is not secure. Repeat the installation process. Ensure the cam and bolt positions are correct, as referenced in the installation instructions. Browse to answers.schlage.com and search on “Installing BE365” for a video. |
After pushing and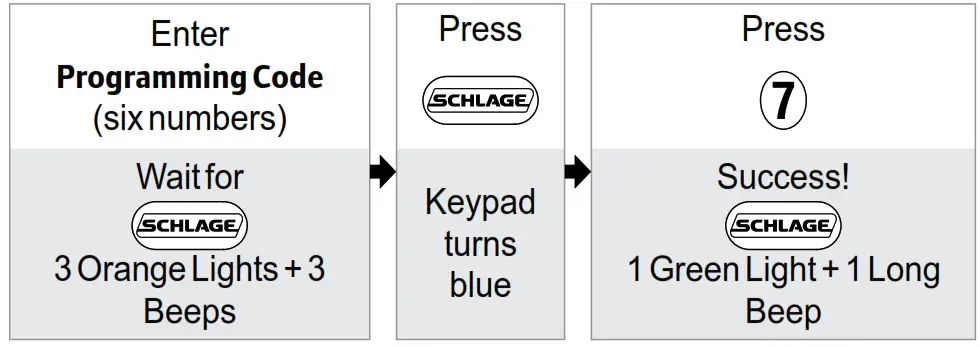 rotating thumb turn, the deadbolt does not extend. rotating thumb turn, the deadbolt does not extend. |
None | None | Lock and Leave feature is disabled. See Enable or Disable Lock & Leave on page 12. | |
| After entering my User Code, the lock flashes green, but I cannot unlock the lock. | 1 High | Green Blinking |
Lock Override is enabled and should be disabled. See Lock Override on page 7. | |
| Outside thumb turn does not freely spin after the deadbolt is thrown. | None | None | Lock is malfunctioning. Disable the keypad by enabling Lock Override. See Lock Override on page 7. Call Customer Service. | |
| I forgot my Programming Code. | None | None | Check the front of this guide or the back of the keypad assembly for the default Programming Code. | |
| If needed, restore lock to factory settings. See Restore Factory Settings on page 15. | ||||
| I need to delete a User Code that I don’t remember. | None | None | Delete all User Codes. Then add all needed User Codes back into the lock. See Programming Guide on page 10. | |
| User Code does not unlock lock. | 2 | Red | User Code entered is not a valid User Code. | |
| 1 High, 1 Low |
Green then Red |
Vacation Mode is enabled. See Disable Vacation Mode on page 12. | ||
 does not light when numbers are pressed. does not light when numbers are pressed. |
None | None | Too many incorrect User Codes have been entered. Wait 30 seconds and try again. | |
| If keypad does not respond after 30 seconds, then replace battery. See Changing the Battery on page 6 for Keypad Deadbolt or Changing the Battery on page 9 for Keypad Lock. | ||||
| There is a delay before unlock after a valid User Code is entered. | High/ Low, then 1 | Red then Green |
Battery is low and should be replaced. See Changing the Battery on page 6 for Keypad Deadbolt or Changing the Battery on page 9 for Keypad Lock. | |
| blinking red but no codes have been entered. |
None | Quick Red Blinking |
Battery is dead and MUST be replaced. See Changing the Battery on page 6 for Keypad Deadbolt or Changing the Battery on page 9 for Keypad Lock. | |
| Cannot add a new User Code. | High/Low | Red | 19 User Codes already exist. Delete a User Code before adding a new one. See Deleting User Codes on page 11. |
| 2 | Red | Second User Code entered did not match first User Code entered. See Adding User Codes* on page 11. | |
| The User Code matches the first four digits of the existing Programming Code. | |||
| Cannot delete a User Code. | 2 | Red | Second User Code entered did not match first User Code entered. |
| Cannot change Programming Code. | 2 | Red | Second Programming Code entered did not match first Programming Code entered. See Changing the Programming Code* on page 11. |
| First four digits of new Programming Code match an existing User Code. | |||
| Cannot delete all User Codes. | 2 | Red | Programming Code entered second time is incorrect. |
| Lock will not stay in programming mode. | 2 | Red | Any key other than  was pressed immediately after programming mode was entered. was pressed immediately after programming mode was entered. |
| An incorrect entry was made during the programming process. |
* Number of beeps if beeper is turned on.
Restore Factory Settings
If you lose or forget your Programming Code, you can restore the factory settings, which will restore the default Programming code.
- Disconnect the battery.
- Press and release the Schlage button.
- The following steps must occur within 10 seconds:
a. Reconnect the battery. The Schlage button will light green for one second.
b. Then, press and hold the Schlage button until it lights green and the lock beeps. - Try entering one of the default User Codes. If it does not unlock the lock, start over at step 2.
Once you’ve done this, you can change the programming code to a personalized number. See Changing the Programming Code* on page 11.
 WARNING
Locate the default Programming and User Codes on the front of this guide or the back of the Keypad Assembly before beginning! Default Programming and User Codes will be restored. All existing User Codes and current Programming Code will be erased. CUSTOMER SERVICE CANNOT RETRIEVE LOST DEFAULT CODES! DO NOT RESTORE FACTORY SETTINGS UNLESS YOU CAN LOCATE THE DEFAULT CODES.

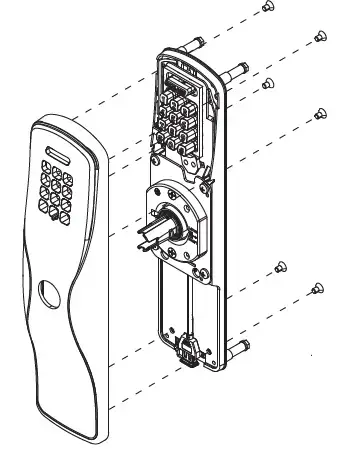
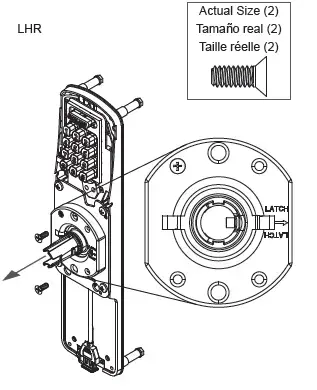
Prepare door

If insulator strip is present, carefully remove it.
Install sex bolts to secure device.
Install grommet.
Install device per manufacturer instructions.
Install spindle into assembly.
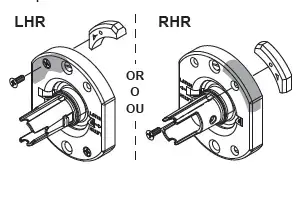
Check lever handing.
Install cylinder and lever.

Install outside assembly
Install inside assembly.
Install cover and screw.
Install batteries.
Set up lock.
After installing the lock, see the user guide for setup and operation.
Lever Removal
Changing the cylinder’s tailpiece
- Remove USB plug.
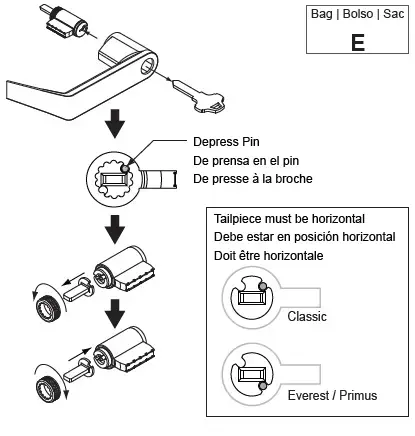
- Remove cover from baseplate.
- Remove spring cage.
- Move lever stop to opposite side − Align arrow with latch.
- Reinstall springcage.
- Reassemble cover and baseplate.
IMPORTANT: Do not pinch the ribbon cable duringreassembly. Vuelva a ensamblar la cubierta y la placa base.
]]>Schlage Control™ Smart Deadbolts
BE467F, Grade 2
Schlage Control™ Smart Deadbolt with Addison trim in Aged Bronze
Schlage Control™ Smart Deadbolt with Greenwich trim in Satin Nickel
Schlage Control™ Smart Deadbolts mark a new era of electronic access control in the multi-family world. By ushering in the next generation of highly scalable, efficiency boosting capabilities, multi-family properties can focus on operating more profitably—and with greater appeal for residents.
Using cloud-based mobile or web apps, facility staff can configure and manage access from virtually anywhere. The open integration capabilities, in conjunction with ENGAGE™ Technology, offers flexible, streamlined control and the freedom to integrate with alliance software partners to manage a wide spectrum of facility needs. Residents will enjoy the convenience of using a smartphone and/or smart credentials to open doors.
Schlage Control™ Smart Deadbolts are part of an extensive Allegion® lineup, which holds a solution for every door a multi-family property needs to manage.
Benefits
- Improves security & safety, reduces liability
- No-cylinder design makes locks 100% pick and bump proof
- Designed for accessibility using smart credentials and/or smartphone
- Increases efficiency of property operations
- Eliminates cost and hassle of managing of keys
- No-tour functionality (altering access to a lock without having to visit it)
- Maximize return on investment
- Smart credentials eliminate lock rekeying costs
- Upgrades property visual appeal
Features
- Keyless, no cylinder design — 100% bump and pick-proof
- Modern credentials — smart credential and/or smartphone as key
- Lock programming via mobile application on phone and/or tablet (Bluetooth® connection)
- Supports both on-line (Gateway Required) and off-line applications
- Up to 500 users per lock
- Audit trail reports up to 1,000 events
- Fits standard door prep
- 2-year battery life (Off-Line Mode)
- Full suiting with Schlage decorative mechanical locks
- ADA compliant design
Markets
- Multi-family communities
- Senior living communities
- Student housing
- Military housing
Specifications
- Latch: 1” x 2-1/4” square and round corner faceplate (round corner standard, square corner included in package) 1” edge bore required
- Strikes: 1-1/8” x 2-3/4”, round corner, no box, latch strike
- Backset: Adjustable backset, fits 2-3/8” to 2-3/4” backsets
- Door Range: 1-3/8” to 1-3/4” (thick door kit available – up 2-1/4”)
- Hole Distance: Minimum 4” center-to-center distance between cross bore holes
- Battery: 4-AA batteries included, (If loss of battery power occurs, a 9V battery can be used to jump start the lock and provide access with an assigned credential.)
- Construction: All-metal chassis and escutcheons
- Bore: 2-1/8”
- Credential: Supports smart and multi-technology aptiQ MIFARE classic or aptiQ DESFire EV1
- Stile width: Minimum 4-1/2” stile for 2-3/8” backset, minimum 5” stile for 2-3/4”
- Certifications: 90 minute UL Listed A 156.12 Grade 2 ANSI/BHMA certified
- Operating Temperature Exterior Side: -35C to 66C
- Operating Temperature Interior Side: -10C to 50C
Style Options
BE467F Schlage Control™ Smart Deadbolt with Addison trim in Aged Bronze
BE467F Schlage Control™ Smart Deadbolt with Greenwich trim in Satin Nickel
Finish Options

Matching Lever Designs (Ordered separately)
BE467F Schlage Control™ Smart Deadbolt Lock with Addison trim in Aged Bronze with Accent lever
BE467F Schlage Control™ Smart Deadbolt Lock with Greenwich trim in Satin Nickel with Broadway Lever
]]>Model FC60, Handleset
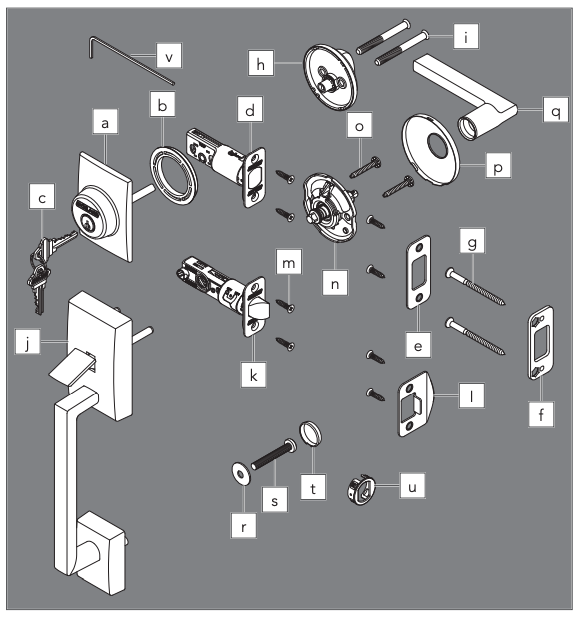
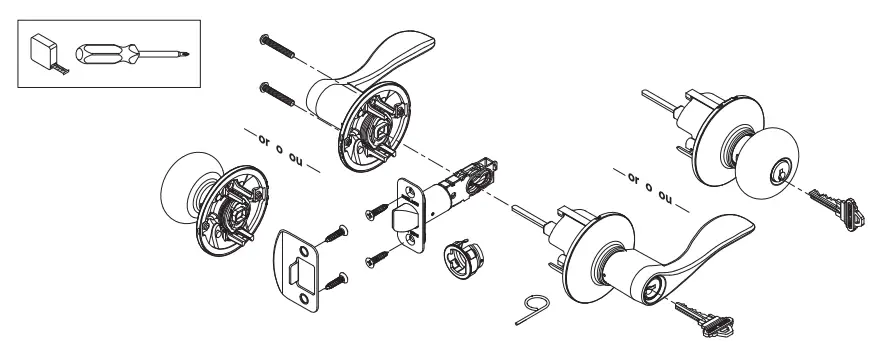
a. Cylinder
b. Cylinder ring
c. Keys (2)
d. Bolt
e. Bolt strike
f. Reinforcement strike
g. Reinforcement screws
h. Thumbturn
i. Thumbturn screws
j. Handle
k. Latch
l. Latch strike
m. Latch/Bolt/Strike screws (8)
n. Chassis
o. Chassis screws
p. Trim
q. Knob/Lever
r. Washer
s. Handle bolt
t. Bolt cover
u. Drive-in faceplate
v. Hex wrench (Do not discard!)
1. Check door dimensions.
1a If dimensions do not match, you may need to modify your door.
* May vary from 8 1/4″ (210 mm) to 9 3/4″ (248 mm) for existing hole.
1b Check latch and bolt length.
Measure the backset as shown.
- 2 3/8″ (60 mm): no adjustment is necessary.
- 2 3/4″ (70 mm): see the Adjust latch and bolt section.
2. Install the latch and bolt.
2a Choose the faceplate.

2b Secure with screws.
or 2b Use wood block and hammer.

3. Install the strikes onto the door frame.
Use included strikes for best performance.
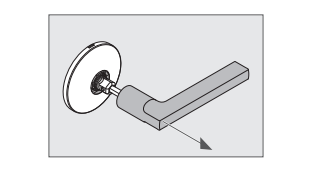
4. Install the handle into the bottom hole.
 You may need help holding the handle in place during installation.

Push firmly! Then hold in place.
5. Install the interior chassis.
5a Chassis is spring-loaded. Push against door and hold in place.

5b Secure with two (2) screws. Make sure chassis is straight!
6. Install the handle bolt.
7. Install the interior trim.
8. Install the interior knob/lever.
8a Push knob/lever firmly into place.
8b Then tighten set screw.
9. Install the cylinder and ring into the top hole.
10. Install the thumbturn.
10a Align slot in thumbturn with tailpiece.
10b Secure with screws.
Change levers
1. Loosen set screw, but do not remove.
2. Pull lever off.
3. Reinstall appropriately. Then tighten set screw.
Adjust latch and bolt
For 2 3/4″ backset, rotate and pull latch/bolt out to long setting.

Change faceplate
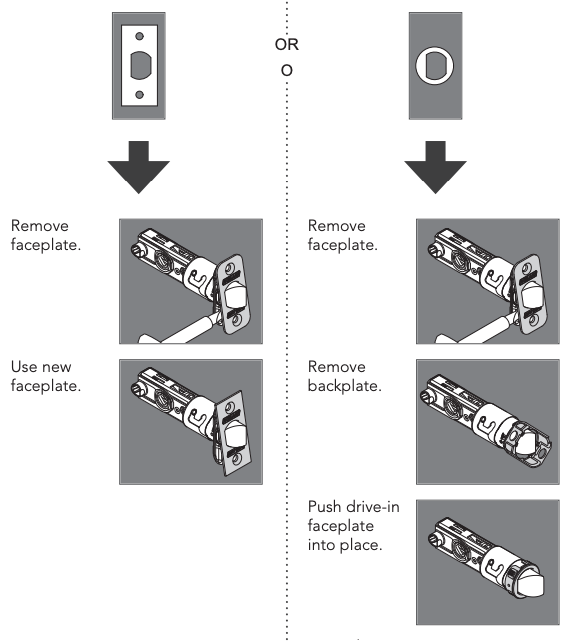
F-Series, F-Series UL
Installation Instructions
1. Check door preparation.
TEMPLATE
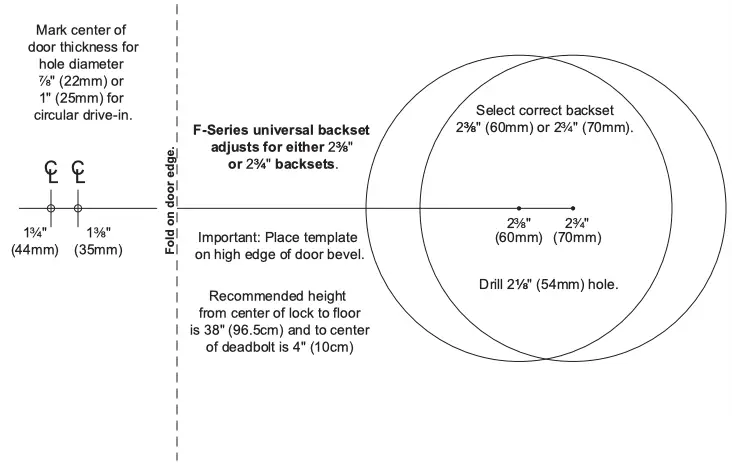
2. Choose faceplate to match door.
3. For UL functions only (CF, CS)
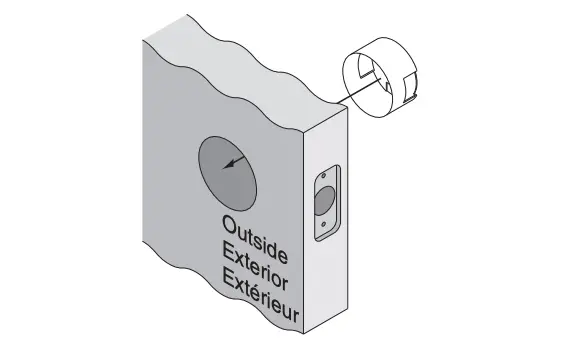
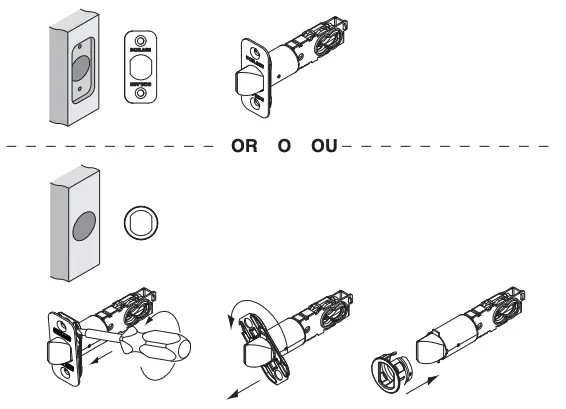
4. Install latch.
5. Install outside lever or knob
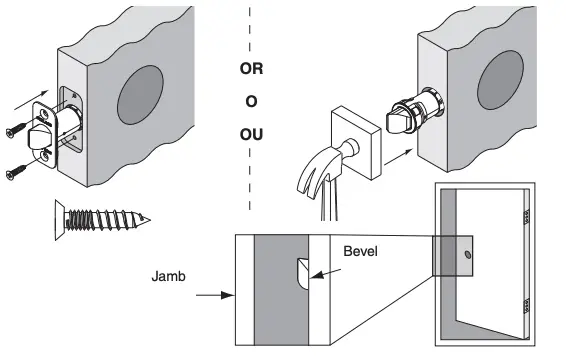
6. Install strike.
7. If necessary, switch levers.
Non-Keyed Functions
OR