![]()

Copyright Statement
© 2018 Hisense Company Ltd. All Rights Reserved.
All material in this User Manual is the property of Hisense Company Ltd. and its subsidiaries, and is protected under US and International copyright and/or other intellectual property laws. Reproduction or transmission of the materials, in whole or in part, in any manner, electronic, print, or otherwise, without the prior written consent of Hisense Company Ltd., is a violation of Hisense Company Ltd. rights under the aforementioned laws.
No part of this publication may be stored, reproduced, transmitted or distributed, in whole or in part, in any manner, electronic or otherwise, whether or not for a charge or other or no consideration, without the prior written permission of Hisense Company Ltd. Requests for permission to store, reproduce, transmit or distribute materials may be made in writing to the following address:
USA:
Hisense USA Corporation
7310 McGinnis Ferry Road
Suwanee, GA 30024
CANADA:
Hisense Canada Co., Ltd
2283 Argentia Road, Unit 16
Mississauga, ON, Canada
L5N 5Z2
MEXICO:
Hisense Mexico S. de R.L. de C.V.
Blvd. Miguel de Cervantes Saavedra No 301
Torre Norte Piso 2, Col. Ampliación Granada
Miguel Hidalgo, Ciudad de México, C.P. 11520
“Sharp™”, “Aquos™”, “Quattron™” and any and all other Sharp product names, logo’s, slogans or marks are registered trademarks owned exclusively by Sharp Corporation.
“Hisense™”, and any and all other Hisense product names, logo’s, slogans or marks are registered trademarks and intellectual property rights of Hisense Company Ltd. and its subsidiaries.
This product is sold to you under one or more license agreements between Sharp Corporation and Hisense International (Hong Kong) America Investment Co. Ltd. All other trademarks are the property of their respective holders.
Disclaimer Page
**Notwithstanding anything to the contrary, including in any or all descriptions, representations, statements or other communications related to this Sharp, Aquos or Quattron device (hereinafter “Device”) made in any form whatsoever and at any time, some or all of the pre-installed, or subsequently installed Application Services may not be available or capable of functioning as intended by the provider of the Application Services in any or all usage areas for reasons outside of the control of the licensors or manufacturer of this device, including but not limited to, Internet access, local service limitations, etc. Any purchase or use of the Device, including any Application Services, is purely at the user’s risk. Application Services are provided on an as-available basis without warranties of any kind, either expressed or implied, that the Application Service will be uninterrupted or error-free, including but not limited to vagaries of weather, disruption of Service, acts of God, warranties of title, local or regional limitations, no infringement, NOR IMPLIED WARRANTIES OF MERCHANTABILITY OR FITNESS FOR A PARTICULAR PURPOSE. No advice or information given by the licensors or manufacturers providers, affiliates, or contractors or their respective employees shall create such a warranty. All licensors and the manufacturer of this device, jointly and separately, specifically disclaim any and all responsibility for any or all Application Services from functioning at any time, and by purchasing the Device, you accept such disclaimer without any claim on the licensors and manufacturer. You are solely responsible for providing an active and working connection to the Internet, along with any and all hardware and/or software necessary to use the Device as intended.
Disclaimer:
Images throughout this document are for illustrative purposes only and may differ from the actual product.
Connecting Devices to your TV
You have several options for connecting your TV to different devices. The method in which you connect will be based upon the type of cables you have and the available outputs on your device.
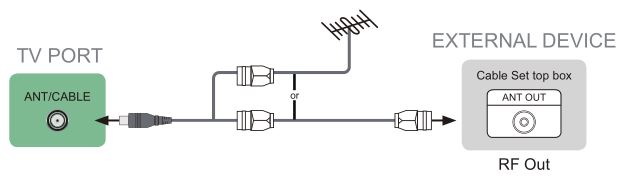
Connecting an antenna, cable set-top box or satellite receiver
To connect an antenna, cable set-top box or satellite receiver:
- Connect one end of a coaxial cable (not included) to the RF OUT port on the antenna, cable or satellite box. If you are using an antenna with twin-lead cable, you may need a 300-75 Ohm adapter (not provided) to connect it to the back of your TV. Likewise, if you are using several antennas, you may need a combiner (not provided).
- Connect the other end of the cable to the ANT/CABLE port on the side of TV.
- Using your remote, press the [INPUT] button and select ANT/CABLE as the input source.
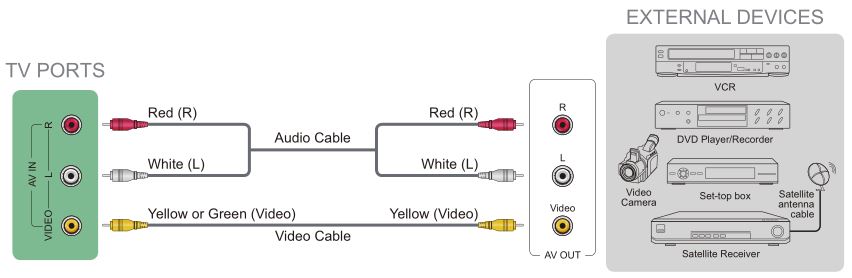
Connecting a satellite receiver, DVD player or other audio visual (AV) device with a composite video cable (yellow/red/white)
To connect an AV device with a composite video cable (not provided):
- Use the audio and video cables to connect the composite video/audio ports of the external AV device to the AV IN ports of the TV. (Video = yellow, Audio Left = white, and Audio Right = red)
- Plug the connected devices into the AV connectors on the TV before switching it on.
- Using your remote, press the [INPUT] button and select AV as the input source.
Connecting an AV device with a component video cable (red/blue/green)
To connect an AV device with a component cable (not provided):
- Use a component video cable to connect the component output ports of the external device to the YP B P R ports for the TV. (Y = green, P B = blue, and P R = red). Use an audio cable to connect the component audio ports of the external device to the TV AUDIO (L/R) ports.
- Plug the connected devices into the YP B P R and L/R ports on the TV before switching it on.
- Using your remote, press the [INPUT] button and select COMPONENT as the input source.

NOTE
- One AV device can be connected to the TV using a component video or composite video cable. (Only available for some models)
- YPBPR ports vary by model.
- Images throughout this document are for illustrative purposes only and may differ from the actual product.
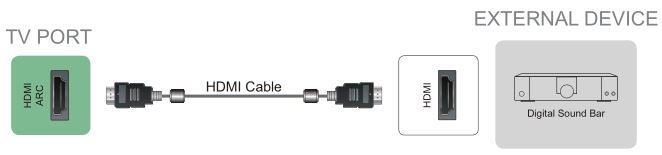
Connecting an AV device with an HDMI cable
This 4K TV has three high-powered HDMI version 2.0 inputs that enable you to connect 4K Ultra-HD external devices. For example, if you have an X-box or Blu-ray player that supports the 2.0 standard, more details will be transmitted to the TV screen to maximize your entertainment experience.
Please refer to the User Manual that came with your device for step-by-step instructions.
To connect an AV device with an HDMI cable (not provided):
- Use an HDMI cable to connect the HDMI output port of the AV device to the HDMI port of the TV.
- Plug the connected devices into the HDMI port on the TV before switching it on.
- Using your remote, press the [INPUT] button and select the corresponding HDMI input.
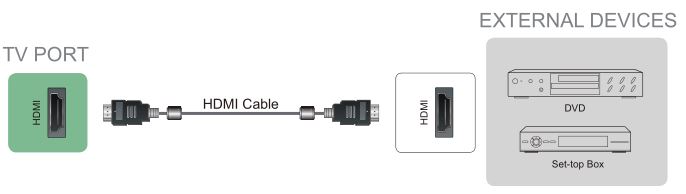
NOTES
- Because the HDMI connector provides video and audio signals, it is not necessary to connect an audio cable.
- We strongly recommend to use HDMI Cable with 2 cores as shown in the figure.
Connecting a headphone
You can connect headphone (not provided) to the AUDIO OUT port on your TV. While the headphone is connected, the sound from the built-in speakers will be disabled.

Connecting speakers or other audio receivers
To connect speakers or other audio receivers with an audio cable (not provided):
- Use an audio cable to connect the digital audio in port of the audio receiver device to the DIGITAL AUDIO OUT port of the TV. Another option is to use an RCA Y-cable (1/8”-stereo mini to L/R phono) to connect an analog sound system to the AUDIO OUT port of the TV.
- Plug the connected devices into the main power socket before switching on the TV.
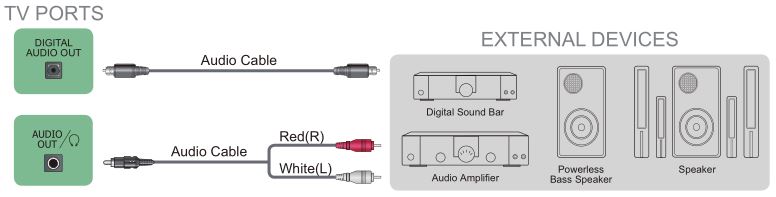
- TIP: If you prefer to use Audio Return Channel, then see Connecting a digital sound bar to use Audio Return Channel (ARC) on page 7.
NOTES
- When a digital audio system is connected to the DIGITAL AUDIO OUT port, decrease the TV and system volume.
- 5.1 CH (channel) audio is available when the TV is connected to an external device that supports a 5.1 channel surround sound.
- You can receive 5.1 channel audio in one of two ways. The first way is to connect the DIGITAL AUDIO OUT port from the device to the Amplifier. The second way is to connect the DIGITAL AUDIO OUT port on the back of the TV to the Optical port on the Amplifier. After you’ve completed one of the two methods then be sure to go into the Advanced Audio Settings of the TV and select RAW to receive the 5.1 channel audio. You will need to also go into the sound or audio settings of your device to ensure it is set to 5.1 Channel output. It may read ‘Bitstream’, ‘RAW’ or ‘Digital’.
Connecting a digital sound bar to use Audio Return Channel (ARC)
If you’d like to use the Audio Return Channel (ARC) feature to have sound sent from the TV back down an HDMI cable to a digital sound bar, then you will need to connect the cable to the HDMI / ARC port. By using this feature, you will also be able to control the sound bar with your TV remote instead of having to use multiple remotes for each device.
To connect a digital sound bar with an HDMI cable (not provided):
- Connect the cable that’s attached to the sound bar to the HDMI / ARC port on the TV.
- Turn on the sound bar by pressing the Power button.
- Press the [
 ] button on your remote and press the [ ˅ ] button of your remote to select Settings and then press OK to enter the Settings menu, go to System > HDMI-CEC.
 - Turn on the HDMI-CEC setting.
NOTES
- Only digital sound bars that require a wired connection are compatible with the TV.
- If the device has an Input Selector feature then make sure to change it to TV.
Connecting a USB device
You can connect the USB devices such as hard drives, USB sticks and digital cameras for browsing photos, listening music and watching recorded movies.
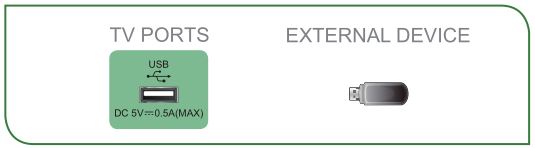
- Connect a USB device into the USB port.
- Select the Media type on the Media screen or Home screen. For more information, see Media on page 27.
NOTES
- When connecting a hard disk or a USB hub, always connect the mains adapter of the connected device to the power supply. Exceeding a total current consumption may result in damage. The USB1.1 and USB2.0 devices maximum current consumption are 500mA. The USB3.0 device maximum current consumption is 1A.
- For individual non-standard high-capacity mobile hard disk, if it’s impulse current is greater than or equal 1A, it may cause TV-rebooting or self-locking. So the TV does not support it.
- The USB port supports a voltage of 5V.
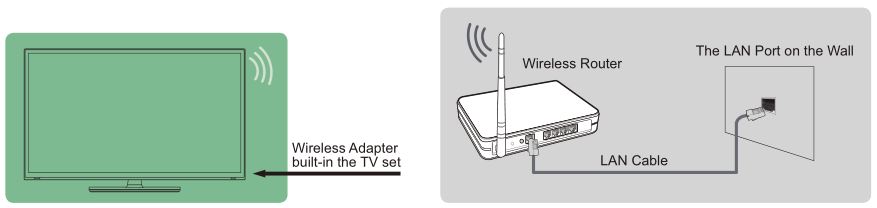
Connecting Your TV to a Wireless or Wired Network
You have the option to connect your TV to a wireless or wired network to access the Internet. For more information about the network settings on TV, see Network Menu on page 20.
Connecting to a wireless network
Our built-in wireless LAN adapter supports the IEEE 802.11 ac/b/g/n communication protocols and we recommend that you use an IEEE 802.11n or IEEE 802.11ac router. When you play a video over an IEEE 802.11 b/g connection, the video may not play smoothly.
NOTES
- You must use the built-in Wireless LAN Adapter to use a wireless network because the set does not support an external USB network adapter.
- To use a wireless network, your TV must be connected to a wireless IP sharer. If the wireless IP sharer supports Dynamic Host Configuration Protocol (DHCP), your TV can use a DHCP or static IP address to connect to the wireless network.
- Select a channel for the wireless IP sharer that is not currently being used. If the channel set for the wireless IP sharer is currently being used by another device nearby, this will result in interference and communication failure.
- If you apply a security system other than the systems listed below, it will not work with the TV.
- If Pure High-throughput (Greenfield) 802.11N mode is selected and the Encryption type is set to WEP, TKIP or TKIP-AES (WPS2 Mixed) for your Access Point (AP), then the TV will not support a connection in compliance with these Wi-Fi certification specifications.
- If your access point (AP) supports Wi-Fi Protected Setup (WPS), you can connect to the network via Push Button Configuration (PBC) or PIN (Personal Identification Number). WPS will automatically configure the SSID and WPA key in either mode.
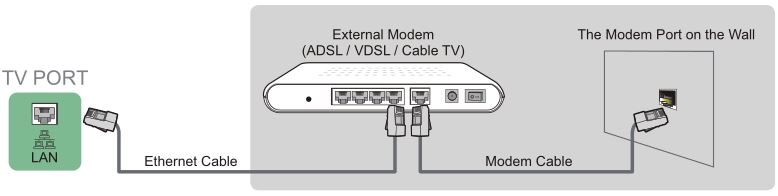
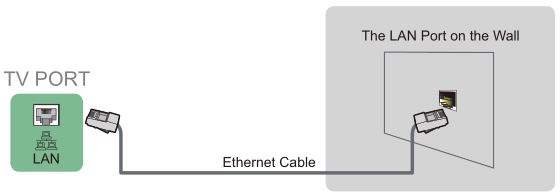
Connecting to a wired (Ethernet) network
You can attach your TV to your LAN in one of the three following ways:
Option 1
You can attach your TV to your LAN by connecting the LAN port on the back of your TV to an external modem using a Cat 5 LAN cable. See the illustration below.
Option 2
You can attach your TV to your LAN by connecting the LAN port on the back of your TV to an IP Sharer which is connected to an external modem. Use an Ethernet cable for the connection. See the illustration below.
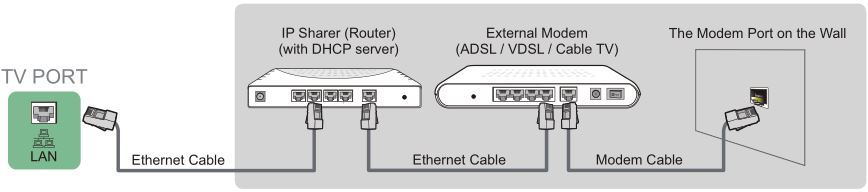
Option 3
Depending on how your network is configured, you may be able to attach your TV to your LAN by connecting the LAN port on the back of your TV directly to a network wall outlet with an Ethernet cable. See the diagram below.
If you have a Dynamic Network, you should use an ADSL modem or router that supports Dynamic Host Configuration Protocol (DHCP). Modems and routers that support DHCP automatically provide the IP address, subnet mask, gateway, and DNS, so you don’t have to enter them manually. Most home networks are Dynamic Networks.
Some networks require a Static IP address. If your network requires a Static IP address, you must enter the IP address, subnet mask, gateway, and DNS values manually on your TV’s Cable Setup Screen when you set up the network connection. To get the IP address, subnet mask, gateway and DNS values, contact your Internet Service Provider (ISP).
NOTE
- You can use ADSL modems that support DHCP if your network requires a static IP address. ADSL modems that support DHCP also let you use static IP addresses.
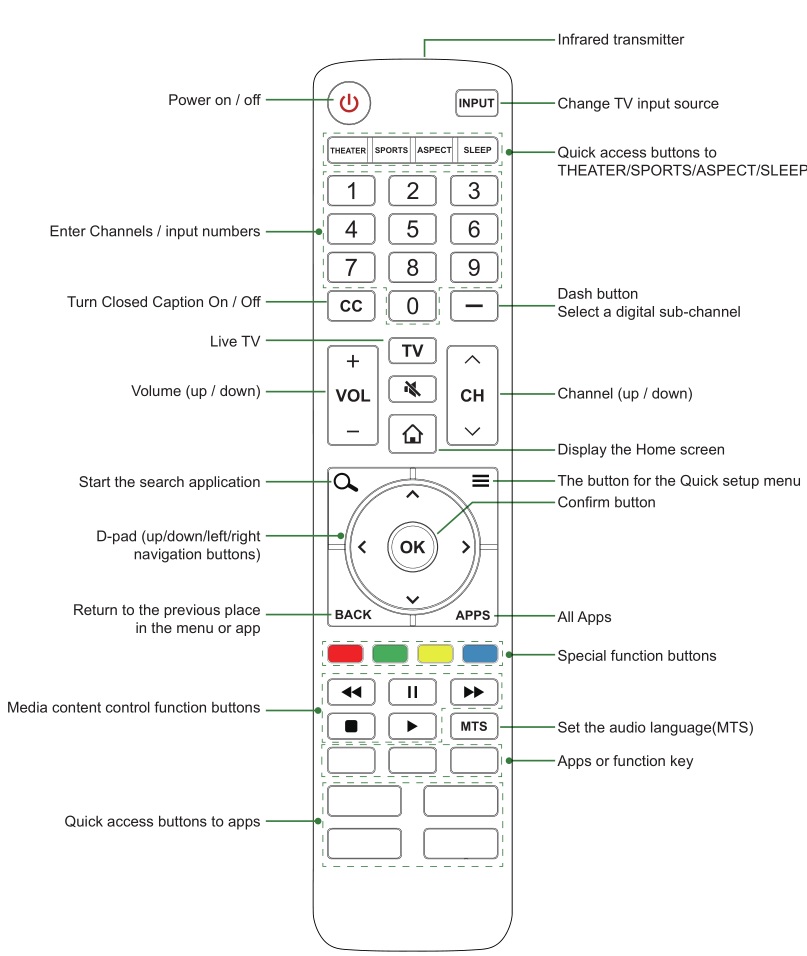
Using Your TV Remote Control
Buttons on your TV remote
NOTE
- Check information according to the actual remote control in the accessory bag.
Remote control range information
- The remote control can work at a distance of up to 26 feet in front of the TV set.
- It can work at a 30 degree horizontal or vertical angle.
Begin using your remote
- Slide the back cover to open the battery compartment of the remote control.
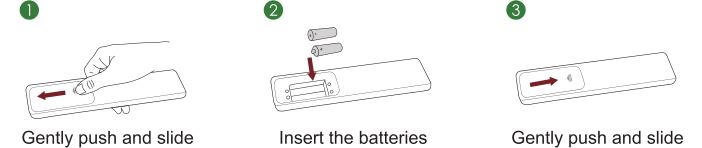
- Insert two AAA size batteries. Make sure to match the (+) and (-) ends of the batteries with the (+) and (-) ends indicated in the battery compartment.
- Replace the battery compartment cover.
NOTES
- Discard batteries in a designated disposal area. Do not throw them into a fire.
- Remove old batteries immediately to prevent them from leaking into the battery compartment.
- If you do not intend to use the remote control for a long time, remove the batteries.
- Battery chemicals can cause a rash. If the batteries leak, clean the battery compartment with a cloth. If chemicals touch your skin then wash it immediately.
- Do not mix old and new batteries.
- Do not mix alkaline, standard (carbon-zinc) or rechargeable (NiCd, NiMH, etc.) batteries.
- Do not continue using the remote if it gets warm or hot.
- Call our Support Center immediately on the support website.
Program your universal cable or satellite remote control to operate your new television (only for USA)
If you would like to program your other household remote controls to your new television, please refer to the User’s Manual supplied by your Cable or Satellite provider. The Cable or Satellite providers’ User’s Manuals should include instructions on how to program their remote to your television.
A list of codes for the most common Cable and Satellite providers are listed below. Use the code that is associated with your Cable or Satellite provider (if applicable).
DIRECTV
0178, 10178, 10019, 10748, 11314, 11660, 11710, 11780, 12049, 10171, 11204, 11326, 11517, 11564, 11641, 11963, 12002, 12183
Time Warner Cable
386, 0178, 10178, 400, 450, 461, 456, 0748, 1463, 0463, 10463
Comcast
0178, 10178, 10463, 11463, 10748, 11314, 11660, 10171, 11204, 11326, 11517, 11641, 11780, 11785, 11892, 11963, 12002
Cox Communications
0178, 10178, 1326, 1463
Dish Network
505, 627, 538, 720, 659
If the code associated with your Cable or Satellite provider is not listed, does not work or you cannot locate the instructions to program your remote, call your local Cable or Satellite provider’s customer service center.
If your Cable or Satellite provider does not have a code available, please contact us.
Using your cable set-top box or satellite receiver remote as a ‘universal’ remote
If you prefer to use your Cable Set-top Box or Satellite Receiver Remote as a ‘Universal Remote’, then visit the Support page to view a list of the codes.
Completing the First-Time Setup Menu
Press the [ ] button on the remote to turn on the TV.
After the splash screen that displays the logo appears, begin the first-time setup menu.
Shortcuts Instructions
You can use shortcuts on the remote control for fast operation.
Turning your TV on or off
- To turn your TV on:
- Connect the power cord to the back of the TV, then plug the power cord into an AC outlet.
- When the TV is powered on, press the [] button on the remote to turn on TV.
- To turn your TV off, press the [] button on the remote.
NOTES
- When your TV is in standby mode, it is still consuming power. To completely disconnect power, please remove the plug from the AC outlet.
- If your TV does not receive an input signal for several minutes, it automatically goes into standby mode.
Selecting the input source
Select the Input Source depending on the video device you have connected to your TV.
To select the input source:
- Turn on your TV, then press the [INPUT] button on the remote, the list of Source appears.
- Press the D-pad arrows of your remote to select the input source.
- Press the [OK] button to confirm your selection.
Using the Live TV
To view broadcast programs, press the [TV] button on your remote.
Channel search guide
When you select ANT/CABLE as input, if no TV channels were saved before, you will be prompted to do a channel search. You can also go to Settings menu > Channel to change the channel settings.
Launch Live TV
After channel tuning is done for the first time, the screen will display Live TV operating tips, including: how to load the
channel list, how to Load info Bar and so on.
[Menu] Load more functions
[OK] Load Channel List
[^] Load Info Bar
[BACK] Load previous channel
Viewing channel information
As you use the [CH ^/ CH v] button on your remote to scroll through channels, an information banner appears on the top of the screen.

The information banner displays the following information:
- Channel number
- Lock status
- Input
- Program name
- Show identification
- Channel name
- Current date and time
- Beginning and end time of the next program
- Start/Stop time progress bar of the current program
- Prompt
If you are watching a particular channel, you can also press the up arrow button of your remote to view channel information.
Viewing a channel list
After you have done an automatic channel scan (if you’re using an antenna) or are receiving your channels through a
cable provider, you can view your list of channels by pressing [OK] on your remote.
Creating a Favorite List
To quickly access your most-watched channels, you can create a Favorite List.
To create your Favorite List:
- Press the [] button on your remote.
- Press the [ v ] button to select Settings, and then press [OK] button to enter the Settings menu.
- Select Channel > Favorite List.
- Using the [^ / v] buttons of your remote, select a channel and press [OK] button.
A heart-shaped indicator will appear beside the channel as confirmation that it has been successfully added.
Viewing your Favorite list
To view channels that you’ve added to your Favorite List simply press [OK] on your remote to call out the channel list. The channel list appears on the right side of the screen and heart-shaped icons are shown next to the channels that make up your Favorite List. You can press [ < / > ] buttons to switch the channel list (Antenna or Cable) , Favorite and History list.
Using the Menu Function
To quickly access menu function, press the [] button on your remote.
Accessibility
You can set Menu Audio, Video Description and High Contrast Menu on or off. The function can be used to meet the needs of visually impaired people.
When the Menu Audio is set on, the contents of each menu displayed can be broadcast out.
When the Video Description is set on, you can hear the introduction of relevant programs.
When the High Contrast Menu is set on, the comparison of menu items is more vivid.
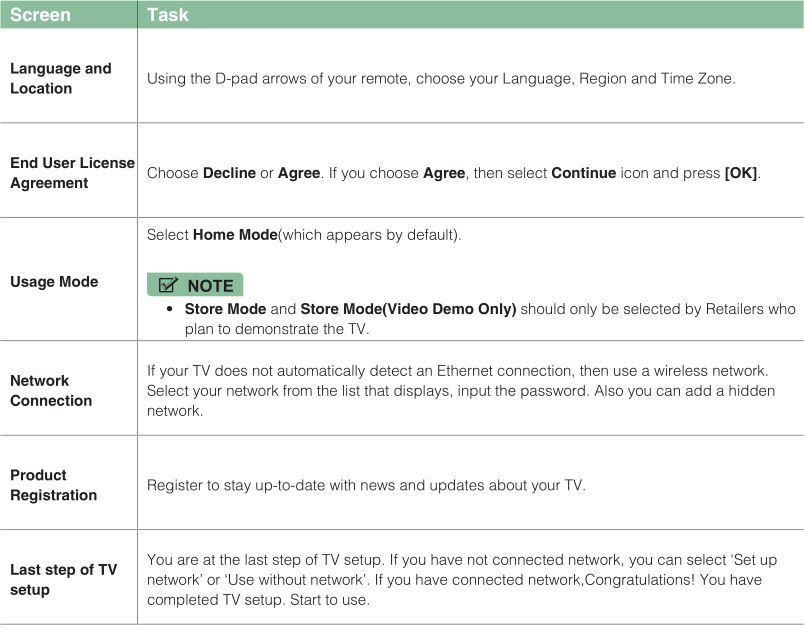
Picture Mode
If you’d like to configure the settings for your picture, then there are seven types of picture modes available: Vivid, Standard, Energy Saving, Theater, Game, Sports and Calibrated.
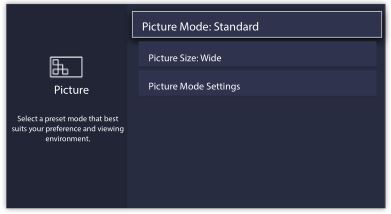
Sound Mode
Select a preset sound mode to suit the type of content you are listening to: Standard, Speech, Late Night, Music, Theater and Sports.
Picture Size
Adjust the Aspect Ratio to stretch or zoom in on your picture. You can choose from the following settings: Auto, Normal,
Zoom, Wide, Direct, Dot-By-Dot, Panoramic and Cinema.
Closed Captioning
You can switch between CC Off, CC On and CC On When Mute in ANT/CABLE mode.
Audio Language(MTS)/SAP
You can choose the Audio Language(MTS) in DTV mode and you can set SAP for Mono, Stereo or SAP in ATV mode.
Audio Only
When you select this option, the screen will not display the picture. You can only listen the audio. Press any button except the [] button, Volume [+/-] buttons and [ ] button to restore operation.
HDMI 2.0 Format
Match the connected device output format. You can select Standard format and Enhanced format in HDMI mode.
Settings
The Settings Menu consists of the following settings: Picture, Sound, Network, Channel, Accessibility, System and Support.
Basic Settings
Your TV comes with many TV setting features to allow you to customize the picture based on your viewing preference and environment. As you navigate throughout different screens to access settings, some of the indicators appear as words On and Off.
Using the Settings Menu
You can press the [] button to access the Menu, press the [ v ] button on the D-pad to select Settings, and then press [OK] button to enter the Settings Menu.
The Settings Menu consists of the following settings:
- Picture
- Sound
- Network
- Channel
- Accessibility
- System
- Support
In each menu, you can:
- Press the [ ^ / v ] buttons to select an item.
- Press the [OK] buttons to enter the sub-menu or to set on or off.
- Press the [ < / > ] buttons to adjust the value.
- Press the [BACK] button to return to the previous menu.
- Press the [EXIT] button to exit the menu.
Picture Menu
- Picture Mode: Select a preset mode that best suits your preference and viewing environment, there are some types of picture modes available: Vivid, Standard, Energy Saving, Theater, Game, Sports and Calibrated.
- Picture Size: Adjust the picture aspect ratio based on the content you are watching. You can choose from the following settings: Auto, Normal, Zoom, Wide, Direct, Dot-By-Dot, Panoramic or Cinema.
- Picture Mode Settings: Customize selected Picture Mode.
- Apply Picture Settings: Remember customized settings when using the Picture Mode on current source or all sources.
- Backlight: Adjust Local Dimming, Backlight Level, Automatic Light Sensor and Minimum Backlight to change the overall brightness of the screen.
NOTE
Some models don’t support the function of Local Dimming.
- Contrast: Increase or decrease contrast between light and dark colors.
- Brightness: Adjust the Brightness level to generate lighter or darker images.
- Color: Adjust the color intensity level.
- Tint: Adjust the colors from green to magenta tint to view the natural skin tones of people on the screen.
- Sharpness: Improve sharpness of the picture edges.
- Overscan: Turn on if you are receiving analog antenna or cable input.
- Color Temperature: Adjust the white color shade.
- Motion Enhancement: This setting minimizes afterimages that are left on the screen when viewing fast-moving objects. You can adjust it from Smooth, Standard, Clear, Film, Custom or Off. A Smooth setting will produce a smoother picture whereas a Clear setting will result in a picture that has less judder (shaking).
NOTE- Some models don’t support the function of Motion Enhancement.
- Digital Noise Reduction: Improve picture clarity by reducing video noise.
- HDMI Dynamic Range: Select Limit for 480p DVD players and select Full for Blu-ray.(HDMI mode only)
- Active Contrast: Automatically adjust contrast according to video content to improve detail.
- Expert Settings: Adjust the color space and Gamma to best suit the content you’re viewing.
- Reset picture settings: Reset all picture settings to factory default.
Sound Menu
- Sound Mode: Select a preset mode that best suits your audio environment: Standard, Speech, Late Night, Music, Theater and Sports.
Set the sound effects to suit your preference.
Configure your audio settings for your sound preferences. Once you choose the mode, you can adjust the audio based on the following settings:
- Speakers: Switches the sound from the TV speakers to Optical or HDMI ARC output connectors.
- Speakers: Switches the sound from the TV speakers to Optical or HDMI ARC output connectors.
- Digital Audio Out: Select the digital audio output format for your external audio device. For example, choose RAW (which is uncompressed audio in RAW form) if you have 5.1 Channel Surround Sound Speaker set up. Choose PCM if you have an amplifier that does not support Dolby Digital technology.
- Digital Audio Delay: Adjust the digital audio output delay time to sync sound from an external speaker with the
images on the TV. - Lip Sync: Synchronize the displayed image with the audio output.
- Balance: Emphasizes sound from the left or right speaker.
- Sound Mode Settings:
- Bass Boost: Bass Boost uses DTS TruBass TM to enhance the perception of bass frequencies to provide deep, rich bass response from the TV’s internal speakers.
- Surround Sound: Surround sound uses DTS TruSurround TM to deliver an immersive surround sound experience from the TV’s internal speakers.
- Dialog Clarity: Dialog Clarity uses DTS Dialog Clarity TM to boost the frequency range of the human voice so dialog is clearly understood and heard above audio or surround effects.
- Equalizer: Adjust low to high pitch sounds.
- Wall Mount setup: Improves sound for wall-mount position.
- Headphone
- Headphone Mode: Disable the TV speaker when you are using a sound bar, ARC or any other external audio amplifiers.
- Headphone Volume: Change the way audio is sent through the type of device that’s connected to your TV Audio Out port.
- Advanced Audio Settings: Tune the audio settings and quality of the TV.
- Auto Volume Control: Activate to prevent the volume from changing when you switch TV channels.
- Preferred Audio Language: Set the audio language based on your preference.(The preferred language must be supported by the broadcaster.)
- Reset Default Audio Settings: Reset all of the Audio settings in current audio mode to the factory default values.
Network Menu
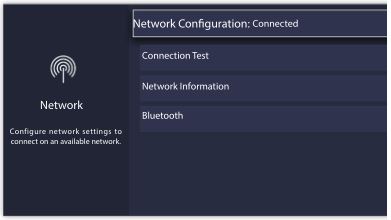
- Network Configuration: Configure network settings to connect to an available network.
When the Connection Type is Wired LAN, means you choose a wired network connection to access the Internet.- IP Settings: Most devices obtain an IP address automatically. Set an IP address manually if you do not have a router, or if your router does not assign IP addresses for you.
When the Connection Type is Wireless, means you choose a wireless network connection to access the Internet. - Refresh: Refresh wireless network.
- Add: You can add wireless network.
- Advanced Settings: Configure the advanced wireless network settings for the TV.
- IP Settings: Most devices obtain an IP address automatically. Set an IP address manually if you do not have a router, or if your router does not assign IP addresses for you.
- Connection Test: Tests the status of your network connection.
- Network Information: View information about your network connection.
- Bluetooth: Connects to external devices via Bluetooth.
NOTE
- Bluetooth function vary by model.
Channel Menu
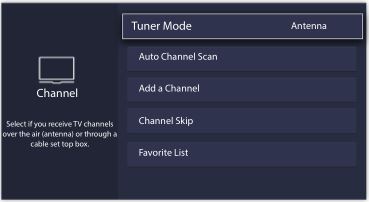
- Tuner Mode: Select if you receive TV channels over the air (antenna) or through a cable set top box.
- Auto Channel Scan: Automatically scan for channels.
- Add A Channel: Type in a channel to add it manually to your TV.
- Channel Skip: Skip selected channels from your Channel List.
- Favorite List: Add Channels to your Favorite List.
Accessibility
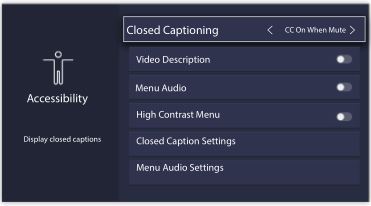
- Closed Captioning: Displays closed captions.
- Video Description: Enables broadcasted descriptive audio for visually impaired.
- Menu Audio: Reads the menu items for visually impaired.
- High Contrast Menu: Improves contrast for visually impaired.
- Closed Captioning Settings: Allows customization of closed caption text display.
- Analog Caption: Select an Analog Caption setting from Off,
CC1-CC4, Text 1-Text 4.
CC1-CC4: Closed captioning appears in a small banner across the bottom of the screen. CC1 is usually the “printed” version of the audio. CC2-CC4 display content provided by the broadcaster.
Text1-Text4: Closed captioning that covers half or all of the screen. Text1-Text4 display content provided by the broadcaster.
Off: To turn off the Analog Caption. - Digital Caption: Select a Digital Caption setting: Off, CS1-CS6.
- Digital CC Settings: There are two caption styles. One is the Automatic function set as the broadcaster, while the other is the Custom style where you can adjust the Size, Font, Text Color, Text Opacity, Background Color etc.
- Analog Caption: Select an Analog Caption setting from Off,
- Menu Audio Settings: Allow customization of spoken menu language. Before using the Menu Audio Settings, please turn on Menu Audio first.
- Volume: Set the volume level of the spoken menu language.
- Language: Selects the spoken menu language.
- Rate: Changes the rate of speech.
- Pitch: Changes the audio menu pitch.
- Focus Menu Audio: Lowers the background volume when menu audio is spoken.
System Menu
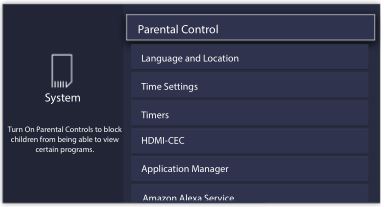
- Parental Control: Turn On Parental Controls to block children from being able to view certain programs. The password is required to be set when you use this function for the first time. For more information about Parental Controls, See Parental Controls on page 23.
- Location and Language: Select the language used for this TV and your location.
- Language: Select the language used for this TV.
- Keyboard Layout: Select a language to match your external keyboard.
- Location: Select your location.
- Time Settings: Configure time and date.
- Time Zone: Select your time zone.
- Time Format: Display the time in a 12 or 24-hour format.
- Daylight Savings: Turn on to apply Daylight Savings Time.
- Date and Time: Select your preferred method of setting the time.
- Timers: Configures Sleep Timer, Power On Timer, Power Off Timer and Menu Timeout.
- Sleep Timer: Set the sleep timer to automatically turn the TV Off within a specified time: Off, 10 Minutes, 20 Minutes, 30 Minutes, 40 Minutes, 50 Minutes, 60 Minutes, 90 Minutes and 120 Minutes.
- Power On Timer: Automatically turn the TV on at the set time.
- Power Off Timer: Automatically turn the TV off at the set time.
- Menu Timeout: Turn the menu off after the chosen amount of time : 10s, 20s , 30s , 60s or Off.
- HDMI-CEC: Control your TV and CEC-enabled devices with one remote.
- HDMI-CEC: Turn on to control your TV and CEC-enabled devices with one remote.
- Device Auto Power Off: Turns CEC-enabled devices off with the TV remote.
- Device Auto Power On: The device with CEC function that is connected to current input will be powered on when TV is powered on.
- TV Auto Power On: Turns the TV on with the remote of a CEC-enabled device connected with you TV.
- CEC Device Lists: Allow connected devices to the HDMI ports to communicate back and forth with the TV.
NOTES - HDMI cables must be used to connect HDMI CEC-compatible devices to your TV.
- The HDMI CEC feature of the connected device must be turned on.
- If you connect an HDMI device that is not HDMI CEC-compatible, all the HDMI-CEC Control features do not work.
- Depending on the connected HDMI device, the HDMI-CEC Control feature may not work.
- Application Manager: Play content from another device and remove this TV from your application accounts.
- Anyview Stream: Allow to view videos, images and music shared from another device in your network
- Wake on Wired LAN: An application on your second screen with Wake on Wired LAN will turn on your TV when you use the feature.
- Wake on Wireless Network: An application on your second screen with Wake on Wireless will turn on your TV
when you use the feature. - Netflix: Remove this TV from your Netflix account. Please contact Netflix if you want to stop being billed for your service.
- ESN: Display the Netflix Electronic Serial Number.
- VUDU: Sign out and remove this TV from your list of authorized Vudu devices.(Only for some countries)
- Amazon Alexa Service: Use your voice to control the TV, other smart home devices, and more.
- Amazon Alexa Service: Turn on and off Alexa service.
- Amazon Alexa Service Setup: Set up accounts to use Alexa service.
- Setup Checklist
- Things to try
- Advanced Settings: Access the Advanced Settings menu.
- TV Name: Choose a name for your TV. This is the name that appears on other device in your network.
- Power LED: Set the power indicator light to On or Off during standby.
- Audio Only: Turn off the display when playing the audio. Press any button except the [ ] button, Volume [+/-] buttons and [ ] button to turn the display back on.
- Input Names: Customize the name of your inputs.
- Live TV Input: Change Live TV Input. Change the response channel of the TV button on the remote control
- Screensaver: Enables Screensaver when the TV is idle.
- Notifications Pop-ups: Activate to receive important system notification and latest content recommendations. View all notification on Home > Notifications.(Only for some countries)
- Automatic Content Recognition: Provide useful information based on content that appears on your TV, i.e. popular TV shows.(Only for some countries)
- Send Diagnostics and Usage: Send diagnostics and usage data to help improve product and service quality (No personal information is collected).
- Usage Mode: Home Mode is optimized for in-home use. Store Mode is optimized for display in retail environments. Sore Mode effects E-Streamer and other demo functions.
- Setup Assistant: Start the Setup Assistant if you want to set up your TV again.
Support Menu

- System Info: View system information.
- Signal Info: Show signal information of current input.
- Network Connection: View your TV’s network connection information.
- Input Connections: View your TV’s Input connection information.
- About: View your TV’s software version and hardware code.
- Self Diagnosis: Perform self diagnosis to test sound, picture and connections.
- Picture Test: Perform this test to test your TV’s picture.
- Sound Test: Perform this test to test your TV’s sound.
- Network Test: Perform this test to test network connection.
- Input Connection Test: Show all related information with external connections.
- End User License Agreement: Click to read the our terms and policy.
- Check Software Update: Check if your TV needs software update.
- Open Source License: Click to read Open Source License details.
- Software Update via USB: Update TV software using a flash drive connected to USB.
- Reset Advertising ID: Reset your advertising ID? You may still receive the same number of ads but they may not be relevant to your interests.(Only for some countries)
- Factory Reset: Reset your TV back to the factory settings.
Parental Control
The Parental Controls setting allows you to block content that is not appropriate for children to watch. You can do this by creating a 4-digit password.
Turning Parental Control On
- Press the [] button on your remote.
- Press the [ v ] button on the D-pad to select Settings, press [OK] button to enter the Settings menu.
- Select System > Parental Control.
- Press the [OK] button on your remote, a Create PIN window displays. Using the numerical keypad on the window, create the password.
- Press the [OK] button to turn the Parental Control On.
You will see the other Parental Control settings change from a greyed out state and become highlighted. When this occurs, begin adding other settings to the Scheduled Blocking, Channel Blocking, Programme Blocking, Input Blocking, App Blocking, Change PIN or Reset Parental Control Defaults features.
- Scheduled Blocking: Block all channels and programs during selected periods of time.
- Channel Blocking: Block selected channels.
- Programme Blocking: Blocks programs by ratings.
- Input Blocking: Block selected inputs.
- App Blocking: If an app that you want to restrict doesn’t appear here then check the Parental Control settings in the
app. - Change PIN: Change the PIN that you use to access Parental Controls. If you want to change your parental control
password, first enter the new password then enter the same password again.
NOTE- If you forget your password, call the Consumer Electronics Care Center.
- Reset Parental Control Defaults: Reset Parental Controls back to the factory setting.
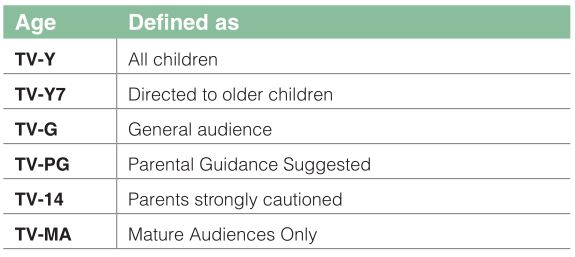
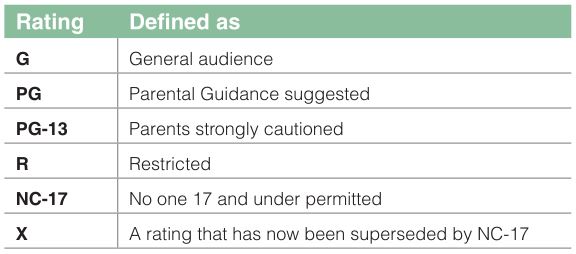
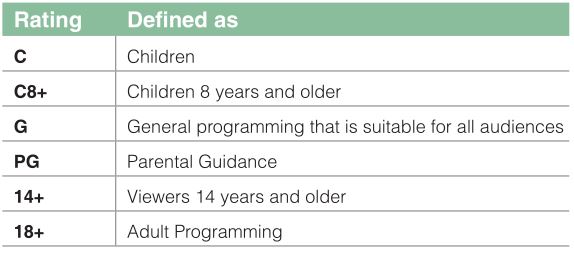
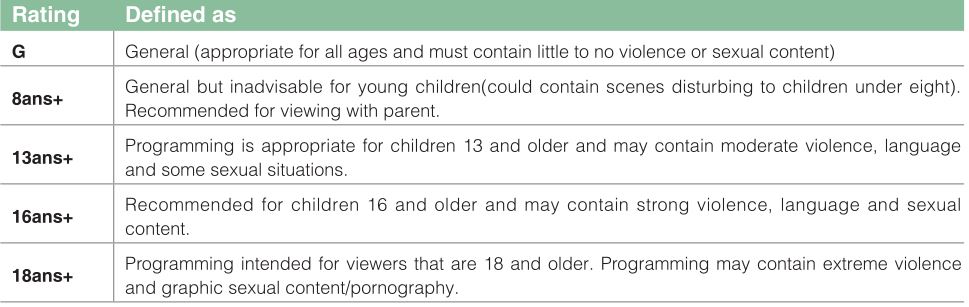
Description of US TV Ratings

Description of Age-based Ratings
US Movie Ratings
Canadian English Ratings
Canadian French Ratings
NOTE
- All ratings that are higher than those you select are also blocked. For example, if you choose to block the PG-13 rating, then the higher ratings (R and NC-17) are automatically blocked too.
Open V-Chip
Turn this On to automatically block programs based on the US rating.
Block Unrated
Block or unblock unrated movies.
Advanced TV Settings
Getting familiar with the Home screen
The simple design of the Home screen menu makes it easy to navigate. It serves as the central location to access
Notifications, Apps, LiveTV, Inputs, Media and Settings.
To access the Home screen, press the [ ] button on your remote control and use the arrows on the D-pad to make
your selection.
Indicators and Icons on the top of the Home screen
You can always view the current time in the top left corner of the Home screen.
If your TV is connected to the Internet through a wireless connection, then an icon ![]() will display in the top right corner of the screen. This location makes it very convenient for you to determine if you still have Internet connectivity as you use the TV.
will display in the top right corner of the screen. This location makes it very convenient for you to determine if you still have Internet connectivity as you use the TV.
Names of sections that appear on the Home screen
The Home screen displays the following section names:
- Notifications
- Apps
- LiveTV
- Inputs
- Media
- Settings
Notifications
If your TV is connected to an external device, the screen will be prompted.
Apps
Numerous factory-installed apps are available for you to choose from for your entertainment preferences.
Installing an App
- To install an app from the AppsNOW / VEWD:
- From the Home screen, click on the Apps to select the AppsNOW / VEWD icon.
- Use the navigation buttons on your remote to select the app that you want to install.
- Press the [OK] button on your remote.
- To install an app from the SearchNOW / VEWD:
Even though your TV has numerous factory-installed apps, there may be others that you’d like to download.- From the Home screen, click on the Apps to select the AppsNOW / VEWD icon.
Begin typing the name of the app. As you begin typing the first two to three letters the SearchNOW / VEWD icon suggests words to quicken your search time. - Use the navigation buttons of your remote to select the app. A page displays that shows a written description of the app.
- Click on Install.
- From the Home screen, click on the Apps to select the AppsNOW / VEWD icon.
Removing an App
You can only delete apps that you’ve installed to the TV. Factory-installed apps can not be deleted.
To delete an app:
- Use the navigation buttons on your remote to select the app that you want to remove.
- Press the ‘red’ button of Special function buttons on your remote. A dialog message displays that asks do you want to remove this app.
- Click on Uninstall. The icon is removed from the Apps list screen.
NOTE
- If an app is deleted, the information related to that app is also removed.
Moving App Icons around
Apps can not be moved around on the screen.
Customizing the name of your TV
If you have several TV’s in your home then you may want to customize the name of your TV. By giving your TV a name, it will make it easier for you to identify it when connecting devices to the TV to stream or mirror content.
To customize the name of your TV:
- Press the [] button on your remote.
- Press the [ v ] button on the D-pad to select Settings, press [OK] button to enter the Settings menu.
- Go to System > Advanced Settings > TV Name.
- Select User Input to bring up the keyboard and begin typing the name.
- When you are finished, power off the TV and power it back on for the change to take effect.
Media
Media is a central location for you to view or listen to different types of content (for example, your photos, music and movies) through the following methods:
- A USB thumb drive or hard drive
- Compatible mobile phone, tablet or other personal device: You can stream movies, music and photos that are stored on Compatible personal device and play or view the content on your TV.
File formats that may be supported
NOTE
- Due to differences in programming tools and other factors, some of the file formats that are listed may or may not be supported.

Browsing Content
To browse through content based on the type that you wish to access:
- You can find the file by Search. Navigate to the appropriate menu tab on the screen and select All, Photo, Music and Video, also you can find the file you want through the file type: Name, Date Modified, Size.
- Click on the name of the folder that contains your content.
- Make your selection to play or view the content.
If you want to close out of the Media center, then press the [EXIT] or [BACK] button on your remote.
Viewing Pictures as a Slideshow
To view pictures in a slideshow:
- Press the [] button on your remote.
- Click on Repeat Mode, and select Repeat All.
- Back to the menu by Pressing the [] button on your remote, click on Interval, and select the time.
- Press the ‘Play‘ button on the TV, the slideshow of your pictures begins.
To stop the slideshow, press the [OK] button on your remote and press it again to restart it.
Viewing Video
To stop or restart the video, you can press the [OK] button on your remote. You can use the navigation buttons of your remote to control the video.
Using Anyview Cast to mirror content from your device to the TV screen
The Anyview Cast is an app that enables you to share (or cast) a video, audio or image from your Android-based device to the TV.
From your tablet or phone
To mirror content from your tablet or phone to the TV:
- Press the [ INPUT ] button on your remote and select the AnyviewCast.
- Turn on the wireless display function on your Android-based device.
NOTE- Some Android-based devices may not support casting.
- Find your TV in the list of devices that displays and select it.
- Wait for the Creating Connection progress bar to complete on the TV screen and the video or image will display in a moment.
Software updates for your TV
The software (also referred to as firmware) is part of what powers your TV. We will provide software updates to continuously enhance your TV and correct any issues that may impact your user experience; therefore, we recommend that you keep your TV connected to the Internet to receive updates when they are available.
You can choose to receive updates manually or check for software updates and install them manually.
Checking for the latest firmware
To manually check for the latest firmware:
- Using your remote, press the [] button.
- Press the [ v ] button on the D-pad to select Settings, press [OK] button to enter the Settings menu.
- Go to Support > Check Software Upgrade.
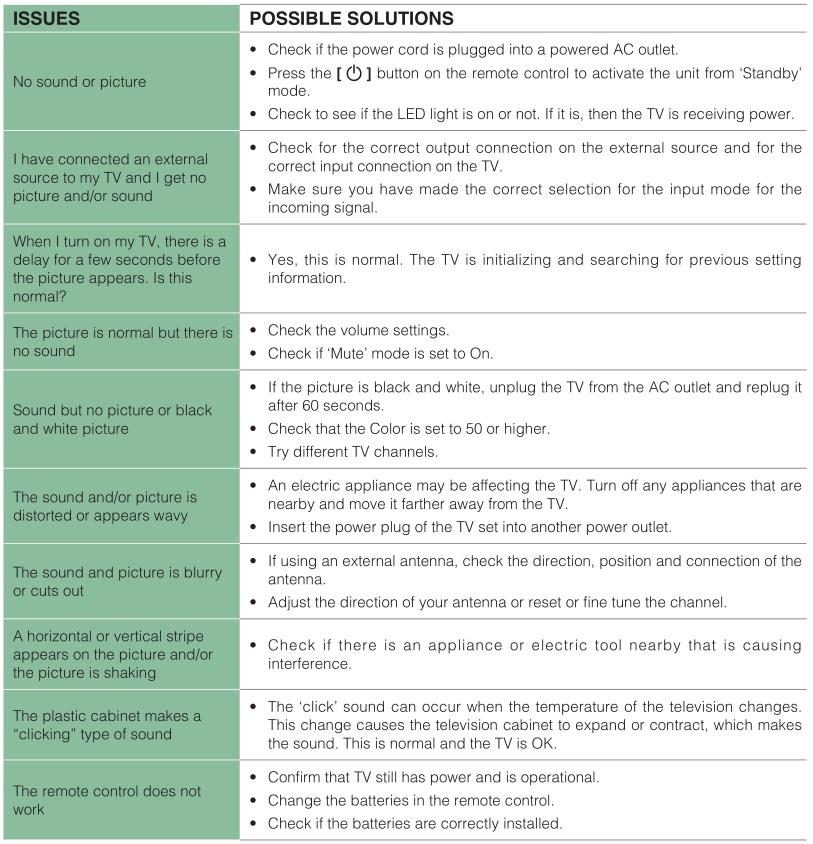
Quick Problem-Solving Tips
When you experience an issue with your TV, turn it off and on again. If this does not resolve the problem, then refer to the tips below. If the problem is still not resolved, then contact us.
NOTE
- For usage in Mexico , operation of this equipment is subject to the following two conditions : 1 ) it is possible that this device doesn’t cause any detrimental interference and 2 ) this device must take any kind of interference, including that which may cause its malfunctioning.
Sharp Roku TV LC-32LB601U / LC-40LB601U Installation Guide
 https://www.sharptvusa.com/support
QUICK SETUP GUIDE
START HERE
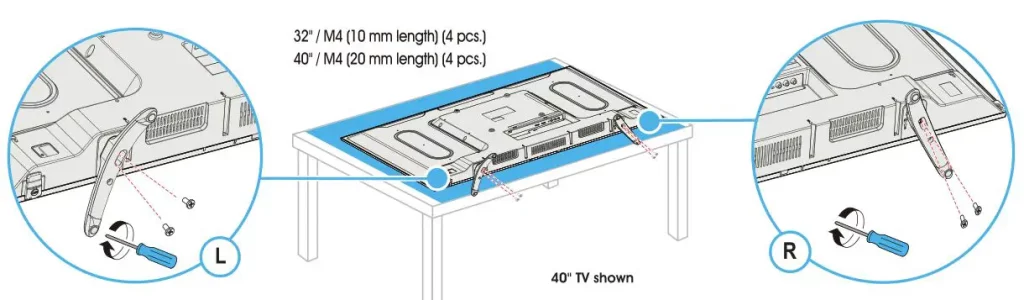
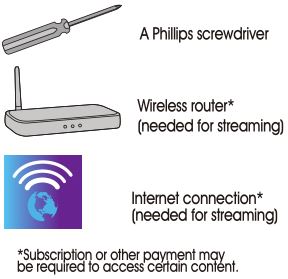
How do I attach the stands to my TV? (not for wall mounting)
You’ll need: Phillips screwdriver and a soft surface to lay your TV on. Carefully place your TV face-down on a cushioned, clean surface.
Align the TV stands with the screw holes on the bottom of the TV. Make sure that the arrows on the stands are pointing towards the front of the TV. Secure the stands to the TV with the four provided screws.
OR
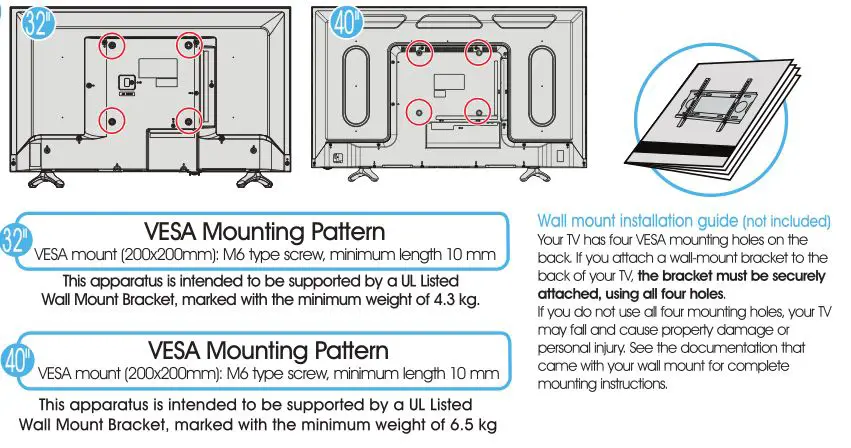
How do I prepare my TV for wall mounting? (not for use with the TV stands)
You’ll need: Phillips screwdriver and a soft surface to lay your TV on.
- Carefully place your TV face-down on a cushioned, clean surface.
- See the instructions that came with your wall mount for more information about how to correctly mount your TV.
![]()
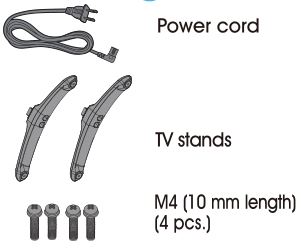
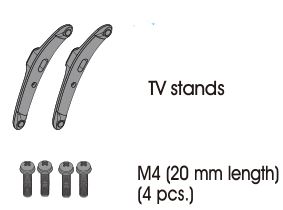
Included accessories
WHAT YOU NEED (not included)
Features
Front view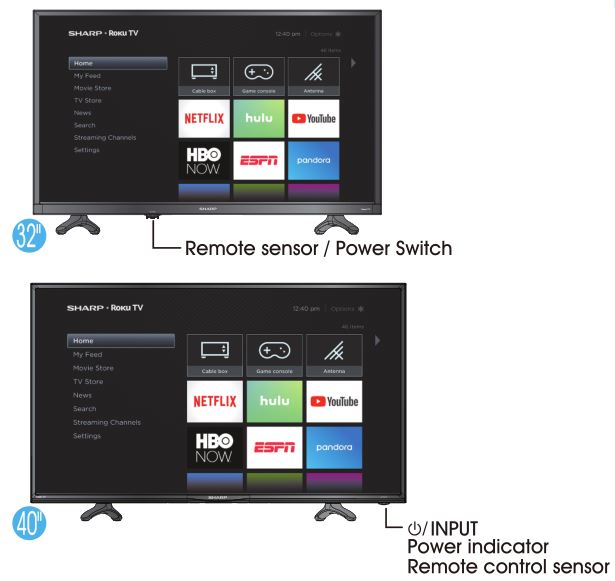
Back view
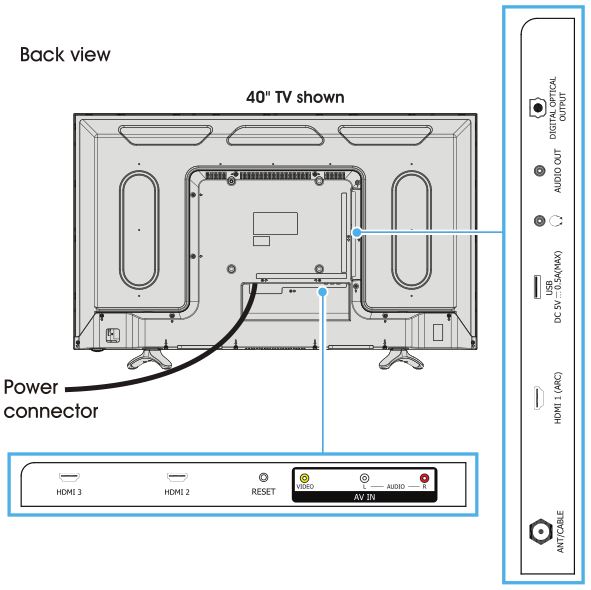
Note: Images do not necessarily represent the exact design of your television.
Before using your new product, please read these instructions to prevent any damage.
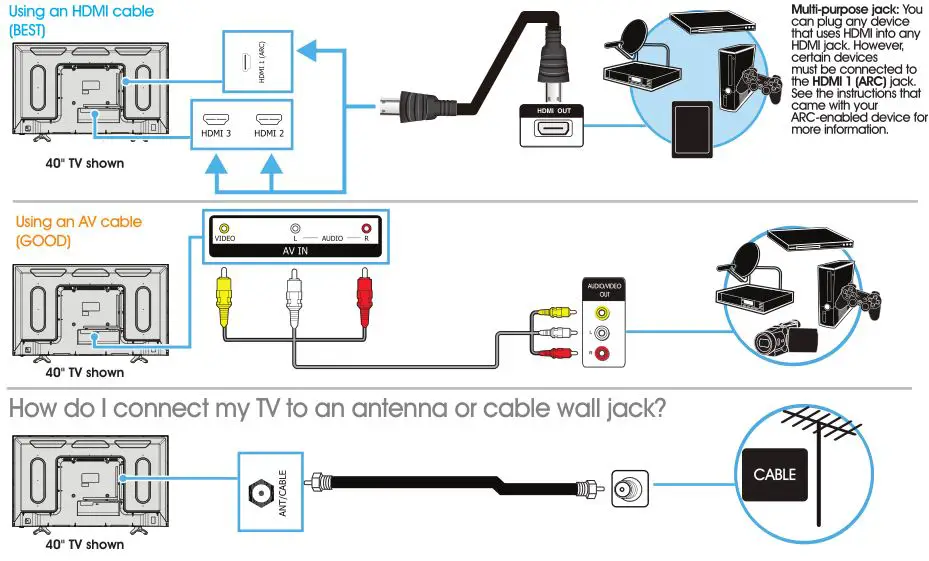
MAKING CONNECTIONS
How do I watch TV or connect a device such as a DVD or Blu-ray disc player, game console, or tablet?
CONNECTING AUDIO DEVICES
How do I connect my TV to external speakers?
TURNING ON MY TV
When can I turn on my TV?
The best time to turn on your TV is after you have connected all devices and either attached the TV stands or wall-mounted your TV.
When your television is in place:
- Plug one end of the power cord into the AC IN connector on the back of your TV (32″) and the other end into a power outlet.
- Remove the remote control cover and install the batteries.
- Press (power) on your remote control.
- Follow the on-screen instructions.
COMPLETE GUIDED SETUP (OPTIONAL)
Establish your network connection.
- Your TV automatically detects your wireless network, so have your network name and password handy and follow the easy on-screen instructions.
- You’ll be prompted to create your Roku account online at https://my.roku.com/link. Your TV will generate a unique code that links your TV to your new account.
Note: Roku accounts are free, and while a valid credit card number is not required, providing your card information makes renting and purchasing entertainment a breeze. You won’t be charged unless you agree to the terms and cost of the content. - Once connected to your account, your TV will automatically update with the latest software, and you can start streaming immediately.
- If you aren’t ready to connect your TV to a wireless network, you can still use it as a regular TV.
- NOTE: Roku does not charge for activation support – beware of scams.
OPTIONAL
Watching local broadcast TV. How do I scan for channels?
If you connected a cable or satellite box, skip this step. If you connected your TV to an antenna or cable wall jack (no box):
- When the setup wizard is complete, select the ANTENNA TV tile from the Home screen.
- Follow the on-screen instructions.
- Whenever you want to watch TV, select this tile.

Make any night a movie night
Access more than 500,000 movies and TV episodes across major streaming services like Netflix, Hulu, Amazon Video, VUDU, and more. Choose from free, rental, and subscription services.
Stream sports on the big screen.
Choose from over 140 sports channels like Watch ESPN, FOX Sports Go, NBA, NFL, MLB, WWE, CBS Sports, and more.*
Explore your passions
In addition to popular streaming channels like HBO NOW, SHOWTIME, PBS KIDS, and FOX NOW, your Sharp • Roku TV also offers hundreds of streaming channels to fuel your passions – including fitness, cooking, religion, outdoors, international programming, and much more.
Enjoy tons of free channels and free trials
Your Sharp • Roku TV has hundreds of popular free channels like Crackle, CBS News, PBS, VEVO, and more. Plus, free trials** to popular subscription services like HBO NOW, SHOWTIME, Netflix, Amazon Video, and Hulu.
*Subscription or other payment may be required to access certain channels. Content may not be available in all areas in which the Sharp • Roku TV is sold and channel availability is subject to change.
**Cancel before your free trial ends to avoid subscription fees. A credit card may be required.
ROKU, ROKU TV, and the ROKU logo are trademarks and the property of Roku, Inc. Other channel logos, brand, and product names are trademarks or registered trademarks of their respective holders.
USING YOUR REMOTE CONTROL

Using your cable set-top box or satellite receiver remote as a universal remote.
If you prefer to use your cable set-top box or satellite receiver remote as a universal remote, refer to the manual that your cable or satellite service provided. It will include instructions on how to program their remote to your television. You can find codes that work with your Sharp • Roku TV and the most common cable and satellite providers’ universal remote controls at www.roku.com/universalremote.
TROUBLESHOOTING
Having trouble completing the guided setup?
Don’t worry, it’s usually an easy fix.
If you cannot see a picture on your TV
- Make sure that your TV and the device you want to watch (cable box, Blu-ray player, game console, etc.) are turned on and plugged into a working wall outlet.
- Make sure that your power cable is connected.
If you cannot connect to your wireless home network during guided setup
- Make sure that the correct wireless network name is selected.
- Make sure that the wireless network password is correctly entered (password is case sensitive).
- Improve wireless signal by rotating the router slightly (even a few inches can help).
If you cannot hear sound
- Make sure that the TV volume is turned up and not on mute.
- Try only the TV speakers by disconnecting any connection to audio devices (like headphones or audio video receivers).
If the TV remote control isn’t working
- Remove any obstruction and point the remote at the TV’s remote control sensor (Features).
- Try a fresh set of batteries.
- If the status light on the front of your TV flashes once each time you press a remote button, the problem is not with the remote.
- Unplug the TV and plug it back in.
One-year limited warranty
Visit https://www.sharptvusa.com/support
Need additional help?
See your online User Guide! This comprehensive guide includes everything from basic how-to steps to more advanced features. Go to: https://www.sharptvusa.com/support
Find your model. Under Owners Manual, find the language you want, then click Download. Your online User Guide opens.
We’re here for you.
https://www.sharptvusa.com/support
For customer service, call: 1-855-544-2030
All rights reserved. SHARP is a trademark of Sharp Corporation;
used under license by Hisense International (Hong Kong)
America investment Co., Limited.
©2018 Best Buy China LTD.
All rights reserve
Sharp Microwave Oven [R-651ZS] User Manual
READ ALL INSTRUCTIONS CAREFULLY BEFORE USING THE OVEN.
FOR CUSTOMER ASSISTANCE
IMPORTANT! Register within 10 days of purchase.
Register ONLINE at www.sharpusa.com/productregistration
To aid in reporting this microwave oven in case of loss or theft, please record below the model number and serial number located on the unit. We also suggest you record all the information listed and retain for future reference.

TO PHONE:
- DIAL 1-800-BE-SHARP ( 237-4277 ) for :
SERVICE (for your nearest Sharp Authorized Servicer)
PARTS (for your authorized parts distributor)
ADDITIONAL CUSTOMER INFORMATION - DIAL 1-800-642-2122 for :
ACCESSORIES and COOKBOOK
TO WRITE:
Shar p Electronics Corporation
Attn: Customer Assistance Center
Sharp Plaza Blvd
Memphis, Tennessee 38193
TO ACCESS INTERNET: www.sharpusa.com
Please provide the following information when you write or call: model number, serial number, date of purchase, your complete mailing address (including zip code), your daytime telephone number (including area code) and description of the problem.
PRECAUTIONS TO AVOID POSSIBLE EXPOSURE TO EXCESSIVE MICROWAVE ENERGY
- Do not attempt to operate this oven with the door open since open-door operation can result in harmful exposure to microwave energy. It is important not to defeat or tamper with the safety interlocks.
- Do not place any object between the oven front face and the door or allow soil or cleaner residue to accumulate on sealing surfaces.
- Do not operate the oven if it is damaged. It is particularly important that the oven door
close properly and that there is no damage to the: (1) door (bent), (2) hinges and latches (broken or loosened), (3) door seals and sealing surfaces. - The oven should not be adjusted or repaired by anyone except properly qualified service personnel.
CONSUMER LIMITED WARRANTY
SHARP ELECTRONICS CORPORATION warrants to the first consumer purchaser that this Sharp brand product (the “Product”), when shipped in its original container, will be free from defective workmanship and materials, and agrees that it will, at its option, either repair the defect or replace the defective Product or part thereof with a new or remanufactured equivalent at no charge to the purchaser for parts or labor for the period(s) set forth below.
This warranty does not apply to any appearance items of the Product nor to the additional excluded item(s) set forth below nor to any Product the exterior of which has been damaged or defaced, which has been subjected to improper voltage or other misuse, abnormal service or handling, or which has been altered or modified in design or construction.
In order to enforce the rights under this limited warranty, the purchaser should follow the steps set forth below and provide proof of purchase to the servicer.
The limited warranty described herein is in addition to whatever implied warranties may be granted to purchasers by law. ALL IMPLIED WARRANTIES INCLUDING THE WARRANTIES OF MERCHANTABILITY AND FITNESS FOR USE ARE LIMITED TO THE PERIOD(S) FROM THE DATE OF PURCHASE SET FORTH BELOW. Some states do not allow limitations on how long an implied warranty lasts, so the above limitation may not apply to you.
Neither the sales personnel of the seller nor any other person is authorized to make any warranties other than those described herein, or to extend the duration of any warranties beyond the time period described herein on behalf of Sharp.
The warranties described herein shall be the sole and exclusive warranties granted by Sharp and shall be the sole and exclusive remedy available to the purchaser. Correction of defects, in the manner and for the period of time described herein, shall constitute complete fulfillment of all liabilities and responsibilities of Sharp to the purchaser with respect to the Product, and shall constitute full satisfaction of all claims, whether based on contract, negligence, strict liability or otherwise. In no event shall Sharp be liable, or in any way responsible, for any damages or defects in the Product which were caused by repairs or attempted repairs performed by anyone other than an authorized servicer. Nor shall Sharp be liable or in any way responsible for any incidental or consequential economic or property damage. Some states do not allow the exclusion of incidental or consequential damages, so the above exclusion may not apply to you.
THIS LIMITED WARRANTY IS VALID ONLY IN THE FIFTY (50) UNITED STATES, THE DISTRICT OF COLUMBIA AND PUERTO RICO.
Your Product Model Number & Description: R-651ZS Home Use Carousel Microwave Oven. (Be sure to have this information available when you need service for your Product.)
Warranty Period for this Product: One (1) year parts and labor. The warranty period continues for an additional four (4) years, for a total of five (5) years, with respect to the magnetron tube in the Product for parts only; labor and service are not provided free of charge for this additional period.
Additional Item(s) Excluded from Warranty Coverage (if any): Non-functional accessories, turntable and light bulb.
Where to Obtain Service: From a Sharp Authorized Servicer located in the United States.
To find the location of the nearest Sharp Authorized Servicer, call Sharp toll free at 1-800-BE-SHARP (1-800-237-4277).
What to do to Obtain Service: Ship prepaid or carry in your Product to a Sharp Authorized Servicer. Be sure to have Proof of Purchase available. If you ship the Product, be sure it is insured and packaged securely.
TO OBTAIN SUPPLY, ACCESSORY OR PRODUCT INFORMATION, CALL 1-800-BE-SHARP OR VISIT www.sharpusa.com. SAVE THE PROOF OF PURCHASE AS IT IS NEEDED SHOULD YOUR OVEN EVER REQUIRE WARRANTY SERVICE.
IMPORTANT SAFETY INSTRUCTIONS
When using electrical appliances, basic safety precautions should be followed, including the following:
WARNING-To reduce the risk of burns, electric shock, fire, injury to persons or exposure to excessive microwave energy:
- Read all instructions before using the appliance.
- Read and follow the specific “PRECAUTIONS TO AVOID POSSIBLE EXPOSURE TO EXCESSIVE MICROWAVE ENERGY” found on page 2.
- This appliance must be grounded. Connect only to properly grounded outlet. See “GROUNDING INSTRUCTIONS” found on page 5.
- Install or locate this appliance only in accordance with the provided installation instructions.
- Some products such as whole eggs and sealed containers – for example, closed glass jars are able to explode and should not be heated in this oven.
- Use this appliance only for its intended use as described in this manual. Do not use corrosive chemicals or vapors in this appliance. This type of oven is specifically designed to heat, cook, or dry food. It is not designed for industrial or laboratory use.
- As with any appliance, close supervision is necessary when used by children.
- Do not operate this appliance if it has a damaged cord or plug, if it is not working properly, or if it has been damaged or dropped.
- This appliance should be serviced only by qualified service personnel.
Contact nearest authorized service facility for examination, repair or adjustment. - Do not cover or block any openings on the appliance.
- Do not store this appliance outdoors. Do not use this product near water — for example, near a kitchen sink, in a wet basement, near a swimming pool, or similar locations.
- Do not immerse cord or plug in water.
- Keep cord away from heated surfaces.
- Do not let cord hang over edge of table or counter.
- Either.
a) When cleaning surfaces of door and oven that comes together on closing the door, use only mild, non-abrasive soaps or detergents applied with a sponge or soft cloth., or
b) See door surface cleaning instructions on page 21. - To reduce the risk of fire in the oven cavity:
a) Do not overcook food. Carefully attend appliance when paper, plastic, or other combustible materials are placed inside the oven to facilitate cooking. b) Remove wire twist-ties from paper or plastic bags before placing bag in oven.
c) If materials inside the oven ignite, keep oven door closed, turn oven off, and disconnect the power cord, or shut off power at the fuse or circuit breaker panel.
d) Do not use the cavity for storage purposes. Do not leave paper products, cooking utensils, or food in the cavity when not in use. - Liquids, such as water, coffee, or tea are able to be overheated beyond the boiling point without appearing to be boiling due to surface tension of the liquid. Visible bubbling or boiling when the container is removed from the microwave oven is not always present. THIS COULD RESULT IN VERY HOT LIQUIDS SUDDENLY BOILING OVER WHEN A SPOON OR OTHER UTENSIL IS INSERTED INTO THE LIQUID.
To reduce the risk of injury to persons:
a) Do not overheat the liquid.
b) Stir the liquid both before and halfway through heating it.
c) Do not use straight-sided containers with narrow necks.
d) After heating, allow the container to stand in the microwave oven for a short time before removing the container.
e) Use extreme care when inserting a spoon or other utensil into the container. - Do not use this microwave oven to heat corrosive chemicals (for example, sulfides and chlorides). Vapors from such corrosive chemicals may interact with the contact and springs of the safety interlock switches thereby rendering them inoperable.
- Keep the waveguide cover clean at all times. Wipe the oven interior with a soft damp cloth after each use. If you leave grease or fat anywhere in the cavity it may overheat, smoke or even catch fire when next using the oven.
- Never heat oil or fat for deep frying as you cannot control the temperature and doing so may lead to overheating and fire.
- Do not operate the oven without the glass tray in place. Be sure it is properly sitting on the rotating base.
- Under-cabinet and wall-mounted appliances:
1) Do not mount over a sink.
2) Do not store anything directly on top of the appliance surface when the appliance is in
operation.
SAVE THESE INSTRUCTIONS
FEDERAL COMMUNICATIONS COMMISSION RADIO FREQUENCY INTERFERENCE STATEMENT
WARNING:
This equipment generates and uses ISM frequency energy and if not installed and used properly, that is in strict accordance with the manufacturer’s instructions, may cause interference to radio and television reception.
It has been type-tested and found to comply with limits for an ISM Equipment pursuant to part 18 of FCC Rules, which are designed to provide reasonable protection against such interference in a residential installation.
However, there is no guarantee that interference will not occur in a particular installation.
If this equipment does cause interference to radio or television reception, which can be determined by turning the equipment off and on, the user is encouraged to try to correct the interference by one or more of the followings.
- Reorient the receiving antenna of radio or television.
- Relocate the Microwave oven with respect to the receiver.
- Move the microwave oven away from the receiver.
- Plug the microwave oven into a different outlet so that microwave oven and receiver are on different branch circuits.
THE MANUFACTURER is not responsible for any radio or TV interference caused by UNAUTHORIZED MODIFICATION to this microwave oven. It is the responsibility of the user to correct such interference.
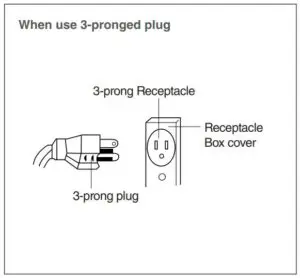
GROUNDING INSTRUCTIONS
This appliance must be grounded. In the event of an electrical short circuit, the grounding plug reduces the risk of electric shock by providing an escape wire for electric current. This appliance is equipped with a cord having a grounding wire with a grounding plug. The plug must be plugged into an outlet that is properly installed and grounded.
WARNING:
Improper use of the grounding can result in a risk of electric shock.
Consult a qualified electrician or serviceman if the grounding instructions are not completely understood, or if doubt exists as to whether the appliance is properly grounded, and either :
- If it is necessary to use an extension cord, use only a 3-wire extension cord that has a 3-blade grounding plug, and a 3-slot receptacle that will accept the plug on the appliance. The marked rating of the extension cord shall be equal to or greater than the electrical rating of the appliance. or
- Do not use an extension cord, if the power supply cord is too short, have a qualified electrician or serviceman install an outlet near the appliance.
WARNING:
Do not cut or remove the third (ground) prong from the power cord under any circumstances.
INSTALLATION GUIDE
- Examine the oven after unpacking.
Check for damage such as a misaligned door, broken door or dent in the cavity.
If any damage is visible, DO NOT INSTALL, and notify your dealer immediately. - Level, flat location.
Install the microwave oven on a level, flat surface. - Ventilation.
Do not block air vents. If they are blocked during operation, the oven may overheat and eventually cause a failure.
For proper ventilation, allow 4 inches of space between oven top, sides, rear and adjacent surfaces. - Away from radio and TV sets.
Poor television reception and radio interference may result if the oven is located close to a TV, radio, antenna, feeder, etc.
Place the oven as far from them as possible. - Away from heating appliances and water taps.
Keep the oven away from heat, steam or splashing liquids. These things can adversely affect oven wiring and contacts. - Power supply.
• Check your local power source.
This microwave oven requires a current of approximately 14.5 amperes, 120Volts, 60Hz and a grounded outlet.
1. A short power-supply cord is provided to reduce the risks of the user becoming entangled in or tripping over a longer cord.
2. Longer cord sets or extension cords are available and may be used if care is exercised in their use.
3. If a long cord or extension cord is used:
• The marked electrical rating of the cord set or extension cord should be at least as great as the electrical rating of the oven.
• The extension cord must be a grounding type 3-wire cord.
• The longer cord should be arranged so that it will not drape the table top or counter where it can be pulled on by children or tripped over unintentionally. - The minimum height of free space necessary above the top surface of the oven is about 4 inches.
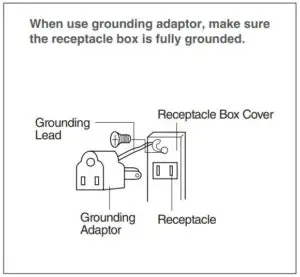
“THE CANADIAN ELECTRICAL CODE DOES NOT ALLOW THE USE OF THE GROUNDING ADAPTOR”
- Choosing a Location for Your Oven
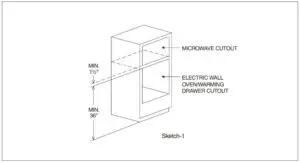
You will use your oven frequently so plan its location for ease of use. Your microwave oven can be built into a cabinet or wall by itself or above any electric wall oven or warming drawer using Sharp’s Built-in Kits listed below.
Please note: It cannot be built in above any gas wall oven.

See Sketch-1 for proper location when building in above an electric wall oven or a warming drawer. Carefully follow both the electric wall oven/warming drawer installation instructions and Sharp’s Built-in Kit instructions. Be sure that the clearance of the floor between the electric wall oven/warming drawer and the microwave oven is a minimum of 1-1/2 inches.
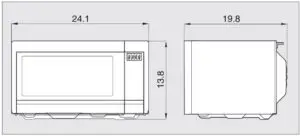
SPECIFICATIONS

* Specifications are subject to change without notice.
FEATURES DIAGRAM
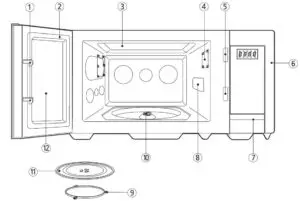
-
- Door latch – When the door is closed, it will automatically shut off. If the door is opened while the oven is operating, the magnetron will automatically shut off.
- Door seal – The door seal surfaces prevent microwaves escaping from the oven cavity.
- Oven cavity
- Oven lamp – Automatically turns on during oven operating.
- Safety interlock system
- Control panel
- Door open button – To open the door push the door open button.
- Wave guide cover – Protects the microwave outlet from splashes of cooking foods.
- Roller guide – This must always be used for cooking together with the glass cooking tray.
- Coupler – This fits over the shaft in the center of the oven cavity floor.
This is to remain in the oven for all cooking. - Glass cooking tray – Made of special heat resistant glass. The tray must always be in proper position before operating. Do not cook food directly on the tray.
- Viewing screen – Allows viewing of food.
The screen is designed so that light can pass through, but not the microwave energy.

- DISPLAY – Cooking time, power level, indicators and current time are displayed.
- SENSOR COOK – Used to cook many of favorite food.
- SENSOR REHEAT – Used to reheat food.
- ONE TOUCH COOK – Used to cook or reheat specific quantites of food.
- POWER – Used to set power level.
- TIME DEFROST – Used to defrost foods for time.
- KEEP WARM – Used to keep the food warm.
- AUTO DEFROST PAD – Press to select DEFROST feature by weight.
- SOFTEN – Used to soften food.
- TIME SET PAD – Used to set the cooking time and the current time.
- EXPRESS COOK – Used to set a cooking time quickly.
- KITCHEN TIMER – Used as a minute timer, delay cooking, hold setting after cooking.
- CLOCK – Used to set clock.
- STOP / CLEAR – Used to stop the oven operation or to delete the cooking data.
- START / +30 SEC – Used to start the oven and also used to set a reheat time.
OPERATION PROCEDURE
This section includes useful information about oven operation.
- Plug power supply cord into a standard 3-pronged 14.5 Amp, 120V AC 60Hz power outlet.
- After placing the food in a suitable container, open the oven door and put it on the glass tray. The glass tray and roller guide must always be in place during cooking.
- Close the door. Make sure that it is firmly closed.
- The oven light is on when the microwave oven is operating.
- The oven door can be opened at any time during operation by pushing the door open button of control panel. The oven will automatically shut off.
- Each time a pad is touched, a BEEP will sound to acknowledge the touch.
- The oven automatically cooks on full power unless set to a lower power level.
- The display will show “ : 0” when the oven is plugged in.
- Time clock returns to the present time when the cooking time ends.
- When the STOP/CLEAR pad is touched during the oven operation, the oven stops cooking and all information retained. To erase all information(except the present time), touch the STOP/CLEAR pad once more. If the oven door is opened during the oven operation, all information is retained.
- If the START pad is touched and the oven does not operate, check the area between the door and door seal for obstructions and make sure the door is closed securely. The oven will not start cooking until the door is completely closed or the program has been reset.
Make sure the oven is properly installed and plugged into the electrical outlet.
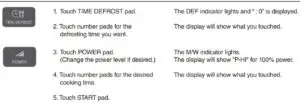
WATTAGE OUTPUT CHART
The power-level is set by touching the Power pad. The chart shows the display, the power level and the percentage of power.

CONTROLS
SETTING THE CLOCK
When the oven is first plugged in, the display will show “:0” and a tone will sound. If the AC power ever goes off, the display show “ : 0” when the power comes back on.

NOTE : This oven has multiple clock systems. If you want 12 hour clock system, omit this step.
The display stops blinking, and the colon starts blinking. If you selected 12 hour clock system, this digital clock allows you to set from 1:00 to 12:59. If you selected 24 hour clock system, this digital clock allows you to set from 0:00 to 23:59.
NOTE: If you attempt to enter an incorrect time, the time will not be set and a error signal tone will sound. Touch the CLOCK pad and re-enter the time.
KITCHEN TIMER MODE
Timer operates as a minute timer, can be set to delay cooking and used to set a holding time after cooking.However delay cooking can not be programmed for defrost. Timer operates without microwave energy.
HOW TO USE AS A MINUTE TIMER
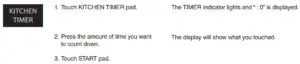
The TIMER indicator starts blinking and the display counts down the time remaining in KITCHEN TIMER mode. When KITCHEN TIMER mode ends, you will hear 3 beeps.
HOW TO USE TO DELAY THE START OF COOKING

When you touch START pad, the TIMER indicator starts blinking and the display counts down the time remaining in KITCHEN TIMER mode. When KITCHEN TIMER mode ends, the oven will beep. The TIMER indicator goes off and M/W indicator starts blinking. The display counts down the time remaining in M/W mode. When M/W cook ends, you will hear 3 beeps.
HOW TO USE TO SET A HOLDING TIME
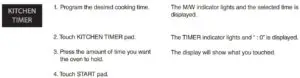
The M/W indicator starts blinking and the display counts down the time remaining in M/W mode. When the M/W cook ends, the oven will beep. The M/W indicator goes off and TIMER indicator starts blinking. The display counts down the time remaining in KITCHEN TIMER mode. When the KITCHEN TIMER mode ends, you will hear 3 beeps.
NOTE : Your oven can be programmed for 59 minutes 99 seconds. (59:99)
AUTO DEFROSTING
AUTO DEFROST lets you easily defrost food by eliminating guesswork in determining defrosting time. Follow the steps below for easy defrosting.
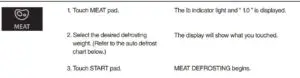
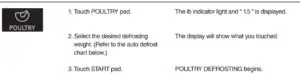

AUTO DEFROST CHART

The defrosting time is automatically determined by the weight selected.
When you touch START pad, the lb indicator goes off and the DEF indicator blinks and the defrosting time counts down in the display window. The oven beeps during the defrosting cycle to signal that the food needs to be turned or rearranged. When the defrosting time ends, you will hear 3 beeps.
TIME DEFROSTING
When TIME DEFROST is selected, the automatic cycle divides the defrosting time into periods of alternating defrost and stand times by cycling on and off.
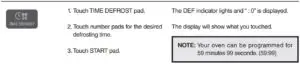
When you touch START pad, the DEF indicator starts blinking to show the oven is in the TIME DEFROST mode. The display counts down the time to show you how much defrosting time is left in the TIME DEFROST mode. The oven beeps during the defrosting cycle to signal that the food needs to be turned or rearranged. When the defrosting time ends, you will hear 3 beeps.
SOFTEN
The soften feature can be used to soften butter, chocolate, ice cream and cream cheese.
See the chart for specific settings to use.

SOFTEN ITEM CHART

KEEP WARM
KEEP WARM feature maintains food at a warm temperature for 30 minutes.

When finished, you will hear a series of beeps.
COOKING IN ONE STAGE

When you touch START pad, the M/W indicator starts blinking to show the oven is cooking.
The display counts down the time to show how much cooking time is left. When the cooking time ends, you will hear 3 beeps.
NOTE : Using lower power levels increases the cooking time which is recommended for foods such as cheese, milk and slow cooking of meats.
COOKING IN TWO STAGES
All recipes require the frozen foods to be defrosted fully before cooking.
This oven can be programmed to automatically defrost foods before cooking.
When you touch START pad, the DEF and M/W indicators come on to confirm the power levels selected. The DEF indicator starts blinking to show you that the oven is in TIME DEFROST mode.
The display counts down the time remaining in TIME DEFROST mode. When the oven beeps, turn over, break apart and/or redistribute the food. At the end of TIME DEFROST mode, the oven will beep and start M/W cook.
The DEF indicator goes off and the M/W indicator starts blinking. The display counts down the time remaining in M/W mode. When M/W cook ends, you will hear 3 beeps.
+30 SEC
+30 sec allows you to reheat for 30 seconds at 100% (full power) by simply touching the +30 sec pad. By repeatedly touching the +30 sec pad, you can also extend reheating time to 5 minutes by 30 second increments.

ONE TOUCH COOK
One touch cooking allows you to cook or reheat many of your favorite foods by touching just one pad. To increase quantity, touch the chosen pad until the number in the display is same as desired quantity to cook. (except for POPCORN)

* BEVERAGE * (200 ml/cup)
- 1 cup (mug) : Touch BEVERAGE once.
- 2 cups (mugs) : Touch BEVERAGE twice within 1.5 seconds.
- 3 cups (mugs) : Touch BEVERAGE three times within 1.5 seconds.

NOTE :
- Use prepackaged room-temperature microwave popcorn.
- Place bag in oven according to manufacturer’s directions.
- Pop only one bag at a time.
- After popping, open bag carefully: popcorn and steam are extremely hot.
- Do not reheat unpopped kernels or reuse bag.
- Do not leave oven unattended while popping popcorn.
CAUTION : If prepackaged popcorn is of a different weight than the recommended weight, do not use the popcorn pad. Follow the manufacturer instruction.
SENSOR OPERATIONS
The Sensor Cook categories are designed to detect the increasing humidity released by the food during the cooking process. The microwave oven sensor will automatically adjust the cooking time to the type and amount of food.
Using Sensor Settings
- After the oven is plugged in, wait 2 minutes before using Sensor Cook.
- Be sure the exterior of the cooking container and the interior of the oven are dry. Wipe off any moisture with a dry cloth or paper towel.
- The oven works with foods at normal storage temperature.
- More or less food than the quantity listed in the chart should be cooked following the guidelines in any microwave cookbook.
- Do not open the oven door or touch STOP/CLEAR pad until cooking time appears on the display window. The measurement of vapor will be interrupted. If this occurs, an error message “Er01” will appear. To continue cooking, touch the STOP/CLEAR pad and cook manually. When the sensor detects the vapor emitted from the food, the remainder of cooking time will appear. The door may be opened when remaining cooking time appears on the display. At this time, you may stir or season food, as desired.
- Always use microwave-safe containers and cover them with loose fitting lids or vented plastic wrap. Never use tight sealing plastic containers. They will prevent steam from escaping and this will mislead the sensor, usually causing the food to overcook.
- Check food for temperature or doneness after cooking. If food is not completely cooked, enter additional cooking time manually. Do not use one of the Sensor Cook categories twice in succession on the same food portion. This may result in severely overcooked or burnt food.
Covering Foods
Some foods work best when covered. Use the cover recommended in the Sensor Cook Chart for these foods.
- Casserole lid.
- Plastic wrap : Use plastic wrap recommended for microwave cooking. Cover dish loosely; allow approximately 1/2 inch to remain uncovered to allow steam to escape. Plastic wrap should not touch food.
- 3. Wax paper : Cover dish completely; fold excess wrap under dish to secure. If dish is wider than paper, overlap two pieces at least one inch to cover.
Be careful when removing any covering to allow steam to escape away from you.
SENSOR COOK
Sensor is semi-conductor device that detects the vapor emitted from the food as it heats. The sensor adjusts the cooking time and power level for various food and quantities and you don’t need to enter the weight or quantity of the food.
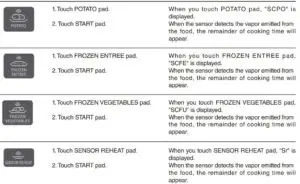
SENSOR COOK CHART
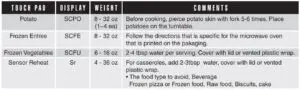
NOTE
Do not use the Sensor Cook twice in succession on the same food portion.
This may result in severely over-cooked or burnt food. If additional time is needed, use one of the +30sec pads or cook time pads.
- Use proper container and cover for best sensor cooking result.
- Always use microwave- safe container and cover them with lid or vented plastic wrap. Never use tight sealing plastic containers – They can be prevent steam from escaping and cause food to overcook.
- Be sure the outside of the cooking containers and the inside of the microwave oven are dry before placing food in the oven.
CHILD SAFETY LOCK
Child safety lock feature may lock the control panel to prevent the oven from being accidentally started or used by children. To lock, press and hold STOP/CLEAR pad for 3 seconds. Lock indicator will be displayed. To unlock, press and hold STOP/CLEAR pad for 3 seconds. Lock indicator will be turned off.
EXPRESS COOK
Express Cook is a quick way to set cooking time from 1-6 minutes at 100% (full power).

TO STOP THE OVEN WHILE THE OVEN IS OPERATING
- Touch the STOP/CLEAR pad.
• You can restart the oven by touching the START pad.
• Touch the STOP/CLEAR pad once more to erase all instructions.
• You must enter in new instructions. - Open the door.
• You can restart the oven by closing the door and touching the START pad.
NOTE: Oven stops operating when door is opened.
CARE OF YOUR MICROWAVE OVEN
The oven should be cleaned regularly and any food deposits removed.
Failure to maintain the oven in a clean condition could lead to deterioration of the surface that could adversely affect the life of the appliance and possibly result in a hazardous situation.
- Turn the oven off before cleaning.
- Keep the inside of the oven clean. When food spatters or spilled liquids adhere to oven walls, wipe with a damp cloth. Mild detergent may be used if the oven gets very dirty.
The use of harsh detergent or abrasives is not recommended. - The outside oven surface should be cleaned with soap and water, rinsed and dried with a soft cloth. To prevent damage to the operating parts inside the oven, water should not be allowed to seep into the ventilation openings.
- If the Control Panel becomes wet, clean with a soft, dry cloth. Do not use harsh detergents or abrasives on Control Panel.
- If steam accumulates inside or around the outside of the oven door, wipe with a soft cloth. This may occur when the microwave oven is operated under high humidity conditions and in no way indicates malfunction of the unit.
- It is occasionally necessary to remove the glass tray for cleaning. Wash the tray in warm sudsy water or in a dishwasher.
- The roller guide and oven cavity floor should be cleaned regularly to avoid excessive noise.
Simply wipe the bottom surface of the oven with mild detergent water or window cleaner and dry. The roller guide may be washed in mild sudsy water.
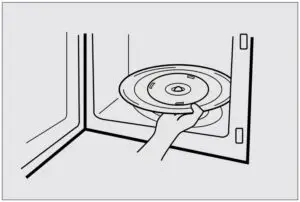
ROLLER GUIDE
- The ROLLER GUIDE and oven floor should be cleaned frequently to prevent excessive noise.
- The ROLLER GUIDE MUST ALWAYS be used for cooking together with the Glass Tray.
GLASS TRAY
- DO NOT operate the oven without the Glass Tray in place.
- DO NOT use any other Glass Tray with this oven.
- If Glass Tray is hot, ALLOW TO COOL before cleaning or placing it in water.
- DO NOT cook directly on the Glass Tray. (Except for popcorn)

BEFORE YOU CALL FOR SERVICE
Refer to following checklist, you may prevent an unnecessary service call.
The oven doesn’t work :
- Check that the power cord is securely plugged in.
- Check that the door is firmly closed.
- Check that the cooking time is set.
- Check for a blown circuit fuse or tripped main circuit breaker in your house.
Sparking in the cavity;
- Check utensils. Metal containers or dishes with metal trim should not be used.
- Check that metal skewers or foil does not touch the interior walls.
- Check if there is dirt or grease on waveguide cover.
CARE AND CLEANING
Although your oven is provided with safety features, it is important to observe the following:
- It is important not to defeat or tamper with safety interlocks.
- Do not place any object between the oven front face and the door or allow residue to accumulate on sealing surfaces. Wipe the sealing area frequently with a mild detergent, rinse and dry. Never use abrasive powders or pads.
- When opened, the door must not be subjected to strain, for example, a child hanging on an opened door or any load could cause the oven to fall forward to cause injury and also damage to the door. Do not operate the oven if it is damaged, until it has been repaired by a competent service technician. It is particularly important that the oven closes properly and that there is no damage to the:
i) Door(bent)
ii) Hinges and Hooks(broken or loosened)
iii) Door seals and sealing surfaces. - The oven should not be adjusted or repaired by anyone except a properly competent service technician.
- The oven should be cleaned regularly and any food deposits removed;
- Failure to maintain the oven in a clean condition could lead to deterioration of the surface that could adversely affect the life of the appliance and possibly result in a hazardous situation.
QUESTIONS AND ANSWERS
*Q : I accidentally ran my microwave oven without any food in it. Is it damaged?
* A : Running the oven empty for a short time will not damage the oven. However, it is not recommended.
* Q : Can the oven be used with the glass tray or roller guide removed?
* A : No. Both the glass tray and roller guide must always be used in the oven before cooking.
* Q : Can I open the door when the oven is operating?
* A : The door can be opened anytime during the cooking operation. Then microwave energy will be instantly switched off and the time setting will maintain until the door is closed.
* Q : What does “Er01” message mean?
* A : “Er01” means SENSOR ERROR and will appear if you open the oven door or touch STOP/CLEAR pad while cooking times is displayed. To continue cooking, touch the STOP/CLEAR pad and cook manually.
* Q : Why do I have moisture in my microwave oven after cooking?
* A : The moisture on the side of your microwave oven is normal. It is caused by steam from cooking food hitting the cool oven surface.
* Q : Will the microwave oven be damaged if it operates while empty?
* A : Yes. Never run it empty.
* Q : Why do eggs sometimes pop?
* A : When baking or poaching eggs, the yolk may pop due to steam build-up inside the yolk membrane. To prevent this, simply pierce the yolk with a toothpick before cooking. Never cook eggs without piercing their shells.
* Q : Why is this standing time recommended after the cooking operation has been completed?
* A : Standing time is very important.
With microwave cooking, the heat is in the food, not in the oven. Many foods build up enough internal heat to allow the cooking process to continue, even after the food is removed from the oven. Standing time for joints of meat, large vegetables and cakes is to allow the inside to cook completely, without overcooking the outside.
* Q : What does “standing time” mean?
* A : “Standing time” means that food should be removed from the oven and covered for additional time to allow it to finish cooking. This frees the oven for other cooking.
* Q : Why does my oven not always cook as fast as the microwave cooking guide says?
* A : Check your cooking guide again, to make sure you’ve followed directions exactly ; and to see what might cause variations in cooking time. Cooking guide times and heat settings are suggestions, to help prevent over-cooking… the most common problem in getting used to a microwave oven.
Variations in the size, shape and weights and dimensions could require longer cooking time. Use your own judgement along with the cooking guide suggestions to check whether the food has been properly cooked just as you would do with a conventional cooker.
* Q : Does microwave energy pass through the viewing screen in the door?
* A : No. The metal screen bounces back the energy to the oven cavity. The holes are made to allow light to pass through. They do not let microwave energy pass through.
* Q : Can I operate my microwave oven without the turntable or turn the turntable over to hold a large dish?
* A : No. If you remove or turn over the turntable, you will get poor cooking results. Dishes used in your oven must fit on the turntable.
* Q : Is it normal for the turntable to turn in either direction?
* A : Yes. The turntable rotates clockwise or counterclockwise, depending on the rotation of the motor when the cooking cycle begins.
* Q : Can I pop popcorn in my microwave oven?
How do I get the best results?
* A : Yes. Pop packaged microwave popcorn following manufacture’s guidelines. Do not use regular paper bags. Use the “listening test” by stopping the oven as soon as the popping slows to a “pop” every 1 or 2 seconds. Do not repop unpopped kernels. Do not pop popcorn in glass cookware.
COOKING INSTRUCTIONS
UTENSIL GUIDE
Only use utensils that are suitable for use in microwave ovens.
To cook food in the microwave oven, the microwaves must be able to penetrate the food, without being reflected or absorbed by the dish used. Care must therefore be taken choosing the utensil. If the utensil is marked microwave-safe, you do not need to worry. The following table lists various utensil and indicates whether and how they should be used in a microwave oven.
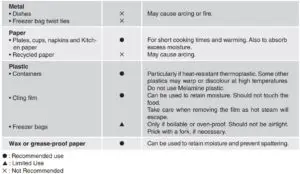
USE YOUR MICROWAVE OVEN SAFELY
General Use
- Do not attempt to defeat or tamper with safety interlocks.
- Do not place any object between the oven front frame and the door or allow residue to build up on sealing surfaces. Wipe with a mild detergent, rinse and dry. Never use abrasive powders or pads.
- Do not subject the oven door to strain or weight such as a child hanging on an open door.
- This could cause the oven to fall forward resulting in injury to you and damage to the oven.
- Do not operate the oven if door seals or sealing surfaces are damaged; or if door is bent; or if hinges are loose or broken.
- Do not operate the oven empty. This will damage the oven.
- Do not attempt to dry clothes, newspapers or other materials in the oven. They may catch on fire.
- Do not use recycled paper products as they may contain impurities which may cause sparks or fires.
- Do not hit or strike the control panel with hard objects. This can damage the oven.
Food
- Never use your microwave oven for home canning. The oven is not designed for proper home canning. Improperly canned food may spoil and be dangerous to consume.
- Always use the minimum recipe cooking time. It is better to undercook rather than overcook foods.
- Undercooked foods can be returned to the oven for more cooking. If food is overcooked, nothing can be done.
- Heat small quantities of food or foods with low moisture carefully. These can quickly dry out, burn or catch on fire.
- Do not heat eggs in the shell. Pressure may build up and eggs can explode.
- Potatoes, apples, egg yolks and sausages are examples of food with non-porous skins.
- These must be pierced before cooking to prevent bursting.
- Do not attempt to deep fat fry in your microwave oven.
- Always allow a standing time of at least 20 seconds after the oven has been switched off to allow the temperature to even out, stir during heating, if necessary, and ALWAYS stir after heating. To prevent eruptive boiling and possible scalding, you should put a spoon or glass stick into the beverages and stir before, during and after heating.
- Do not leave the oven unattended while popping corn.
- Do not pop corn in a paper bag unless it is the commercially prepared Microwave Popcorn product. The kernels can overheat and ignite a brown paper bag.
- Do not exceed the Microwave Popcorn manufacturers suggested popping time.
- Longer popping does not yield more popcorn but it can result in scorch, burn of fire.
- Remember, the Popcorn bag and tray can be too hot to handle. Remove with caution and use pot holders.
ARCING
If you see arcing, open the door and correct the problem.
Arcing is the microwave term for sparks in the oven.
Arcing is caused by:
- Metal or foil touching the side of the oven.
- Foil not molded to food (upturned edges act like antennas).
- Metal, such as twist-ties, poultry pins, or gold rimmed dishes, in the microwave.
- Recycled paper towels containing small metal pieces being used in the microwave.
- Dirt or grease on waveguide cover.
MICROWAVING PRINCIPLES
Microwave energy has been used in this country to cook and reheat food since early experiments with RADAR in World War ll. Microwaves are present in the atmosphere all the time, both naturally and manmade sources. Manmade sources include radar, radio, television, telecommunication links and car phones.
HOW MICROWAVES COOK FOOD
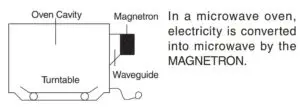
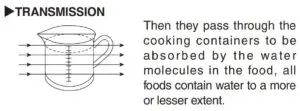
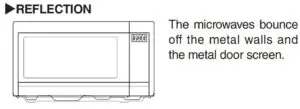
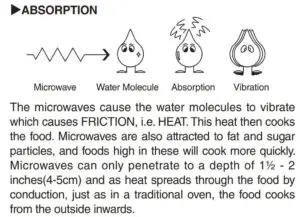
CONVERSION CHARTS
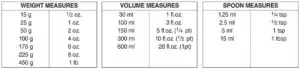

COOKING TECHNIQUES
STANDING TIME
Dense foods e.g. meat, jacket potatoes and cakes, require standing time(inside or outside of the oven) after cooking, to allow heat to finish conducting to cook the center completely. Wrap meat joints and jacket potatoes in aluminium foil while standing. Meat joints need approx. 10-15 minutes, jacket potatoes 5 minutes. Other foods such as plated meal, vegetables, fish etc require 2-5 minutes standing. After defrosting food, standing time should also be allowed. If food is not cooked after standing time, return to the oven and cook for additional time.
MOISTURE CONTENT
Many fresh foods e.g. vegetables and fruit, vary in their moisture content throughout the season, particularly jacket potatoes. For this reason cooking times may have to be adjusted. Dry ingredients e.g. rice, pasta, can dry out during storage so cooking times may differ.
DENSITY
Porous airy foods heat more quickly than dense heavy foods.
CLING FILM
Cling film helps keep the food moist and the trapped steam assists in speeding up cooking times. Pierce before cooking to allow excess steam to escape. Always take care when removing cling film from a dish as the build-up of steam will be very hot.
SHAPE
Even shapes cook evenly. Food cooks better by microwave when in a round container rather than square.
SPACING
Foods cook more quickly and evenly if spaced apart. NEVER pile foods on top of each other.
STARTING TEMPERATURE
The colder the food, the longer it takes to heat up. Food from a fridge takes longer to reheat than food at room temperature.
LIQUIDS
All liquids must be stirred before and during heating. Water especially must be stirred before and during heating, to avoid eruption. Do not heat liquids that have previously been boiled. DO NOT OVERHEAT.
TURNING & STIRRING
Some foods require stirring during cooking. Meat and poultry should be turned after half the cooking time.
ARRANGING
Individual foods e.g. chicken portions or chops, should be placed on a dish so that the thicker parts are towards the outside.
QUANTITY
Small quantities cook faster than large quantities, also small meals will reheat more quickly than large portions.
PIERCING
The skin or membrane on some foods will cause steam to build up during cooking. These foods must be pierced or a strip of skin should be peeled off before cooking to allow the steam to escape. Eggs, potatoes, apples, sausages etc, will all need to be pierced before cooking. DO NOT ATTEMPT TO BOIL EGGS IN THEIR SHELLS.
COVERING
Cover foods with microwave cling film or a lid. Cover fish, vegetables, casseroles, soups. Do not cover cakes, sauces, jacket potatoes or pastry items.
DEFROSTING GUIDE
- Do not defrost covered meat. Covering might allow cooking to take place. Always remove outer wrap and tray. Use only containers that are microwave-safe.
- Begin defrosting whole poultry breast-side-down. Begin defrosting roasts fat-side-down.
- The shape of the package alters the defrosting time. Shallow rectangular shapes defrost more quickly than a deep block.
- After 1/3 of the defrost time has elapsed, check the food. Toy may wish to turn over, break apart, rearrange or remove thawed portions of the food.
- During defrost, the oven will prompt you to turn the over. At this point, open oven door and check the food. Follow the techniques listed below for optimum defrost results.
Then, close oven door, touch the START pad to complete defrosting. - When defrosted, food should be cool, but softened in all areas. If still slightly icy, return to microwave oven very briefly, or let stand a few minutes. After defrosting, allow food to stand 5-60 minutes if there are any icy areas.
Poultry and fish may be placed under running cool water until defrosted
Turn over : Roast, ribs, whole poultry, turkey breasts, hot dogs, sausages, steaks, or chops.
Rearrange : Break apart or separate steaks, chops, hamburger patties, ground meat, chicken or seafood pieces, chunks of meat such as stew beef.
Shield : Use small strips of aluminum foil to protect thin areas or edges of unevenly shaped foods such as chicken wings. To prevent arcing, do not allow foil to come within 1-inch of oven walls or door.
Remove : To prevent cooking, thawed portions should be removed from the oven at this point. This may shorten defrost time for food weighing less than 3 lbs.(1350g).
Cooking chart
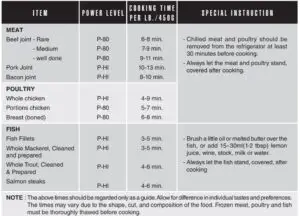
COOKING & REHEATING CHART
Reheating chart
- Baby food particularly needs to be checked carefully before serving to prevent burns.
- When heating pre-packaged ready-cooked foods, always follow the pack instructions carefully.
- If you freeze foods which were bought from the fresh or chilled counters, remember that they should be thoroughly thawed before following the heating instructions on the packed. It’s worth putting a note on them so that other members of the household will remember too.
- Remember to remove metal ties and transfer food from foil containers before reheating.
- Chilled(refrigerated) food takes longer to reheat than food at room temperature (such as just-cooled food or food from the store cupboard).
- All foods should be reheated using full microwave power.
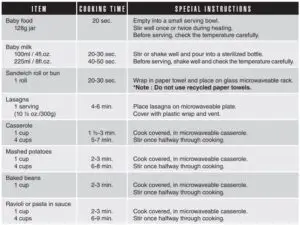
VEGETABLE CHART
Use a suitable glass pyrex bowl with lid. Add 30-45ml cold water(2-3 tbsp.) for every 250g unless another water quantity is recommended – see table. Cook covered for the minimum time – see table.
Continue cooking to get the result you prefer. Stir once during and once after cooking. Add salt, herbs or butter after cooking. Cover during a standing time of 3 minutes.
Hint : cut the fresh vegetables into even sized pieces. The smaller they are cut, the quicker they will cook.
All vegetables should be cooked using full microwave power.
Cooking Guide for fresh vegetables
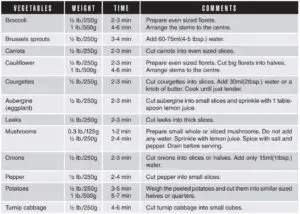
Cooking Guide for frozen vegetables

RECIPES
TOMATO & ORANGE SOUP
1 oz.(25g) butter
1 medium onion, chopped
1 large carrot & 1 large potato, chopped
13/4lb(800g) canned, chopped tomatoes
juice and grated rind of 1 small orange
11/2pints(900ml) hot vegetable stock
salt and pepper to taste
METHOD:
- Melt the in a large bowl on P-HI for 1 minute.
- Add the onion, carrot and potato and cook on P-HI for 4 minutes. stir halfway through cooking.
- Add the tomatoes, orange juice, orange rind and stock. Mix thoroughly. Season with salt and pepper to taste. Cover the bowl and cook on P-HI for 15 minutes. stir 2-3 times during cooking, until the vegetables are tender.
- Blend and serve immediately.
FRENCH ONION SOUP
1 large onions, sliced
1 tbsp (15ml) corn oil
2 oz.(50g) plain flour
2 pints(1.2 liters) hot meat
or vegetable stock
salt and pepper to taste
2 tbsp (30ml) parsley, chopped
4 thick slices French bread
2 oz.(50g) cheese, grated
METHOD:
- Place the onion and oil a bowl, mix well and cook on P-HI for 1 minutes.
- Stir in the flour to make a paste and gradually add stock. Season and add the parsley.
- Cover the bowl and cook on P-70 for 16 minutes.
- Pour the soup into serving bowls, submerge bread and sprinkle generously with cheese.
- Cook on P-70 for 2 minutes, until the cheese has melted.
STIR FRIED VEGETABLES
1 tbsp(15ml) sunflower oil
2 tbsp (30ml) soy sauce
1 tbsp (15ml) sherry
1″(2.5cm) root ginger,
peeled and finely grated
2 medium carrots, cut into fine strips
4 oz.(100g) button mushrooms, chopped
2 oz.(50g) beansprouts
4 oz.(100g) mange-tout
1 red pepper, seeded and thinly sliced
4 spring onions, chopped
4 oz.(100g) canned water chestnuts, sliced
1/4 head of chinese leaves, thinly sliced
METHOD:
- Place the oil, soy sauce, sherry, ginger, garlic and carrots in a large bowl, mix thoroughly
- Cover and cook on P-HI for 3-5 minutes, stirring once.
- Add the button mushrooms, beansprouts, mange-tout, red pepper, spring onions, water chestnuts and chinese leaves. Mix thoroughly.
- Cook on P-HI for 5-6 minutes, until the vegetables are tender. Stir 2-3 times during cooking.
Stir fried vegetables are ideally served with meat or fish.
HONEYED CHICKEN
4 boneless chicken breasts
2 tbsp(30ml) clear honey
1 tbsp(15ml) whole grain mustard
1/2 tsp(2.5ml) dried tarragon
1 tbsp(15ml) tomato puree
1/4 pint(150ml) chicken stock
METHOD:
- Place the chicken breasts in a casserole dish.
- Mix all remaining ingredients together and pour over the chicken. Salt and pepper to taste.
- Cook on P-HI for 13-14 minutes. Rearrange and coat the chicken with the sauce twice during cooking.
BLUE CHEESE & CHIVE JACKETS
2 baking potatoes,
(approx.9 oz.(250g) each)
2 oz.(50g) butter
4 oz.(100g) blue cheese, chopped
1 tbsp(15ml) fresh chives, chopped
2 oz.(50g) mushrooms, sliced
salt and pepper to taste
METHOD:
- Prick each potato in several places. Cook on P-HI for 7-9 minutes. Halve and scoop the flesh into a bowl, add the butter, cheese, chives, mushrooms, salt and pepper, mix thoroughly.
- Pile mixture into the potato skins and place in a flan dish.
- Cook on P-50 for 10 minutes.
WHITE SAUCE
1 oz.(25g) butter
1 oz.(25g) plain flour
1/2 pint(300ml) milk
salt and pepper to taste
METHOD:
- Place the butter in a bowl and cook on P-HI for 1 minute, until melted.
- Stir in the flour and whisk in the milk. Cook on P-HI for 3-4 minutes, stirring every 2 minutes until thick and smooth. Season with salt and pepper to taste.
STRAWBERRY JAM
11/2 lb.(675g) strawberries, hulled
3 tbsp(45ml) lemon juice
11/2 lb.(675g) caster sugar
METHOD:
- Place strawberries and lemon juice in a very large bowl, heat on P-HI for 4 minutes, or until the fruit has softened. Add sugar, mix well.
- Cook on P-70 for 20-25 minutes, until setting point*is reached, stir every 4-5 minutes.
- Pour into hot, clean jars. Cover, seal and label.
* setting point : To determine setting point, place 1 tsp(5ml)jam onto chilled saucer. Allow to stand for 1 minute. Move surface of jam gently with your finger, if the surface wrinkles setting point has been reached.
PLAIN MICROWAVE CAKE
4 oz.(100g) margarine
4 oz.(100g) sugar
1 eggs
4 oz.(100g) self raising flour, sifted
2-3 tbsp(30-45ml) milk
METHOD:
- line the base of 8″ (20.4cm) cake dish with grease-proof paper.
- Cream the margarine and sugar together until light and fluffy. Beat in the eggs and fold in the sifted flour alternately with the milk.
- Pour into prepared container. Cook on P-HI for 4-5 minutes, until a skewer comes out cleanly.
- Leave the cake to stand for 5 minutes before turning out.
OMELETTS
1/2 oz.(15g) butter
4 eggs
6 tbsp(90ml) milk
salt & pepper
METHOD:
- Whisk together eggs and milk.
- Place butter in 10″(26cm) flan dish. Cook on P-HI for 1 minute, until melted. Coat the dish with the melted butter.
- Pour omelette mixture into flan dish. Cook on P-HI for 2 minutes. whisk mixture and cook again on P-HI for 1 minutes.
SCRAMBLED EGG
1/2 oz.(15g) butter
2 eggs
2 tbsp(30ml) milk
salt & pepper
METHOD:
- Melt the butter in a bowl on P-HI for 1 minute.
- Add the eggs, milk and seasoning and mix well.
- Cook on P-HI for 3 minutes, stirring every 30 seconds.
SAVORY MINCE
1 small onion, diced
1 clove garlic, crushed
1 tsp(5ml) oil
7 oz.(200g) can chopped tomatoes
1 tbsp(15ml) tomato puree
1 tsp(5ml) mixed herbs
8 oz.(225g) minced beef
salt and pepper
METHOD:
- Place onion, garlic and oil in casserole, and cook on P-HI for 2 minutes or until soft.
- Place all other ingredients in casserole. Stir well.
- Cover and cook on P-HI for 5 minutes then P-50 for
8-13 minutes or until the meat is cooked.


PIL1044 Universal Sharp TV Remote
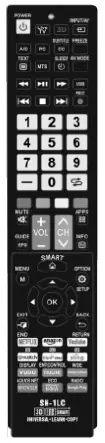
UNIVERSAL SHARP TV REMOTE CONTROL
Please install the batteries and try it first. PIL1044 remote control can directly control most models of Sharp TVs. If it works the first time, there is no need to set. If it does not work, please refer to the following settings methods.
INPUT CODE
- Press and hold the MUTE and POWER buttons for 3 seconds, until the LED indicator starts to flash. Release the buttons.
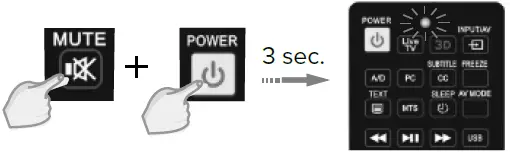
- Enter the 3 digit code. If the code is right, the LED indicator will go off. If the code is wrong, the LED indicator will still be on. If this happens, try to enter the code again.
CODE LIST: 001, 002, 003, 004, 005, 006, 007, 008, 009, 010, 011, 012, 013, 014, 015, 016, 017, 018, 019, 020, 021, 022, 023, 024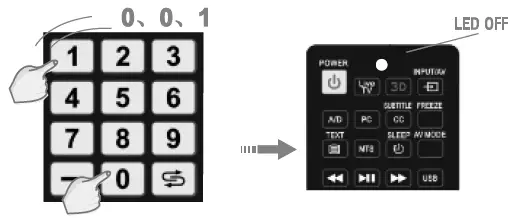
- If the remote still doesn’t work, please try another code from the list.
Note: If you want to exit the pairing mode, press the MUTE button.
CODE INQUIRY
- Press and hold the MUTE button, then press the POWER button. After about 3 seconds, the LED indicator will light up. Release the buttons.
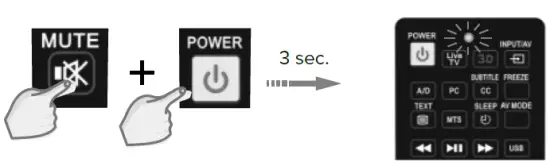
- Input the numbers: 9, 9, 0. LED indicator will flash two times and then go off.
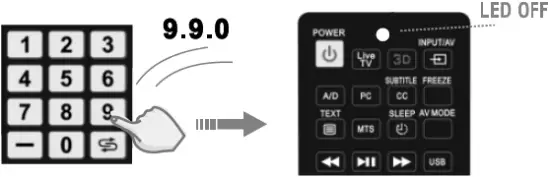
- Input the numbers: 1, 2, 3. After pressing the 1 button, LED indicator starts to flash. The number of flashes is the code’s first number. If the code number is 0, LED indicator will not flash.
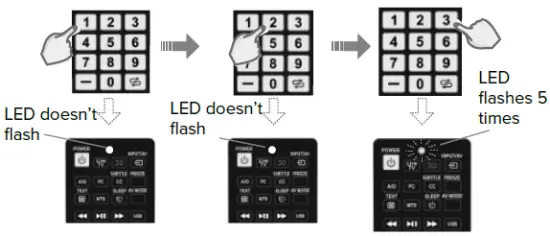
Example: Previous remote control code: 005
LEARNING FUNCTION
It is suitable for IR remote controls, not for Bluetooth or wireless remote controls.
- Press and hold the MUTE and VOL+ buttons for about 5 seconds. Release the buttons when the LED indicator lights up.
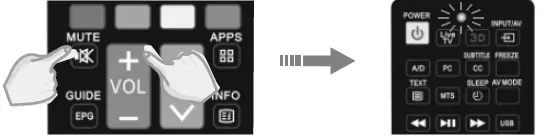
- Point the original remote control to the PIL1044 remote. The distance between them should be within 1-3 cm.

- Press any button on the original remote control. When LED indicator flashes on the PIL1044 remote control after receiving the information, release the button. Then press the button on the PIL1044 remote control. LED indicator flashes two times and then keeps the light on. Repeat the above steps to continue learning other buttons.
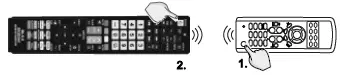
- After learning the buttons press and hold the MUTE button, then press the VOL- button. The LED indicator will go off. The learning will be saved.
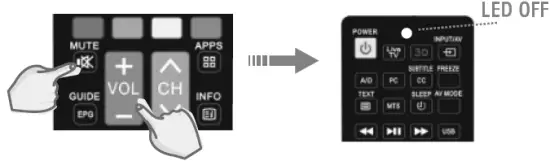
Note: during the learning process if no button is pressed within 25 seconds, the learning will finish without saving.
ONE-BUTTON LEARN FUNCTION
Note: A and B are identical learning remotes.
- A: the remote control has been fully learned.
- B: the remote control that has to be learned.
- Align the head of the remote control A with the head of remote control B at a distance of 1-3 cm and do not shake.

- B remote control: Press and hold the MUTE and 3 buttons for more than 3 seconds. When the LED indicator lights up, release the buttons. The remote is ready for learning.
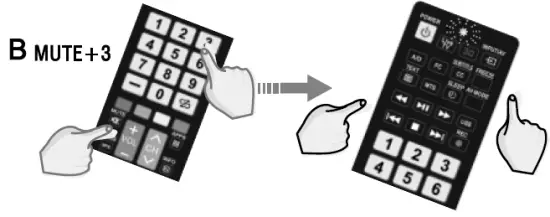
- A remote control: Press and hold the MUTE and 1 buttons for more than 3 seconds. When the LED indicator lights up, release the buttons. When the LED on both remote control flash, the learning function is on. When the LED indicator on both remote controls flashes three times slowly then goes off, it means that learning has finished.
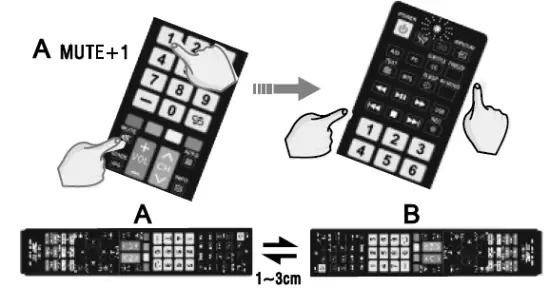
Note: Check if B remote control works. If not, please repeat steps 1-3. Press the MUTE and VOL- buttons to exit.
]]>SHARP®•Roku TV
QUICK SETUP GUIDE
Secure the stands to the TV with the four provided screws.
32″ / M4 (10 mm length) (4 pcs.)
40″ / M4 (20 mm length) (4 pcs.)
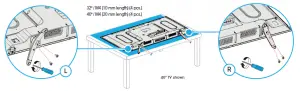
40″ TV shown
OR
How do I prepare my TV for wall mounting? (not for use with the TV stands)
You’ll need: Phillips screwdriver and a soft surface to lay your TV on.
1 Carefully place your TV face-down on a cushioned, clean surface.
2 See the instructions that came with your wall mount for more information about how to correctly mount your TV.
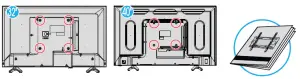
32″ VESA Mounting Pattern
VESA mount (200x200mm): M6 type screw, minimum length 10 mm
40″ VESA Mounting Pattern
VESA mount (200x200mm): M6 type screw, minimum length 10 mm
This apparatus is intended to be supported by a UL Listed Wall Mount Bracket, marked with the minimum weight of 6.5 kg
Wall mount installation guide (not included)
Your TV has four VESA mounting holes on the back. If you attach a wall-mount bracket to the back of your TV, the bracket must be securely attached, using all four holes. If you do not use all four mounting holes, your TV
may fall and cause property damage or personal injury. See the documentation that came with your wall mount for complete mounting instructions.
STOP!
Do not plug your power cord in until all other devices have been connected
Included accessories
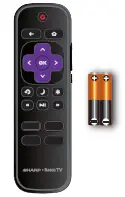 Remote control
and two AAA
batteries
32″
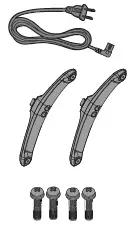 Power cord
TV stands
M4 (10 mm length)
(4 pcs.)
40″
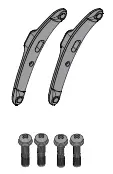 TV stands
M4 (20 mm length)
(4 pcs.)
WHAT YOU NEED (not included)
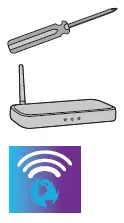 A Phillips screwdriver
Wireless router*
(needed for streaming)
Internet connection*
(needed for streaming)
*Subscription or other payment may be required to access certain content.
Features Front view

32″ Remote sensor / Power Switch
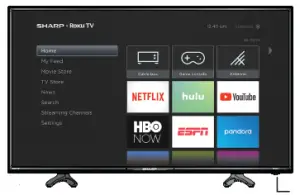
40″ INPUT Power indicator Remote control sensor
Back view
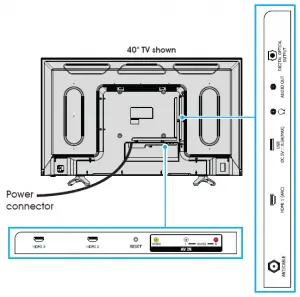
Note: Images do not necessarily represent the exact design of your television.
Before using your new product, please read these instructions to prevent any damage.
2 MAKING CONNECTIONS
How do I watch TV or connect a device such as a DVD or Blu-ray disc player, game console, or tablet?
Using an HDMI cable (BEST)
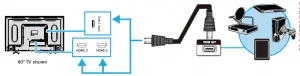
Multi-purpose jack: You can plug any device that uses HDMI into any HDMI jack. However, certain devices must be connected to the HDMI 1 (ARC) jack. See the instructions that came with your ARC-enabled device for more information.
Using an AV cable (GOOD)
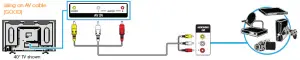
How do I connect my TV to an antenna or cable wall jack?

3 CONNECTING AUDIO DEVICES How do I connect my TV to external speakers?
Using digital audio OR Using analog audio
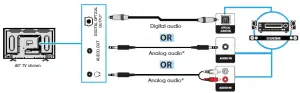
Note: If the volume on the device connected to the analog audio jack is too low, try increasing the volume on your TV.
TURNING ON MY TV
The best time to turn on your TV is after you have connected all devices and either attached the TV stands or wall-mounted your TV.
When your television is in place:
- Plug one end of the power cord into the AC IN connector on the back of your TV (32″) and the other end into a power outlet.
- Remove the remote control cover and install the batteries.
- Press
 (power) on your remote control.
 - Follow the on-screen instructions.
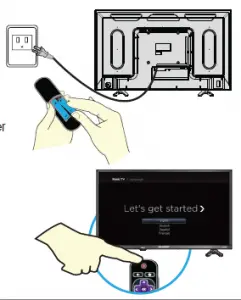
5 COMPLETE GUIDED SETUP (OPTIONAL)
- Your TV automatically detects your wireless network, so have your
network name and password handy and follow the easy on-screen
instructions. - You’ll be prompted to create your Roku account online at
https://my.roku.com/link. Your TV will generate a unique code that
links your TV to your new account.
Note: Roku accounts are free, and while a valid credit card number
is not required, providing your card information makes renting and
purchasing entertainment a breeze. You won’t be charged unless you
agree to the terms and cost of the content. - Once connected to your account, your TV will automatically update
with the latest software, and you can start streaming immediately. - If you aren’t ready to connect your TV to a wireless network, you can
still use it as a regular TV. - NOTE: Roku does not charge for activation support – beware of scams.
6 OPTIONAL
If you connected a cable or satellite box, skip this step. If you connected your TV to an antenna or cable wall jack (no box):
1 When the setup wizard is complete, select the ANTENNA TV tile from the Home screen.
2 Follow the on-screen instructions.
3 Whenever you want to watch TV, select this tile.

Make any night a movie night
Access more than 500,000 movies and TV episodes across major streaming services like Netflix, Hulu, Amazon Video, VUDU, and more. Choose from free, rental, and subscription services.
Stream sports on the big screen.
Choose from over 140 sports channels like WatchESPN, FOX Sports Go, NBA, NFL, MLB, WWE, CBS Sports, and more.*
Explore your passions
In addition to popular streaming channels like HBO NOW, SHOWTIME,
PBS KIDS, and FOX NOW, your Sharp • Roku TV also offers hundreds of streaming channels to fuel your passions – including fitness, cooking, religion, outdoors, international programming, and
much more.
Enjoy tons of free channels and free trials
Your Sharp • Roku TV has hundreds of popular free channels like
Crackle, CBS News, PBS, VEVO, and more. Plus, free trials** to popular
subscription services like HBO NOW, SHOWTIME, Netflix,
Amazon Video, and Hulu.
*Subscription or other payment may be required to access certain channels. Content may not be available in all areas in which the Sharp • Roku TV is sold and channel availability is subject to change.
**Cancel before your free trial ends to avoid subscription fees. A credit card may be required. ROKU, ROKU TV, and the ROKU logo are trademarks and the property of Roku, Inc. Other channel logos, brand, and product names are trademarks or registered trademarks of their respective holders.
USING YOUR REMOTE CONTROL
POWER Turns your TV on or off.
BACK Returns to the previous screen.
Directional keypad
CHANNEL RECALL/JUMP BACK AND INSTANT REPLAY
Changes to the previous channel when viewing antenna or cable (no set-top box) programming. Jumps back one position in video when viewing streaming content. Backspaces one letter during menu entries, such as Search.
SLEEP Sets the sleep timer.
REWIND Rewinds streaming video, jumps to the previous audio track or selection, jumps up one page in menus.
PLAY/PAUSE Pauses or resumes playback.
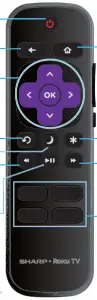 HOME
HOME
Displays your TV’s Home screen. Stops playback if you are watching TV or streaming content.
VIEW MORE OPTIONS
Gives you easy access to picture settings, display options, and more. Press * on any screen to access options.
STREAMING CHANNELS SHORTCUTS
When you press a button:
• If you have not added the channel, displays a sign up page.
• If you have added the channel, displays the channel’s home page.
• If your TV is off, turns on your TV and displays the channel’s home page.
Using your cable set-top box or satellite receiver remote as a universal remote. If you prefer to use your cable set-top box or satellite receiver remote as a universal remote, refer to the manual that your cable or satellite service provided. It will include instructions on how to program their remote to your television. You can find codes that work with your Sharp•Roku TV and the most common cable and satellite providers’ universal remote controls at www.roku.com/universalremote.
SHARP® • Roku TV
TROUBLESHOOTING
Having trouble completing the
guided setup? Don’t worry, it’s usually an easy fix.
If you cannot see a picture on your TV
- Make sure that your TV and the device you want to watch (cable box, Blu-ray player, game console, etc.) are turned on and plugged into a working wall outlet.
- Make sure that your power cable is connected.
If you cannot connect to your wireless home network during guided setup
- Make sure that the correct wireless network name is selected.
- Make sure that the wireless network password is correctly entered (password is case sensitive).
- Improve wireless signal by rotating the router slightly (even a few inches can help).
If you cannot hear sound
- Make sure that the TV volume is turned up and not on mute.
- Try only the TV speakers by disconnecting any connection to audio devices (like headphones or audio video receivers).
If the TV remote control isn’t working
- Remove any obstruction and point the remote at the TV’s remote control sensor (Features).
- Try a fresh set of batteries.
- If the status light on the front of your TV flashes once each time you press a remote button, the problem is not with the remote.
- Unplug the TV and plug it back in.
One-year limited warranty
Visit https://www.sharptvusa.com/support
Need additional help?
See your online User Guide! This comprehensive guide includes
everything from basic how-to steps to more advanced features.
Go to: https://www.sharptvusa.com/support
Find your model. Under Owners Manual, find the language you
want, then click Download. Your online User Guide opens.
We’re here for you.
https://www.sharptvusa.com/support
For customer service, call: 1-855-544-2030
All rights reserved. SHARP is a trademark of Sharp Corporation;
used under license by Hisense International (Hong Kong)
America investment Co., Limited.
©2018 Best Buy China LTD.
All rights reserved.
Sharp Microwave Drawer: SMD2470AS , SMD2470AH , SMD3070AS
INSTALLATION MANUAL
SPECIAL WARNING
INSTALLATION AND SERVICE MUST BE PERFORMED BY A QUALIFIED INSTALLER.
IMPORTANT: SAVE this installation manual FOR LOCAL ELECTRICAL INSPECTOR’S USE.
READ AND SAVE THESE INSTRUCTIONS FOR FUTURE REFERENCE.
CLEARANCES AND DIMENSIONS
For SAFETY CONSIDERATIONS do not install drawer in any combustible cabinetry, which is not in accord with the stated clearances and dimensions on pages 2 – 5. See Figure 1 (for 24″) or Figures 4 and 5 (for 30″).
UNPACKING YOUR MICROWAVE DRAWER

- Remove all packing materials from inside the Microwave Drawer. DO NOT REMOVE THE WAVEGUIDE COVER, which is located on the top of the Microwave Drawer.
- Remove the feature sticker, if there is one. Check the drawer for any damage, such as misaligned or bent drawer, damaged drawer seals and sealing surfaces, broken or loose Microwave Drawer guides and dents inside the cavity or on the front side of the drawer. If there is any damage, do not operate the Microwave Drawer and contact your dealer or a SHARP AUTHORIZED SERVICER.
IMPORTANT NOTES TO THE INSTALLER
- Read all of the Installation Manual before installing the Microwave Drawer.
- Remove all packing material before connecting the electrical supply.
- Observe all governing codes and ordinances.
- Be sure to leave these instructions with the consumer.
IMPORTANT NOTES TO THE CONSUMER
Keep this manual with your Operation Manual for future reference.
- As when using any microwave oven generating heat, there are certain safety precautions you should follow. These are listed in the Operation Manual. Read all and follow carefully.
- Be sure your Microwave Drawer is installed and grounded properly by a qualified installer or service technician.
IMPORTANT SAFETY INSTRUCTIONS

If the information in this manual is not followed exactly, a fire or electrical shock may result that could cause property damage, personal injury or death.
To reduce the risk of tipping, the Microwave Drawer must be secured by a properly installed Anti-Tip block.
- This Microwave Drawer must be electrically grounded in accordance with local codes.
- Make sure the wall coverings and the cabinets around the Microwave Drawer can withstand the heat generated by the Microwave Drawer.
Never leave children alone or unattended in the area where a Microwave Drawer is in use. Never leave the drawer open when the microwave is unattended.
Stepping, leaning or sitting on the drawer may result in serious injuries and can also cause damage to the Microwave Drawer.
- Do not use the Microwave Drawer as a storage space. This creates a potentially hazardous situation.
- Check that the time-of-day is in the display. If not, touch STOP/CLEAR to prevent unintended use.
CLEARANCES AND DIMENSIONS
- Dimensions that are shown in Figure 1 (for 24″) or Figures 4 and 5 (for 30″) must be used. Given dimensions provide minimum clearance. Locate electrical outlet in the shaded area in the upper left-hand corner of the cutout. See Figure 9.
- Contact surface must be solid and level. Pay special attention to the floor on which the Microwave Drawer will sit. The floor of the opening should be constructed of plywood strong enough to support the weight of the oven (about 100 pounds).
- Check location where the Microwave Drawer will be installed for proper electrical supply.
- Your oven can be built into a cabinet or wall by itself or under a gas or electric wall oven.
- Be sure that the clearance of the floor between the wall oven and the microwave drawer is a minimum of 2-inches. • The microwave interior will easily accommodate a 9″ x 13″ oblong dish or a bag of microwave popcorn.
- The oven can also be mounted flush. Please see instructions for flush mounting included with the Flush Mount Deflector vent.
24″ MICROWAVE DRAWER MEASUREMENTS
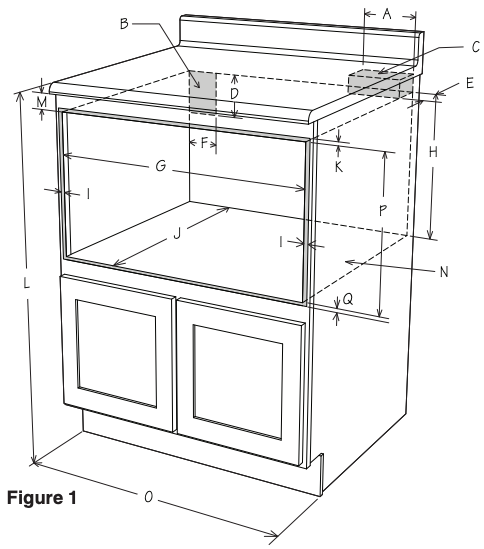
A. 6″
B. Suggested electrical outlet location*
C. Anti-Tip block
D. 5″
E. 3-1/2″
F. 4″
G. 22-1/8″ opening
H. 14-13/16″ to bottom of Anti-Tip block
I. Allow 7/8″ overlap
J. 23-1/2″ minimum depth
K. Allow 3/16″ overlap
L. 36″ countertop height
M. Allow 7/16″ minimum space
N. Floor must support 100 lb
O. 24″ cabinet minimum
P. 15-9/16″ opening
Q. Allow 1/8″ overlap
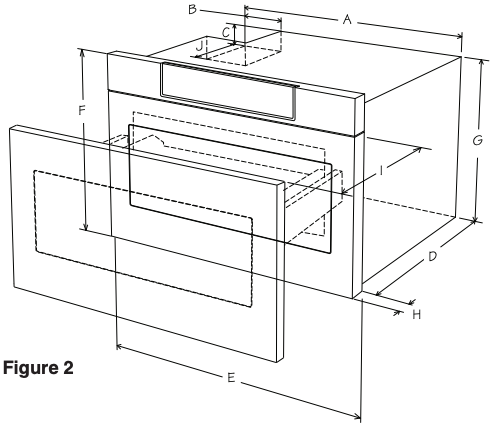
A. 21-5/8″
B. 4-11/16″
C. 1-3/4″
D. 21-7/8″
E. 23-7/8″
F. 15-7/8″
G. 14-19/32″
H. 1-9/64″ door thickness
I. 15″ auto drawer opening
J. 4″
Figures 1 and 2 contain many Microwave Drawer measurements for reference when planning the drawer’s location.
This Microwave Drawer can be installed below any electric or gas wall oven.
* Can also be installed using an electrical outlet in an adjacent cabinet within the area where the provided electrical cord can reach. Power cord access hole in cabinet should be a minimum 1 1/2″ diameter hole and deburred of all sharp edges.

Always allow sufficient power cord length to the electrical outlet to prevent tension.
Always check electrical codes for requirements.
This drawing represents a typical standard cabinet. If installed in custom cabinets with extended counter tops, take into account visibility and access to controls. See Figure 3.
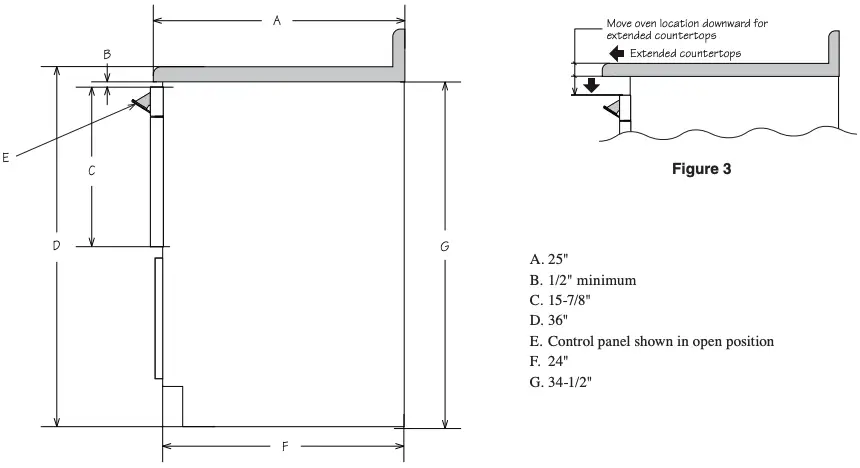
30″ MICROWAVE DRAWER MEASUREMENTS
Figures 4, 5 and 6 contain many Microwave Drawer measurements for reference when planning the drawer’s location.
This Microwave Drawer can be installed below any electric or gas wall oven.
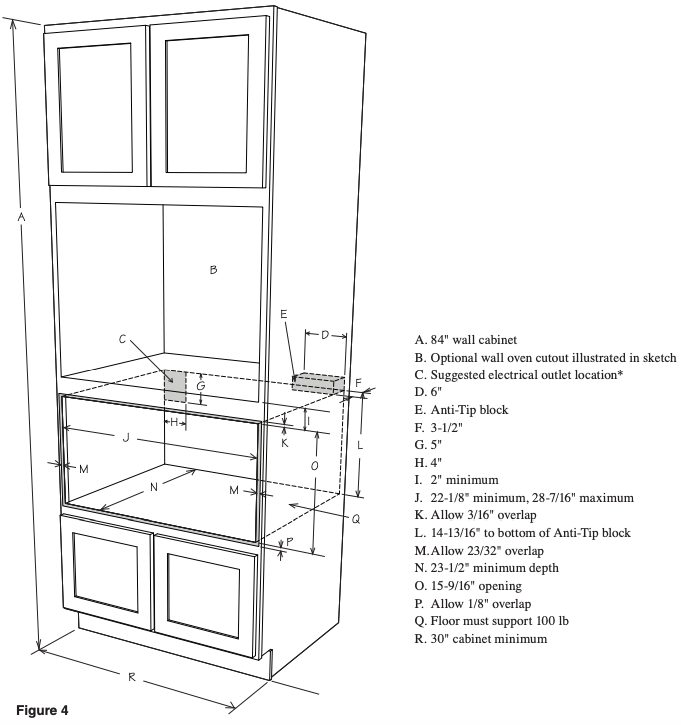
* Can also be installed using an electrical outlet in an adjacent cabinet within the area where the provided electrical cord can reach. Power cord access hole in cabinet should be a minimum 1 1/2″ diameter hole and deburred of all sharp edges.
Always allow sufficient power cord length to the electrical outlet to prevent tension.
Always check electrical codes for requirements.
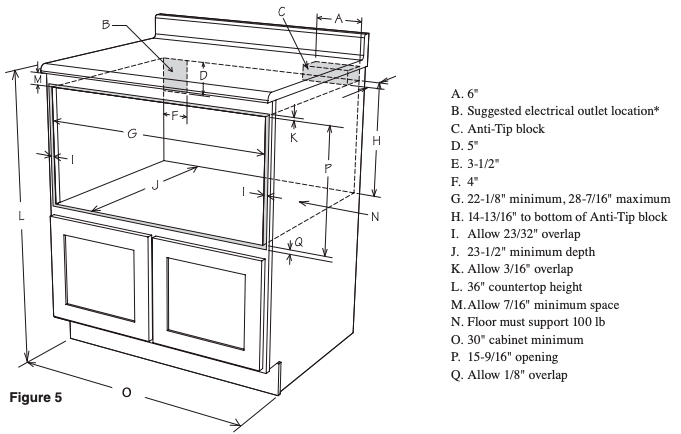
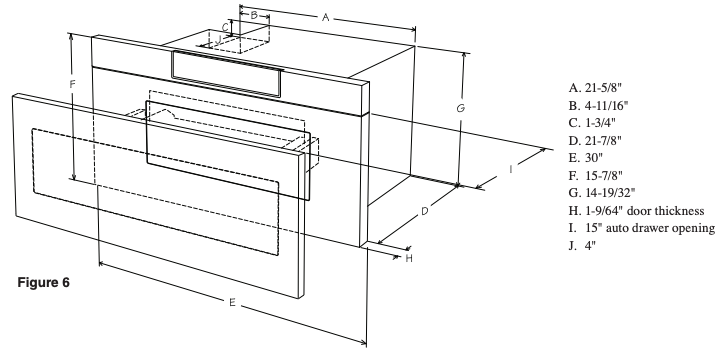
This drawing represents a typical standard cabinet. If installed in custom cabinets with extended counter tops, take into account visibility and access to controls. See Figure 7.
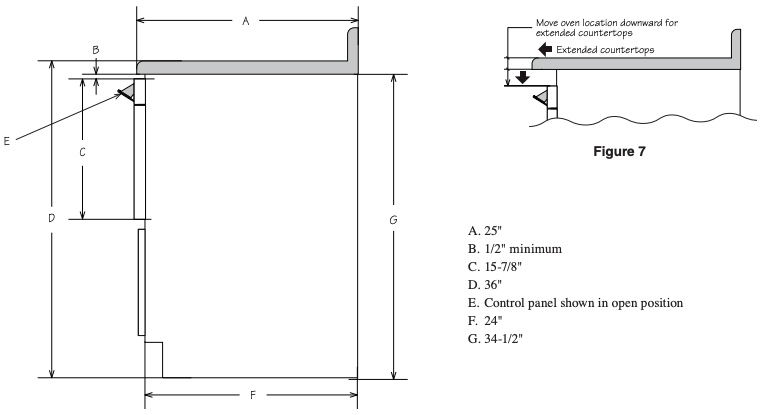
ANTI-TIP BLOCK
NORMAL INSTALLATION STEPS
ANTI-TIP BLOCK INSTALLATION INSTRUCTIONS
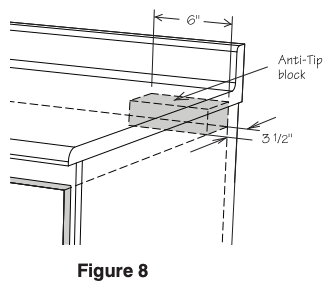
To reduce the risk of tipping of the drawer, the Anti-Tip block must be properly installed located 14 13/16-inches above the floor on which the Microwave Drawer will sit. The 6-inch Anti-Tip block must be provided by the installer. See Figures 1, 4 and 5. The Anti-Tip block prevents serious injury that might result from spilled hot liquids.
If the Microwave Drawer is ever moved to a different location, the Anti-Tip block must also be moved and installed. When installed to the wall, make sure that the screws completely penetrate the dry wall and are secured in wood or metal so that the block is totally stable. When fastening, be sure that the screws do not penetrate electrical wiring or plumbing.
ELECTRICAL OUTLET
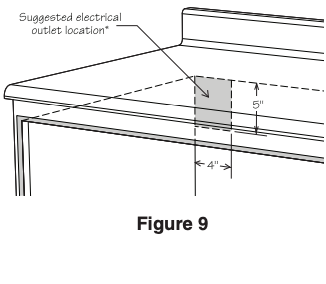
The electrical requirements are a 120 volt 60 Hz, AC only, 15 amp. or more protected electrical supply. It is recommended that a separate circuit serving only this appliance be provided.
The drawer is equipped with a 3-prong grounding plug. It must be plugged into a wall receptacle that is properly installed and grounded. Should you only have a 2-prong outlet, have a qualified electrician install a correct wall receptacle.
Note: If you have any questions about the grounding or electrical instructions, consult a qualified electrician or service person.
* Can also be installed using an electrical outlet in an adjacent cabinet within the area where the provided electrical cord can reach.
Always check electrical codes for requirements.
GROUNDING INSTRUCTIONS
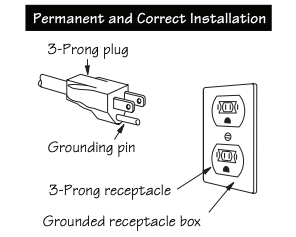
This appliance must be grounded. The Microwave Drawer is equipped with a cord having a grounding wire with a grounding plug. It must be plugged into a wall receptacle that is properly installed and grounded in accordance with the National Electrical Code and local codes and ordinances. In the event of an electrical short circuit, grounding reduces risk of electric shock by providing an escape wire for the electric current.
– Improper use of the grounding plug can result in a risk of electric shock. Do not use an extension cord. If the power supply cord is too short, have a qualified electrician or serviceman install an outlet near the appliance.
DRAWER INSTALLATION
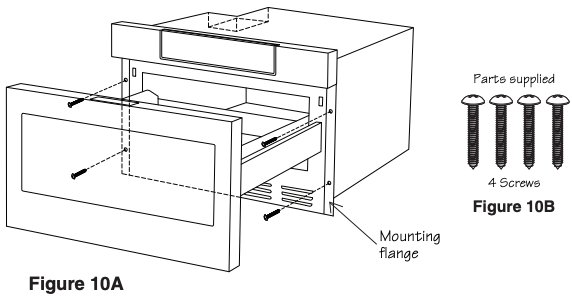
- Place the drawer adjacent to the wall or cabinet opening. Plug the power supply cord into the electrical outlet.
- Carefully guide the drawer into the prepared opening. Avoid pinching the cord between the oven and the wall.
- Slide the drawer all the way until the mounting flange is flush with the face of the cabinet. See Figure 10A.
- Open the drawer. Using the 4 holes on the drawer as a template, pre drill the cabinet using a 1/16″ bit. See Figure 10A.
- Secure the drawer with the 4 screws supplied. See Figure 10B.
MODEL AND SERIAL NUMBER LOCATION
The name plate includes model and serial number. Open the Microwave Drawer fully. The label is beyond the back wall of the microwave cavity facing up from the flat surface.
CARE, CLEANING AND MAINTENANCE
Refer to the Operation Manual for cleaning instructions.
BEFORE YOU CALL FOR SERVICE
Read the BEFORE YOU CALL and operating instruction sections in your Operation Manual. It may save you time and expense. The list includes common occurrences that are not the result of defective workmanship or materials in this range. Refer to the warranty in your Operation Manual for Sharp’s toll-free service number and address. Please call or write if you have inquiries about your microwave product and/or need to order parts.
]]>![]()
MODEL
HT-SBW460
SOUND BAR HOME THEATER SYSTEM
OPERATION MANUAL
Thank you for purchasing this SHARP product. To obtain the best performance from this product, please read this manual carefully. It will guide you in operating your SHARP product.
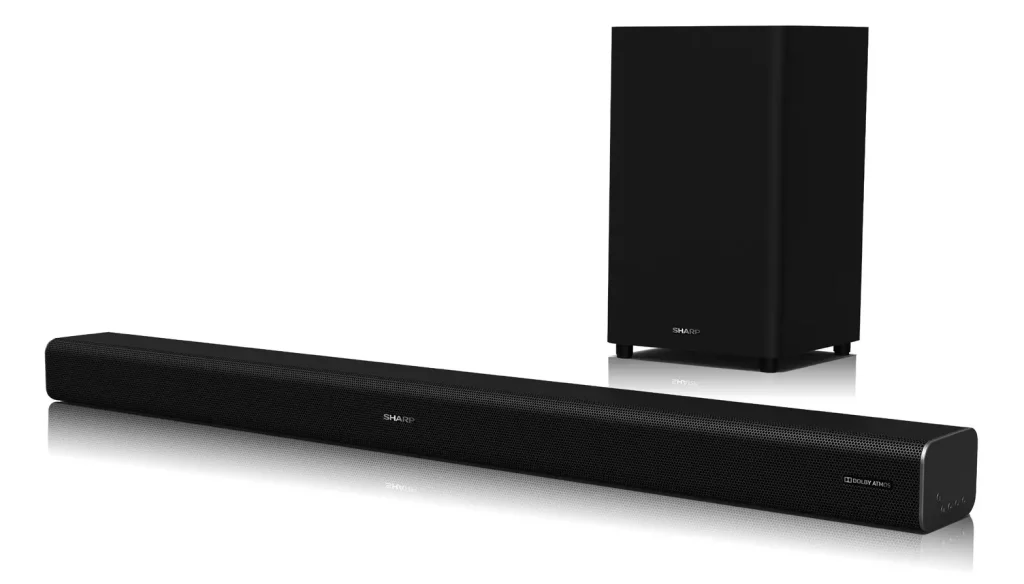

Accessories
The following accessories are included.

Special notes
The terms HDMI and HDMI High-Definition Multimedia Interface, and the HDMI Logo are trademarks or registered trademarks of HDMI Licensing LLC in the United States and other countries.
The Bluetooth® word mark and logos are registered trademarks owned by Bluetooth SIG, Inc. and any use of such marks by SHARP is under license. Other trademarks and trade names are those of their respective owners.
Manufactured under license from Dolby Laboratories. Dolby, Dolby Atmos, and the double-D symbol are trademarks of Dolby Laboratories.
Precaution
General
- Please ensure a minimum distance of 150 cm around the apparatus for sufficient ventilation. Do not block any ventilation openings of this product.
- Use the sound bar on a firm, level surface free from vibration.
- Keep the sound bar away from direct sunlight, strong magnetic fields, excessive dust, humidity and electronic/electrical equipment (home computers, facsimiles, etc.) which generate electrical noise.
- Do not place anything on top of the sound bar.
- Do not expose the sound bar to moisture, to
temperatures higher than 60°C (140°F) or to extremely low temperatures. - If the sound bar does not work properly, unplug and plug it in again. Then turn it on.
- In case of an electrical storm, unplug the sound bar for safety.
- Hold the AC power plug by the head when removing it from the wall socket, as pulling the lead can damage internal wires.
- The AC power plug is used as a disconnect device and shall always remain readily operable.
- Do not remove the outer cover, as this may result in electric shock. Refer internal service to your local SHARP service facility.
- The ventilation should not be impeded by covering the ventilation openings with items, such as newspapers, tablecloths, curtains, etc.
- No naked flame sources, such as lighted candles, should be placed on the apparatus.
- Attention should be drawn to the environmental aspects of battery disposal.
- This unit should only be used within the range of 5°C – 35°C (41°F – 95°F).
- The apparatus is designed for use in moderate climates.
- SHARP is not responsible for damage due to improper use. Refer all servicing to a SHARP authorised service centre.
Warnings:
- The voltage used must be the same as that specified on this sound bar. Using a higher voltage is dangerous and may result in a fire or other type of accident causing damage. SHARP will not be held responsible for any damage resulting from such usage.
- When the
 button is set at STANDBY position, mains voltage is still present inside the sound bar. The sound bar may be brought into operation by the remote control.
 - This sound bar contains no user serviceable parts. Never remove covers unless qualified to do so. This sound bar contains dangerous voltages, always remove mains plug from the socket before any service operation and when not in use for a long period.
- To prevent fire or shock hazard, do not expose this appliance to dripping or splashing. No objects filled with liquids, such as vases, shall be placed on the apparatus.
Volume control
The sound level at a given volume setting depends on speaker efficiency, location and various other factors. It is advisable to avoid exposure to high volume levels, which occurs whilst turning the sound bar on with the volume control setting up high, or while continually listening at high volumes.
Controls and indicators
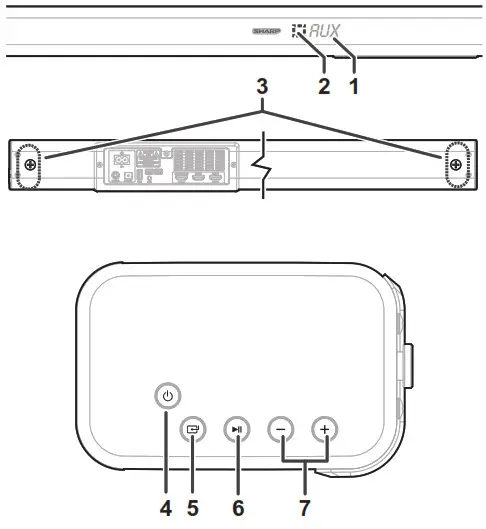
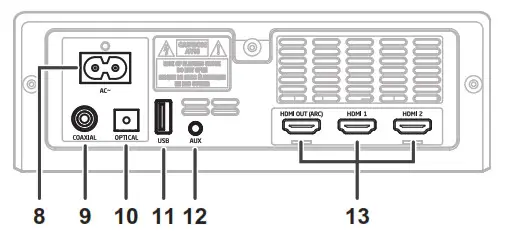
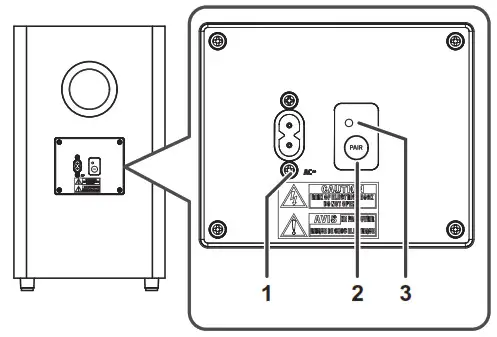
Soundbar
- Display window - Show the current status.
- Remote Control Sensor - Receive signal from the remote control.
- Wall bracket screws
- (ON/OFF) button - Switch the unit between ON and Standby mode.
 (SOURCE) button - Select the play function.
 button - Play/pause/resume playback in Bluetooth/USB mode. Press and hold to activate the pairing function in Bluetooth mode or disconnect the existing paired Bluetooth device.
- VOL+ / VOL- buttons - Increase/decrease the volume level.
- AC~ Socket
- COAXIAL Socket
- OPTICAL Socket
- USB Socket - Insert the USB device to play music.
- AUX Socket - Connect to an external audio device.
- HDMI (1/2/ARC) Sockets - Connect to a TV via HDMI cable.
Wireless subwoofer
- AC~ Socket - Connect to power.
- PAIR button - Press activate the pairing function between the sound bar and the subwoofer.
- PAIR Indicator - Light up solidly when the pairing succeed.

Remote control
- – Switch the unit between ON and STANDBY mode.
 Select the Bluetooth mode.
Press and hold to activate the pairing function in Bluetooth mode or disconnect the existing paired Bluetooth device.- Select the play function.
- SURR – Turn the surround ON/OFF.
- HDMI – Select the HDMI 1/2/ARC mode.
- VOL +/- Increase / decrease the volume level.
 Skip to previous / next track in Bluetooth / USB mode.
- Play / pause / resume playback in Bluetooth / USB mode.
 (MUTE) Mute or resume the sound.
- BASS +/- Adjust bass level.
- TRE +/- Adjust treble level.
- EQ – Select a preset sound mode.
( Dimmer Setting )
Remote control
Battery installation
- Open the battery cover.
- Insert the batteries according to the terminal indicated in the battery compartment. When inserting or removing the batteries, push it toward the () battery terminals.
- Close the cover.
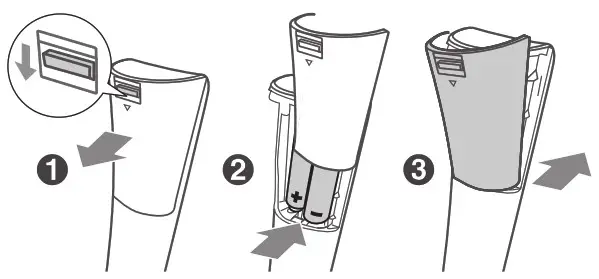
Caution:
Replace all old batteries with new ones at the same time.
- Do not mix old and new batteries.
- Remove the batteries if the unit will not be used for a long period of time. This will prevent potential damage due to battery leakage.
- Do not use rechargeable batteries (nickelcadmium battery, etc.).
- Installing the batteries incorrectly may cause the unit to malfunction.
- Batteries (battery pack or batteries installed) shall not be exposed to excessive heat such as sunshine, fire or the like.
Notes concerning use:
- Replace the batteries if the operating distance is reduced or if the operation becomes erratic. Purchase 2 “AAA” size batteries (UM/SUM4, R3, HP-16 or similar).
- Periodically clean the transmitter on the remote control and the sensor on the unit with a soft cloth.
- Exposing the sensor on the unit to strong light may interfere with operation. Change the lighting or the direction of the unit.
- Keep the remote control away from moisture, heat, shock, and vibrations.
Test of the remote control
The remote control can be used within the range shown below:
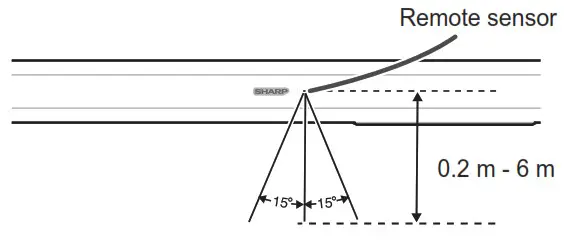
System preparation
A: Normal Placement (place Sound bar on levelled surface in front of TV)
B: Wall Mounting
Wall mounting
Make sure to unplug the AC power lead before installing the sound bar or changing the position.
Cautions:
- Be very careful to prevent the sound bar [12.5.6 kg (35..733 lbs.)] from falling when mounting on the wall.
- Before mounting, check the wall strength. (Do not put on the veneer plaster or whitewashed wall. The sound bar may fall.) If unsure, consult a qualified service technician.
- Check all wall mount angle screws for looseness.
- Select a good location. If not, accidents may occur or the sound bar may get damaged.
- SHARP is not responsible for accidents resulting from improper installation.
Notes:
- Installation must be carried out by qualified personnel only. Incorrect assembly can result in severe personal injury and property damage (if you intend to install this product yourself, you must check for installations such as electrical wiring and plumbing that may be buried inside the wall). It is the installer’s responsibility to verify that the wall will safely support the total load of the sound bar and wall brackets.
- Additional tools (not included) are required for the installation.
- Do not overtightened screws.
- Keep this instruction manual for future reference.
- Use an electronic stud finder to check the wall type before drilling and mounting.
- Drill 4 parallel holes (Ø 5.5 mm – 6 mm each according to wall type) in the wall. The distance between the holes should be 893 mm. Firmly fix 1 dowel into each hole in the wall if necessary.
- If it is a solid brick, first insert the expansion rubber into the hole. Tighten the wall mount brackets on the wall with screws and screwdriver (not included). Make sure that they are securely installed.
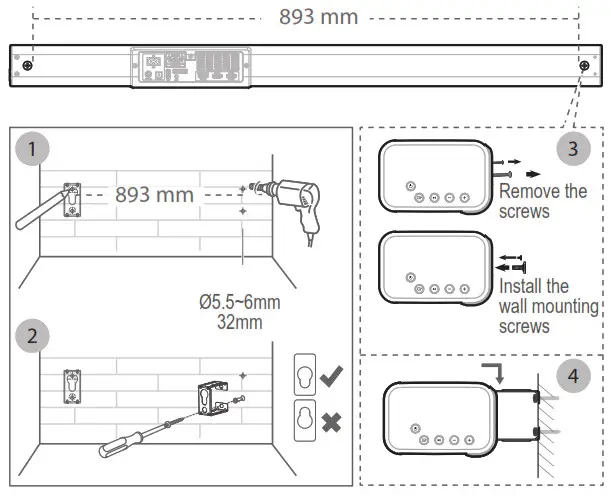
- Remove the screws at the back of the unit. Install the wall mounting screws into the back of the unit.
- Lift the unit onto the wall mount brackets and slot into place.
Connections
Dolby Atmos®
Dolby Atmos gives you amazing experience you have never heard before by overhead sound, and all the richness, clarity, and power of Dolby sound.
For using Dolby Atmos®
Dolby Atmos® is available only in HDMI mode. For the details of the connection, please refer to “HDMI Connection”.
- To use Dolby Atmos® in HDMI 1 / HDMI 2 / HDMI ARC mode, your TV has to support Dolby Atmos®.
- Make sure that “No Encoding” is selected for bitstream in the audio output of the connected external device (e.g. Blu-ray DVD player, TV etc.).
- While entering Dolby Atmos / Dolby Digital / PCM format, the sound bar will show DOLBY ATMOS / DOLBY AUDIO / PCM AUDIO.
- While the soundbar is using Dolby Atmos audio, you can only adjust the bass level of the subwoofer.
HDMI connection
Some 4K HDR TVs require the HDMI input or picture settings to be set for HDR content reception. For further setup details on HDR display, please refer to the instruction manual of your TV.
Using HDMI to connect the sound bar, AV equipment and TV:
Method 1: ARC (Audio Return Channel)
The ARC (Audio Return Channel) function allows you to send audio from your ARC- compliant TV to your sound bar through a single HDMI connection. To enjoy the ARC function, please ensure your TV is both HDMI-CEC and ARC compliant and set up accordingly. When correctly set up, you can use your TV remote control to adjust the volume output (VOL +/- and MUTE) of the sound bar.
- Connect the HDMI cable (included) from unit’s HDMI (ARC) socket to the HDMI (ARC) socket on your ARC compliant TV. Then press the remote control to select HDMI ARC.
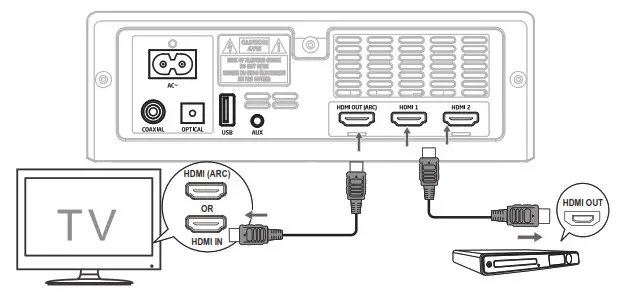 TIPS:
TIPS: - Your TV must support the HDMI-CEC and ARC function. HDMI-CEC and ARC must be set to On.
- The setting method of HDMI-CEC and ARC may differ depending on the TV. For details about ARC function, please refer to your TV owner’s manual.
- Only HDMI cables of version 1.4 or higher can support the ARC function.
Method 2: Standard HDMI
If your TV is not HDMI ARC-compliant, connect your sound bar to the TV through a standard HDMI connection.
- Use an HDMI cable (included) to connect the sound bar’s HDMI OUT socket to the TV’s HDMI IN socket.
- Use an HDMI cable (included) to connect the sound bar’s HDMI IN (1 or 2) socket to your external devices (e.g. games consoles, DVD players and blu-ray).
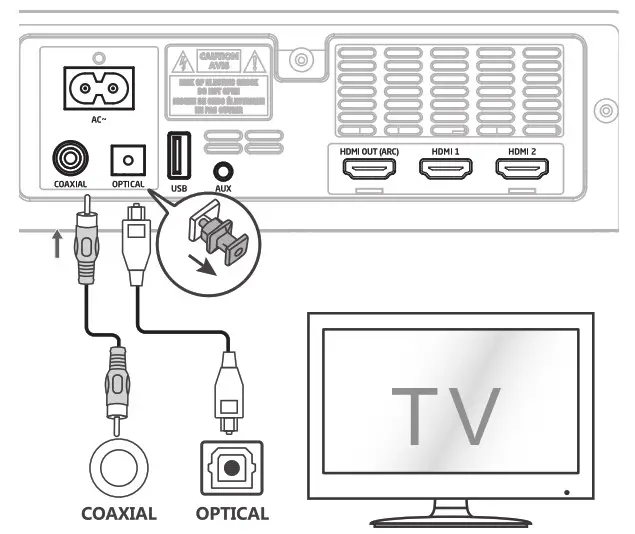
Using the OPTICAL socket
Remove the protective cap of the OPTICAL socket, then connect an OPTICAL cable (not included) to the TV’s OPTICAL OUT socket and the OPTICAL socket on the unit.
Using the COAXIAL socket
You also can use the COAXIAL cable (not included) to connect the TV’s COAXIAL OUT socket and COAXIAL socket on the unit.
TIPS:
The unit may not be able to decode all digital audio formats from the input source. In this case, the unit will mute. This is NOT a defect. Ensure that the audio setting of the input source (e.g. TV, game console, DVD player, etc.) is set to PCM or Dolby Digital (Refer to the user manual of the input source device for its audio setting details) with HDMI/HDMI ARC/OPTICAL/ COAXIAL input.
Using the AUX socket
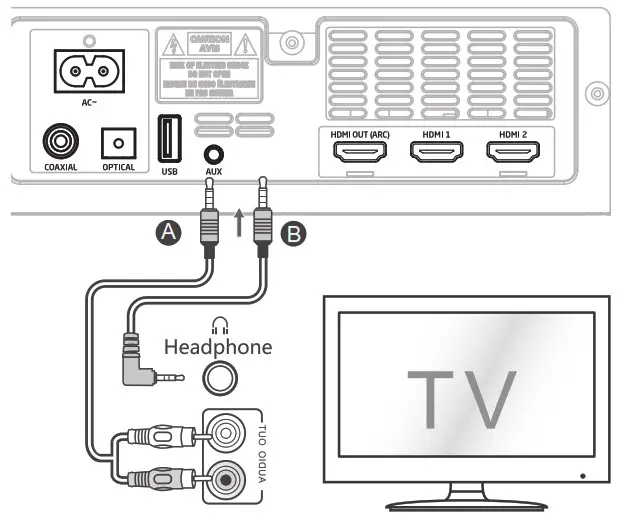 A. Use a RCA to 3.5mm audio cable (not included) to connect the TV’s audio output sockets to the AUX socket on the sound bar.
B. Use a 3.5mm to 3.5mm audio cable (included) to connect the TV’s or external audio device headphone socket to the AUX socket on the sound bar.
Power connection
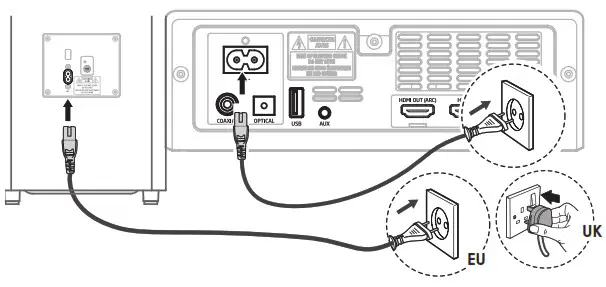
Risk of product damage!
- Ensure that the power supply voltage corresponds to the voltage printed on the back or the underside of the unit.
- Before connecting the AC power cord, ensure you have completed all other connections.
Sound bar
Connect the mains cable to the AC~ Socket of the sound bar and then into a mains socket.
Subwoofer
Connect the mains cable to the AC~ Socket of the Subwoofer and then into a mains socket.
Pairing the wireless subwoofer with the sound bar
Automatic pairing
The subwoofer and sound bar will automatically pair when both units are plugged into the mains sockets and turned on. No cable is needed for connecting the two units.
- When the subwoofer is pairing with the sound bar, the Pair Indicator will flash fast.
- When the subwoofer is paired with the sound bar, the Pair Indicator will light up.
Notes:
- Do not press the Pair button on the rear of the 1subwoofer, except for manual pairing.
- If the automatic pairing fails, pair the subwoofer with the sound bar manually.
Manual pairing
- Ensure that all the cables are well connected and the sound bar is in Standby mode.
- Press and hold the Pair button on the rear of the subwoofer for a few seconds. The subwoofer will enter the pairing mode and the Pair Indicator will blink quickly.
- Press the button on the sound bar or on the remote control to switch the sound bar on.
- After the wireless connection succeeded, the Pair Indicator will light up.
- If the Pair indicator blinks, the wireless connection has failed. Unplug the cable of the subwoofer and then reconnect the main cable after 4 minutes. Repeat step 1 ~ 4.
Notes:
- If the wireless connection fails again, check if there is conflict or strong interference (for example, interference from an electronic device) around your location. Remove these conflicts or strong interferences and repeat the above procedures.
- The subwoofer should be within 6 meters of the sound bar in an open area.
- If a TV or an external device is connected, the sound bar AUX mode and the subwoofer will switch on automatically when the TV or the external device is switched on.
- If the sound bar is not connected with the subwoofer and it is in On mode, the POWER Indicator will flash. Follow step 1 ~ 4 above to pair the subwoofer to the sound bar.
Basic operation
Standby / ON
When you first connect the unit to the mains socket, the unit will be in Standby mode.
- Press the button on the unit or on the remote control to switch the unit ON.
- Press the button again to switch the unit back to STANDBY mode.
- Disconnect the mains plug from the mains socket
If you want to switch the unit OFF completely.
• If a TV or an external device is connected, the unit will switch on automatically when the TV or the external device is switched on.
• When there is no input signal from the unit in over 15 minutes, then it will automatically switch to Standby mode.
Select Modes
Press the ![]() button repeatedly on the unit or the
button repeatedly on the unit or the ![]() / HDMI /
/ HDMI /![]() buttons on the remote control to select the AUX, OPTICAL, COAXIAL, HDMI 1, HDMI 2, HDMI ARC, USB and BT (Bluetooth) mode. The selected mode will show on the display.
buttons on the remote control to select the AUX, OPTICAL, COAXIAL, HDMI 1, HDMI 2, HDMI ARC, USB and BT (Bluetooth) mode. The selected mode will show on the display.
Adjust the Bass / Treble
- Press the BASS +/- button on the remote control to adjust bass level.
- Press the TREBLE +/- button on the remote control to adjust treble level.
Turn the Surround Sound ON/OFF
- Press the SURROUND button on the remote control to turn on the surround sound.
- Press this button again to turn off the surround sound.
Adjust the Volume
- Press the VOL+ / VOL- buttons on the unit or on the remote control to adjust the volume.
- If you wish to turn the sound off, press the button on the remote control. Press the button again or press the VOL+ / VOLbuttons on the unit or on the remote control to resume normal listening.
Select Equaliser (EQ) Effect
While playing, press the EQ button on the remote control to select between preset equalisers:
- Movie (recommended for viewing movies),
- Music (recommended for listening to music),
- News (recommended for listening to news),
- Night (recommended for listening at night).
AUX / OPTICAL / COAXIAL / HDMI / HDMI ARC operation
- Ensure that the unit is connected to the TV or audio device.
- Press the button repeatedly on the unit or the / HDMI buttons on the remote control to select the AUX, OPTICAL, COAXIAL, HDMI 1, HDMI 2, HDMI ARC mode.
- Operate your audio device directly for playback features.
- Press the VOL +/ button to adjust the volume to your desired level.
Notes:
- The unit may not be able to decode all digital audio formats from the input source. In this case, the unit will mute. This is NOT a defect. Ensure that the audio setting of the input source (e.g. TV, game console, DVD player, etc.) is set to PCM or Dolby Digital (Refer to the user manual of the input source device for its audio setting details) with HDMI 1 /HDMI 2 / HDMI ARC / OPTICAL / COAXIAL input.
- When the DOLBY DIGITAL audio format is entered, the sound bar display shows DOLBY AUDIO.
- When the PCM audio format is entered, the sound bar display shows PCM AUDIO.
- When entering non-PCM or DOLBY DIGITAL audio formats, if there is no sound output from the unit and the display show NO SUPPORT.
Bluetooth operation
Pair Bluetooth-enabled Devices
The first time you connect your bluetooth device to this unit, you need to pair your device to it.
Notes:
- The operational range between this unit and a Bluetooth device is approximately 180 meters (without any object between the Bluetooth device and the unit).
- Before you connect a Bluetooth device to this unit, ensure you know the device’s capabilities. Compatibility with all Bluetooth devices is not guaranteed.
- Any obstacle between this unit and a Bluetooth device can reduce the operational range.
- If the signal strength is weak, your Bluetooth receiver may disconnect, but it will re-enter pairing mode automatically.
- During ON mode, press the button repeatedly on the unit or the button on the remote control to select Bluetooth mode. “NO BT” will show on the display if the unit is not paired to any Bluetooth device.
- Activate your Bluetooth device and select the search mode. “HT-SBW460” will appear on your Bluetooth device list.
• If you cannot find the unit, press and hold the button on the remote control or button on the unit to be searchable. The display will show “PAIR” and you will hear “Pairing” from the unit. - Select “HT-SBW460” in the pairing list. After successful pairing, you will hear “Paired” from the unit, and the display panel shows “BT”.
- Play music from the connected Bluetooth device.
To disconnect the Bluetooth function, you can:
- Switch to another function on the unit.
- Disable the function from your Bluetooth device.
The Bluetooth device will be disconnected from the unit after the “Disconnected” voice prompt. Press and hold the button on the remote control or button on the unit.
TIPS:
- Enter “0000” for the password if necessary.
- If no other Bluetooth device pairs with this unit within two minutes, it will recover its previous connection.
- The unit will also be disconnected when your device is moved beyond the operational range.
- If you want to reconnect your device to this unit, place it within the operational range.
- If the device is moved beyond the operational range, when it is brought back, please check if the device is still connected to the unit.
- If the connection is lost, follow the instructions above to pair your device to the unit again.
Listen to Music from Bluetooth Device
- If the connected Bluetooth device supports Advanced Audio Distribution Profile (A2DP), you can listen to the music stored on the device through this unit.
- If the device also supports Audio Video Remote Control Profile (AVRCP), you can use the unit’s remote control to play music stored on the device.
- Pair your device with the unit.
- Play music via your device (if it supports A2DP).
- Use supplied remote control to control playback (if it supports AVRCP).
- To pause/resume play, press the button on the remote control or on the unit.
- To skip to a track, press the buttons on the remote control.
USB operation
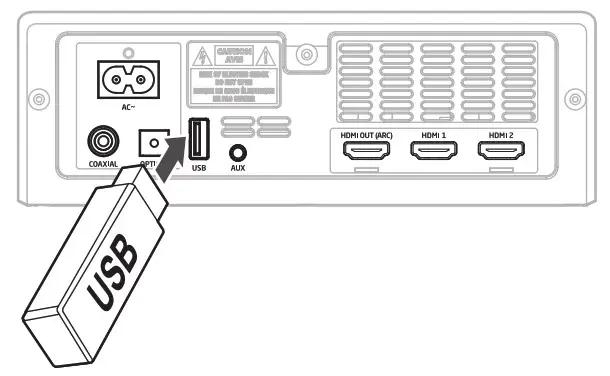
- Insert the USB device.
- Press the button repeatedly on the sound bar or remote control to select USB mode.
- During playback:
• To pause or resume play, press the button on the remote control or on the unit.
• To skip to the previous or next file, press the buttons on the remote control.
TIPS:
- The unit can support USB devices with up to 32 GB of memory.
- This unit can play MP3 only.
Troubleshooting
No power
- Ensure that the AC cord of the apparatus is properly connected.
- Ensure that there is power at the AC outlet.
- Press button to turn the unit on.
Remote control does not work
- Before you press any playback control button, first select the correct source.
- Reduce the distance between the remote control and the unit.
- Insert the battery with its polarities (+/-) aligned as indicated.
- Replace the battery.
- Aim the remote control directly at the sensor on the front of the unit.
No sound
- Make sure that the unit is not muted. Press MUTE or VOL+/VOL button to resume normal listening.
- Press button on the unit or on the remote control to turn the sound bar to standby mode. Then press the button again to turn the sound bar on.
- Unplug both the sound bar and the subwoofer from the mains socket, then plug them again. Turn on the sound bar.
- Ensure the audio setting of the input source (e.g. TV, game console, DVD player, etc.) is set to PCM or Dolby Digital mode while using digital (e.g. HDMI, OPTICAL, COAXIAL) connection.
- The subwoofer is out of range, please move the subwoofer closer to the sound bar. Make sure the subwoofer is within 5 meters from the sound bar (the closer the better).
- The sound bar may have lost connection with the subwoofer. Re-pair the units by following the steps on the section “Pairing the Wireless Subwoofer with the Sound bar”.
- The unit may not be able to decode all digital audio formats from the input source. In this case, the unit will mute. This is NOT a defect.
TV has display problem while viewing HDR content from HDMI source.
- Some 4K HDR TVs require the HDMI input or picture settings to be set for HDR content reception. For further setup details on HDR display, please refer to the instruction manual of your TV.
I can’t find the Bluetooth name of this unit on my Bluetooth device for Bluetooth pairing
- Ensure the Bluetooth function is activated on your Bluetooth device.
- Ensure you have paired the unit with your Bluetooth device.
- This is a 15 minutes power off function, one of the ERPII standard requirement for saving power
- When the unit’s external input signal level is too low, the unit will be turned off automatically in 15 minutes. Please increase the volume level of your external device.
The subwoofer is idle or the indicator of subwoofer does not light up.
- Please unplug power cord from the mains socket, and plug it in again after 4 minutes to resent the subwoofer.
Specification
As part of our policy of continuous improvement, SHARP reserves the right to make design and specification changes for product improvement without prior notice. The performance specification figures indicated are nominal values of production units. There may be some deviations from these values in individual unit.
Sound bar
| Power supply | AC 100-240V – 50/60 Hz |
| Power consumption | 30W |
| Power consumption (standby) | < 0.5 W |
| Output power | 2 x 25 W + 50 W (RMS) |
| Frequency response | 130 Hz – 20 KHz |
| Dimensions | Length: 950 mm Height: 70 mm Depth:105 mm |
| Weight | 2.6 kg |
Bluetooth
| Version | V 4.2 |
| Maximum power transmitted | 5 dbm |
| Frequency bands | 2402 MHz – 2480 MHz |
Wireless Subwoofer
| Power supply | AC 100-240V – 50’60 Hz |
| Power consumption | 25W |
| Power consumption (standby) | < 0.5 W |
| Output power | 120 W (RMS) |
| Maximum power transmitted | 3 dBm |
| Frequency response | 50 Hz – 130 Hz |
| Frequency bands | 5150 – 5250 MHz: 5725 – 5850 MHz |
| Dimensions | Length:240 mm Height:415mm Depth:240mm |
| Weight | 5.6 kg |
Remote control
| Distance/Angle | 6m / 30° |
| Battery type | AAA (1.5V X 2) |
MEMO
![]()
SHARP CORPORATION

Printed in China
20C R MW
SHARP Washing Machine User Manual
![]()
ES-W95TWXT
ES-W85TWXT
Operation manual
Thank you for purchasing our product.
Please read this manual carefully before use.
Please read “Safety precautions” carefully before use.
Please keep this manual in a safe place.
Our product is intended to be used in household and similar applications such as:
– staff kitchen areas in shops, offices and other working environment;
– farm houses;
– by clients in hotels, motels and other residential type environments;
– bed and breakfast type environments;
– areas for communal use in blocks of flats or in launderettes.
Safety precautions
CAUTION
- To avoid accident /injury, if the power cord is damaged, it must only be replaced by an authorized service staff or contact the nearest Sharp Service Center for assistance.
- If powder detergent or liquid detergent spill over the top lid, or other plastic components, wipe it away immediately, otherwise it may damage them.
- Each time washing is finished, clean lint filter box. Otherwise it may not be effective in filtering lint.
- The new hose-sets supplied with the appliances are to be used and that old hose-sets should not be reused.
Parts of the washing machine
Machine body
List of accessories
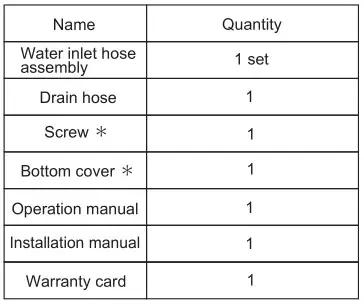
NOTE
* Bottom cover and Screw are applied by service staff.
• Keep the Operation manual and installation manual for future reference.
Specifications
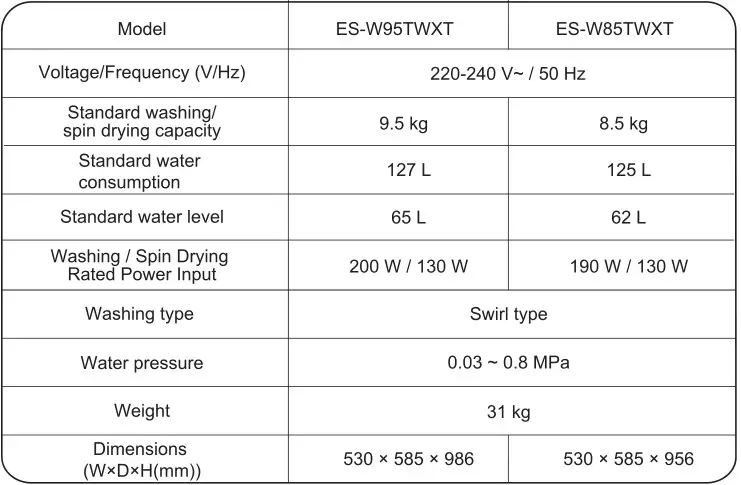
Installation
See Installation manual for detail.
The way to check whether the product is installed correctly
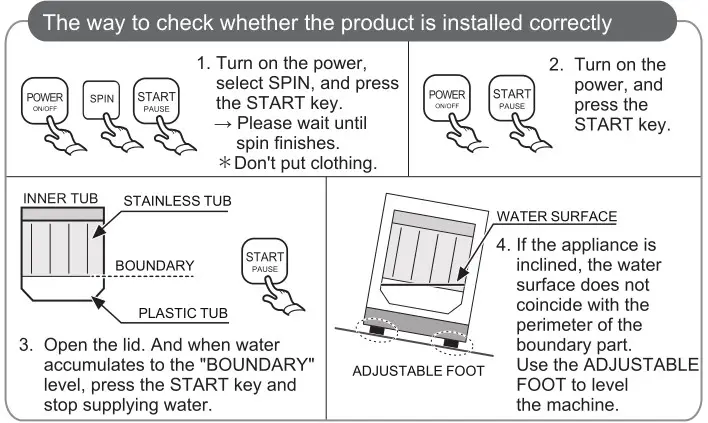
Drain hose
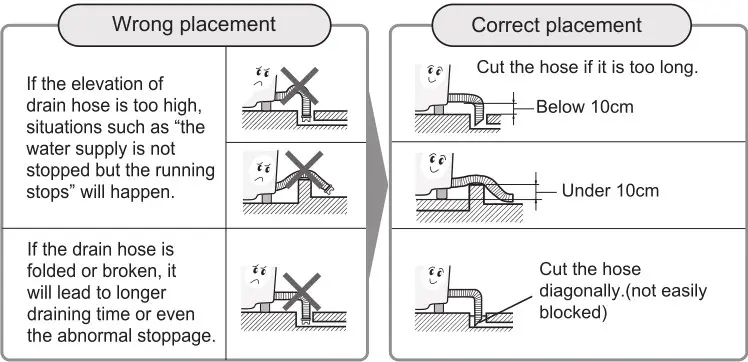
- If a floor drain is used, the height from the ground should not be under 10 cm.
- If the drain hose is too high, the water supply will not stop. This time, you should adjust the drain hose so that the clearance to the floor is below 10cm, The water will drain out, and then start again.
- Plug the drain hose into the drain port tightly. If the drain hose drops, water will flow to the ground and damage the floor.
- Please do not plug the drain hose to the inside or bottom of washing machine.
- Change the direction of drain hose
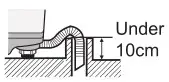
- When the draining hose is not long enough, please use extension hose. The length of used extension hose should not exceed 1.5m. (The inner diameter of draining hose is about 3.8cm).
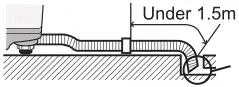
(not easily blocked)
- If the hose is too long, it can be cut off at the narrow part shown in the figure.
Key points in washing clothes
Pay extra attention to the following situations
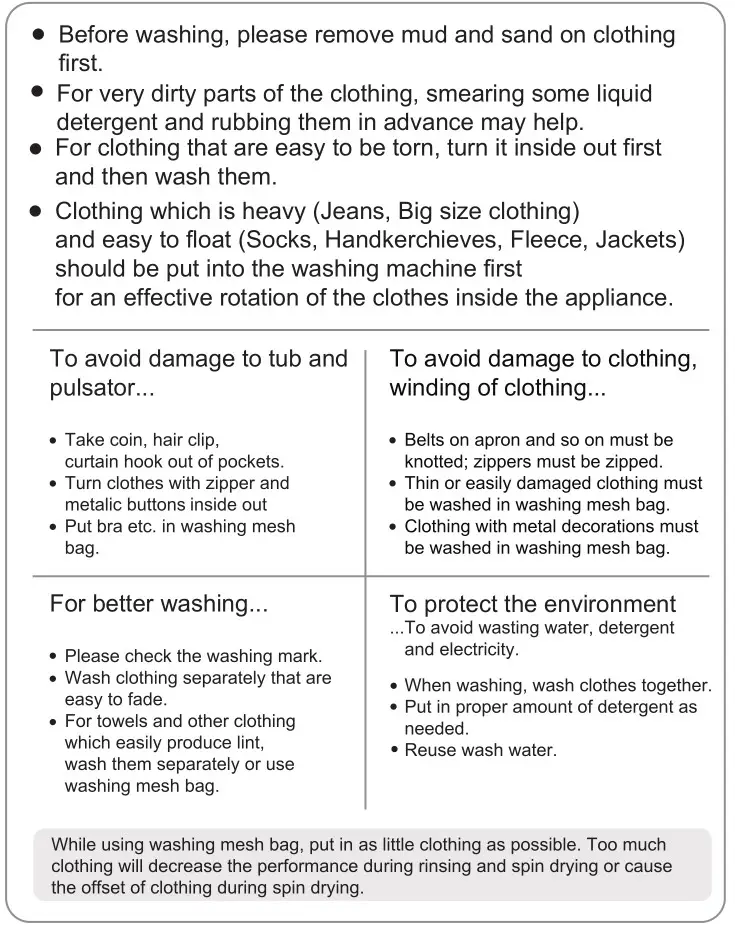
Instruction on control panel functions
Control panel / Display
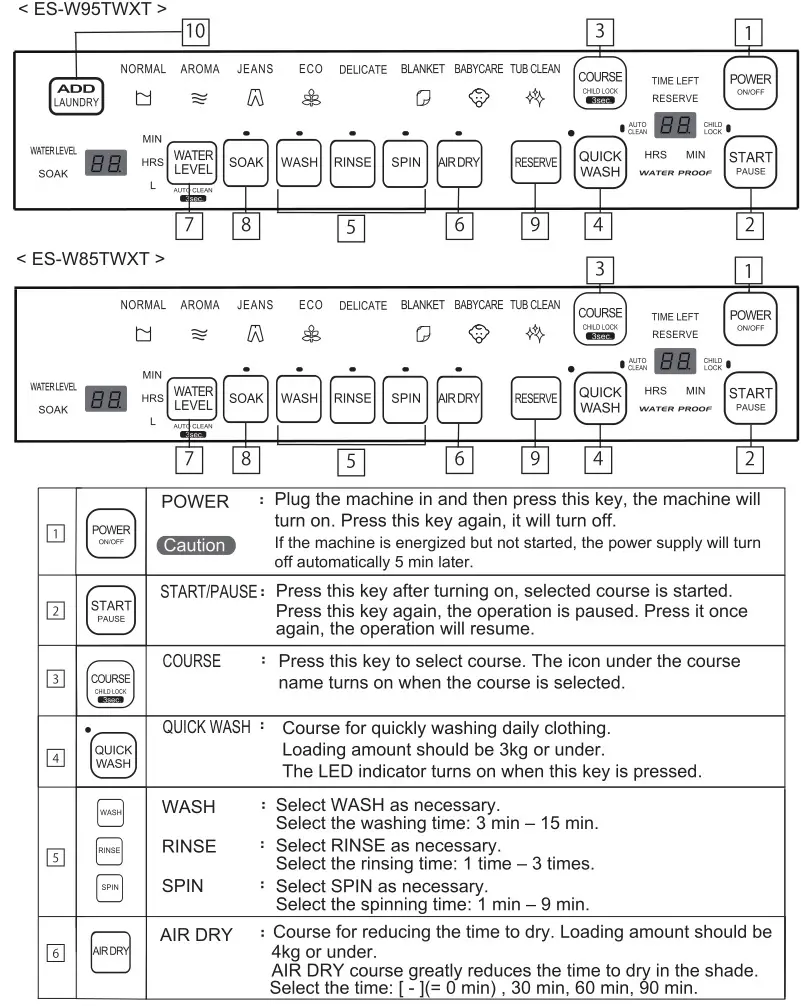
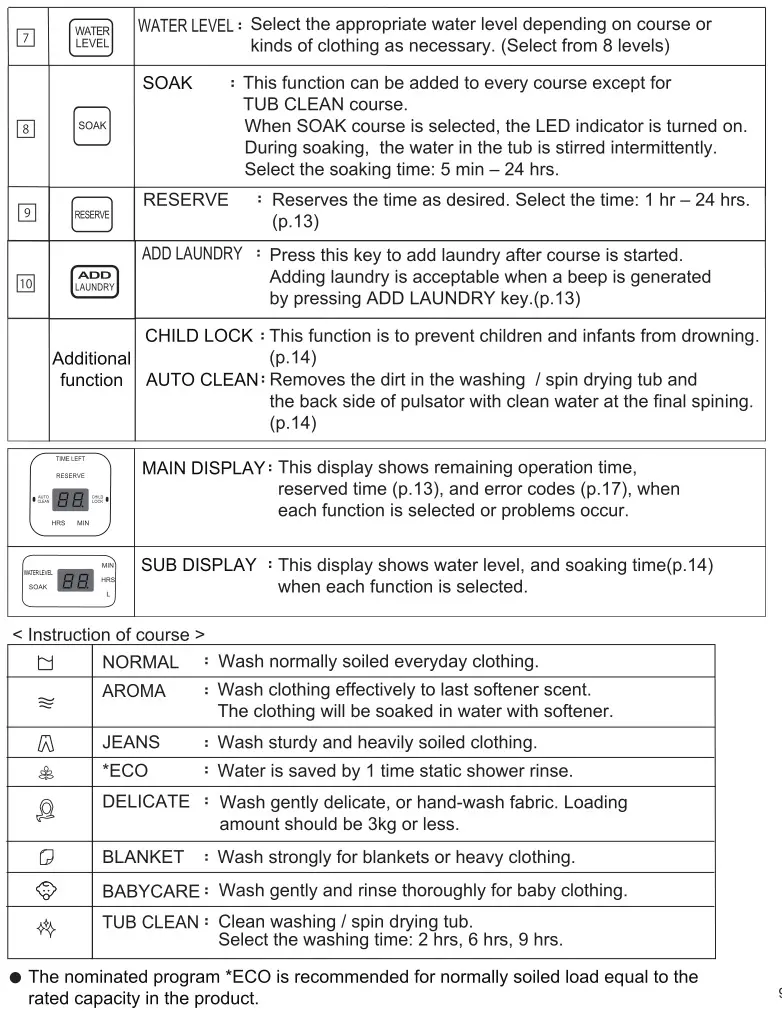
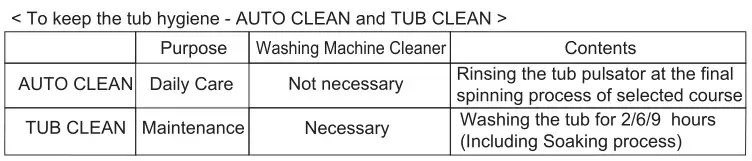
Things to know before washing
- Select the course depending on the type of clothing or soiled level on clothing.
- Once you press START/PAUSE key, you cannot change the course. When you want to change the course, turn off the power and select the desired course again.
- LED indicator blinks when in operation, and lights when the course is selected.
- The machine generates a beep and turns off when it finishes the course. The beep sound setting can be turned off by pressing COURSE key and AIR DRY key simultaneously after the operation starts.
- When the motor gets hot beyond a safe limit, it fail-safes on itself, and can’t work enough. Do not operate the machines many times in a row.
- In BLANKET course, fold the blanket as below.
- In BLANKET course, keep the blanket below the line.
![]()
ECO SHOWER RINSE
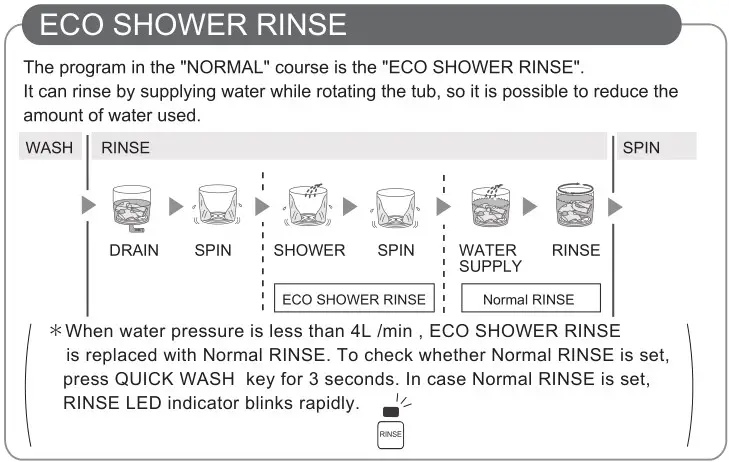
Instruction on washing courses
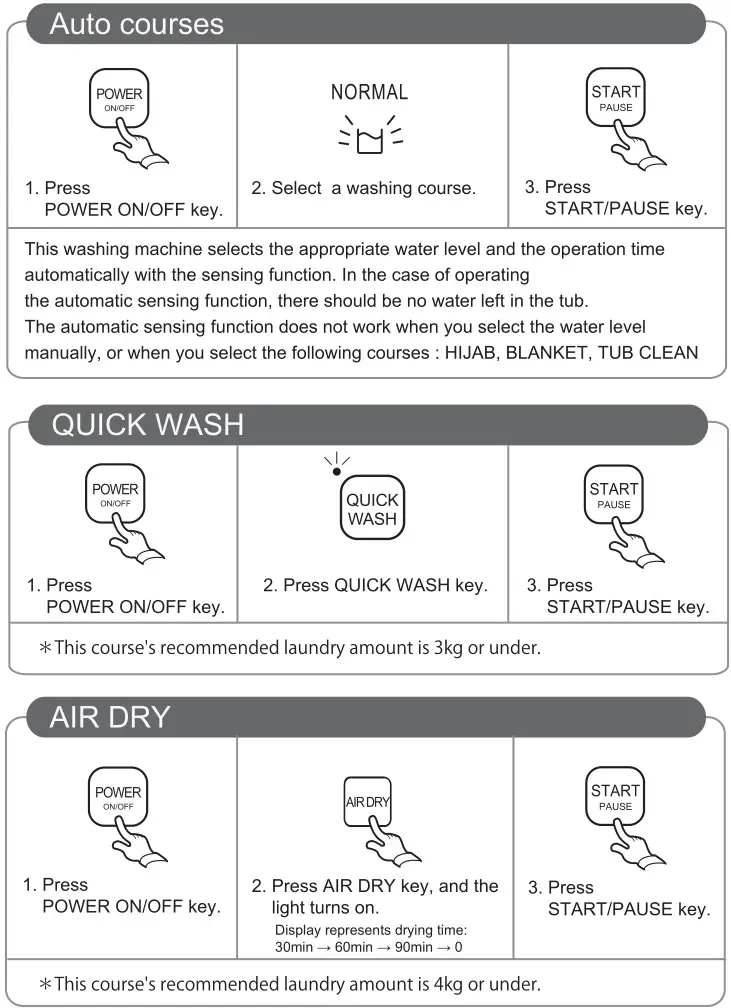
Manual washing course
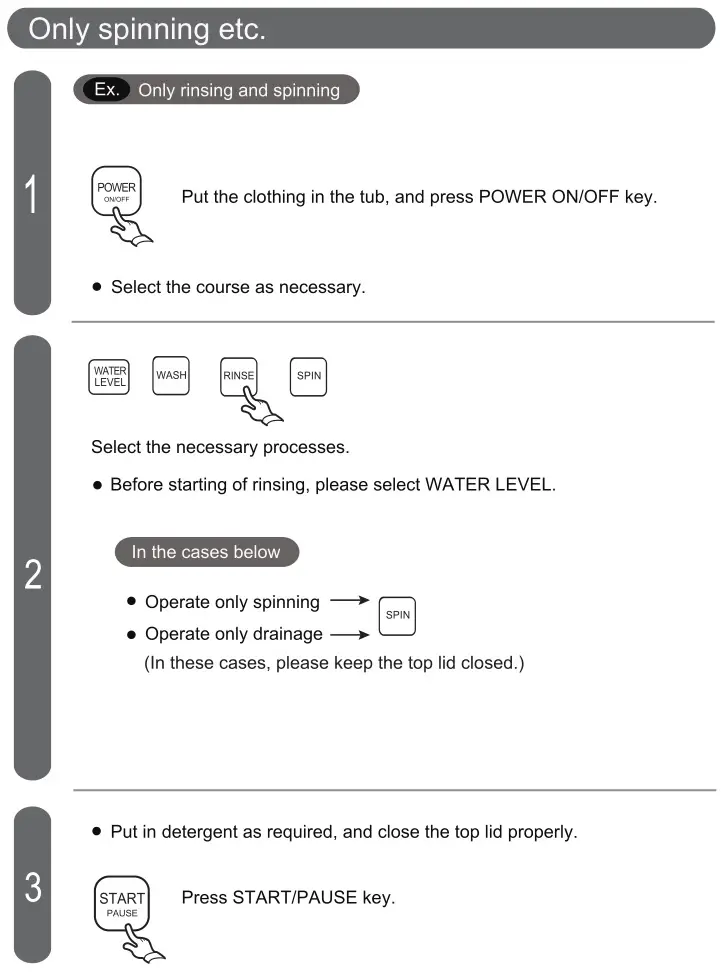
Additional operating procedure
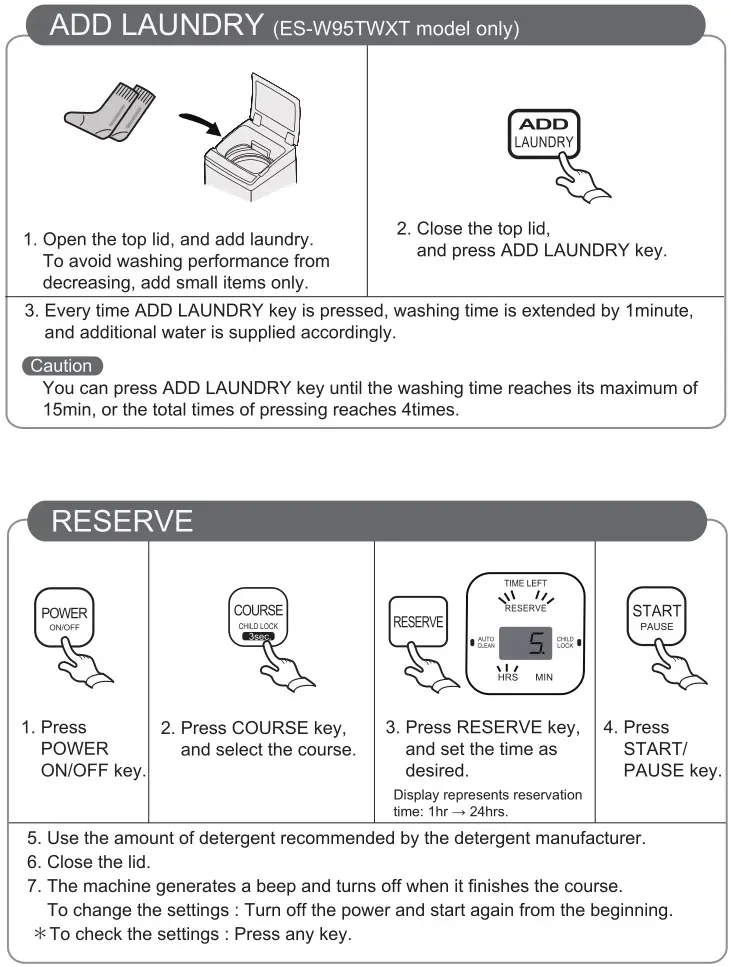
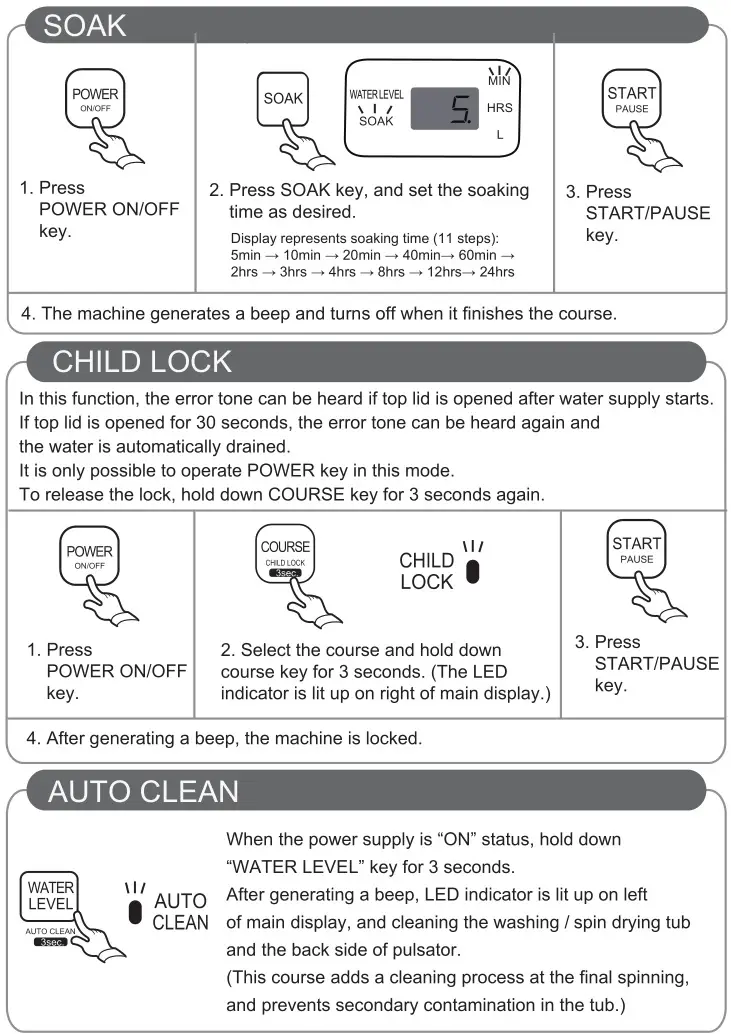
Maintenance
Water inlet hose connecting port

Lint filter box
Clean it every time after using
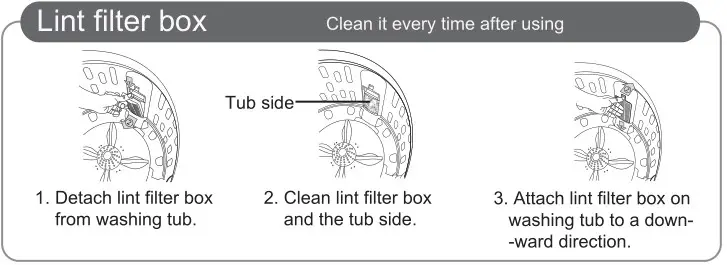
Washing / Spin Drying tub
- Every time after washing, turn off the faucet and power. (If necessary, dismantle water inlet hose.)
- Wipe the water in the tub after washing as soon as possible. Use clean soft cloth.
- Be sure to pull out the plug from the plug socket during maintenance.
- Hanging power cord and drain hose is desirable.
- Open top lid for about 1 hour after cleaning the tub.
- Do not use solvents such as alcohol, cleanser and so on, because they may cause damage to the surface of the tub.
TUB CLEAN
In the case of cleaning the washing / spin drying tub

Common non-fault phenomenon
(Please refer to this section if there is an abnormality happens.)
Abnormal display

Caution
It generates a beep when washing machine indicates abnormal display.
As the phenomenon may not be a fault, please check it again before sending the machine for repair. In the case of failure, please consult Sharp Service Center. Be sure not to disassemble and repair the machine without permission.
Common non-fault phenomenon
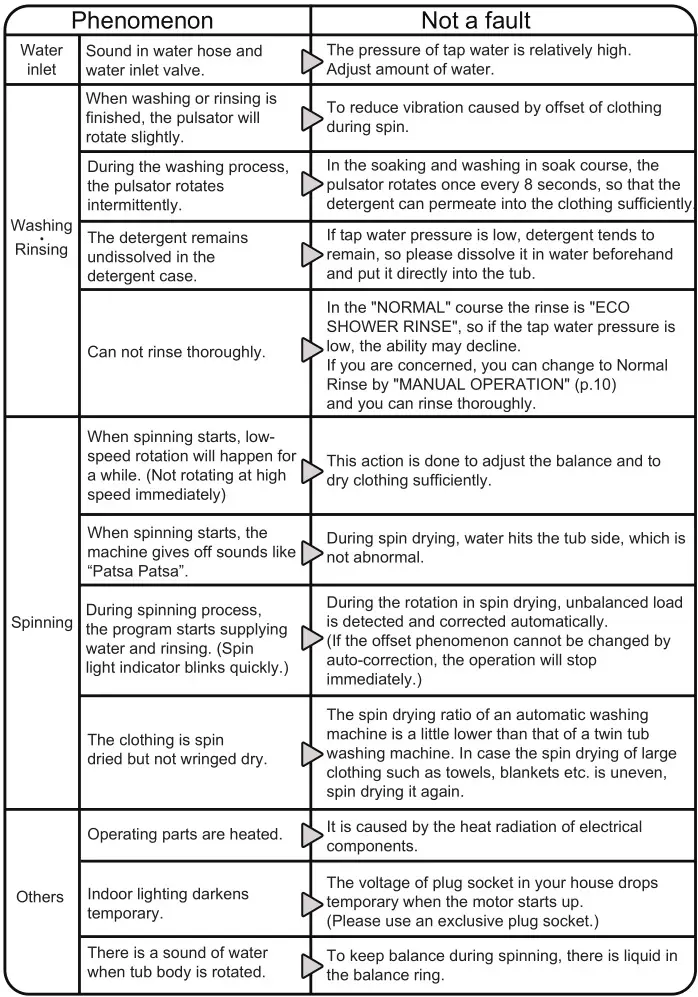
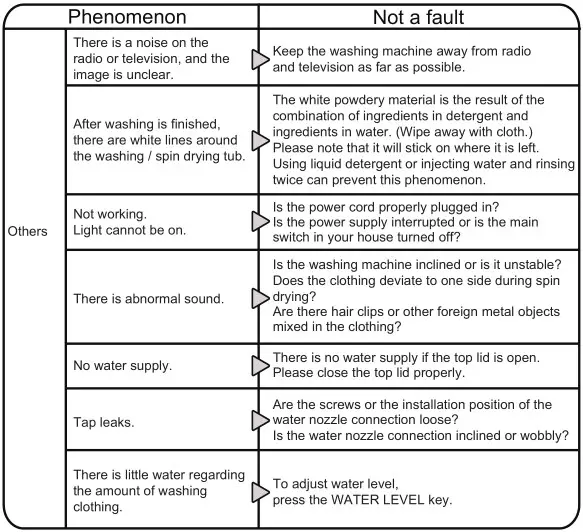
Inspection of a washing machine that have been used for many years.
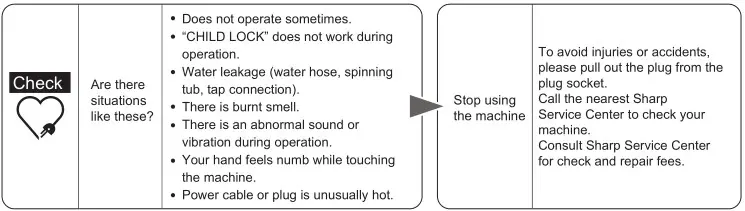
![]()
SHARP CORPORATION
OSAKA, JAPAN
![]()
 Quick Start Guide
| LC-32Q5220U LC-32Q5230U LC-32Q5240U LC-32Q5250U |
LC-32Q5270U LC-32Q5280U LC-32Q5290U LC-32Q5200U LC-32Q5100U |
Help SHARP improve the environment by reducing paper waste.
For detailed instructions and feature descriptions, access the full User Manual online.
Before using the TV, please read this guide carefully and keep it for future reference.
© 2018 Hisense Company Ltd. All Rights Reserved.
All material in this Quick Start Guide is the property of Hisense Company Ltd. and its subsidiaries and is protected under the US and International copyright and/or other intellectual property laws. Reproduction or transmission of the materials, in whole or in part, in any manner, electronic, print, or otherwise, without the prior written consent of Hisense Company Ltd., is a violation of Hisense Company Ltd.
rights under the aforementioned laws.
No part of this publication may be stored, reproduced, transmitted or distributed, in whole or in part, in any manner, electronic or other-wise, whether or not for a charge or other or no consideration, without the prior written permission of Hisense Company Ltd. Requests for permission to store, reproduce, transmit or distribute materials may be made in writing to the following address:
USA: Hisense USA Corporation
7310 McGinnis Ferry Road
Suwanee, GA 30024
CANADA: Hisense Canada Co., Ltd
2283 Argentia Road, Unit 16
Mississauga, ON, Canada L5N 5Z2
MEXICO: Hisense Mexico S. de R.L. de C.V.
Blvd. Miguel de Cervantes Saavedra No 301
Torre Norte Piso 2, Col. Ampliación Granada
Miguel Hidalgo, Ciudad de México, C.P. 11520
“Sharp™”, “Aquos™”, “Quattron™”, and any and all other Sharp product names, logos, slogans, or marks are registered trademarks owned exclusively by Sharp Corporation.
“Hisense™”, and any and all other Hisense product names, logos, slogans, or marks are registered trademarks and intellectual property rights of Hisense Company Ltd. and its subsidiaries.
This product is sold to you under one or more license agreements between Sharp Corporation and Hisense International (Hong Kong)
America Investment Co. Ltd. All other trademarks are the property of their respective holders.
Register Your TV!
Congratulations on the purchase of your new TV! This Quick Start Guide will walk you through a few easy steps to set up your TV. For detailed instructions, access the User Manual on the support pages listed below.
Because we value your business, we want to keep you in the know of ‘all things SHARP’. Using your mobile phone, scan the Registration page QR code to register your TV. Depending on the make and model of your phone, you may need to download a QR code scanning app.
| Country | Customer Care Center | SHARP Support Page | REGISTER YOUR TV |
| U.S.A |
|

|

|
| CANADA |
|

|
No need to register |
| MEXICO |
|

|

|
Disclaimer: This Quick Start Guide is intended as a general guideline to help you set up your TV. Images throughout this document are for illustrative purposes only and may differ from the actual product.
Packaged Contents
Your package in which you purchased your new TV contains the following items:
|
|
IMPORTANT:
To prevent accidentally discarding items that came with your TV, be sure to check ALL of the foam in the carton box.

- Please check foam for accessories before discarding them.
Required tools and devices
- Wireless router (not included) for Internet connectivity
- Phillips screwdriver (not included) to secure the TV stand
- HDMI and other types of cables (not included) to connect external devices to the TV
- Wall mount bracket (not included) if you prefer to mount the TV to the wall
Buttons and Ports on the TV

STEP 1. Attach the TV Stand or Wall Mount Bracket (not included)
Attach the TV Stand
CAUTION:
- Be sure to disconnect the A/C power cord before installing a stand or Wall-Mount brackets.
- The LED display is very fragile and must be protected at all times when installing the legs that form the stand. Be sure to protect the
- TV screen from getting scratched or damaged by any hard objects. In addition, DO NOT exert pressure on the front of the TV at any time because it could crack.
To attach the left and right leg that forms the stand:
- Carefully place your TV face-down on a soft, flat surface to prevent the TV from being damaged or the screen from getting scratched.
- Remove the 2 stands from the foam and then insert the stands into the bottom slots of the TV.
- Use the 4 screws in the accessory bag to secure the base stand to the TV tightly.
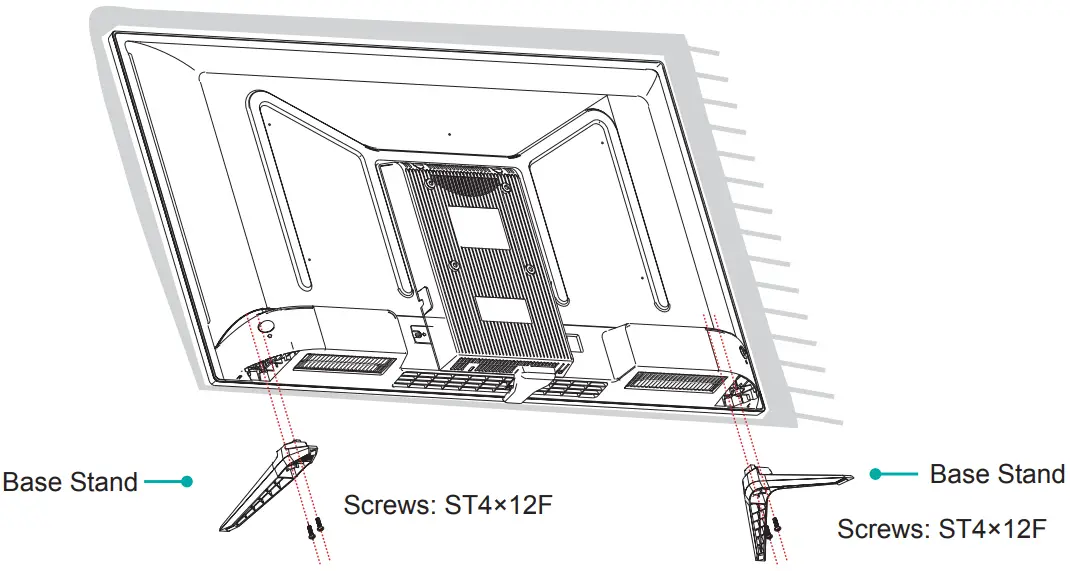
Attach the Wall Mount Bracket (not included)
Before you begin the third-party manufacturer instructions, be sure to do the following things:
- Place the TV face down on a clean, safe, and cushioned surface.
- Remove the TV stand if you already attached it.
- Place the spacers (not included) in the corresponding bracket holes.
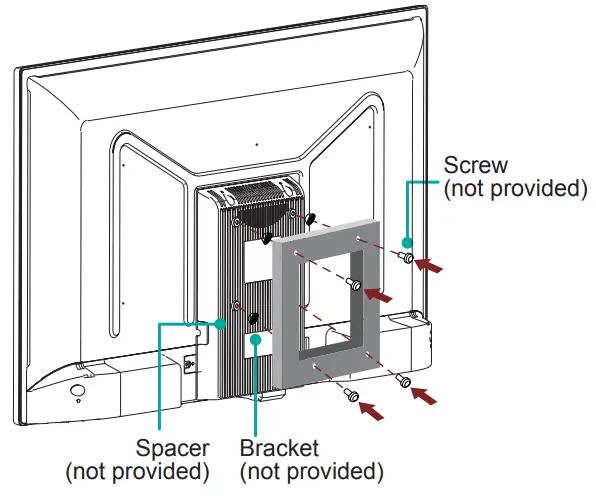
CAUTION:
- When you attach the mount, be sure to use the spacers (provided by the third-party manufacturer) between the TV and the bracket.
- To prevent internal damage to the TV and ensure it is mounted securely, be sure to use fixing screws (not provided) that are 8 – 10mm in length when measured from the attaching surface of the mounting hook.
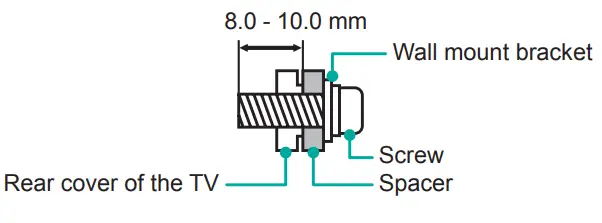
Follow instructions provided with the Wall mount bracket.
- To complete the installation, please contact the wall-mount manufacturer or the retailer from which you purchased the TV.
- The selected screws are 8.0 – 10.0 mm in length when measured from the attaching surface of the rear cover.
NOTE: The diameter and length of the screws differ depending on the wall mount bracket model.
STEP 2. Connect Devices to your TV
Check to ensure that you have selected the right cables for the ports and that they are connected securely. Loose connections can affect the quality of the picture image and color.
| TV label | Port | Cable | External Equipment | Brief Description | |
| ANT/CABLE |  |
 |
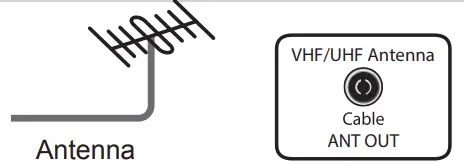 |
Connect an outdoor VHF/UHF antenna. | |
| HDMI |  |
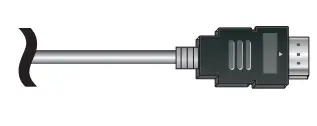 |
 |
Connect a High Definition Multimedia Interface (HDMI) cable from an external device. | |
| Connect a High Definition Multimedia Interface (HDMI) cable from an external device. | |||||
| AV IN | VIDEO |  |
Yellow |
Connect a composite video cable and left-right audio cables from an external AV device. | |
| L |  |
 |
|||
| R |  |
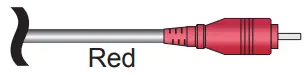 |
|||
| DIGITAL AUDIO OUT |  |
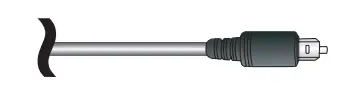 |
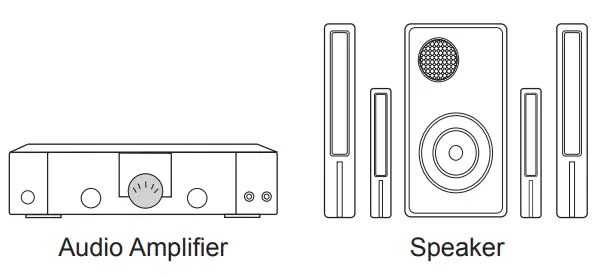 |
Connect an optical cable from an external digital audio system. | |
| USB |  |
 |
Connect a USB device for browsing photos, music, and movies. The unit only recogonizes a USB Memory Stick. |
||
| AUDIO
OUT |
 |
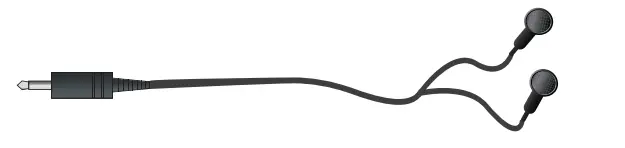 |
Connect headphones to hear audio from the TV. Headphones with microphones are not supported. | ||
|
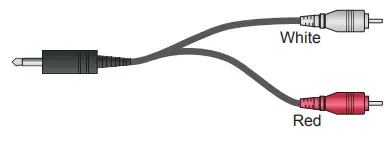 |
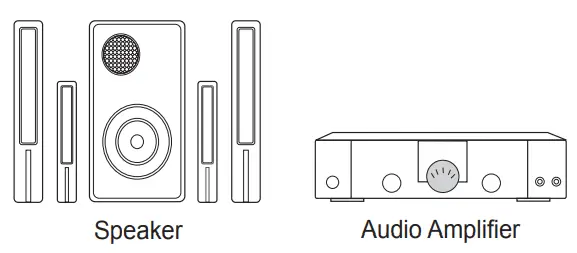 |
Connect an audio adapter (not provided) from an external analog audio system. | ||
| LAN |  |
 |
LAN |
Connect an Ethernet cable to access a network or the Internet. The TV also has a wireless connectivity feature. | |
STEP 3. Establish a Network Connection
- Press the
 button on the remote control, press the [ ˅ ] button to select Settings, and then press [OK] to enter the Settings menu.
 - Select Network → Network Configuration.
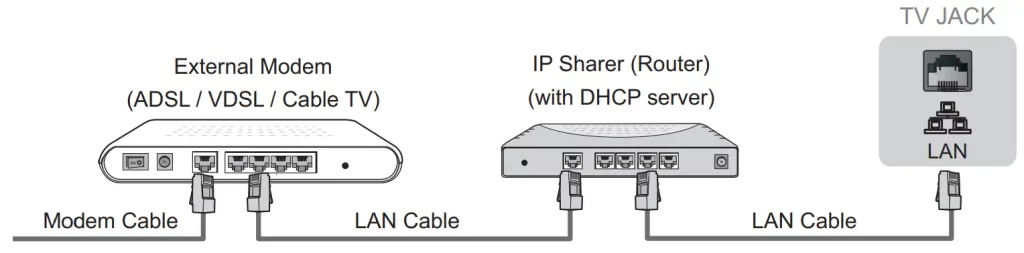
Establish a wired network connection
Automatically obtain an IP address
- Select Wired LAN. The TV will automatically obtain an IP address and connect to the network.
NOTE: The default option of IP Settings Mode is DHCP. - If the connection fails then “Disconnected” will display for the Ethernet status. Retry or enter the IP Settings, select Manual to input the information again.
Manually enter the IP address
- Select Manual
- Enter the IP Address, Netmask, Gateway, DNS Server 1, and DNS Server 2 in the menu. Next, select Save.
Establish a wireless network connection
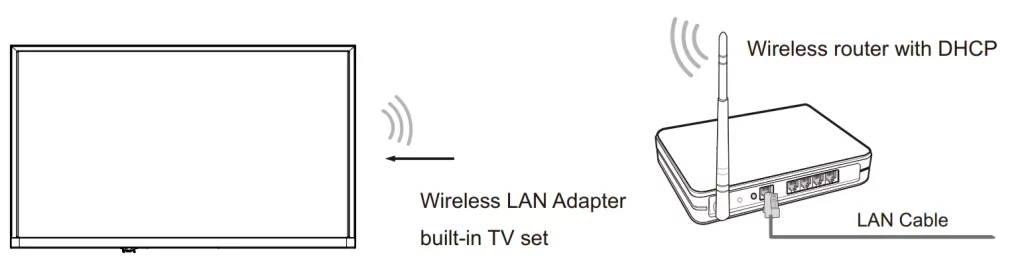
The TV can directly receive network signals via a wireless router
- Select Wireless The list of networks will be displayed automatically.
- Select a wireless network from the list, input the password, and select
- If the network connection does not appear in the list, select Refresh to refresh the list or select Add A Network to manually enter SSID and Security mode selection.
Close the network connection
Select Off. The network connection will close.
Buttons on your TV remote
| BUTTON | DESCRIPTION |
| Power on / off | |
| INPUT | Change the TV input source |
| Number | Enter Channels / input numbers |
| CC | Turn Closed Captioning On/Off and CC On When Mute |
 |
Dash button / Select a digital sub-channel |
| -(Red / Green /Yellow / Blue) | Special function buttons |
| TV | Live TV |
 |
The button for the Quick setup menu |
 |
D-pad (up/down/left/right navigation buttons) |
| OK | Confirmation button |
| BACK | Return to the previous place in the menu or app |
| EXIT | Exit the application |
 |
Display the Home screen |
| +VOL – | Volume (up/down) |
| +CH – | Channel (up/down) |
 |
Mute and restore sound |
| MTS | Set the audio language(MTS) |
 |
Media content control function buttons |
| NRT | Choose to leave the Video description feature On or Off |
| APPS | All apps |
NOTE: The buttons that appear on your remote may differ from the descriptions that we’ve provided for context.
STEP 4. Begin Using your Remote
- Slide on the back cover to open the battery compartment of the remote control.
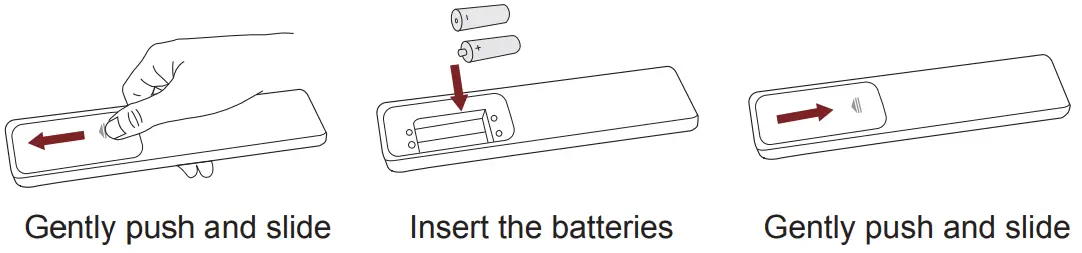
- Insert two AAA size batteries. Make sure to match the (+) and (-) ends of the batteries with the (+) and ( – ) ends indicated in the battery compartment.
- Replace the battery compartment cover.
Important Information about the remote and batteries:
- Discard batteries in a designated disposal area. Do not throw them into a fire.
- Remove old batteries immediately to prevent them from leaking into the battery compartment.
- If you do not intend to use the remote control for a long time, then remove the batteries.
- Battery chemicals can cause a rash. If the batteries leak, clean the battery compartment with a cloth. If chemicals touch your skin then wash it immediately.
- Do not mix old and new batteries.
- Do not mix alkaline, standard (carbon-zinc) or rechargeable (NiCd, NiMH, etc.) batteries.
- Do not continue using the remote if it gets warm or hot.
Call our Support Center immediately on the support website.
Remote Control Range Information
- The remote control can work at a distance of up to 26 feet in front of the TV set.
- It can work at a 30 degree horizontal or vertical angle.
Program Your Universal Cable or Satellite Remote Control to Operate Your New Television (only for The USA)
If you would like to program your other household remote controls to your new television, please refer to the User’s Manual supplied by your Cable or Satellite provider. The Cable or Satellite providers’ User Manuals should include instructions on how to program their remote to your television.
A list of codes for the most common Cable and Satellite providers are listed below. Use the code that is associated with your Cable or Satellite provider (if applicable).
DIRECTV……0178, 10178, 10019, 10748, 11314, 11660, 11710, 11780, 12049, 10171, 11204, 11326, 11517, 11564, 11641, 11963, 12002, 12183
Time Warner Cable……386, 0178, 10178, 400, 450, 461, 456, 0748, 1463, 0463, 10463
Comcast……0178, 10178, 10463, 11463, 10748, 11314, 11660, 10171, 11204, 11326, 11517, 11641, 11780, 11785, 11892, 11963, 12002
Cox Communications……0178, 10178, 1326, 1463
Dish Network.…..505, 627, 538, 720, 659
If the code associated with your Cable or Satellite provider is not listed, does not work or you cannot locate the instructions to program your remote, call your local Cable or Satellite provider’s customer service center.
If your Cable or Satellite provider does not have a code available, please contact us at one of the phone numbers on Page 1.
Using Your Cable Set-top Box or Satellite Receiver Remote as a ‘Universal’ Remote
If you prefer to use your Cable Set-top Box or Satellite Receiver Remote as a ‘Universal Remote’, then visit the Support page to view a list of the codes.
STEP 5. Power on the TV
Plug the power cord into a power outlet.
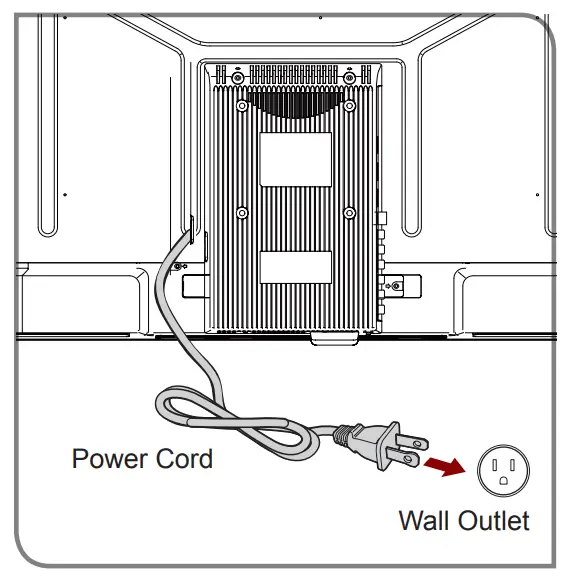
Press the Power button on the remote to turn on the TV. A splash screen that shows the logo appears. Next, the First-Time Setup Menu begins by prompting you to choose your language, region, and Time Zone.

STEP 6. Complete the First-Time Setup Menu
After the splash screen that shows the logo appears, begin the first-time setup menu.
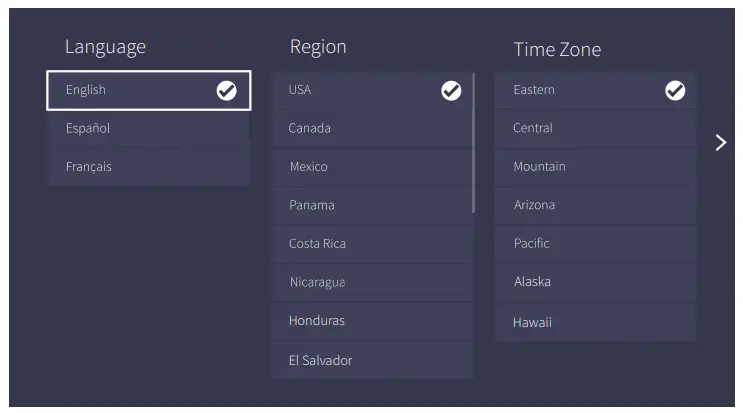
| Screen | Task |
| Language and Location |
|
| End-User License Agreement |
|
| Usage Mode |
Note: ‘Store Mode and Store Mode(Video Demo Only)’ should only be selected by Retailers who plan to demonstrate the TV. |
| Network Connection |
|
| Product Registration |
|
| Last step of TV setup |
|
STEP 7. Begin to Enjoy your TV
Your Smart TV is easy to use and brag-worthy!
Now that you’ve completed the first-time setup menu, the Home screen is your starting point for navigating the TV. Gone are the days where your TV only provides one way for you to be entertained. This showpiece provides you the convenience of watching a program on a live channel, accessing Video on Demand to watch a movie, and many other entertainment options.
Using your remote, press the Home button to begin enjoying your TV.
Text-to-Speech(TTS) and Video Description functionalities on TV
TTS and Video Description can help users to navigate the menus on the screen and hear audio descriptions of relevant programs.
Text-to-Speech(TTS) can convert written text into voice text, in this way, it can help people who have a visual impairment to listen to the information they are unable to read. And Video Description is audio narration added to certain programs to describe the main visual elements that visually impaired users may not be able to see.
Below are steps to enable the functions:
- Press the button to access Menu, and select Settings to enter the Settings Menu.
- Select Accessibility > Menu Audio or Video Description, you can choose to turn the Menu Audio or Video Description On or Off.
When Menu Audio is turned on, the contents of each menu displayed can be broadcast out.
When Video Description is turned on, users can hear the introduction of relevant programs.

Disclaimer: Subscriptions or other payments may be required to access content through some applications. Some or all of the included or downloaded application services in this Sharp, Aquos or Quattron device may not function depending on the Internet connection,
local limitations of included applications, or other reasons outside of the Licensors or Manufacturers control. ALL LICENSORS AND THE MANUFACTURER EXPRESSLY DISCLAIM RESPONSIBILITY FOR ANY APPLICATION SERVICE FROM FUNCTIONING AT ANY TIME, FOR CONTENT IN ANY APPLICATION SERVICE, FOR DISRUPTIONS OF SERVICE, LOCAL OR REGIONAL LIMITATIONS, WARRANTIES OF TITLE, NO INFRINGEMENT, AND FOR IMPLIED WARRANTIES OF MERCHANTABILITY OR FITNESS FOR A PARTICULAR PURPOSE. By purchasing this device, you accept such Disclaimer without any claim on any Licensor and/or the Manufacturer at any time and in any territory.
Product Specifications
| Model Name | LC-32Q5220U / LC-32Q5230U / LC-32Q5240U / LC-32Q5250U / LC-32Q5270U / LC-32Q5280U /
LC-32Q5290U / LC-32Q5200U / LC-32Q5100U |
|
| Dimension (W × H × D) | Without Stand | 28.7 × 16.9 × 3.1 inches (729 × 428 × 80 mm) |
| With Stand | 28.7 × 18.6 × 7.1 inches (729 × 474 × 180 mm) |
|
| Weight | Without Stand | 8.6 lbs (3.9 kg) |
| With Stand | 8.8 lbs (4.0 kg) | |
| Active Screen Size (Diagonal) | 31.5 inches | |
| Screen Resolution | 1366 × 768 | |
| Audio Power | 6 W + 6 W | |
| Power consumption | 65 W | |
| Power Supply | 120 V ~ 60 Hz | |
| Key Apps | Netflix, Vudu, YouTube, and AppsNow (Some apps only for the USA) | |
| Ports | 2 HDMI ports, 1 USB port, 1 Digital Audio Output, 1 ANT/CABLE Input, 1 left/right Audio Input for Composite, 1 RCA Composite Video Input,1 LAN port for Ethernet,1Earphone Audio Output. | |
| Other features | Dynamic contrast Picture, VES A standard wall mount support, Parental Control and Closed Caption | |
Disclaimer: All products, product specifications, and data are subject to change without notice to improve reliability, function, design, or otherwise.
QUICK PROBLEM-SOLVING TIPS
When you experience an issue with your TV, turn it off and on again. If this does not resolve the problem, then refer to the tips below. If the problem is still not resolved, then contact us at one of the phone numbers on Page 1.
| ISSUES | POSSIBLE SOLUTIONS |
| No sound or picture |
|
| I have connected an external source to my TV and I get no picture and/or sound. |
|
| When I turn on my TV, there is a delay for a few seconds before the picture appears. Is this normal? |
|
| The picture is normal but there is no sound |
|
| Sound but no picture or black and white picture |
|
| The sound and/or picture is distorted or appears wavy |
|
| The sound and picture is blurry or cut out |
|
| A horizontal or vertical stripe appears on the picture and/or the picture is shaking |
|
| The plastic cabinet makes a “clicking” type of sound |
|
| The remote control does not work |
|
Certification and Compliance
FCC Notice
This device has been tested and found to comply with the limits for a Class B digital device pursuant to Part 15 of the FCC Rules.
These limits are designed to provide reasonable protection against harmful interference in a residential installation. This device generates, uses, and can radiate radio frequency energy and, if not installed and used in accordance with the instructions, may cause harmful interference to radio communications.
However, there is no guarantee that interference will not occur in a particular installation. If this device does cause harmful interference to radio or television reception, which can be determined by turning the device off and on, the user is encouraged to try to correct the interference by one or more of the following measures:
- Reorient or relocate the receiving antenna.
- Increase the separation between the device and receiver.
- Connect the device into an outlet on a circuit different from that to which the receiver is connected.
- Consult the dealer or an experienced radio/TV technician for help.
NOTE: The manufacturer is not responsible for any radio or TV interference caused by unauthorized modifications to this equipment. Such modifications could void the user’s
authority to operate the equipment.
The Wi-Fi Module complies with FCC radiation exposure limits set forth for an uncontrolled environment. This device should be installed and operated with a minimum distance of 20 centimeters between the radiator and your body.
Declaration of Conformity
Trade Name: SHARP
Model: LC-32Q5220U / LC-32Q5230U / LC-32Q5240U /LC-32Q5250U / LC-32Q5270U / LC-32Q5280U / LC-32Q5290U /LC-32Q5200U / LC-32Q5100U
Responsible Party: Hisense USA Corporation
Address: 7310 McGinnis Ferry Road, Suwanee, GA 30024
Telephone Number: 678-318-9060
This device complies with Part 15 of the FCC Rules. Operation is subject to the following two conditions: (1) this device may not cause harmful interference, and (2) this device must accept any interference received, including interference that may cause undesired operation.

©2018. All rights reserved. SHARP and the SHARP logo are registered trademarks of SHARP. Other brand and product names are registered trademarks of their respective owners.
]]>SHARP Digital Alarm Clock SPC276 User Manual

Thank you for your purchase of this quality clock. The utmost care has gone into the design and manufacture of your clock. Please read these instructions and store them in a safe place for future reference.
Features
- PM indicator
- Alarm indicator
- TIME button
- SOUND button for sleep
- BLUETOOTH button
- ALARM button.
- SNOOZE/ DIMMER/ SLEEP TIME/ VOLUME (Rotary Dial)
- SLEEP mode LED
- BLUETOOTH LED
- DC SV jack
- Battery compartment
Power Supply
- Insert the AC adapter into a 120V AC – 60Hz mains outlet and the other end of the cord into the DC SV jack on the back of the unit.
Setting the Time
- Press and hold the TIME button for 2 seconds to activate time setting, the hour digit will flash. Use the DIAL to rotate to the correct hour. The PM indicator will appear when the hour is advanced into the PM time.
- After the hour is set, press the TIME button again, the minute digits will flash. Use the DIAL to rotate to the correct minute.
- Press the TIME button to save and exit the time setting or automatically save and exit after 20 seconds without any action.
Setting the Alarm
- Press and hold the ALARM button for 2 seconds to activate alarm setting, the hour digit will flash. Use the DIAL to rotate to the correct hour. The PM indicator will appear when the hour is advanced into the PM time.
- After the hour is set, press the ALARM button again, the minute digits will flash. Use the DIAL to rotate to the correct minute.
- After the minute is set, press the ALARM button again, the display will show 10 (default alarm volume is 10, max 16) use the DIAL to adjust the volume. As you rotate the DIAL the volume of the beep will correspond to the number on the display.
- Press the ALARM button to save and exit the alarm setting.
Using the Alarm
- Press the ALARM button, the ALARM indicator will light on the display and will sound at the preset time.
- Press the ALARM button again, the ALARM indicator will no longer be visible and the alarm will remain OFF.
Snooze Function (rotary dial button)
- When the wake-up alarm is sounding press SNOOZE/DIMMER dial to activate the SNOOZE, this will cause the alarm to pause and the alarm will sound again in 9 minutes. This will happen each time when the SNOOZE/DIMMER dial is pressed.
Dimmer Function (rotary dial button)
- Press the SNOOZE/DIMMER DIAL to use the display DIMMER. There are three levels of display brightness: High/ Medium / Low (High is the default setting)
Bluetooth Function
- Press the BLUETOOTH button to enter BLUETOOTH mode. The PAIRING indicator will flash blue quickly. Using the native controls on your Bluetooth device (e.g. smartphone), select “SHARP” in your Bluetooth settings to pair.
- When successfully paired and connected, the PAIRING Indicator will display a solid blue light and a chime will sound from the unit.
- After initial pairing, the unit will stay paired unless unpaired manually by the user or canceled due to a reset of the Bluetooth device.
- Use the native controls on the connected Bluetooth device to select a track.
- To play or skip the selected track, use the native controls on the connected Bluetooth device.
- Audio played through the connected Bluetooth device will now be heard through the speakers.
- To adjust the volume, rotate the DIAL on the top of the unit.
- To turn off BLUETOOTH mode, press and hold the BLUETOOTH button for 2 seconds.
Playing Sleep Sounds
- To play soothing SLEEP SOUNDS press the SOUND button.
- Press the SOUND button again to cycle through the other sounds. (White Noise/ Pink Noise/ Brown Noise/ Rain/ Thunder/ Ocean)
- To adjust the volume, rotate the DIAL on the top of the unit.
- To turn off SLEEP SOUNDS, press and hold the SOUND button for 2 seconds.
Volume Control (rotary dial button)
- When playing a SLEEP SOUND or using BLUETOOTH, rotate the DIAL to increase or decrease the volume. The display will show the current volume level (volume level 0-16).
Sleep Timer Function (rotary dial button)
- When playing a SLEEP SOUND or using BLUETOOTH, press and hold the DIAL and rotate to set the SLEEP timer for 90 I 60 I 30 minutes. Release the dial when your desired SLEEP time is shown and press the dial again to confirm. The SLEEP SOUND or BLUETOOTH will automatically turn OFF to the set time.
- To view the remaining SLEEP time press the DIAL and the display will show the remaining sleep time.
Note: The dimmer function will not operate when the sleep timer is dive.
Battery Backup
- Remove the BATTERY DOOR and insert 2 new “AAA” batteries (not included) in the direction of the polarity symbols.
- Please make sure the batteries are new and inserted correctly.
- The battery will hold the ALARM and TIME settings if the power is interrupted.
There will be no display under battery power and the ALARM will sound at the correct time. If there is no battery and the power is interrupted, the display will flash 12:00 and the ALARM/ TIME will need to be reset.
Care of Your Clock
- Replace the back up battery annually, or store the clock without a battery. When not in use. A soft cloth or a paper towel may be used to clean your clock. Do not use any corrosive cleanser or chemical solutions on the clock. Keep the clock clean and dry to avoid any problems.
Battery Precautions
- Only batteries of the same or equivalent type as recommended are to be used.
- Batteries are to be inserted with the correct polarity.
- The supply terminals are not to be short-circuited.
- Do not dispose of batteries in fire. Batteries may explode or leak.
FCC Information
§ 15.105 Information to the user.
NOTE: This equipment has been tested and found to comply with the limits for a Class B digital device, pursuant to Part 15 of the FCC Rules. These limits are designed to provide reasonable protection against harmful interference in a residential installation. This equipment generates, uses and can radiate radio frequency energy and, if not installed and used in accordance with the instructions, may cause harmful interference to radio communications. However, there is no guarantee that interference will not occur in a particular installation. If this equipment does cause harmful interference to radio or television reception, which can be determined by turning the equipment off and on, the user is encouraged to try to correct the interference by one or more of the following measures:
- Increase the separation between the equipment and receiver.
- Connect the equipment into an outlet on a circuit different from that to which the receiver is connected.
- Consult the dealer or an experienced radio/TV technician for help.
This equipment complies with FCC radiation exposure limits set forth for an uncontrolled environment.
This equipment should be installed and operated with minimum distance 20cm between the radiator & your body.
DIGITAL ALARM CLOCK
![]()
WARNING: TO REDUCE THE RISK OF FIRE OR
ELECTRIC SHOCK, DO NOT EXPOSE THIS
APPLIANCE TO RAIN OR MOISTURE.
CAUTION: TO PREVENT ELECTRIC SHOCK DO NOT USE THIS (POLARIZED) PLUG WITH AN EXTENSION CORD, RECEPTACLE, OR OTHER OUTLET UNLESS THE BLADES CAN BE FULLY INSERTED TO PREVENT BLADE EXPOSURE.
Please read this before operating your unit.
The Bluetooth word and logos are registered trademarks owned by Bluetooth SIG, Inc.
Important Safety Instructions
- Read these instructions -All the safety and operating instructions should be read before this product is operated.
- Keep these instructions -The safety and operating instructions should be retained for future reference.
- Heed all warnings -All warnings on the appliance and in the operating instructions should be adhered to.
- Follow all instructions – All operating and use instructions should be followed.
- Do not use this apparatus near water- The appliance should not be used near water or moisture – for example, in a wet basement or near a swimming pool, and the like.
- Clean only with dry cloth.
- Do not block any ventilation openings, Install in accordance with the manufacture’s instructions.
- Do not install near any heat sources such as radiators, heat registers, stoves, or other apparatus ( including amplifiers) that produce heat.
- Do not defeat the safety purpose of the polarized or grounding -type plug. A polarized plug has two blades with one wider than the other. A grounding type plug has two blades and a third grounding prong. The wide blade or the third prong are provided for your safety. If the provided plug does not fit into your outlet, consult an electrician for replacement of the obsolete outlet.
- Protect the power cord from being walked on or pinched particularly at the plugs, convenience receptacles, and at the point where they exit from the apparatus.
- Only use attachments/accessories specified by the manufacturer.
- Use only with the cart, stand, tripod, bracket, or table specified by the manufacturer, or sold with the apparatus. When a cart or rack is used, use caution when moving the cart/apparatus combination to avoid injury from tip – over.

- Unplug the apparatus during lightning storms or when unused for long periods of time.
- Refer all servicing to qualified personnel. Servicing is required when the apparatus has been damaged in any way, such as power supply cord or plug is damaged, liquid has been spilled or objects have fallen into the apparatus has been exposed to rain or moisture, does not operate normally, or has been dropped.
- Please keep the unit in a good ventilation environment.
- CAUTION: These servicing instructions are for use by qualified service personnel only. To reduce the risk of electric shock, do not perform any servicing other than that contained in the operating instructions unless you are qualified to do so.
WARNING: The mains plug is used as disconnect device, the disconnect device shall remain readily operable. This equipment is a Class II or double insulated electrical appliance. It has been designed in such a way that it does not require a safety connection to electrical earth. Do not install this equipment in a confined or building-in space such as a book case or similar unit, and remain a well ventilation conditions. The ventilation should not be impeded by covering the ventilation openings with items such as newspaper, table-cloths, curtains etc.
WARNING: All above markings were located on the external enclosure of the apparatus, except for label of Date Code was pasted inside the battery compartment. The apparatus shall not be exposed to dripping or splashing and that objects filled with liquids, such as vases, shall not be placed on apparatus.
Caution: Changes or modifications not expressly approved by the party responsible for compliance could void the user’s authority to operate the equipment.
WARNING: The battery shall not be exposed to excessive heat such as sunshine, fire or the like.
If customer service is needed, please email cluster – [email protected]
or call toll free at 1-800-221-0131 and ask for Customer Service.
Monday-Friday 9:00AM – 4:00 PM EST
One Year Limited Warranty
M.Z. Berger & Company warrants the original consumer purchaser of this product that it shall be free of defects in materials and workmanship for one year from the purchase date of this product. Defects caused by tampering, improper use, unauthorized modifications or repairs, immersion in water or abuse are not covered by this warranty. If a defect covered by this warranty occurs during the warranty period, wrap your clock carefully and send it to the following address:
M.Z. Berger & Co., Inc.
353 Lexington Ave – 14th Fl.
New York, NY 10016
You must include a poof of Purchase, either the original receipt or a photocopy and a check or money order for USD $6.00 to cover the cost of handling. Also include your return address inside the package. M.Z. Berger will repair or replace the clock and return it to you. M.Z. Berger will not be liable for any loss or damage, including incidental or consequential damages of any kind; from any breach of warranty either expressed or implied relating to the product. Since some states do not allow the exclusion or limitation of incidental or consequential damages, this limitation may not apply to you.
Printed in China Model : SPC276