Page 3 of 4
« Previous Next »
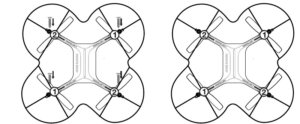
Replacing Propellers
- Follow the diagram.
- Remove screw from top of Propeller
- Remove broken Propeller and replace with new Propeller.
- Make sure you installed the correct blade. Each blade has a number written on it. Match the blades with the corresponding number on the drone.
- Insert the screw into top of Propeller

Uninstall Propeller

Remote Overview

OPERATING DRONE
Pre Flight Checklist
- Read all warnings and instructions.
- Install remote batteries, page 2.
- Make sure that drone and remote are powered off.
- Assemble Drone, page 3.
- Charge batteries, page 3.
Choosing a location
- Drone is designed to be flown indoors and outdoors
- Always make sure you have enough space to fly drone
- Always follow warnings, page 1
Starting Drone
- Making sure your remote is off, slide drone switch to ON. Drone lights will begin to flicker
- Choose a flat even surface and follow the diagram
- Turn remote on. Bring the Throttle all the way up then bring it all the way down. Remote will beep and drone lights will flicker rapidly then turn on permanently once paired.
- Drone is ready for flight.
Step 4 – Lift Off
- Slowly and carefully press the Throttle Joystick up. Drone will begin to elevate. You can compensate for some of the drones drifting by using the Multi Directional Button or by following step 5. You may need to practice this step several times before successfully getting drone into the air.
- You can let go of the throttle once you get to your desired elevation. The drone will engage its auto hover function.

Step 5 – Drone Begins to Drift
Follow this step if your drone begins to drift while take off or during flight
- Drone drifts backwards: Press the forward Adjustment Button
- Drone drifts forwards: Press the Backwards Adjustment Button
- Drone drifts left: Press the Right Adjustment Button
- Drone drifts right: Press the Left Adjustment Button
- Drone spins clockwise (viewing drone from top): Slide the spin Adjustment to the left
- Drone spins counter-clockwise (viewing drone from top): Slide the Spin Adjustment to the right
Step 6 – Operating Drone in Flight
The drones range is approximately 400 feet or 150 feet of altitude
- Read and be aware of all warnings found on page 1.
- Maintain your desired elevation by using the Throttle
- Push the Throttle joystick to right or left to spin the drone.
- Use the Multi Directional Joystick to move forwards, backwards, and side to side
- Review step 5 if your drone begins to drift
- Drone will begin to blink when drone is paired to remote and battery is low
Step 7 – Landing Drone
There are two ways to land the drone
- Press the Auto Land Button. The drone will slowly begin to land. If the drone begins to drift, you can still control the drone’s direction using the Multi Directional Button.
- Slowly and carefully press the Throttle Joystick down until drone lands. If the drone begins to drift, you can still control the drone’s direction using the Multi Directional Button
Always turn off remote prior to retrieving or picking up drone. This will help you avoid accidently activating propellers.
Page 3 of 4
« Previous Next »
[View Manual Contents]