MODES
Stunt Button
Once you are comfortable flying the drone, use the Stunt Button to perform acrobatic stunts.
- Hover the drone to at least above 10 feet.
- Press the Stunt Button. You will hear beeping coming from the remote
- Move the Multi Directional Button to the desired direction that you would like the drone to flip
Auto Orientation Button
- Auto Orientation default setting is off. To enter this mode press Auto Orientation “+” button. Re mote will beep twice.
- After drone success paired, the 2 white LED lights toward orientation will be the original forward orientation, when drone is in auto orientation mode, whatever the drone spin, the forward orientation will be previous original forward orientation.
- Remote will beep every 6s to indicate the drone is in Auto Orientation mode.
- To exit mode, press the “+“ button. Remote will sound 1 long beep indicating that it has exited Auto Orientation mode.
Auto Landing Button
- Make sure you have achieved level, balanced flight, where the drone is neither climbing nor descending.This mode allows you to safely and slowly land your drone without having to control the speed. It is done for you automatically.
- The ideal auto landing height is 25ft.
- Press the “-“ button to trigger auto land. Remote will beep continuously until drone lands
- Do NOT touch the left control stick. This will interrupt the landing sequence.
- To steer the drone during landing, use the right control until drone has reached the ground.
- Press the “-“ button again to exit auto landing mode.
NOTE: Please make sure the throttle joystick is on down position before exit auto landing mode.
Camera – taking pictures and creating videos
- Taking a picture- press Camera Button once to take a picture. 4 main lights will blink once and audible beep heard indicating photo has been taken.
- Creating video- press Video Button once to take a video. Main lights will blink continuously indicating video is being recorded. Lights will go solid (stop blinking) when video recording has stopped.
- Please press the video button again to stop the video creating.
NOTE: Please make sure the throttle joystick is on down position before exit auto landing mode.
INSTALLING BLADE GAURDS
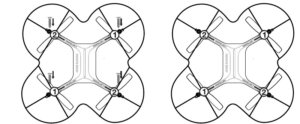
- Click blade guards in place per diagrams below.
- Use provided screws and a small screwdriver to secure the blade gaurds before use.

TIPS
- Do not crash drone into sand or dirt. Drone gears may become clogged
- When first learning to fly, practice lifting off and hovering
- Stay several feet from walls and buildings
- Always Press Throttle all the way down after crashing or when something gets stuck in propellers
- Never fly drones above or near people, sudden changes in wind or other conditions could lead to unexpected crashes.
- Always use caution when flying drone vehicles, obey relevant laws, respect the privacy and property rights of others.
- The drone shall never be modified or used for anything except its intended purpose.
WARNING: Changes or modifications to this unit not expressly approved by the party responsible for compliance could void the user’s authority to operate the equipment.
TROUBLESHOOTING
When remote switch is turned on, the remote light does not illuminate:
- Check that batteries in the remote are installed correctly OR
- Replace with new batteries
During drone flight, the remote LED is flashing:
1) Remote batteries are low; replace them with new batteries
Drone and remote properly pair, but the drone will not lift-off:
1) Drone Li-Po needs charging. Use charging cable to connect the drone to power source.
After trimming the drone, the drone flight is very unstable and cannot fly properly:
1) One or more blades are most likely damaged;
2) Turn off the drone and remote.
3) Replace with the proper number replacement blade and try flying again.
After impact, the drone is unstable:
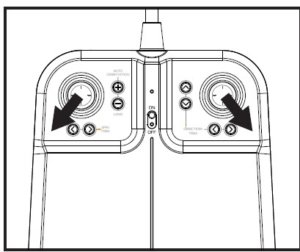
1) Put the left remote control lever to the left bottom and put the right remote control lever
to the right bottom at the same time which connected to the drone (diagram to right).
2) If the above does not resolve the issue, reboot the drone and controller and pair again.
Remote Controller and Drone can not be paired:
1) Check Point: Remote Controller must be closed to Drone, not exceed 4 meters.
Note: If there are 2 sets of Drones within 4 meters for Pairing, you must pair one successfully before pairing the second set.

This device complies with Part 15 of the FCC Rules. Operation is subject to the following two conditions: (1) this
device may not cause
harmful interference, and
(2) this device must accept any interference received, including interference that may
cause undesired operation.

NOTE: This equipment has been tested and found to comply with the limits for a Class B digital device, pursuant to Part 15 of the FCC Rules. These limits are designed to provide reasonable protection against harmful interference in a residential installation.
This equipment generates, uses and can radiate radio frequency energy and, if not installed and used in accordance with the instructions, may cause harmful interference to radio commu- nications.
However there is no guarantee that interference will not occur in aparticular installation.
If this equipment does cause harmful interference to radio or television reception, which can be determined by turning the equipment off and on the user is encouraged to try to correct the interference by one or more of the following measures:
Reorient or relocate the receiving antenna,
- Increase the separation between the equipment and receiver.
- Connect the equipment into an outlet on a circuit different from that to which the receiver is connected.
- Consult the dealer or an experienced radio/TV technician for help.
©Sharper Image. All Rights Reserved.
SHARPER IMAGE ® name and logo are registered trademarks manufactured and marketed by MerchSource, LLC under license. All other logos and
trademarks are proprietary to their respective owners. The artwork and design of this package are protected by US copyright law and may not be reproduced, distributed, displaced, published or used for any purpose without prior written permission.
Altering, removing or reproducing any of the trademark or copyright notices on this package is not permitted.
©2016 MerchSource, LLC. All rights reserved.Distributed by MerchSource, LLC, Irvine, CA 92618.
PATENT PENDING

