Tommee Tippee 1063 Electric Breast Pump Instructions Manual
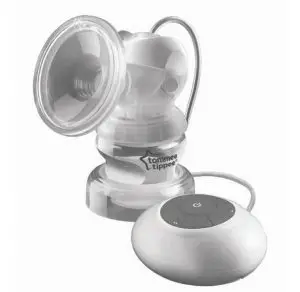
Closer to nature® electric breast pump
For hygiene reasons this product cannot be returned once opened unless faulty.
Please read and retain this information for future reference.
The intended use of the Tommee Tippee Electric Breast Pump is to express milk from the breast of lactating women. Researched and developed by specialists and breastfeeding experts to express milk for storage and later use.
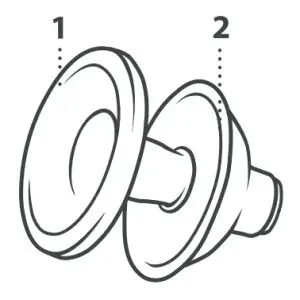
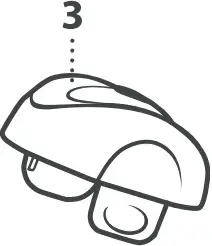
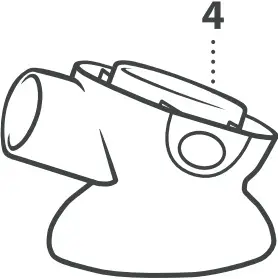
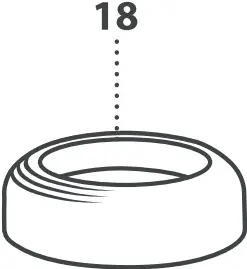
PARTS GUIDE
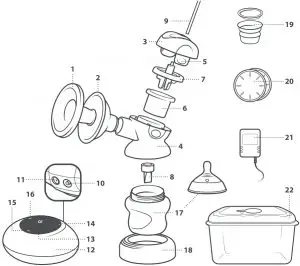
- Silicone insert
- Horn
- Upper pump body
- Lower pump body
- Release tabs
- Diaphragm
- Diaphragm cap
- Valve
- Airtube
- Air tube socket
- Mains adaptor socket
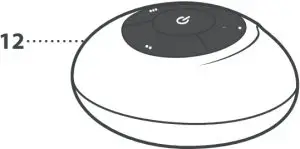
- Motor
- On/off button
- Low expression button/light indicator
- Medium expression button/light indicator
- High expression button/light indicator
- 150ml bottle
- Bottle stand & horn hygiene cover
- 60ml milk storage pot
- Breast pads
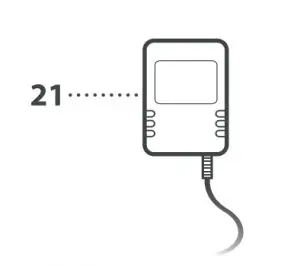
- Mains adaptor
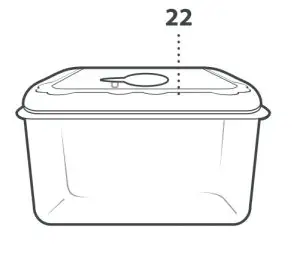
- Steriliser box
DISASSEMBLING THE ELECTRIC BREAST PUMP
- Unscrew bottle from lower pump body.
- Pull off valve.
- Pull air tube from upper pump body and motor unit.
- Press release tabs to release upper pump body and pull apart.
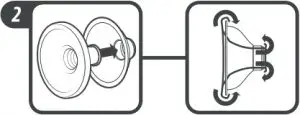
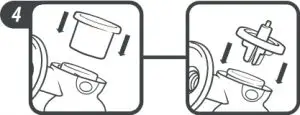
- Pull out diaphragm cap and diaphragm.
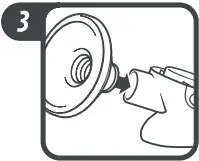
- Pull horn from lower pump body.
IT IS NOT ESSENTIAL TO TAKE THE SILICONE INSERT OUT OF THE HORN FOR CLEANING unless milk or dirt has become trapped inside. If so, unclip lip from cup and pull apart.
CLEANING, STERILISING AND MAINTENANCE
Before use ensure the breast pump has been disassembled, washed and sterilised.
The parts to be sterilised are :


Silicone insert, horn, upper pump body, lower pump body, diaphragm, diaphragm cap, valve, bottle, horn hygiene cover, and milk storage lid or milk storage pods if required. These components are suitable for sterilization by steam {electric and microwave), boiling or cold water tablelliquid solution. Follow the sterilizer manufacturer’s instructions
Do not sterilise:

Air tube, motor unit and adaptor. Wipe clean only with a damp cloth.
- Always wash the product mmediately after use to remove milk residue.
- Wash all products to be sterilised in warm soapy water and rinse in clean water or use a dishwasher.
- Do not clean with solvents or harsh chemicals.
- Do not allow product to come into contact with oil based foods (e.g. oil/ tomato based sauces) as staining will occur.
- Inspect the air tube before and after each use for condensation. Allow to air dry before next use.
- To clean the valve, rub gently between your fingers in warm soapy water-do not insert objects as damage could result.
- Routine maintenance includes cleaning. No other servicing is required.
ASSEMBLING THE ELECTRIC BREAST PUMP
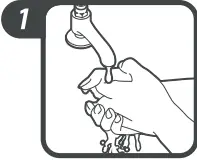
- Wash your hands thoroughly before handling the pump.
Wash and sterilise your breast pump before using. Follow instructions in section for CLEANING, STERILISING AND MAINTENANCE. - Make sure the silicone insert is securely attached. Clip lip over end of horn first, then push tube through funnel, ensuring lip is fully clipped over the other side also.
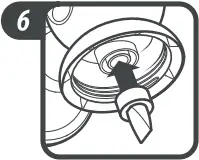
- Push horn onto the lower pump body as far as it will go.
- Push diaphragm down into lower pump body as far as it will go and push diaphragm cap over the top as far as it will go until it is sealed.
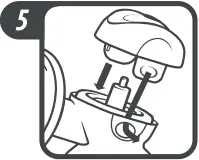
- Push upper pump body and lower pump body together. They will click into place.
- Push valve onto lower pump body.
- Screw bottle onto lower pump body .
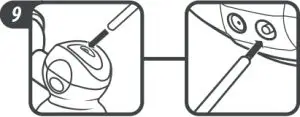
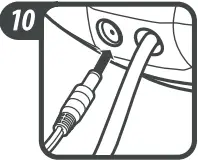
- Connect air tube onto upper pump body and the air tube socket of the motor unit. This is on the RIGHT of the two sockets on the motor unit.
- Plug the electric adaptor into the electric adaptor socket of the motor unit. This is on the LEFT.
- Plug the electric adaptor into the mains power supply.
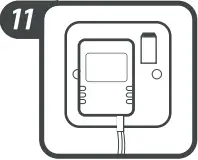
BATTERY OPERATION
- To install batteries, disconnect the air tube and mains adaptor.
- Push the clip of the battery compartment towards centre of motor unit whilst pulling upwards. Remove the cover.
- Insert batteries as indicated inside the battery compartment and push the cover back into place until it snaps shut.
- Batteries are to be inserted with the correct polarity. Ensure that the+ and -ends of the batteries are positioned correctly.
Requires 4AA batteries (sold separately). DO NOT USE RECHARGEABLE BATTERIES. The use of rechargeable batteries could cause your breast pump to
malfunction and will void the warranty. Non-rechargeable batteries are not to be recharged. Different types of batteries are not to be mixed. Only batteries of the same or equivalent type as recommended are to be used. Exhausted batteries are to be removed from the breast pump. Batteries should always be removed or replaced by an adult. Keep away from children. Remove batteries if the electric breast pump will not be used for some time. Help the environment by disposing of your product responsibly. Please use designated collection points or recycling facilities when disposing of the item or batteries.
USING THE ELECTRIC BREAST PUMP

- Ensure that the breast pump has been cleaned and sterilised. Wash your hands before touching the breast pump or your breasts and avoid touching inside the breast pump or the storage pot. Find a comfortable chair where you can relax
- Hold the pump in whichever hand is most comfortable.
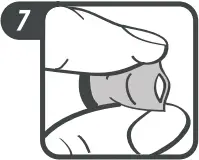
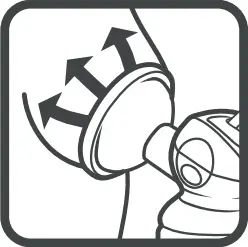
- Place the silicone insert of the horn over your breast, so that it creates a seal all the way round. IF AIR CAN GET IN THERE WILL BE LOW OR NO SUCTION,
- Press the on/off button to promote milk let-down. This let-down setting is a gentle rhythm to get your milk flowing.
- IMPORTANT: Sit upright and do not tilt the bottle while pumping, it should be kept upright at all times to avoid milk flowing back up through the air tube. If this happens you must turn the breast pump off immediately as it could damage the motor. Read HELPFUL ADVICE for further information.
- After approximately a minute or so, your breast milk will start flowing freely. At this point, we recommend you press the low expression button.
- To increase the expression level, press the medium expression button ••. The button will light up. If expressing is uncomfortable at this level switch back to the slower level by pressing the low expression button.
- If you would like to express faster than the medium expression level, press the high expression button •••. The button will light up. If expressing is uncomfortable at this level switch back to medium expression.
- Adjust expression level accordingly to achieve maximum comfort.
- Avoid overfilling bottle. Switch off if you express over 150ml.
- Once finished pumping, switch off the breast pump and unplug it. You do not need to sterilise your pump until you are ready to use it again.
- Cover and store the expressed milk for later use.
THE CLOSER TO NATURE• ELECTRIC BREAST PUMP CAN ONLY BE USED WITH TOMMEE TIPPEE• CLOSER TO NATURE’ BOTTLES.
A SEPARATE INSTRUCTION SHEET ON HOW TO CLEAN AND STERILISE THETOMMEETIPPEE• CLOSER TO NATURE• BOTTLE IS ENCLOSED. PLEASE READ AND RETAIN THIS IMPORTANT INFORMATION FOR FUTURE REFERENCE.
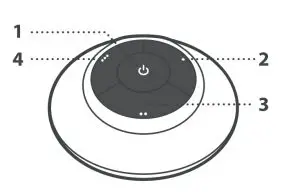
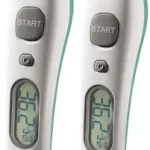
 On/off Button to promote milk let down
 Low expression button
- Medium expression button
- High expression button
IMPORTANT WARNINGS!
- Keep this instruction sheet for future reference as it includes important information.
- This appliance is intended for household use only. Do not use outdoors.
- Before plugging in the breast pump for the first time ensure that the voltage is compatible with your electricity supply adaptors by checking the label on the base of the unit and the supplied adaptors.
- Do not immerse. To protect against fire, electric shock and injury to persons. Do not immerse cord, plugs, motor unit and air tube in water or other liquid or clean with a wet sponge or cloth.
- Keep the appliance and its cord out of reach of children. Children shall be supervised to ensure that they do not play with this appliance. Do not place furniture or other obstructions on the adapter cables and be sure to position them so that nobody can trip over them. Always position the adaptor and cord well out of reach of your baby and any young children. Be careful not to position them where a child might try to step on it. Keep adaptor cords away from hot surfaces such as radiators or central heating pipes.
- User maintenance other than cleaning and sterilization is not required for this product.
- Always unplug from the power supply when not in use.
- Do not operate any appliance with a damaged cord or plug or after the appliance malfunctions or has been damaged in any manner. If the supply cord is damaged it must be changed by a qualified person in order to avoid a hazard. If the damage is from new the unit must be returned to the manufacturer. If within a retail warranty period this product should be exchanged at place of purchase.
- Do not use any accessories other than those supplied with this appliance. The use of accessories, transducers and cables other than those specified with the exception of transducers and cables sold by the manufacturer of the MODEL 1063 as replacement parts for internal components may result in increased EMMISSIONS or decreased IMMUNITY of the MODEL 1063. MODEL 1063 should not be used adjacent to or stacked with other equipment.
- The adaptor converts your AC power so that it is only supplied at safety extra low voltage corresponding to the marking on the appliance. The Electric Breast Pump MODEL 1063 is only to be used with adapter model number SJB0500800PC
- Adapter rating – Input: 0.3A Output 5.0 VDC 800 mA
- Motor unit rating – 4.8-5.0VDC 800mA
- BATTERY WARNINGS – Batteries are to be inserted with the correct polarity. Ensure that the+ and – ends of the batteries are positioned correctly. Requires 4 AA batteries (sold separately). DO NOT USE RECHARGABLE BATTERIES. The use of rechargeable batteries could cause your breast pump to malfunction and will void the warranty. Non rechargeable batteries are not to be recharged. Different types of batteries or new and used batteries are not to be mixed. Only batteries of the same or equivalent type as recommended are to be used. Exhausted batteries are to be removed from the breast pump. Batteries should always be removed or replaced by an adult. Keep batteries away from children. Remove batteries if the electric breast pump will not be used for some time.
HELPFUL ADVICE
- The best time to use your breast pump is after the first feed of the day (unless otherwise advised by your breastfeeding advisor)
- Be comfortable and relax, e.g. watch the TV or have your favorite music playing.
- Remember you are only trying to express milk from just behind the nipple- strong suction is not necessary.
- There should be no pain using your breast pump. If you feel pain, try using the pump more gently. Then examine your breasts. If there are any red or hot areas contact your breastfeeding advisor as soon as possible.
- Do not continue to use the pump once your milk has stopped flowing.
- Wash all breastfeeding equipment after use and before sterilisation.
IF THERE IS LO W OR NO SUCTION:
Make sure all connections are secure. Make sure the silicone insert on the horn forms a complete seal around the breast. Make sure the valve is cleaned and not damaged. Make sure the air tube is securely fitted to the upper pump body and the motor unit. Check there is no kink in the air tube.
IF PUMP WILL NOT TURN ON:
Make sure the pump is plugged in correctly. Make sure the “on” button is pressed and the light is on. Do not repeatedly press the on ‘off button. If using batteries, make sure the mains adaptor is not plugged into the pump. If using batteries, make sure batteries are installed correctly.
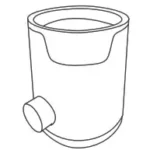
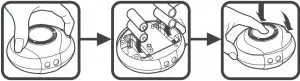
STERILISER BOX
To use:
- 1. Pour 100ml of water into sterilising box
- Load upturned bottle, disassembled breast pump and any accessories.
- Securely fit box lid.
- Open valve, on lid of box.
- Place steriliser box in microwave.
- Follow instructions according to microwave output.
- CAUTION: To avoid risk of burning, always ensure box is cool to touch before lifting out.
- Immediately fit valve on lid to make box airtight and sterile.
| WATTAGE | FULL POWER | COOLING TIME |
| Under 800W | 6 minutes | 3 minutes |
| Over 850W | 4 minutes | 3 minutes |
USING THE BREAST MILK STORAGE SYSTEM

For use with the Tommee Tippee closer to nature breast pumps
HOW TOUSE
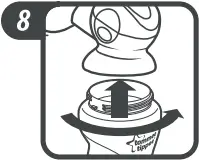
- Ensure pot is clean and sterilised.
- Place pot inside of bottle.
- Screw bottle onto bottle neck adaptor and continue to follow assembly of breast pump instructions.
- When the breast pump is fully assembled and in usage, the pot will hold up to 60ml 12oz.
- Once you have expressed 60ml stop pumping, place lid on storage pot and remove from bottle.
- Store pot in either the fridge or freezer. See storage guide below.
- If you want to continue expressing, either insert another clean and sterilised pot or express directly into the bottle of the breast pump
STORAGE OF BREAST MILK
| Method of storing milk | Use within | REMEMBER |
| Room temperature <25°C | 6 hours |
|
| Refrigerated at 5-10°C | 3 days | |
| Refrigerated at 0-4°C | 6 days | |
| Refrigerated before freezing | 24 hours | |
| Once frozen | 6 months | |
| Defrosted before feeding | 12 hours | |
| Refreezing | NEVER |
- You will notice that stored milk separates out into layers. Shake to remix thoroughly before feeding.
- When freezing milk, allow space at the top of the bottle for expansion. It is easiest to freeze milk in individual feed quantities of 60-125ml (2-4oz).
- Thaw frozen milk in the fridge or by standing the bottle in luke warm water until it has reached body temperature.
- If you want to take expressed milk with you when you are out, make sure it stays cold or frozen until needed.
USING BREAST MILK STORAGE SYSTEM AS A SIPPY CUP
- If milk has been chilled, remove lid and place in warm water to heat to temperature required. Always check food temperature before feeding.
- Hold cup up to baby’s mouth and gently tip to allow baby to sip from cup.
For your child’s safety and health
WARNING!
Always use this product with adult supervision. Accidents have occurred when babies have been left alone with drinking equipment due to the baby falling or if the product has disassembled.
Always check food temperature before feeding. Always stir heated food to ensure even heat distribution and test the temperature before serving.
CLEANING AND STERILISING
- Before first use, clean the product.
- Clean before each use.
- Always wash the product immediately after use.
- Wash in warm soapy water and rinse in clean water or use a dishwasher. Do not clean with solvents or harsh chemicals.
- Do not allow product to come into contact with oil based foods (e.g. oil/tomato based sauces} as staining will occur.
- Suitable for all forms of sterilisation.
STORAGE AND USE
- Inspect before each use. Throw away at the first signs of damage or weakness.
- Do not store or leave in direct sunlight or near a source of heat.
- Do not store with or allow to come into contact with solvents or harsh chemicals.
- Not suitable for use in a conventional oven or a combination microwave oven with the grill feature switched on.
- Keep all components not in use out of reach of children.
Ref No. 0300035
Model No 1063
Materials listing:
TPE, PPSU Polypropelene, silicone, tissue paper, wood pulp, super absorbent polymer, and polyethylene.