![]()
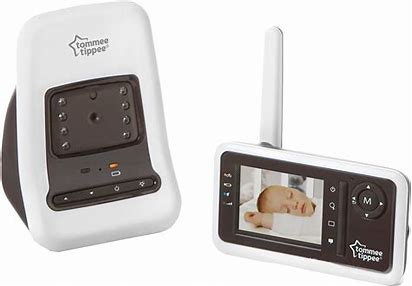
digital video monitor
with movement sensor pad
INSTRUCTIONS FOR USE
model 1094S
tommeetippee.com
baby unit (=BU) 1094SB
parent unit (=PU) 1094SP
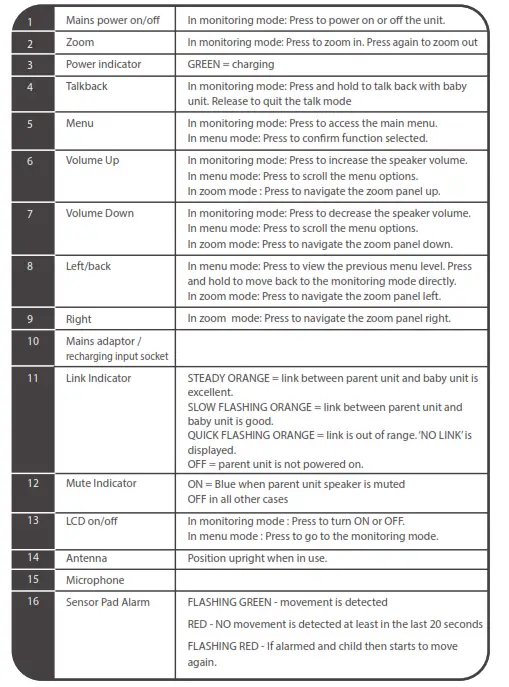
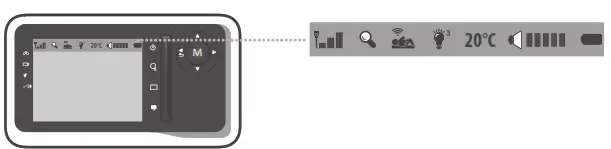
![]()
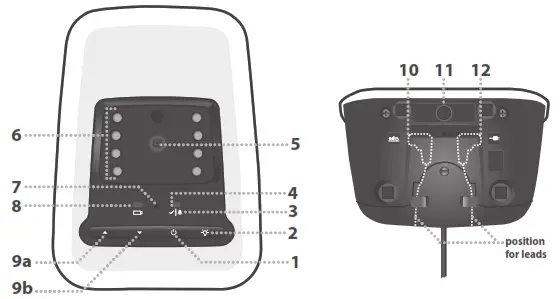
parent unit LEDs
charging your monitor before first use:
THE PARENT UNIT:
- The parent unit is supplied with a rechargeable battery pack.
- To insert the battery pack, open the battery casing with a screwdriver. Insert the supplied rechargeable battery pack. Take extra care to ensure that the battery pack is inserted correctly and the right way round. Refit the battery casing securely with a screwdriver.
- DO NOT use a non-rechargeable battery pack. ONLY use battery pack supplied.
- Plug the mains power cable into socket on side of parent unit and connect the other end of the mains power cable to the mains power.
- Power on the parent unit and charge for 10 hours before use.
THE BABY UNIT:
- The baby unit does not require batteries if powered from the mains.
- If mains usage is not available, the baby unit will operate on batteries 4 x alkaline AA (LR6), which are not supplied.
- To insert batteries, open the battery casing with a screwdriver. Insert 4 x alkaline AA (LR6) batteries (rechargeable or non-rechargeable, but not mixed) and close casing securely with screwdriver. Take extra care to ensure that the batteries are inserted correctly and the right way round.
- There is NO charging function on the baby unit.
- The battery light flashes orange to indicate the battery is low.
- Battery power is disconnected automatically when the mains adaptor is in use. If the adaptor is turned off at the mains and still remains connected to the monitor then the batteries will be automatically activated.
CAUTION:
Risk of explosion if battery is replaced by an incorrect type. Dispose of used batteries according to the instructions. Use only rechargeable Li-polymer battery 950mAh with rating: 3.7/950mAh. Rechargeable battery: Manufacturer: BYD COMPANY LIMITED Model no.: SCD530-1 FOR REPLACEMENT PARENT UNIT BATTERIES, VISIT OUR WEBSITE www.tommeetippee.com
correct use of batteries
- Non-rechargeable batteries are not to be recharged.
- Rechargeable batteries are to be removed from the baby unit before being charged.
- Rechargeable batteries are only to be charged under adult supervision.
- Different types of batteries or new and used batteries are not to be mixed.
- Only batteries of the same or equivalent type as recommended are to be used.
- Batteries are to be inserted with the correct polarity.
- Exhausted batteries are to be removed from the monitor.
CAUTION: risk of severe malfunction if battery is replaced by an incorrect type. Dispose of used batteries according to the instructions.
setting up the parent unit
- Connect the mains adaptor into a nearby wall socket in your baby’s nursery and switch on the power at the mains.
- Press POWER on the parent unit until the POWER INDICATOR is on. The parent unit is now powered on and the parent unit will search for and link itself to the baby unit.
- Ensure that the sensor pad on-off switch is turned OFF.
- In monitoring mode, you can press <LCD ON/OFF> on the parent unit. Turning off the LCD will not power off the parent unit, you can still monitor the baby with it
NOTE:
Any triggering events such as baby cries, temperature of baby’s room exceeds the alert range, parent unit loses link with baby unit, etc. will turn on the LCD automatically.
setting up your baby unit
- Connect the mains adaptor into a nearby wall socket in your baby’s nursery and switch on the power at the mains.
- Press POWER on the baby unit until the POWER INDICATOR is on. The baby unit is now powered on and will link with the parent unit.
- Ensure that the sensor pad on-off switch is turned OFF.
- Direct the camera towards the baby’s cot. For adjusting the zoom feature, refer to section ‘Adjusting the Zoom’.
WARNING about using the baby unit!
• The baby unit should be 1 to 1.5 metres away from the baby’s cot on a flat surface or use the tripod mount.
• Never place the baby unit in or attach to the baby’s cot.
testing the parent unit
- First ensure that the baby unit has been set up and is working correctly following the previous instructions.
- To test the parent unit you must ensure that it is at least 5 metres away from the baby unit.
- Turn the sensor pad OFF.
- Place a sound source in the nursery at least 1 to 1.5 metres away from the baby unit, close the nursery door and go to another room with the parent unit only.
- Turn on the power and adjust the volume up or down to a comfortable level.
- You will hear sounds from your nursery.
- Walk around your house and garden with the parent unit, ensuring that you can hear the sounds from the baby unit at all times. The monitor will work up to a distance range of 300m approximately. Depending on the surrounding conditions as well as spatial and structural factors. The range indoors is normally less than outdoors.
- If you lose the signal from the baby unit a beep tone will be emitted from the parent unit and the antenna icon will flash. Even if the speaker volume is set OFF, the alert tone will still emit at volume level 1 when no link alert is triggered. Alert tone will only be emitted once initially. The screen will continue to show NO LINK until restored.
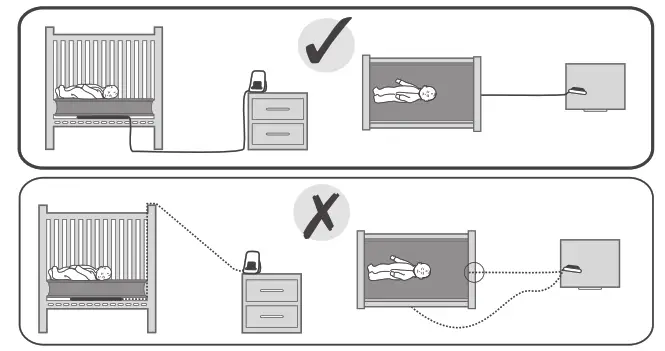
WARNING about the danger of cords:
STRANGULATION HAZARD! – Keep cords out of the reach of children. Do not use with an extension cord.
 WARNING! STRANGULATION HAZARD! Children have STRANGLED in cords. When using without protective covering. Keep this cord out of the reach of children (more than 0.9 m (3ft) away).
- Check immediately the location of corded monitors to make sure cords are out of arm’s reach of your baby and other young children.
- Place cords more than a metre away from any part of the cot. The monitor must not be used in any other sleep environment.
- Check the location of the monitor periodically, as what is within arm’s reach to a baby will change as the baby grows.
- Make sure the sensor cords are taut and not dangling to reduce the strangulation hazard.
- Do not place furniture or other obstructions on the adaptor cords and be sure to position them so that nobody can trip over them
- Keep adaptor cords away from hot surfaces such as radiators and central heating pipes.
- Be careful not to position the adaptor where a child might try to stop on it.
- Never use Tommee Tippee monitor adaptors with any other equipment. Nor should you use any other adaptors with your Tommee Tippee monitor.
- Please note that the adaptors become warm in use – this is quite normal and not a hazard.
- The adaptors convert your AC power to a safe low DC voltage.
- Use the power adaptor provided.
- The product is only suitable for use for cots and cotbeds that comply with EN716.
Adaptor:
Manufacturer: TEN PAO INTERNATIONAL LTD.
Model no.: EU: S006MV0600080 UK: S006MB0600080
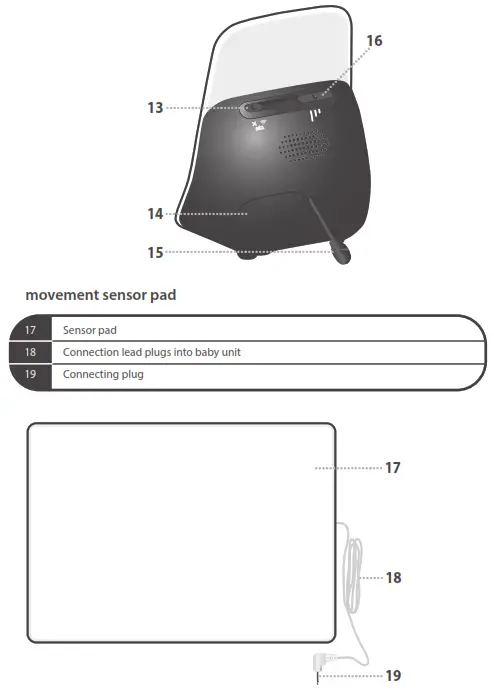
setting up the movement sensor pad
The monitor has the ability to monitor your baby’s movements via the highly sophisticated movement sensor pad. It is designed for use in a cot with a flat, filrm base. It should not be used in a travel cot, swinging crib, moses basket, or with a hollow or foam-free mattress.
- Place the sensor pad between the cot mattress and the cot base, directly under the area where your baby will be sleeping.
- Ensure the sensor pad is positioned the correct way up and that the connecting cord is fed through the base of the cot out of accessibility range of your baby (50cm from the surface of mattress) and other young children.
- If the cot has a solid base it may be necessary to make a small hole through which the connecting cord can pass.
- Ensure the connecting cord plug is pushed fully into the socket underneath the baby unit.
- Do not hang cable over the top or through the bars of the cot.
- Place the cable down and onto the floor.
IMPORTANT !
TEST YOUR SENSOR PAD BEFORE PROCEEDING FURTHER:
- Turn the Sensor Pad switch to ON. The Sensor Pad LED on the Baby Unit will light up if movement is detected.
- The Sensor Pad LED will light up GREEN and flash to show the connection is good and continuous movement is detected from child.
- Check the sensor pad is working by touching the cot mattress gently anywhere near where your baby will be sleeping.
- If the Parent Unit is linked with the Baby Unit successfully, the Sensor Pad icon will appear on the Parent Unit. The Sensor Pad status LED will light up if movement is detected and there will be an audible ticksound . The volume of the tick can be adjusted.
- If the Sensor Pad switch is ON without the Sensor Pad being connected securely, there will be an error tone from the Baby Unit and the Sensor Pad icon in the Parent Unit will flash. The text ‘PLEASE CONNECT THE SENSOR PAD’ will also appear on the Parent Unit.
- Test the alarm by continuing to touch the mattress for a few moments and then step away from the cot and stop all movement near the sensor pad.
- After approximately 20 seconds the alarm will sound on both the Parent Unit and Baby Unit and the RED alarm light will come on . The text ‘PLEASE CHECK THE BABY’ will also appear on the parent unit until the Sensor Pad is reset.
- If movement is detected again after the alarm has activated the alarm will stop and the red alarm light will flash on the baby unit and the parent unit to let you know that the alarm has activated.
- To reset the alarm, switch the Sensor Pad off and on again.
- If the Sensor Pad is securely installed, but switched off on the Baby Unit the text ‘PLEASE TURN ON THE SENSOR PAD’ will be displayed on the Parent Unit standby screen.
No alarm after 20 seconds of NO movement-Make sure there is no movement or vibration around thesensor pad and test again. If no alarm again after 20 seconds,increase sensitivity setting and test again.
False alarm when there IS movement-Check the connections are secure and test again. If alarmtriggers again, decrease sensitivity setting and test again.
if the movement sensor alarm sounds:
- The tommee tippee closer to nature movement sensor pad is NOT a medical device and is NOT designed to prevent cases of Sudden Infant Death Syndrome (SIDS). This tommee tippee closer to nature monitor is intended to help you monitor your child and is NOT to be used as a substitute for adult supervision.
- The alarm going off may not be a sign of a problem with your baby. It may be a sign that the baby has moved away from the sensor pad area, or that batteries are running low if not mains power operated.
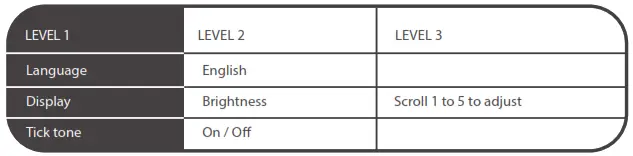
adjusting the tick tone:
The audible ticking sound gives reassurance that your sensor pad is correctly connected and the monitor is sensing movement. If you wish to switch off the ticking sound:
- Press <MENU> to access main menu
- Press ▲ UP or ▼DOWN to select tick tone.
- Press <MENU> to enter the sub-menu.
- Press ▲ UP or ▼ DOWN> to select from ON to OFF.
- Press <MENU> to confirm.
adjusting the sensitivity of the sensor pad:
This monitor is compatible with standard cot mattresses. With thicker mattresses (ie spring interior) you may need to adjust the sensitivity switch on the baby unit from it’s preset medium level to the high level. With some very thin mattresses you may need to change a low sensitivity level.
WARNINGS ABOUT USING THE SENSOR PAD!
- A moving or swinging cord may be interpreted by the sensor pad as a baby’s movement. To avoid this, ensure that the cord is not positioned where it may be subject to movement.
- You should ensure there is no vibration in or near the nursery, so that the sensor pad is monitoring only your baby’s movements.
- The sensor pad does not carry any electricity and will not affect your baby even if the mattress is subject to bedwetting or vomiting.
- Never immerse the sensor pad in liquid. To clean, wipe with a dry, lint free cloth.
- Never place the connecting cord in contact with any moving objects, or near any heated surface.
- Always ensure wires and cables are out of reach from your baby and younger children. Never place connecting cords amongst your baby’s bedding, the child could be strangled.
- Ensure the sensor pad is used the correct way up.
- Do not immerse sensor mat in liquid and avoid contact with moisture.
HELPFUL ADVICE ABOUT USING THE SENSOR PAD: - If you remove your baby from the cot (e.g. for a feed) remember to turn off the sensor pad. to prevent the alarm from sounding. Remember to switch the alarm back on when you put the baby back into the cot.
adjusting speaker volume of parent unit and baby unit
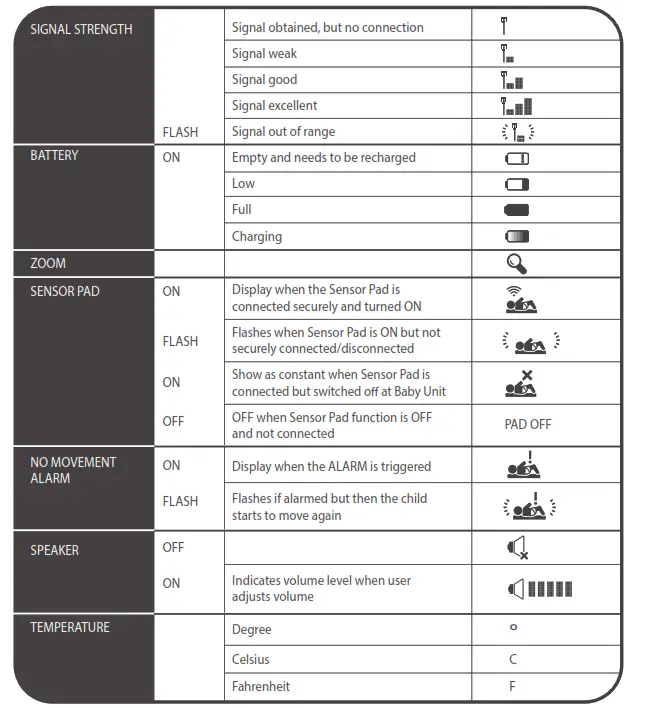
There are 5 volume levels on baby unit from level 1 to level 5, and 6 volume levels on parent unit, including level 1 to level 5 and Volume Off. The volume level of parent unit will be shown on the status bar when you adjust the volume.
ADJUSTING VOLUME OF PARENT UNIT
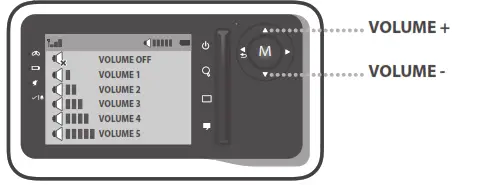
Press ▲ UP to increase or ▼ DOWN to decrease the volume of the parent unit. Mute icon will be displayed if the volume is turned off on the parent unit.
adjusting volume of baby unit
Press ▲ UP to increase or ▼ DOWN to decrease the volume of the baby unit. An audible alert will emit when you reach the highest or lowest volume level.
Changing the volume setting on the baby unit affects the volume when you use the Talk Back feature.
adjusting the zoom
The zoom mode allows you to view your baby.
The ZOOM icon![]()
- In monitoring mode, press <ZOOM> to enter zoom mode.
- Press ▲ UP/ ▼ DOWN / LEFT / RIGHT to navigate the zoom area.
- Press <ZOOM> again to zoom out and return to the normal monitoring mode.
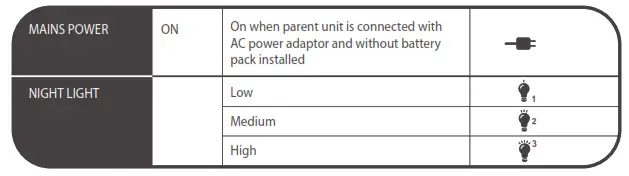
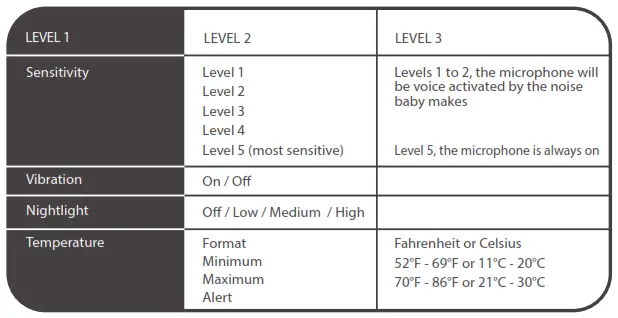
using the nightlight
- Press the nightlight key
 on the baby unit.
 - To adjust the brightness or turn it off, press the key again with the sequence L>M>H>Off
- To turn on from the Parent Unit, select the nightlight main menu and select the brightness level.
- The nightlight function is limited to level 1 if the Baby Unit is running on batteries.
- The nightlight on the Baby Unit operates even if the Parent Unit is out of battery or turned off.
- The nightlight settings and icons are synchronized when the Baby Unit and Parent Unit are connected.
helpful advice about using the nightlight
• You may find it useful to use a lower brightness if you wish your baby not to sleep in complete darkness and then adjust to a higher brightness for when baby needs attention during the night and you do not wish to turn on the main bedroom lights.
• If operating in battery mode the brightness will function on Low (L) only and will fade out after 5 minutes.
using talkback
Talkback allows you to communicate from the parent unit to the baby unit to comfort and reassure your baby.
- In monitoring mode, press and hold <TALK>
 on the parent unit to speak to baby.
 - The audio from the baby unit will be muted and the parent will not be able to hear the baby until the button has been released. The mute icon will be displayed on parent unit status bar.
ADJUSTING THE TALKBACK VOLUME
The baby unit has 5 volume levels from Level 1 to Level 5
During TalkBack, press ▲ UP or ▼ DOWN on the baby unit to increase or decrease the volume respectively.
parent unit settings of menu options
parent unit menu options – continued
setting the language
- Press <MENU> to access main menu.
- Press ▲ UP or ▼ DOWN to select LANGUAGE.
- Press <MENU> to enter the sub-menu.
- Press ▲ UP or ▼ DOWN to select the desired language.
- Press <MENU> to confirm.
setting the display
- Press <MENU> to access main menu.
- Press ▲ UP or ▼ DOWN to select DISPLAY.
- Press <MENU> to enter the sub-menu to set the brightness level.
- Press ▲ UP or ▼ DOWN to select from Level 1 to Level 5. You can preview the brightness when scrolling the menu list.
- Press <MENU> to confirm.
NOTE:
The LCD backlight is always on when in AC power mode from the mains. If operating in battery mode, the LCD backlight will fade out after 20 seconds after last key press.
adjusting the sound sensitivity
You can change the level of sensitivity on your baby monitor to suit your baby. For example, if your baby is a particularly quiet sleeper, you can increase the sensitivity levels so that you are sure to hear if baby disturbs or becomes uncomfortable.
There are 5 different levels. The microphone will be voice activated by the noise baby makes. Level 5 is the most sensitive. The sound sensitivity settings of the baby unit can be changed only when parent unit is linked with the baby unit:
- Press <MENU> to access main menu
- Press ▲ UP or ▼ DOWN to select SENSITIVITY.
- Press <MENU> to enter the sub-menu.
- Press ▲ UP or ▼ DOWN to select from Level 1 to Level 5.
- Press <MENU> to confirm.
NOTE:
•If LCD is off, and baby voice reaches the sensitivity level 3,4 or 5, the LCD will be turned on automatically.
• When the microphone sensitivity of the baby unit is set to a high level, it picks up more sounds and therefore transmits more often. As a result, the units will consume more power.
setting the temperature format
The Baby Unit constantly monitors the temperature in your baby’s room and alerts you if it gets too hot or too cold. The temperature is displayed
- Press <MENU> to access main menu
- Press ▲ UP or ▼ DOWN to select TEMPERATURE.
- Press <MENU> to select Format.
- Press <MENU> to enter the sub-menu.
- Press ▲ UP or ▼ DOWN to select Celsius or Fahrenheit.
- Press <MENU> to confirm.
- The real-time temperature format displayed on the status bar of parent unit will be changed accordingly.
NOTE:
The temperature displayed is for reference only. There may be a slight tolerance of the degree accuracy comparing with the actual temperature. It is important to physically check the actual temperature in your baby’s room regularly.
setting the vibration
- Press <MENU> to access main menu
- Press ▲ UP or ▼ DOWN to select VIBRATION.
- Press <MENU> to enter the sub-menu.
- Press ▲ UP or ▼ DOWN to turn the vibration ON or OFF.
- Press <MENU> to confirm.
- If ON, the Parent Unit will vibrate once to confirm it is activated.
NOTE:
•In vibration mode, the parent unit will vibrate when the noise level from the baby reaches sensitivity level 3, 4 or 5 while the loudspeaker volume of the parent unit is switched off.
• If the Parent Unit speaker volume is turned off whilst in monitoring mode and vibration mode, the Parent Unit will vibrate once.
• When the noise level from the baby reaches sensitivity level 3, 4 or 5, the vibrating alert is triggered and will vibrate every 5 seconds.
paging to locate the parent unit
- If both ▲ UP (9a) and ▼ DOWN (9b) keys are pressed for 3 seconds on the baby unit at the same time, the paging tone is emitted.
- PAGING will be displayed on the LCD of the parent unit.
- If volume is OFF before paging starts, reset it to default volume level (4).
- During paging, any key pressed on the parent unit will stop the paging tone.
- If the link is lost between the parent unit and the baby unit, the paging tone will not be emitted when both ▲ UP (9a) and ▼ DOWN (9b) keys are pressed together. There will be no change on baby unit.
- If paging is not stopped, it will expire in 2 minutes.
- Paging function does not work if parent unit is turned off.
resetting to default settings
parent unit default
- Ensure the parent unit is powered OFF.
- Press and hold ▲ UP.
- Press POWER.
- The parent unit LCD will display ‘please press M to restore default settings’.
- Press M to confirm.
baby unit default
- Ensure the parent unit is powered OFF.
- Press and hold ▲ UP.
- Press POWER ON, whilst still holding ▲ UP.
- After 3 seconds, the sensor pad alarm LED will flash.
- Release ▲ UP key and press ▼ DOWN key. The sensor pad LED will resume on.
TROUBLESHOOTING
The link light on the parent unit does not come on
• Check whether the parent unit is powered on.
• Check whether the supplied rechargeable battery pack is correctly installed and not drained.
The link light on the parent unit flashes
• The parent unit and the baby unit may be out of range with each other. Reduce the distance between the units, but not closer than 1.5 metres.
• The baby unit may be switched off. Press <POWER> key to switch on the baby unit.
The low battery indicator on the baby unit flashes
• Replace with 4 x alkaline AA (LR6) batteries or connect the baby unit to the mains power.
The low battery icon on the parent unit LCD screen flashes
• The rechargeable battery pack in the parent unit is running low. Connect the parent unit to the mains power with the supplied power adaptor for recharging.
The parent unit beeps
• This means the connection has been lost with the baby unit. Reduce the distance between the parent unit and the baby unit, but not closer than 1.5 metres.
• The baby unit may be switched off. Switch on the baby unit.
• The rechargeable battery pack in the parent unit is running low. Connect the parent unit to the mains power with the supplied power adaptor for recharging.
• The temperature alert may have triggered. Check the temperature of the baby’s room.
Cannot view the video image of baby from the parent unit.
• The LCD may be turned off. Switch on the LCD.
• The parent unit and the baby unit may be out of range with each other. Reduce the distance between the units, but not closer than 1.5 metres.
• The rechargeable battery pack in the parent unit is drained. Connect the parent unit to the mains power with the supplied power adaptor for recharging.
Cannot hear sound or baby cry from the parent unit.
• The volume level in the parent unit may be set too low. Increase the volume level of the parent unit.
• The microphone sensitivity level of the baby unit may be set too low. Increase the sensitivity level of the baby unit.
• The parent unit and the baby unit may be out of range with each other. Reduce the distance between the units, but not closer than 1.5 metres.
The parent unit is too sensitive to room sounds.
• The microphone sensitivity level of the baby unit may be set too high. Decrease the microphone sensitivity level of the baby unit from the parent unit.
The baby monitor system produces a high-pitched noise.
• The parent unit and the baby unit are too close to each other. Make sure the parent unit and baby unit are at least 1.5 meters away from each other.
• The speaker volume of the parent unit maybe set too high. Decrease the volume of the parent unit.
How long does the nightlight last?
• If the baby unit is run on batteries the nightlight will fade out after 5 minutes. If is run from the mains
electricity it will remain on until switched off.
Alkaline batteries in the baby unit are running low quickly.
• The microphone sensitivity level of the baby unit may be set too high. Decrease the microphone sensitivity level of the baby unit from the parent unit.
• The volume level of the baby unit may be set too high which consumes power. Decrease the volume level of the baby unit.
The rechargeable battery pack in the parent unit is running low quickly.
• The volume level of the parent unit may be set too high. Decrease the volume level of the parent unit.
• For a replacement battery, visit our website www.tommeetippee.com
Talkback feature is not working.
• Make sure the baby unit is powered on and the link between parent and baby unit is normal.
GENERAL SAFETY INFORMATION:
• Warning! Adult use only – Keep out of reach of children at all times. Do not allow a child to play with it – It is not a Toy
• Make sure you store your monitor in a safe place when not in use, away from heat and water.
• Take care not to drop either unit as this may affect the functioning of you monitor.
IMPORTANT:
The Tommee Tippee monitor has been designed to give you added reassurance for those times when you cannot be in the same room as your baby, it is NOT a substitute for proper adult supervision. It is important that an adult stays within range of the monitor at all times during use. Please remember that your Tommee Tippee monitor is not a medical device, nor a device to prevent cases of Sudden Infant Death Syndrome or ‘cot death’, and you should not rely on it for your baby’s well-being. You should personally check your baby as frequently as necessary.
technical specifcations
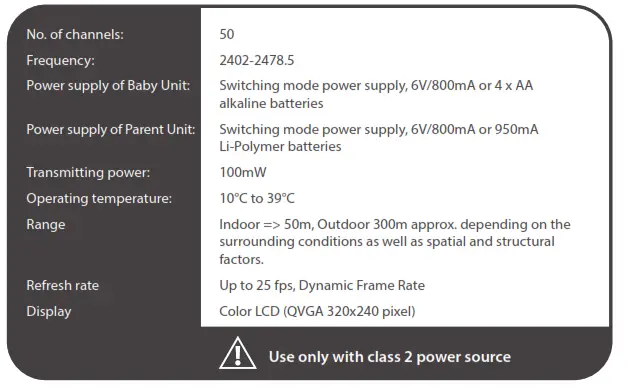
IMPORTANT SAFETY INSTRUCTIONS:
• When using your equipment, basic safety precautions should always be followed to reduce the risk of fire, electric shock and injury to persons, including the following:
1. Do not use this product near water, for example, near a bath tub, wash bowl, kitchen sink or laundry tub, in a wet basement or near a swimming pool.
2. Use only the power cord and batteries indicated in this manual. Do not dispose of batteries in a fire, they may explode. Check with local regulations for possible special disposal instructions.
If you are having any problems in setting up your monitor or require any further information please visit our website www.tommeetippee.com Please retain our address for future reference:
Mayborn Baby and Child
Northumberland Business Park West
Cramlington
Northumberland
NE23 7RH, UK
441010
DECLARATION OF CONFORMITY
We, Jackel International Ltd trading as Mayborn Baby and Child Dudley Lane, Cramlington, Northumberland, NE23 7RH, UK
declare under our responsibility that the electrical product:
Tommee Tippee Model 1094S
Closer to Nature Digital Video Baby Monitor
Closer to Nature Digital Video Baby Monitor with Movement Sensor Pad
which this declaration relates to is in conformity with the following standards:
RF: EN 300 328
RF: EN 50371
EMC: EN 301489-1/-17
LVD: EN 60950-1
LED: EN 60825
Following the provisions of 1999/5/EC (R&TTE Directive) the product is produced by a manufacturing organisation accredited to ISO 9001
Andrew Richardson – Quality Assurance Manager

Cramlington, December 2011