Tommee Tippee closer to nature Electric Steam Sterilizer
IMPORTANT SAFEGUARDS
READ ALL INSTRUCTIONS
FOR HOUSEHOLD USE ONLY
When using electrical appliances, basic safety precautions should also be followed including the following:
- CAUTION: TO PROTECT AGAINST ELECTRICAL SHOCK DO NOT IMMERSE CORD OR PLUGS OR STERLILZER BASE IN WATER OR OTHER LIQUID
- CAUTION: TO ENSURE CONTINUED PROTECTION AGAINST RISK OF ELECTRIC SHOCK, CONNECT TO PROPERLY GROUNDED OUTLETS ONLY
- Do not place on or near a hot gas or electric burner, or in a heated oven.
- Do not use outdoors.
- Always use on a flat heat resistant surface.
- When in use electric sterilizer contains hot water and steam.
- Extreme caution must be used when moving an appliance containing hot oil or other hot liquids.
- Do not touch hot surfaces. Use handles and knobs.
- Always keep the electric sterilizer and its plug out of reach of small children
- Before plugging in the electric sterilizer for the first time ensure the voltage is compatible with your electricity supply by checking the label on the base of the unit
- Always attach plug to appliance first, then plug into the wall outlet. To disconnect, turn any control “off”, then remove plug from wall outlet.
- Ensure water has been added to the base unit before switching the unit on.
- Always add 2.7 fl .oz / 80ml of water before use. If you put too little or too much water into the sterilizer it will not operate correctly.
- Always unplug from the electric outlet when not in use. Allow to cool before putting on or taking off any parts.
- Close supervision is necessary when any appliance is used by or near children.
- The product has been fitted with a cord wind on the base of the unit to allow you to adjust the length of the cord safely. It is recommended that the chord be kept as short as possible. Do not let cord hang over edge of table or counter, or touch hot surfaces.
- Do not operate any appliance with a damaged cord or plug or after the appliance malfunctions or has been damaged in any manner. User maintainance other than cleaning or descaling is not required for this product. Return appliance to the nearest authorized service facility for examination, repair, or adjustment.
- The use of accessory attachments is not recommended by the appliance manutacturer as this may cause injuries.
- Do not use appliance for anything other than intended use
- This appliance is not intended for use by persons (including children) with reduced physical, sensory or mental capabilities, or lack of experience and knowledge, unless they have been given supervision or instruction concerning use of the appliance by a person responsible for their safety.
- Do not open whilst in use as this product contains boiling water. Beware of escaping steam from the vent holes in the lid.
- Always allow at least 3 minutes cooling time before opening.
- Take care when lifting the sterilizer lid after use to avoid scalding.
- Keep all components out of reach of children.
- Never place items on top of the sterilizer.
- User maintenance, other than cleaning and de-scaling, is not required for this product.
- Other servicing should be performed by an authorized service representative.
SAVE THESE INSTRUCTIONS
- A short power-supply cord should be used to reduce the risk resulting from becoming entangled in or tripping over a long cord
- Longer detachable power-supply cords or extension cords are available and may be used if care is exercised in their use
- If a longer detachable power-supply cord or extension cord is used:
- The marked electrical rating of the cord set or extension cord should be at least as great as the electrical rating of the appliance;
- The cord should be arranged so that it will not drape over the countertop or tabletop where it can be pulled on by children or tripped over unintentionally.
- If the appliance is of the grounded type, the extension cord should be a grounding-type 3-wire cord.
closer to nature®
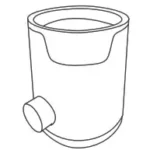
electric steam sterilizer
Before using your closer to nature steam sterilizer, please ensure that you read all instructions thoroughly. Please save this instruction sheet for future reference as it includes important information.
This sterilizer is designed for use with tommee tippee® closer to nature® bottles and feeding accessories (except bottle brush). The sterilizer will hold up to 6 closer to nature® bottles, plus accessories.
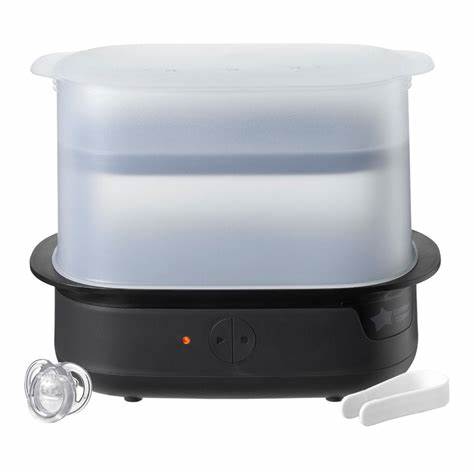
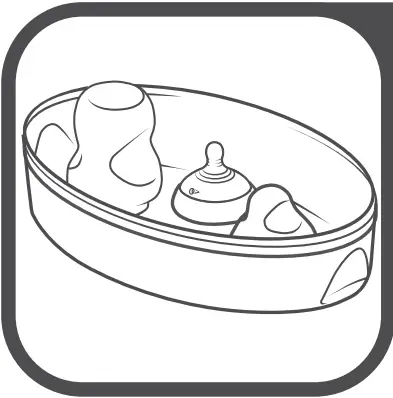
PARTS GUIDE (see diagram)
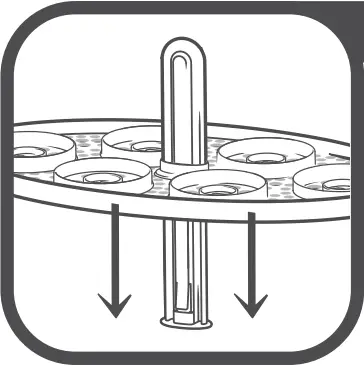
A Removable lower tray
B Removable upper tray
C Central Stem
D Locator for closer to nature® bottle neck
E Locator for closer to nature® anti-colic valve (if sterilizing closer to nature® anti-colic bottles)
F Locator for closer to nature® screw ring and nipple
G Locator for bottle hood
H Sterilizer lid
I Sterilizer base
J Electric cord with plug
K Start switch and sterilizing light
L Steam vents
M 2.7 fl oz / 80ml measurement on closer to nature® bottle
IMPORTANT INSTRUCTIONS FOR SETTING UP YOUR STERILIZER BEFORE FIRST USE:
- Do not connect to power at this stage.
- Remove all items from inside the sterilizer base.
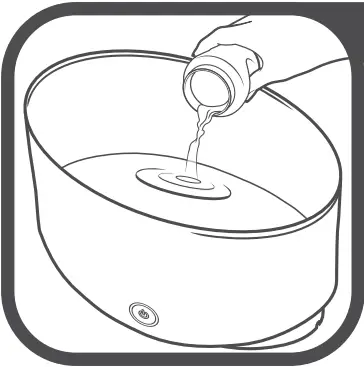
- Pour exactly 2.7 fl.oz / 80ml of water into the sterilizer base.
Your closer to nature® bottles have a handy measure. - Assemble the white lower tray (A), central stem (C) and upper tray (B) and place in the sterilizer base.
- Add the lid.
- Plug the electric cord into your electric outlet. The start switch and sterilizing light should come on automatically. If it does not then press the switch and it will light up amber to show that sterilizing has begun.
- The light will switch off when sterilizing has finished.
- Allow to cool for 3 minutes before unplugging.
- Remove lower tray, central stem and upper tray, pour away any remaining water and wipe dry. Your sterilizer is now ready for use.
FOR INSTRUCTIONS ON HOW TO CLEAN AND STERILIZE THE TOMMEE TIPPEE® CLOSER TO NATURE® BOTTLES, PLEASE SEE SEPARATE LEAFLET.
USING THE ELECTRIC STEAM STERILIZER
Preheating of the appliance is not necessary.
- Before sterilization, wash all bottles and feeding accessories in warm soapy water or in a dishwasher (top rack only) to remove any milk residues. Separate all components for washing and reassemble nipple and screw ring for sterilizing.
WARNING: DO NOT ALLOW PRODUCT TO COME INTO CONTACT WITH OIL BASED FOODS (e.g. OIL/TOMATO BASED SAUCES) AS STAINING WILL OCCUR. - Pour exactly 2.7 fl.oz/ 80ml of water into the sterilizer base. Your closer to nature® bottles have a handy 80ml measure.
WARNING: MORE THAN 80ML OF WATER IN THE STERILIZER BASE WILL PROLONG THE CYCLE TIME. LESS THAN 80ML MAY NOT STERILIZE ITEMS PROPERLY.
- Assemble central stem and lower tray into the sterilizer base.
- Place the bottles neck downwards into the locators of the removable lower tray. If using closer to nature® anti-colic bottles, place bottle parts in the locators as shown.
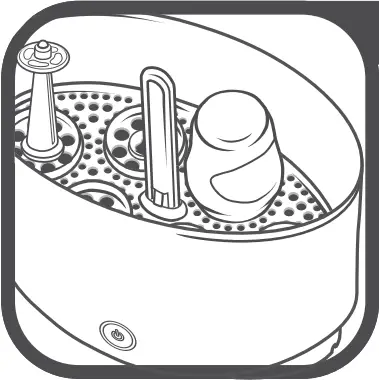
- Fit the removable upper tray into place.
- Place the assembled nipple and screw ring in the locators of the removable upper tray. It is important not to have the hoods fitted onto the nipple and screw ring.

- Slot the hoods into the hood locators of the removable upper tray so that they hang over the nipple and screw ring but are not fully assembled.

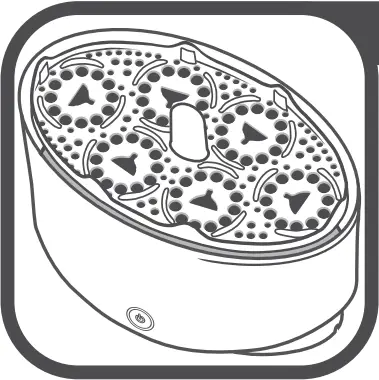
- Place the lid onto the sterilizer base.
- Plug in and switch on.
- Press the start switch and it will light up amber. This shows that sterilizing has begun.
- The light will switch off when sterilizing has finished.
- Allow to cool for 3 minutes before opening the sterilizer.
- The contents will remain sterile for 24 hours if the sterilizer is unopened.
- Wash your hands thoroughly before handling sterilized items. Take care as the items will be hot.
- Remove the sterilized items. The teat tongs can be used to remove the small items. The lid when removed and placed flat becomes another hygienic work surface for making up feeds.
- Drain and rinse unit to prevent a build up of limescale.
CLEANING YOUR ELECTRIC STERILIZER
After each use, unplug and allow to cool before cleaning. Pour away any excess water and wipe with a damp cloth only. Do not clean with abrasive cleaners or allow to come into contact with solvents or harsh chemicals, damage could result.
DE-SCALING
De-scale your electric sterilizer every 4 weeks to ensure it continues to work efficiently. To descale your electric sterilizer:
- Empty the electric sterilizer and wipe down the inside with a sponge or damp cloth.
- Pour in 1 cup of white vinegar.
- Turn sterilizer on and run for 5 minutes.
- Unplug the unit and let cool, then pour any remaining liquid down the sink. Rinse the interior of the sterilizer well with cool water and use a clean sponge or damp cloth to remove any buildup that came loose as a result of the descaling / cleaning process.
- Plug unit back in and add regular amounts of water you use for normal warming. Turn on and run for 5 minutes to remove any additional build up. Upon completion, rinse sterilizer again and use as directed.
PROBLEM SOLVING