Tommee Tippee First Sips
Product information for:
first sips transition cup
first straw transition cup
trainer sippee cup
trainer straw cup
mealtime trainer
sippee cup
sportee bottle
insulated sipper tumbler
insulated straw tumbler
sipper cup
SAFETY GUIDANCE
For your child’s safety and health.
WARNING!
- Always use this product with adult supervision. Accidents have occurred when babies have been left alone with drinking equipment due to the baby falling or if the product has disassembled.
- Never use spouts or straws as a pacifier. Continuous and prolonged sucking of fluids will cause tooth decay. Tooth decay in young children can occur even when non-sweetened fluids are used. This can occur if the baby is allowed to use the cup for long periods through the day and particularly through the night, when saliva flow is reduced or if it is used as a pacifier.
- Always check food temperature before feeding.
- Always stir heated food to ensure even heat distribution and test the temperature before serving
- Not suitable for microwave use apart from sterilizing. See cleaning and sterilization instructions below.
CLEANING AND STERILIZATION
- Before first use, clean the product.
- Clean before each use.
- Always wash the product immediately after use.
- Wash in warm soapy water and rinse in clean water or use a dishwasher (top shelf only). Do not clean with solvents or harsh chemicals.
- Do not allow product to come into contact with oil based foods (e.g. oil/tomato based sauces) as staining will occur.
- Our insulated sipper tumbler and insulated straw tumbler are suitable for sterilization by cold water tablet/liquid solution only.
- All other cups are suitable for sterilization by steam (electric and microwave), boiling or cold water tablet/liquid solution.
STORAGE AND USE
- Inspect before each use and pull the spout or straw in all directions. Throw away at the first signs of damage or weakness.
- Do not store or leave in direct sunlight or near a source of heat.
- Do not store with or allow to come into contact with solvents or harsh chemicals.
- Keep all components not in use out of reach of children
- Not suitable for use in a convectional oven or a combination microwave oven with the grill feature switched on.
- As with most sippy cups, ours are to be used with milk, water or juices that don’t contain pulp.
- DO NOT use with carbonated beverages, formula or hot liquids.
INSTRUCTIONS FOR CLEANING STRAW CUPS
- Unscrew the lid.
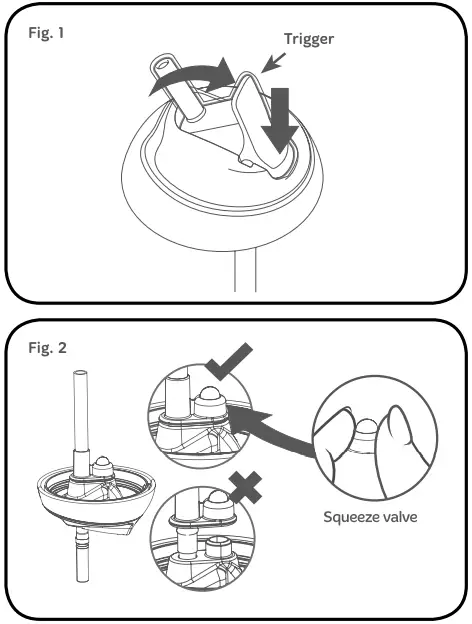
- Pop up the straw by pressing the trigger. (Fig. 1)
- Wash in warm soapy water and rinse in clean water or use a dishwasher (top shelf only).
- If the straw has been completely removed from the lid – remove the trigger from the lid by pushing to the left then right. Push the straw through the lid, and then pull the straw from the top, until the valve seals in position. Squeeze the valve to ensure it is open. (Fig 2.)
- Replace lid on base.
INSTRUCTIONS FOR CLEANING VALVE CUPS
- Unscrew the lid. Pull the valve out (this is important for a thorough cleaning of the valve). You may need to wiggle the valve left to right to get it to release. (Fig. 3)
- After each use, immediately wash all parts thoroughly in warm soapy water and rinse in clean water. The valve should be hand-washed only. All other parts including the lid, base, cover and handles can be washed in the dishwasher (top shelf only).
- To ensure no residual soapy water is left in the valve, run clean water directly into all four openings after washing.
- To remove excess water, shake the valve and let it air-dry before reassembling it with the cup. Store your lids and cups separately, to allow air to circulate freely.
- Once all parts are dry, to re-assemble, place the valve back in the lid, pushing until the four sides lock into place. (Fig.4) Screw the lid back on the cup.

INSTRUCTIONS FOR USE
When replacing the lid onto the bottle base align the two dots on the back of the cup. (Fig 5). This ensures the optimum fit. DO NOT OVERTIGHTEN. This cup is designed as a meal time trainer and may leak if over tightened and not stored upright when full.
INSTRUCTION FOR CLEANING MEALTIME TRAINER
- Un-screw the lid unit from the cup base.
- Take the lid unit apart by gripping the lid top and turning the locking connector anti-clockwise. (Fig. 6) Separate the locking connector, silicone disk, screw ring and lid top.
- Wash all parts in warm soapy water and rinse in clean water or use a dishwasher (top shelf only).
- Re-assemble by turning the screw ring upside down and placing the silicone disk inside with the grooves facing up. (Fig. 7)
- Take the lid top and push up through the hole in the silicone disk (Fig. 8 A)
- Align locking connector and twist to lock. (Fig. 8 B)
- Place the lid on the base. REMEMBER to align the two dots on the back. (Fig 5) DO NOT OVER TIGHTEN.
- The cup has been assembled correctly when the lid top aligns with screw ring and can be pressed down on. (Fig. 9) If the lid top can not be pushed down, the silicone disk has been assembled up-side down.


THE TOMMEE TIPPEE CUP RANGE


Distributed By Mayborn USA;
Mayborn USA Inc. dba Mayborn Group
1 Edgewater Drive
Suite 109
Norwood, MA 02062
Copyright © Mayborn USA. 2014.
TOMMEE TIPPEE is a registered trademark.
Any manufacture, publication, copying, hiring, lending and reproduction of any materials is strictly prohibited and constitutes infringement.