The amazing sleep trainer for young children
Instructions for use
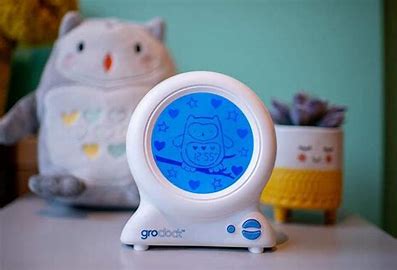
The Gro clock explained…
Stay in bed – When you activate your Gro clock, stars, and hearts appear around a sleeping Ollie. To show the passing of time, the stars disappear at even times during sleep or nap time.
Time to get up – When the clock reaches the wake-up time that you set, the stars disappear, and Ollie wakes up, meaning your child can get up.
After Ollie wakes up, it will remain displayed for two hours, before changing to the energy-saving mode where the digital clock is displayed until re-activated.
The Gro clock has two options – night-time sleep mode and day-time nap mode.
You only need to pre-set the wake-up times you want once (Step 3), but you need to activate the clock (Step 4), each time you use it.
Daily activation of the clock soon becomes part of the bedtime routine and needs to be done in order to set your Gro clock.
Use your bedtime storybook to help explain the Groclock to your child.
What the buttons do
Settings menu


To set your Gro clock
Step 1 – Plug in the Groclock – the screen showing the digital clock display will appear.
Step 2 – Set the current time
- Press the scroll down button

- Press the enter


- Press the enter
- Set the current time using the up

- The word ‘On’ will appear. Scroll up or down between ‘On’ or ‘OFF’ depending on if you want the digital clock to be visible while the count-down process is happening. Press enter.
The settings menu screen will return.
Step 3 – Set the wake-up times
You do not set a go-to-sleep time just the wake-up time you want Ollie to wake up. (If you are not intending to use this product for day-time naps, set both night-time and day-time modes to the same ‘wake up’ time).
Night-time sleep mode
- Whilst on the settings menu screen with the 5 icons flashing, press enter button, and the clock icon will flash
- Press scroll down so the star image is flashing, press enter to select
- Select the time that you want the Groclock to ‘wake up’ (the time for your child to get up e.g. 7:00 am) Set the time using the up and down buttons – select the hour, press enter,, select the minutes, press enter, select am or pm, press enter (ensure this is set as AM for a morning ‘wake up’).
Day-time nap mode
- Whilst on the settings menu screen with the 5 icons flashing, press enter button, and the clock icon will flash
- Press scroll down so the sun image is flashing, press enter to select
- Select the time that you want the Groclock to ‘wake up’ (the time for your child to get up from their nap e.g. 3:00 pm)
Set the time using the up and down buttons – select the hour, press enter,, select the minutes, press enter, select am or pm, press enter.
Key lock feature
Key lock deactivates once wake up time has been reached
To switch on key lock –
When the Groclock is activated in night-time sleep or day-time nap mode, press and hold the scroll down
The buttons will now be locked.
To turn off key lock Press and hold the scroll down
TIP: Try not to let your child see you set the key lock.
To return to the screen showing the digital clock display, press scroll down
Step 4 – Activate your sleep trainer when putting your child to sleep
- From the digital clock screen, press scroll down

- The screen will change from awake Ollie to asleep Ollie with small stars around the outer edge, this will now count down to the ‘wake up’ time previously set when the sun will come out.
- From the digital clock screen, press scroll down
- The screen will change from awake Ollie to asleep Ollie with small stars around the outer edge, this will now count down to the ‘wake-up time previously set when the sun will come out.
To return to the menu when the sleep trainer is activated
Press enter
Additional features
Adjusting the brightness
The brightness level of the screen can be adjusted.
- From the digital clock display return to the settings menu screen by pressing scroll down
- Press the enter and the clock icon
- Press scroll down

- Scroll up
- Press scroll down
Setting the audible alarm
The Gro clock has an audible alarm that can be set to go off at any time in any mode.
- From the digital clock, the display returns to the settings menu screen by pressing scroll
- Press the enter
- Press scroll down

- Select the time you wish the alarm to sound. Set the time using the up
- The bell symbol will start to flash, scroll up

- Press scroll down
To turn off the audible alarm follow steps 1-4 (above) but on step 5 ensure you select the bell symbol with the cross over it
Frequently asked questions
Q. If the power is turned off, does the clock remember the correct time?
A. When the power goes off, the clock ‘freezes’ all the settings, including the main time, the wake-up times, and brightness settings. Therefore if the power goes off for a few seconds and then back on, the time will have been paused for a few seconds. However if the power was off say for 3 hours, then the time will be out by 3 hours and will therefore need resetting.
Q. If I need to keep the power on should I worry about electricity consumption?
A. Your Groclock uses LEDs so it’s naturally energy efficient. It also has a built-in energy-saving mode.
Q. What is the difference between the night–time and day–time nap mode?
A. The Groclock works the same way in both modes. The two modes enable two different ‘wake up’ times to be stored, this does not need to be daytime it could be an alternate night-time.
Q. Is there a demo mode so I can show my child how Ollie changes when he wakes up?
A. Yes! To set the demo mode press and hold the scroll up
Q. My screen has frozen and is not responding to the controls.
A. Switch the Groclock off at the mains, wait a few seconds and switch back on.
For further information visit tommeetippee.com
Safety
IMPORTANT WARNINGS! Keep this instruction sheet for future reference. These instructions can also be found at www.tommeetippee.com
WARNING. LONG CABLE. STRANGULATION HAZARD.
Your Groclock is a safe low voltage device, powered from a small mains-operated power unit.
For your continued safety and the reliability of your Groclock, please observe the normal electrical safety precautions:
- This product is not a toy. Please ensure that it is kept out of reach of children and never allow your child to play with either the power unit or the connecting lead
- Keep the product away from water and moisture. It’s intended for indoor use only
- Repairs should be carried out only by a competent engineer. There are no customer adjustments or fuses inside the Groclock case
- The Groclock has been designed to be robust, but it may be broken if dropped
- The connecting lead is a low voltage only, but for reliability reasons, it should be treated with care
- To completely disconnect the power unit, the AC/DC adapter must be unplugged from the mains
- Access to power to supply the AC/DC adapter should not be obstructed whilst in use
- Electrostatic discharge may affect the working of your Gro clock. If this occurs, simply switch the unit off for several seconds and the unit will reset
- The Groclock and AC/DC adaptor shall not be exposed to dripping or splashing and no objects filled with liquids, such as vases, shall be placed on the Groclock and AC/DC adaptor
- For use only with the power cable supplied with the Gro clock
Mayborn ANZ Pty Ltd. (ABN 66 154 703 134), PO Box 475 Mt Waverley VIC 3149, AUSTRALIA
Newborn Brands (NZ) Ltd. PO Box 47-677, Ponsonby, Auckland, 1144, NEW ZEALAND.
Mayborn (UK) Limited retains all intellectual property rights to this product.
TOMMEE TIPPEE is a registered trademark. Copyright© Mayborn (UK) Limited 2019.
Patent-pending UK, USA, and worldwide PCT patents and Design rights applied for.
Product Ref No: 291345 14171219_1
Technical Information
Height: 13.9 cm
Weight: 285g
Mains Supply Voltage: 230V, 50Hz.
Power Unit: 6V at 200mA.

Information on the disposal for Waste Electrical & Electronic Equipment (WEEE)
This symbol on the products and accompanying documents means that used electrical and electronic products should not be mixed with general household waste. For proper disposal for treatment, recovery, and recycling, please take these products to designated collection points where they will be accepted on a free of charge basis. In some countries, you may be able to return your products to your local retailer upon the purchase of a new product.
Disposing of this product correctly will help you save valuable resources and prevent any possible effects on human health and the environment, which could otherwise arise from inappropriate waste handling. Please contact your local authority for further details of your nearest collection point for WEEE.
Penalties may be applicable for the incorrect disposal of this product in accordance with national legislation.
When the time comes to dispose of this equipment, please help protect our environment by means of proper disposal. Your local
authorities will have special return and disposal facilities available for you.