
VORTEX V22 Smartphone

User Manual
To ensure proper phone operation and longevity, please read this guide carefully. Images and locations may vary slightly based on model version. This manual should be used for general guidance and troubleshooting purposes.
Getting to know your phone
Key definitions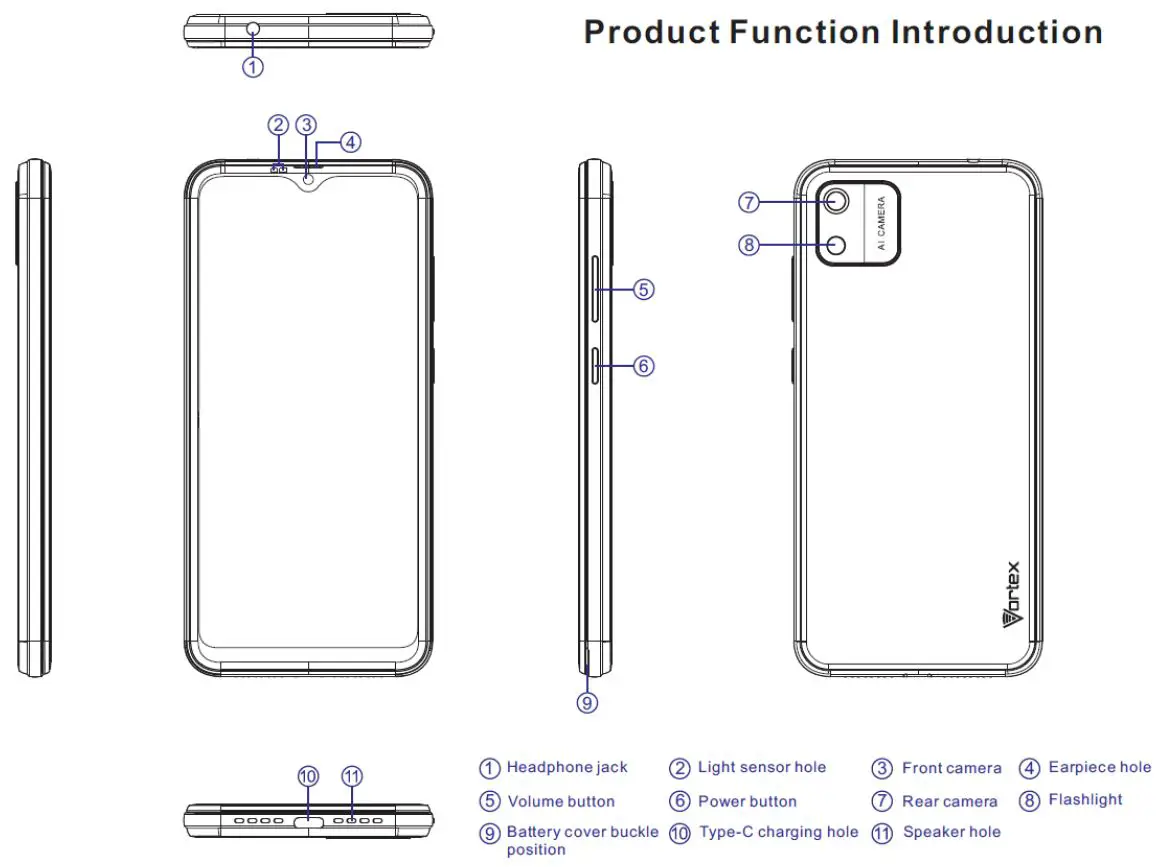
Insert the SIM and microSD cards
After opening the phone case, insert the SIM card into the lower slot. The SD card is inserted into the upper slot.
Caution: Use only the properly sized sim card, do not cut or force the SIM card into the slot.
Turn on and adjust the volume
- Turn on: Hold down the “Power button” until the screen lights up.
- Adjust the volume: Press “Volume +” to turn up the volume, Press ” Volume -” to turn down the volume
Screen control
You can control your phone through a series of operations on the screen.
- Touch: You can touch the items on the screen to make selections, open applications or use the keyboard to input characters.
- Swipe or slide: Quickly move your finger across the surface of the screen without pausing (be careful not to drag items).
- Touch & hold: You can touch & hold some items to get an available menu.
- Drag: You can drag some items on the screen to relocate the icon or produce certain operations.
- Switch between landscape mode and portrait mode: You can switch to landscape mode by rotating your phone. The landscape mode is only valid under some interfaces, such as the text input interface, the message viewing interface and compatible applications.
- Pinch: In some apps (such as Maps and Photos), you can zoom in and out by placing two fingers on the screen at once and pinching them together (to zoom out) or spreading them apart (to zoom in).
Open and switch applications
Open and close the Applications screen
On the home screen, you can swipe up quickly to view more applications. Touch an icon to enter the corresponding application. Touch the Home key to return to the home screen.
Switch to a recently used application
On the home screen, touch the █, opens a list of thumbnail images of apps you’ve worked with recently. To open an app, touch it. To remove a thumbnail from the list, swipe it up.
Home Screen
Arrange & work with apps
- Explore your widgets: Touch the widgets tab at the top of any application screen.
- Get more apps: Touch the Play Store icon on the home screen and sign in to download additional apps.
Manage notifications - Open notifications panel: When a new notification appears on the notification bar, you can drag the notification bar down from the top of the screen to open the notifications panel when your phone has been in idle mode or lock the screen.
- Respond to a notification: Touch it.
- Dismiss a notification: Swipe it sideways.
- Close notifications: Swipe left to turn off notifications.
Place an app icon on the Home screen
Touch & hold the app icon, slide your finger, and lift your finger to drop the icon in place.
Delete items on the homepage
Touch & hold the app icon, slide your finger toward the top of the screen, and drop the app over the Remove icon.
Use folders
You can combine several app icons in a folder. Drop one app icon over another on a Home screen, and the two icons will be combined. From any Home screen, you can
- Open a folder: Touch it. The folder opens:
- Rename a folder: Touch its name.
- Move icons around your Home screens: Touch, hold and slide.
Change wallpaper
- Touch & hold anywhere that is not occupied on the home screen. A list of options appears.
- Select wallpaper from Photos/ Live Wallpapers/ Wallpapers.
Switch to sleep mode
Sleep mode is a kind of power saving mode, which also helps to prevent inadvertent operations. If your phone has been in idle mode for a while, it will automatically switch to sleep mode. You can also press the Power button to turn off the screen and enable sleep mode.
Wake up your phone
After the phone switches to the sleep mode, the screen will be turned off and locked. If needed, please wake your phone and unlock the screen if you want to use your phone.
- Press the Power button to turn on the screen.
- Swipe up to unlock the screen.
If you’ve set an unlock pattern or password, you need to draw the unlock pattern or input the password to enter the main interface.
Make and answer calls
Directly make a call
On the home screen, touch the button to display the dialing keypad. Touch the numeric buttons to input the telephone number and touch the button to make the call.
Make the call from Contacts
On the home screen, touch the Contacts icon, touch the desired contact and touch the phone number to dial it.
Make the call from Call log
On the home screen, touch the button, notice the three tabs at the top of the phone. the call log shows recent calls. Touch the phone icon in a call log to display it.
Make an international call
On the home screen, touch the button to display the dialing keypad. Touch & hold the “0” key until “+” appears on the screen, then dial the country code or region code, city code and phone number.
Dial from Messaging
- On the home screen, touch the Messaging icon.
- Select and open one message or conversation.
- Touch the icon at the top of the phone to dial a number.
Answer a call
Your phone will ring or vibrate (depending on the current mode and settings) upon an incoming call.
- Slide from middle to up to answer the call.
- If headphones are inserted, press the key on the headphones to answer the call.
Reject a call
Swipe down the middle to deny a call.
End a call
Touch the button to hang up the call.
Adjust the volume
During a call, you can raise or lower the volume by using the volume keys.
Turn the speaker on or off
During a call, touch the Speaker button to turn on the speaker, and touch it again to turn off speaker.
Add a call
During a call, touch the Add call button then dial a number and touch the phone icon to add one call and put the current caller on hold. This function requires compatibility with your network operator.
Open the dialing keypad
In a call, you can touch the button to open the dialing keypad to input additional numbers.
Contacts
You can place calls from the Phone app, the Contacts app, or other apps that display contact information. When you see a phone number, you can usually touch it to dial. The contacts interface can be divided into the following tab pages:
- Recent: Call history of the call.
- Contacts: View the list of contacts.
- Favorites: Display the numbers you usually call.
All of your contacts are displayed alphabetically in a scrollable list. You can slide your finger up or down to scroll quickly.
Add new contact
- In Contacts, touch the icon at the bottom right hand corner of the screen.
- Input all contact information. Slide up to move to the next field.
- Touch the Save icon to save your contact.
Delete contacts
In Contacts, hold the contact and then select Delete contact.
Edit contact details
- In Contacts, touch the contact whose details you want to edit.
- Edit the contact information.
Search contacts
- In Contacts, touch the Search contacts.
- Type a key word of a contact name. The phone will automatically list all matched contacts.
Add a contact to Favorites
You can tap the contact you want to add to favorites in the contact interface, and then touch ☆ in the upper right corner to add it to Favorites directly. You can only add the contacts stored on the phone to the Favorites.
Accounts
You can synchronize contact information to your phone from a GoogleTM Account.
In Contacts, touch and then select Sign In.
Share a contact
You can share a contact with someone.
- In Contacts, tap the contact you want to share.
- Touch and then touch Share.
- Select application with which to share (Bluetooth®, Email, Gmail, MMS, SMS and SD Card).
Messages
In Messages, you can send or receive text messages and multimedia messages. On the home screen, touch the Messaging icon to open.
Send messages
- In Messaging, touch the Start chat.
- Input your desired telephone number in Type name or number. You can also select contacts you want to send message from the Contacts and then touch.
- You can touch the icon to attach pictures, videos or audio files. The phone will automatically convert the message to a multimedia message.
- Input some text in Text message.
- After that, touch the icon to send the message.
Receive messages
- In idle mode, you will be reminded about the new messages in the notification area. Slide down to open the notification panel to view.
- Touch the message.
- Directly input text to reply to the message.
- Touch the icon at the top of the phone to directly call back. Touch & hold the text to pop up the Message options menu, you can Copy, Forward, Lock/Unlock or Delete the message and etc.
Settings
In Messaging, touch the Menu key and then touch Settings to change relevant settings.
Gmail
You can use Gmail to read and write email from any mobile device or browser. Your email is always up to date and available no matter where you check it from. On the home screen or in the All Apps screen, touch the Gmail icon to open Gmail.
Set up an Gmail account for the first time
You need to set up an Gmail account when you use Gmail for the first time.
- If you already have a Gmail account, touch Existing, then enter the Gmail address and password.
- Otherwise, touch New and follow the prompts to create a new Gmail account.
Send Emails with Gmail
After the setting of a Gmail account is completed, your phone will automatically enter the inbox of this Gmail account.
- In the inbox of the Gmail account, you want to use, touch
- Fill in one or more recipients. You can touch the Menu key to add CC/BCC.
- Enter the email subject and then compose your message.
- If you want to attach a photo or video, Touch the Menu key > Attach picture/Attach video.
- Touch to send.
Replying to or forwarding email messages in Gmail
- In the Gmail inbox, touch the email message.
- To reply to the sender, touch. or Touch and choose whether to Reply all or Forward.
- If you selected Reply all, enter your reply message. If you selected Forward, specify the message recipients.
- Touch to send.
Network Applications
Network connection
Your phone can connect to the Internet, data services may incur additional charges. For details, please consult your network service provider.
Ways of Connecting to the Internet
Your phone’s networking capabilities allow you to access the Internet via the mobile network’s GSM/WCDMA connection and Wi-Fi.
GSM/WCDMA data connection
Different locations may have different mobile network availability. Initially, your phone is configured to use the fastest mobile network available for data. You can also configure your phone to access a different set of networks entirely, or to behave in special ways when roaming. The icons on the Status bar indicate which kind of data network you’re connected to. On the home screen, touch Settings> Network & internet > Mobile networks to change relevant settings.
Wi-Fi
Turn on/off Wi-Fi
- On the home screen, touch Settings and then touch Network & internet.
- To turn on Wi-Fi, touch OFF and slide it to the right. Touch ON and slide to the left to turn off Wi-Fi.
Connect to Wi-Fi
- . On the home screen, touch Settings and then touch Network & internet.
- Turn on Wi-Fi.
- Touch Wi-Fi. Your phone will automatically search for all nearby Wi-Fi networks.
- Select the network you would like to connect to from the list.
- If you’ve selected an open network, your phone will automatically connect to it.
- If you’ve selected a secure network, you need to input the password.
Browser
You can use Chrome to view web pages and to search for information on the web.
Open Browser
- On the home screen, touch the Chrome icon.
- Touch the URL field at the top to input a web address.
- Enter a new address and then touch Go.
You can touch > Bookmarks/History to select the bookmark you want to open. Touch SAVED PAGES or HISTORY to open other web pages.
Browse web
After opening a web page, you can slide your finger on the screen to view other parts of the page.
Zoom in or out
You can use two fingers to zoom in or out. Spread your fingers apart or pinch them together to zoom in or out.
Browsing options
When browsing web pages, touch the to select more operations such as Save to bookmarks, Share page, Find in page, Request desktop site.
Settings
You can choose settings that will affect how page content is displayed and privacy and security preferences to suit your browse style. On the Browser screen, touch Settings to enter the settings interface.
Bluetooth
Via the Bluetooth® function, you can exchange data with other Bluetooth devices that are within a short distance. Because Bluetooth® devices communicate through radio waves; interference might exist due to obstacles or other electronic devices.
Turn on/off Bluetooth
- On the home screen, touch Settings > Connected devices > Connection preferences > Bluetooth.
- Slide the ON/OFF button next to Bluetooth® to turn it on or off.
Pairing
- Touch Pair new device, when Bluetooth is on to automatically search for devices. Your phone will scan for and display all Bluetooth devices it finds.
- Touch the ID of the desired device.
Send files via Bluetooth
To send files via Bluetooth®, do as follows:
- Select a file or item, such as a contact or a media file from an appropriate application or File manager.
- Open it, touch the Menu key and choose Share, or touch and hold it, choose then touch the icon.
- Search for and pair with a Bluetooth®-enabled device.
Change your phone’s Bluetooth name
- . On the home screen, touch Settings > Connected devices > Connection preferences > Bluetooth
- If the Bluetooth function is not turned on, turn it on.
- Touch Bluetooth, then touch the Device name to edit the name of your device, then touch Rename.
- Touch the name of the phone to toggle it to Visibility timeout so that other Bluetooth® devices can find your device.
Airplane mode
In areas where the use of mobile devices is restricted, you can activate Airplane mode to disable phone function but still use other functions of your phone such as calendar, music and games. You will not be able to make/answer calls, send/receive messages in Airplane mode.
- On the home screen, touch Settings > Network & internet.
- Check the box for Airplane mode. The phone will turn off all wireless connections when Airplane mode is enabled.
Experiencing Multimedia
Camera
Your phone has a camera, which can be used to take photos and record video clips.
Note:
Please respect the privacy of others and abide by the local regulations and customs when taking photos.
Take photos
- On the home screen, touch the Camera icon to open the camera.
- Tap the icon to take photos after the view is satisfactory. To view your picture, touch the thumbnail in the bottom left corner of the screen.
Record video clips
You can use icon to change from Camera to Camcorder or vice versa. Tap the icon to start recording and touch the icon to stop recording. After a video is recorded, you can touch the frame in the bottom left corner of the screen to view the video.
Photos
The Photos categorizes your pictures and videos by storage location and stores these files in folders. Tap a folder to view the pictures or videos inside
More Applications
File Manager
On the home screen, touch the Files icon. You can view all files saved in the phone or on the memory card.
Clock
On the home screen, touch the Clock icon.
Adding an Alarm
- Touch the Alarm.
- Touch the icon at the down of the screen.
Turning on/off an Alarm
On the Alarms screen, slide the ON/OFF button next to an alarm to turn it on or off.
Stopwatch
- On the Clock screen, touch Stopwatch.
- Touch to start timing, press to pause.
Timer
- On the Clock screen, touch Add timer.
- Set the length of time to count down.
- Touch to begin.
- When the timer expires, touch to stop the alert.
Manage applications
You can view and manage applications installed in your phone.
Install new applications
You can install applications from the Play Store or from elsewhere. When installing applications that are not from the Play Store, make sure the software is suitable for your phone.
Installing applications from the Play Store
- On the home screen, touch the Play Store icon.
- Search for the applications you want to install.
Installing applications not in the Play Store
- Copy the application to the SD card and find the file from File manager.
- Check Unknown sources.
- Touch the file and complete the installation according to the wizard.
Compliance Information
FCC NOTICE
The following statement applies to all products that have received FCC approval. Applicable products wear the FCC logo, and /or an FCC ID in the format FCC ID:2ADLJ-V22 on the product label.
- This device complies with Part 15 of the FCC Rules. Operation is subject to the following two conditions:
- This device may not cause harmful interference.
- This device must accept any interference received, including interference that may cause undesired operation.
- Changes or modifications not expressly approved by the party responsible for compliance could void the user’s authority to operate the equipment.
NOTE: This equipment has been tested and found to comply with the limits for a Class B digital device, pursuant to Part 15 of the FCC Rules. These limits are designed to provide reasonable protection against harmful interference in a residential installation.
This equipment generates uses and can radiate radio frequency energy and, if not installed and used in accordance with the instructions, may cause harmful interference to radio communications. However, there is no guarantee that interference will not occur in a particular installation. If this equipment does cause harmful interference to radio or television reception, which can be determined by turning the equipment off and on, the user is encouraged to try to correct the interference by one or more of the following measures: Reorient or relocate the receiving antenna.
Increase the separation between the equipment and receiver. Connect the equipment into an outlet on a circuit different from that to which the receiver is connected.
Consult the dealer or an experienced radio/TV technician for help.
RF warning statement
The device has been evaluated to meet general RF exposure requirements. The device can be used in portable exposure
Certification Information
This device complies with Part 15 of the FCC Rules. Operation is subject to the following two conditions: (1) this device may not cause harmful interference, and (2) this device must accept any interference received, including interference that may cause undesired operation.
FCC Warning
This device complies with part 15 of the FCC Rules. Operation is subject to the following two conditions:(1) This device may not cause harmful interference, and (2) this device must accept any interference received, including interference that may cause undesired operation. Any Changes or modifications not expressly approved by the party responsible for compliance could void the user’s authority to operate the equipment.
Note: This equipment has been tested and found to comply with the limits for a Class B digital device, pursuant to part 15 of the FCC Rules. These limits are designed to provide reasonable protection against harmful interference in a residential installation. This equipment generates uses and can radiate radio frequency energy and, if not installed and used in accordance with the instructions, may cause harmful interference to radio communications. However, there is no guarantee that interference will not occur in a particular installation. If this equipment does cause harmful interference to radio or television reception, which can be determined by turning the equipment off and on, the user is encouraged to try to correct the interference by one or more of the following measures:
- Reorient or relocate the receiving antenna.
- Increase the separation between the equipment and receiver.
- Connect the equipment into an outlet on a circuit different from that to which the receiver is connected.
- Consult the dealer or an experienced radio/TV technician for help.
Specific Absorption Rate (SAR) information:
This Smart phone meets the government’s requirements for exposure to radio waves. The guidelines are based on standards that were developed by independent scientific organizations through periodic and thorough evaluation of scientific studies. The standards include a substantial safety margin designed to assure the safety of all persons regardless of age or health.
FCC RF Exposure Information and Statement
The SAR limit of USA (FCC) is 1.6 W/kg averaged over one gram of tissue. Device types: V22 (FCC ID: 2ADLJ-V22) has also been tested against this SAR limit. The highest SAR value reported under this standard during product certification for use at the ear is 0.773W/kg and when properly worn on the body is 0.914W/kg. This device was tested for typical body-worn operations with the back of the handset kept 0mm from the body. To maintain compliance with FCC RF exposure requirements, use accessories that maintain a 10mm separation distance between the user’s body and the back of the handset. The use of belt clips, holsters and similar accessories should not contain metallic components in its assembly. The use of accessories that do not satisfy these requirements may not comply with FCC RF exposure requirements and should be avoided.
Body-worn Operation
This device was tested for typical body-worn operations. To comply with RF exposure requirements, a minimum separation distance of 10mm must be maintained between the user’s body and the handset, including the antenna. Third-party belt-clips, holsters, and similar accessories used by this device should not contain any metallic components. Body-worn accessories that do not meet these requirements may not comply with RF exposure requirements and should be avoided. Use only the supplied or an approved antenna. The EUT was tested and rated under the American National Standard Institute (ANSI) C63.19-2011 hearing aid compatibility standards. The ANSI standard for hearing aid compatibility contains two types of ratings:
- M-Ratings: Rating for less radio frequency interference to enable acoustic coupling with hearing aids.
- T-Ratings: Rating for inductive coupling with hearing aids in telecoil mode.
This device complies with the FCC HAC requirements has also been tested E-Field, H-Field, and T-Coil.