CABLE MODEM QUICK START
This Quick Start describes how to connect the cable modem to a cable modem service as an Internet gateway for a computer, wireless router, or other local Ethernet-capable device.
Package Contents
- Cable modem
- Power cube
- Ethernet RJ-45 cable
- This Quick Start flyer
Before Installing Your Cable Modem
Your cable service provider needs to know your modem’s MAC ADDRESS, which is printed on a label on the bottom of your modem. You can provide this when you order cable modem service; or if you already ordered service, by calling the cable company BEFORE installing your modem. You may also be asked for your cable modem’s model name and number, which is ZOOM 5341J. If you need the modem’s serial number, you can find it near the MAC address on the modem’s label.
System Requirements
- You need to connect the cable modem to a cable modem service that uses any of the popular DOCSIS standards – 3.0, 2.0, or 1.1. If you need to get cable modem service, please speak with your cable service provider.
- You need to connect a computer, router, or other Ethernet-capable device to the cable modem using an Ethernet cable. The computer can be a Windows, Macintosh, or Linux computer. The router must have one or more Ethernet ports, and may include wireless capability. Instructions for making this connection are below.
If your cable service provider provided a cable modem starter kit, please continue below. If you don’t have or choose not to use the cable modem starter kit from your service provider, go to How to connect to a computer if you don’t have or choose not to use a cable modem starter kit.
How to connect a computer or router if your cable service provider provided a cable modem starter kit
Some cable service providers supply a cable modem starter kit that can be useful when you install your cable modem. The kit may include a coaxial cable for connecting between a wall jack and your cable modem. (These are also available at most electronics retailers.) The kit will include instructions, and may also include a CD with software. If you receive a kit like this, we recommend that you read the kit’s instructions and use them to install your cable modem. This cable modem is DOCSIS 3.0 certified by CableLabs, and connects like a normal cable modem.
You will need to plug in the cable modem’s power cube, make sure the modem’s Power button is ON, connect to cable modem service using a coaxial cable, and then connect to a computer or router using the included Ethernet cable.
Note: Please refer to the Cable Modem Rear Panel section if you would like to see a diagram of the back of the cable modem and a description of the connections.
After you have installed your cable modem and it has synchronized itself with the cable network, your cable modem can connect your computer to the Internet.
Note: Allow 5 to 30 minutes for the cable modem to connect to the network the first time because the cable modem must locate and connect to the appropriate channels for communication. You’ll see the DS (downstream), US (upstream), and Online modem lights flashing until the Online light stays steady green to signal success. (Blue US/DS LEDs indicate channel bonding.)
To check that your cable modem is working, open your browser and go to a familiar Web site to check that the cable modem is working. If it works, congratulations! Installation is complete. Otherwise, see Troubleshooting Tips for help.
How to connect to a computer if you don’t have or choose not to use a cable modem starter kit
- Plug one end of the Ethernet cable into the modem’s LAN jack and plug the other end into your computer’s Ethernet jack.
Note: Please refer to the Cable Modem Rear Panel section if you would like to see a diagram of the back of the cable modem and a description of the connections. - Connect the modem to a coaxial cable for the cable service. The cable service is carried on the same cables and connectors as your cable TV service.
? You can connect a coaxial cable between an open cable service wall jack and the cable modem. (If no wall jack is open, you can use a coaxial T connector.)
? Alternatively, there may already be a coaxial cable that is connected to service and that has an open end for connecting to the cable modem. - Plug the modem’s power cube into an outlet and then into the modem’s Power jack. Make sure the modem’s Power button is ON. Allow 5 to 30 minutes for the cable modem to connect to the network the first time because the cable modem must locate and connect to the appropriate channels for communication. The Link light of the modem should be lit to show the Ethernet connection. You’ll see the DS (downstream), US (upstream), and Online modem lights flashing until the Online light stays steady green to signal success. (Blue US/DS LEDs indicate channel bonding.) If the modem’s front panel Power, DS (downstream), and US (upstream) lights do not stay on steady after a reasonable amount of time, please refer to Troubleshooting Tips.
- Now that you have installed your Zoom cable modem and it has synchronized itself with the cable network, your cable modem can connect your computer to the Internet.
How to connect your cable modem to a router (not a computer) if you don’t have or choose not to use a cable modem starter kit
- The router should not be plugged in or powered up. If it is, unplug it.
- Plug one end of the Ethernet cable into the modem’s LAN jack and the other end into the router’s WAN Ethernet jack, typically labelled WAN or Internet.
Note: Please refer to the Cable Modem Rear Panel section if you would like to see a diagram of the back of the cable modem and a description of the connections. - Connect the modem to the cable outlet.
? You can connect a coaxial cable between an open cable service wall jack and the cable modem. (If no wall jack is open, you can use a coaxial T connector.)
? Alternatively, there may already be a coaxial cable that is connected to service and that has an open end for connecting to the cable modem. - Plug the modem’s power cube into an outlet and then into the modem’s Power jack. Make sure the modem’s Power button is ON. Allow 5 to 30 minutes for the cable modem to connect to the network the first time because the cable modem must locate and connect to the appropriate channels for communication.
- Power-up the router. Make sure the modem’s Power button is ON. Wait for the router to complete its power-up sequence.
- The Link light of the modem should be lit to show the Ethernet connection. You’ll see the DS (downstream), US (upstream), and Online modem lights flashing until the Online light stays steady green to signal success. (Blue US/DS LEDs indicate channel bonding.) If the modem’s front panel Power, DS (downstream), and US (upstream) lights do not stay on steady after a reasonable amount of time, please refer to Troubleshooting Tips.
- Follow your router’s instructions for setting up the router and connected devices.
- Using a computer connected to the router, open the computer’s browser and go to a website to check that the connection between your cable modem and router is working properly. If it works, congratulations! Installation is complete.
If you have a problem connecting to the router, please try a simpler setup by connecting the cable modem directly to a PC by following the instructions in the section How to connect to a computer if you don’t have or choose not to use a cable modem starter kit.
If the cable modem still doesn’t connect, please refer to Troubleshooting Tips.
Once the cable modem works properly when connected directly to your computer, try the following:
- First try shutting down and restarting the router; if that doesn’t help, then try shutting down and restarting each computer connected to the router. Power cycle your cable modem and allow time for it to resynchronize with the cable system.
- You may also need to check that the DHCP client on the router’s WAN port is enabled. If you need help, look in your router’s manual or contact your router manufacturer.
- If that does not solve the problem, you may need to contact your cable service provider and give them the MAC address of the router’s WAN port.
Cable Modem Rear Panel
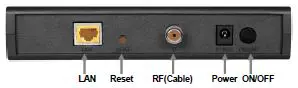
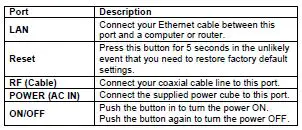
Please note the following:
- Do not block the modem vents in any way.
- Do not place the modem near a heating or air conditioning duct, in direct sunlight, anywhere susceptible to drastic temperature changes, or where it’s very hot or very cold.
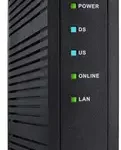
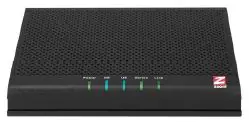
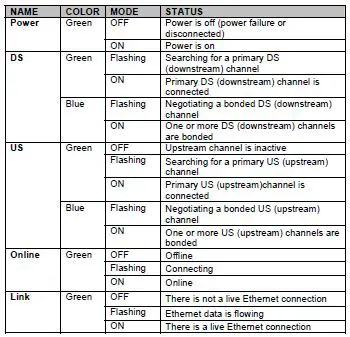
Front Panel LEDs
Your cable modem has several lights on its front panel to help you monitor the cable modem’s status.
Troubleshooting Tips
Problem: What do I do if my cable service provider wants me to access the Configuration Manager?
Solution:
- Disconnect the coaxial cable from the back of the cable modem.
- Wait until the Online LED turns off.
- Disconnect whatever was plugged into the Ethernet port of your cable modem.
- Connect a PC directly to the Ethernet port of your cable modem (re-connect your PC if it had previously been connected).
- Reconnect the coaxial cable TV cable to the back of the cable modem.
- On your PC, open a browser and type in the address 192.168.100.1 Enter
User Name: admin
Password: password - Now you will see status information about your cable modem and its connection that you can read back to your service provider.
Problem: I cannot access my Internet service or send or receive email.
Solution: The following front panel lights on the cable modem – Power, DS (downstream),US (upstream), and Online – must be solidly lit before your modem will let you connect to the Internet. If they are not:
- Make sure the cable modem’s Power button is ON and that the cable modem is plugged into a live power outlet.
- Check your modem’s Ethernet and cable connections.
- Power cycle your modem.
- Restart your computer.
- Check to see that your cable TV is working.
- Check with your cable service provider to make sure that high speed access is available and running.
- In rare instances, the cable signal may be weak or noisy. If this is the case, call your cable service provider.
- If you are using your PC’s Ethernet port, check that this port is functioning correctly. If you are using wireless, check that your wireless connection is functioning correctly. Refer to your computer’s or router’s documentation if necessary.
- Check that your Web browser is configured correctly. It should be set to use a network connection (this might be called a Local Area Network or broadband connection).
- Check that your computer’s network settings are configured correctly. A Windows computer should have a local area connection that should normally be Internet Protocol version 4, Internet Protocol version 6, or TCP/IP; not AOL, Dial-up, or Adapter. A Macintosh computer should be configured for Built-in Ethernet, and TCP/IP should be set to Using DHCP.
What if I’m told that my modem isn’t approved for my cable modem service?
This modem is approved for almost all cable modem services. This product is designed to work with almost all the cable modem services in the US (and most other countries, too). It has been certified by CableLabs, and some other cable service providers also have their own special tests, and this cable modem has passed these tests. Beware of installers who try to get you to use their cable modem instead of a Zoom cable modem. Some of these installers provide bad information because they are misinformed or because they earn a fee for providing their cable modem. If the installer tells you that a cable modem provided by him or the service provider is “free”, that’s almost never true. You will almost definitely be charged a monthly rental fee for that cable modem. Please double-check the existence of such fees with your service provider before you accept a cable modem that your installer offers.
In the unlikely event that you are told that your Zoom modem is not approved by your cable modem service, please email us at [email protected] or call us at (617)753-0963.
Approval information for CableLabs, Comcast, Cox, and CableOne® is available at www.zoomtel.com/cableOK
If You Need Help
We encourage you to register your product and to notice the many support options available from Zoom. Please go to www.zoomtel.com/techsupport From here you can register your modem and/or contact our technical support experts and/or use our intelligent database SmartFactstm and/or get warranty information.
US: (617) 753-0963
Safety Issues and Warnings
WARNING: Risk of electric shock. Do NOT expose to water or moisture.
- The cable modem is a high-performance communications device designed for home and office environments.
- Do NOT use the cable modem outdoors. Keep the cable modem in an environment that is between 0°C and 40°C (between 32°F and 104°F).
- To avoid overheating the cable modem, do NOT place any object on top of the cable modem.
- Do NOT place the cable modem in a confined space.
- The manufacturer assumes no liabilities for damage caused by any improper use of the cable modem.
- Make sure the voltages and frequency of the power outlet matches the electrical rating labels on the power cube.
FCC Statement
This device complies with Class B Part 15 of the FCC Rules. The device generates, uses and can radiate radio frequency energy and, if not installed and used as instructed, may cause harmful interference to radio communication. Only Coaxial cables are to be used with this device in order to ensure compliance with FCC emissions limits. Accessories connected to this device by the user must comply with FCC Class B limits. The manufacturer is not responsible for any interference which results from use of improper cables, or which results from unauthorized changes or modifications to the device.
UL Listing
This product is UL-Listed and complies with all applicable electrical and fire safety requirements.
Limited Warranty
Zoom Telephonics, Inc. (hereinafter “Zoom”) warrants this product against defects in material and workmanship for a warranty period of 2 years. This warranty applies to the original end-user purchaser.
For all Zoom products other than software, Zoom will, solely at its option, repair or replace this product with a functionally equivalent new or factory-reconditioned product during the warranty period. The consumer will deliver the product to Zoom. All transportation risks and costs in connection with this warranty service are the responsibility of the consumer.
Zoom will replace software at no charge if there is a defect in materials or workmanship for a period of 30 days from date of original retail purchase, provided the defective software is returned to Zoom. Shipments from Zoom will normally be via U.S. Mail. Software products supplied by Zoom are sold “as is,” without warranty, either expressed or implied, as to function, application, merchantability, performance, and quality.
Zoom is not responsible for incidental or consequential damages, and is not responsible for damages resulting from the breach of any expressed or implied warranty. Zoom is not responsible for any costs of recovering, reprogramming, or reproducing any programs or data stored or used with the Zoom products, damage to property, and to the extent permitted by law, damages for personal injury.
This warranty is in lieu of all other warranties, expressed or implied. We do not assume or authorize assumption for us of any other warranty expressed or implied. Some states and countries do not allow the exclusion or limitation of incidental or consequential damages, so the above limitation or exclusions may not apply to you.
This warranty does not apply if the Zoom product has been damaged by accident, abuse, lightning or other natural disasters, misuse or misapplication, or if it has been modified without the written permission of Zoom, or if any serial number has been removed or defaced.
This warranty shall not be applicable to the extent that any provisions of this warranty are prohibited by any federal, state, or municipal law that cannot be preempted. This warranty gives you specific legal rights, and you may also have other rights that vary from state to state or country to country.
Disclaimer
Zoom Telephonics, Inc. (hereinafter “Zoom”) assumes no liabilities with respect to the contents of this document. Zoom also reserves the right to revise this document or update occasionally the content hereof without any obligation to notify any person of such revisions or amendments. Specifications subject to change without notice.