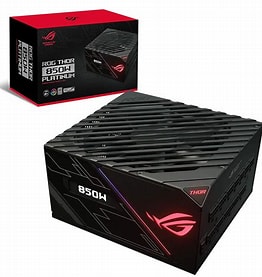
Q15060a


Quick Start Guide

Package contents
| ROG-THOR-850P | ROG-THOR-1200P |
| 1 x ROG-THOR-850P PSU | 1 x ROG-THOR-1200P PSU |
| 1 x Chassis Screws Package | 1 x Chassis Screws Package |
| 1 x ROG Sticker | 1 x ROG Sticker |
| 4 x ROG Cable Tie | 6 x ROG Cable Tie |
| 10 x Cable Tie | 12 x Cable Tie |
| 2 x Sleeved Cable Combs (6-pin) | 4 x Sleeved Cable Combs (6-pin) |
| 6 x Sleeved Cable Combs (8-pin) | 10 x Sleeved Cable Combs (8-pin) |
| 2 x Sleeved Cable Combs (24-pin) | 2 x Sleeved Cable Combs (24-pin) |
| 1 x User Manual | 1 x User Manual |
| Cables*: | Cables*: |
| – 1 x Main Power cable | – 1 x Main Power cable |
| – 2 x CPU cables | – 2 x CPU cables |
| – 3 x PCIe cables | – 6 x PCIe cables |
| – 3 x SATA cables | – 3 x SATA cables |
| – 2 x Peripheral cables | – 2 x Peripheral cables |
| – 1 x Floppy cable | – 1 x SATA to peripheral cable |
| – 2 x Addressable RGB cables | – 1 x Floppy cables |
| – 2 x Addressable RGB cable |
* Refer to the Cable description table for more information on the different cables.
Specifications
| Model | ROG-THOR-850P | ROG-THOR-1200P | ||||||||
| Intel Specification | ATX12V / EPS12V | ATX12V / EPS12V | ||||||||
| Dimensions (L x W x H) | 160mm x 150mm x 86mm | 190mm x 150mm x 86mm | ||||||||
| Efficiency | 80Plus Platinum | 80Plus Platinum | ||||||||
| AC Input Range | 100-240Vac | 100-240Vac | ||||||||
| DC Output Voltage | +3.3V | +5V | +12V | -12V | +5Vsb | +3.3V | +5V | +12V | -12V | +5Vsb |
| Maximum Load | 20A | 20A | 71A | 0.3A | 3A | 25A | 25A | 100A | 0.3A | 3A |
| Combined Load | 100W | 852W | 3.6w | 15W | 125W | 1200W | 3.6W | 15W | ||
| Total Output | 852W | 1200W | ||||||||
3
Cable description
| Connector | Cable |
| MB Power |  |
| CPU |  |
| PCIe |  |
 |
|
| SATA |  |
 (Included in 1200W only) |
|
 (Included in 850W only) |
|
| SATA to peripheral |  |
| Peripheral |  |
 |
|
| Floppy |  |
| Addressable RGB |  |
 |
Features

The illustrations in this section are for reference only and may vary between models.
Front view
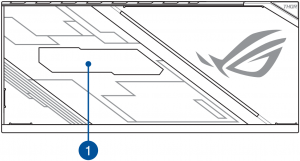
5
Left view
Right view
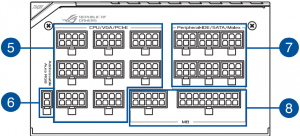
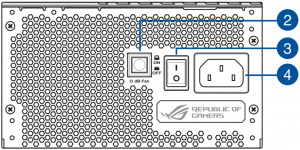
1 OLED power display 5 8-pin CPU / VGA / PCI-E connectors
2 0 dB Fan button* 6 2-pin Addressable AURA RGB connector
3 Power switch 7 6-pin Peripheral-IDE / SATA / Molex connectors
4 Power connector 8 10-pin and 18-pin MB connectors
* Pressing this button will turn off the 0dB function, allowing the PSU fan to spin at all times.
6
Getting started

The illustrations in this section are for reference only and may vary between models.
1.
2.
Connecting the peripheral cables
You may connect the SATA to Peripheral cable or Floppy cable to any of the Peripheral cables to extend additional SATA power connectors or a floppy power connector.
To extend SATA power connectors:

To extend a floppy power connector:

7
Safety information
- NEVER, under any circumstances, open the power supply unit. This is extremely dangerous due to the high voltage inside.
- DO NOT insert any objects into the fan grill or the ventilation area of the power supply unit.
- DO NOT place any objects in front of the fan or the ventilation area of the power supply unit that may obstruct or restrict the airflow.
- USE ONLY the modular cables bundled with the power supply unit.
- Avoid dust, humidity, and temperature extremes. Do not place the power supply unit in any area where it may become wet.
- The power supply unit is for integration into a computer, and not intended for external or outdoor usage.
- DO NOT use any third party cables or extension cables with this unit.
Notice labels
















8
