anko 42939740 Port Bt Party Speaker User Manual
Warning
| CAUTION
RISK OF ELECTRIC SHOCK DO NOT OPEN |
||
| The lighting flash with arrowhead symbol, with an equilateral triangle is intended to alert the user to the presence of uninsulated dangerous voltage within the products enclosure that may be sufficient magnitude to constitute a risk ofelectric shock topersons. | CAUTION: TO REDUCE THE RISK OF SHOCK, DO NOT REMOVE COVER (OR BACK). NO USER SERICEALBE PARTS INSIDE REFEER SERVICING TO QUALIFIED SERVICE PERSONNEL. | The exclamation point within an equilateral triangle is intended alert the user tithe presence of important operating and maintenance (servicing) instructions in the l iterature accompanying the appliance. |
Important precautions
- The apparatus shall not be exposed to dripping or splashing and that no objects filled with liquids, suchas vases, shall be placed on the apparatus.
- Minimum distances 100 cm around the apparatus for sufficient ventilation.
- The ventilation should not be impeded by covering the ventilation opening swith items, such as news papers, table-cloths or curtains.
- No naked flame sources such as lighted candles,should be placed on the apparatus.
- When the mainsplug or and appliance coupler is used as the disconnect device, the disconnect device shall remain readily operable.
- To be completely disconnected the power input, the mains plug of apparatus shall be disconnected from the mainscom pletely.
- The main plug of apparatus should not be obstructed or should be easily accessed during intended use.
- The use of apparatus in moderate climates.
- Attention should be drawn to the environmental aspects of battery disposal.
- Batteries shall not be exposed to excessive heat such as sunshine, fire or the like.
- Excessive sound pressure from earphones and headphones can cause hearing loss.
- The internal battery is non-user replaceable.
- Do not use this apparatus near the water.
- For PLUGGABLE EQUIPMENT, the socket-outlet (power adaptor) shall be installed near the equipment and shall be easily accessible
Avoids to use battery in following conditions:
– High or low extreme temperature during use, storage or transportation.
– Replacement of a battery with an incorrect type that can defeat a safeguard.
– Disposal of a battery into fire or a hot oven, or mechanically crushing or cutting of a battery, that can result in an explosion.
– leaving a battery in an extremely high temperature surrounding environment that can result in an explosion or the leakage of flammable liquid or gas.
– Extremely high temperature and/or extremely low air pressure that can result in an explosion or the leakage of flammable liquid or gas
Package contents
- Speaker x 1
- Tripod Stand x 1
- USB Power Cable x 1
- Line In / FM Antenna Cable x 1 ( the same one cable)
- Tripod Adapter x 1
- Tripod Stand Remote Control x 1
Product |
||
| Speaker | ||
| DC Input | : | 5V |
| FM Radio | : | 87.5-108MHz |
| Speaker Size | : | 8 Inch + Treble |
| Battery | : | Rechargeable lithium battery |
| Line In | : | 3.5mm |
| Microphone Input | : | 6.35mm |
DESCRIPTION OF REAR FUNCTION PANEL

- LED On/Off
- Power On/Off and Volume knob
- Battery Charge light Indicator
- DC 5V Input Slot ( for speaker )
- Line in Input Jack
- Display Screen
- TF Slot
- Microphone Volume Knob
- Echo Volume Knob
- Microphone Input Jack
- Mode Function Switching Button
- Previous Button
- Play/Pause Button
- Next Button
- USB Slot
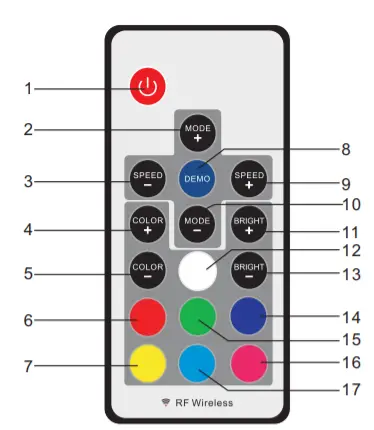
DESCRIPTION OF TRIPOD STAND REMOTE CONTROL

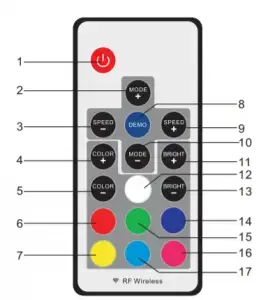
- Power On/Off Button
- Mode Switching+ Button
- Speed- Button(Gradual Change Mode)
- Color+ Button(Breath Mode)
- Color- Button(Breath Mode)
- Red Color Button
- Yellow Color Button
- Demo Button
- Speed+ Button(Gradual Change Mode)
- Mode Switching- Button
- Bright+ Button(Color Mixing Mode)
- White Color Button
- Bright- Button(Color Mixing Mode)
- Purple Color Button
- Green Color Button
- .Pink Color Button
- Sky Blue Color Button
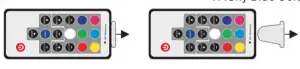
Remote Control Instruction:
- Before use the remote control, please take off the transparent plastic insulation sheet from the bottom slot of remote control and keep it.
- If not intend to use the remote control, please insert back the transparent plastic insulation sheet to bottom slot of remote control to keep the battery life.
CAUTION:
Danger of explosion if battery is incorrectly replaced. Replace only with the same or equivalent type by the technical staff.
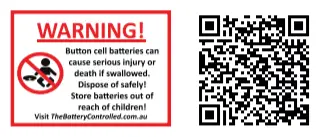
SWALLOWING MAY LEAD TO SERIOUS INJURY OR DEATH IN AS LITTLE AS 2 HOURS DUE TO CHEMICAL BURNS AND POTENTIAL PERFORATION OF THE OESOPHAGUS. DISPOSE OF USED BATTERIES IMMEDIATELY AND SAFELY.FLAT BATTERIES CAN STILL BE DANGEROUS.
EXAMINE DEVICES AND MAKE SURE THE BATTERY COMPARTMENT IS CORRECTLY SECURED, E.G. THAT THE SCREW OR OTHER MECHANICAL FASTENER IS TIGHTENED.
DO NOT USE IF COMPARTMENT IS NOT SECURE IF YOU SUSPECT YOUR CHILD HAS SWALLOWED OR INSERTED A BUTTON BATTERY, CALL THE 24HOUR POISONS INFORMATION CENTRE IN AUS ON 131126 OR IN NZ 0800 764 766 OR CONTACT YOUR COUNTRY’S EMERGENCY DEPT
Getting Started
Caution:
- Do not plug or unplug the power cable while you have wet hands.
- To protect this speaker from alightning storm, or when left unattended and unused for long periods of time, unplug power cable from the wall outlet.
- When unplugging the power cord from a wall outlet, always pull on the power plug only.Never unplug it by pulling the power cord
Intrenal Battery Level indicator
- There is a battery indicator symbol on the display panel. Show the battery capacity level.
- When the battery capacity is low. The battery indicator will show in half.
- When the battery indicator keep flashing . Battery is almost run out. Please charge the speaker
Charging the internal Battery
The speaker comes with a built-in rechargeable, follow the below steps to charge it:
- Connect the USB power cable (supplied in the accessories) with USB charger ( not supplied in the accessories) to the DC 5V input slot.
- The battery light indicator will show RED on the rear function panel.
- If full charged, the RED indicator light will trun off automatically
Intrenal Battery Level indicator
- There is a full grid battery indicator symbol keeping static on the right bottom corner of the display screen, meaning battery capacity is full.
- If the half grid battery indicator symbol will light on on the left bottom corner of the display screen, meaning battery capacity is low.
- If the half grid battery indicator symbol keeping flashing on the left bottom corner of the display screen, meaning battery capacity is almost running out, please charge the battery on time.
Note: please fully charge the product when it is not going to be used for a long time and charge once a month to keep longer battery life.
Turning ON/OFF the speaker
- Press the Power ON/OFF & Volume Knob on the rear function panel to power on or off the Speaker.
- Press the Power button on the remote control to Standby mode.
Turn ON/OFF the color light of tripod stand
- Connect the one end of DC connector of the tripod stand with an adapter ( supplied in the accessories ), then plugin to the 220-240V 50Hz wall socket to power on the tripod stand.
- Press the POWER button on or off the remote control can control within 5M with 360 degree. The infrared receiver is located on the tripod stand.
- Disconnect the DC connector and the AC adapter when not in use with the tripod.
Function Instructions
USB Operation
This speaker has a USB port for play back MP3 music.
- Insert your USB device into the USB port and the unit will start playing automatically. Press the [MODE] button to swith to USB mode if the speaker is on other mode.
- Press the or key to the previous or next track.
- Press the button to play or pause music.
FM Operation
This speaker supports FM radio function.
- Insert the Line In Cable/ FM antenna cable (supplied in the accessories) to the Line input jack on the rear function panel and extend the cable.
- Press [ MODE ] button on the rear function panel repeatedly until FM function is selected.
- Long press button on the function panel to search the FM radio station automatically.
- Press or to select the previous or next FM radio station.
Bluetooth Operation
This speaker supports Bluetooth function.
- Press [ MODE ] button on the function panel switch to the Bluetooth mode if the speaker on other mode.
- Once on the Bluetooth mode,” bLUE ” will keep flashing on the display screen.
- Open the Bluetooth funciton of the external device and search the Bluetooth device name “42939740 ” to pair.
- Press connect to “PAIR” with the speaker.
- Both speakers TWS will pair automatically if above operation correct. Once connected, ” bLUE ” will keep static on the display screen, you can play the music with the speaker.
- You can use button or button on rear the function panel to control the songs of the external device.
TWS Connecting
This speaker supports TWS pairing function, please buy two same speaker to enjoy this function.
- Turn on the Bluetooth function of the one speaker, connected the bluetooth and playing music.
- Long press MODE button on the rear function panel to open the TWS function, ” E ON ” will short display on the screen.
- Turn on the bluetooth of another speaker and ” bLUE ” will keep flashing on the screen, then long press [ MODE ] button of this speaker to open the TWS function, ” E ON ” will short display on the screen and “bLUE ” will keep static.
- Both speakers’ TWS will pair automatically if above operation correct. Once TWS paired successully, ” bLUE ” of both speaker will keep static.
- Turn the volume knob on the function panel of any speaker increase or decrease the music volume.
- If not using the TWS function, please long press [ MODE ] to deconnected TWS, ” E OFF ” will short show on the display screen, and ” bLUE ” will keep flashing on another speaker
Function Instructions
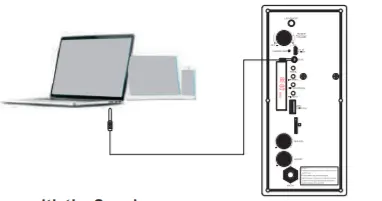
Connect with Line in
- Press [ MODE ] button on the rear function panel to switch to the Line in mode,” LINE ” will be displayed on the screen.
- Connect this speaker Line in input jack and the device Earphone jack by provided Line in cable (supplied in the accessories)
- Once connected,turn on your external device and play music. Caution: Please turn off the unit before connect AUX cable in order to avoiding unexpected noise.
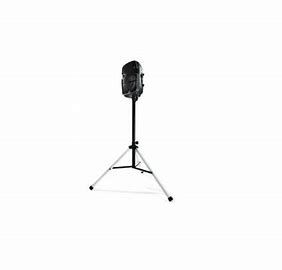
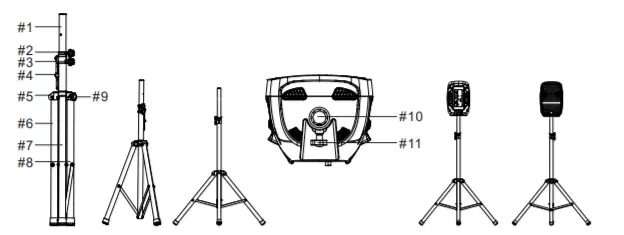
Tripod Stand use with the Speaker
- Please twist loose the knob screw of the fixed mount(#9) on the tripod stand(#5), to loose the LED tube (#6/#7/# 8) to adjust the size of the fixed position.
- After twist loosen the knob screw from the fixed mount , please grasp the black centerl tube (#1) with one hand and push the fixed mount (# 5) with another hand and push it down; Or grasp any two of LED tubes with both hands (#6/#7/# 8) to pull out,and adjust
a suitable fixed size, then tighten the knob screw of the fixed mount (#9). - Loosen the two knob screws on the center tube (#2, #3) to adjust the height of the tripod stand.
- After adjusted the height of the tripod stand, please must tighten the knob screws of the center tube(#2, #3) and insert the pin (#4) to the corresponding hole of the tripod stand to fix the height, to prevent the center tube fall off.
- There is a groove at the bottom of the speaker (#10), please correspondingly to place the speaker on the top of the center tube of the tripod stand, also tighten the knob screw
on the rear of the speaker (#11) to prevent the speaker fall off.
Connect with Wired Microphone
NOTE:
- Please use and place the tripod stand on a flat ground to avoid unbalanced placement.
- When the speaker and the tripod stand are used together, please ensure tighten all knob screws from both.
- Please don’t place the speakers with different hole sizes to the tripod stand, which may cause unstable and fall down, may hurt the people.
- The Tripod stand height up to 2.3M, recommend to use for 1.6M, too high may cause knock down.
- The most stable fixed size between two LED tubes is between 65cm to 85cm.
- Please take care of the children not to touch or play with the tripod to prevent accidentally push down.
- Only use the tripod with this speaker only.
Connect to Wired Microphone
Insert 6.35mm wired microphone, and use control knob to adjust the sound level.
When playing with the wired microphone, please use this knob to adjust the volume of microphone.

When playing with the wired microphone, please use this knob to adjust the echo volume of microphone
Important Notes
While using the microphone, avoid being put the microphone opposite the bass of Party Speaker,as they may have Whistler Noisy. To get the best singing performance, keep the micro phone within
5-15cm of the mouth and at a 45 degree angle. When using the microphone, always pay attention to the battery. If the battery is low, the indicator light will come on and the performance will progressively become poor.
Caution: Please do not put the microphone directly face to the Party speaker, it may damage the speaker.
Warranty
Thank you for your purchase from Kmart. Kmart Australia Ltd warrants your new product to be free from defects in materials and workmanship for the period stated above, from the date of purchase, provided that the product is used in accordance with accompanying recommendations or instructions where provided This warranty is in addition to your rights under the Australian Consumer Law. Kmart will provide you with your choice of a refund, repair or exchange (where possible) for this product if it becomes defective within the warranty period Kmart will bear the reasonable expense of claiming the warranty. This warranty will no longer apply where the defect is a result of alteration, accident, misuse, abuse or neglect. Please retain your receipt as proof of purchase and contact our Customer Service Centre on 1800 124 125 (Australia) or 0800 945 995 (New Zealand) or alternatively, via Customer Help at Kmart.com.au for any difficulties with your product. Warranty claims and claims for expense incurred in returning this product can be addressed to our Customer Service Centre at 690 Springvale Rd, Mulgrave Vic 3170. Our goods come with guarantees that cannot be excluded under the Australian Consumer Law. You are entitled to a replacementn or refund for a major failure and compensation for any other reasonably foreseeable loss or damage. You are also entitled to have the goods repaired or replaced if the goods fail to be of acceptable quality and the failure does not amount to a major
failure. For New Zealand customers, this warranty is in addition to statutory rights observed under New Zealand legislation.