anko Convection Oven

IMPORTANT SAFEGUARDS
When using electrical appliances, basic safety precautions should always be followed, including the following:
READ ALL INSTRUCTIONS
- To protect against electric shock do not immerse the appliance, power cord, plugs in water or other liquids.
- Close supervision is necessary when any appliance is used by or near children.
- Unplug from outlet when not in use and before cleaning. Allow to cool before putting on or taking off parts, and before cleaning the appliance.
- If the supply cord is damaged, it must be replaced by a qualified electrician in order to avoid a hazard, or the product must be disposed of.
- The use of accessory attachments not recommended by the appliance manufacturer may cause injuries
- The appliance is intended for household use only. Do not use outdoors or for commercial purpose. Any other use will void the warranty.
- This appliance is intended to be used indoors in household and similar applications such as: staff kitchen areas in shops, offices and other working environments, farm houses, by clients in hotels, motels and other residential type environments, bed and breakfast type environments.
- Do not let cord hang over edge of table or counter, or touch hot surfaces.
- Do not place on or near a hot gas or electric burner, or in a heated oven.
- Do not touch hot surfaces.
- Do not use appliance for other than intended use.
- Do not use this appliance within reach of a bath or a sink or any vessel containing water or liquids.
- Do not disconnect from the mains by pulling on the mains cord, grasp the plug itself to remove it.
- Remove all protective wrapping prior to placing bread in the oven.
- Always attach a plug to the mains cord.
- Never use the appliance if the supply cord is damaged. It must be replaced by a qualified electrical person only or the appliance must be disposed of.
- The appliance is not intended for use by persons (including children) with reduced physical, sensory or mental capabilities, or lack of experience and knowledge, unless they have been given supervision or instructions concerning use of the appliance by a person responsible for their safety.
- Children should be supervised to ensure that they do not play with the appliance.
- The appliances are not intended to be operated by means of an external timer or separate remote-control system
- Do not use an extension cord with this appliance.
- Always operate the appliance on an even flat surface. Make sure that there is enough ventilation, so that the hot steam can evaporate.
- To avoid the danger of fire, never leave the appliance unattended. And never use appliance near any of the inflammables, such as curtains, wall cabinet…etc., due to risk of burning and or fire.
- Before connecting the appliance to mains power, the glass lid must be placed on the on glass bowl.
- Caution: hot surface. Care must be taken. The surfaces are liable to get hot during use.
- For the details on how to clean surfaces that come in contact with food, please refer to section “Cleaning and Maintenance”.
- The temperature of accessible surfaces may be high when the appliance is operating.
SAFETY PRECAUTIONS FOR CONVECTION OVEN.
- Always operate on an even flat surface.
- Avoid contact with the lid and glass bowl surfaces during and after use, as they will be hot.
- DO NOT touch the heating element or fan during use as they will be very hot.
- Always remove lid using the handle and ensure to place the hot lid correctly on the lid stand provided. To prevent heat damage never place the hot lid directly on the bench top.
- Use away from walls and curtains.
- Do not place any items on top of the oven whilst in use.
- Do not block or cover the air vents on the top, back or sides of the oven.
- Do not immerser the unit in water or any other liquid.
- Ensure that the cord is kept well away from the heating element during use.
BEFORE FIRST USE
- Remove all accessories and shipping materials packed inside the oven.
- Wash all accessories in warm soapy water. Wipe the inside of the oven with a damp cloth or sponge. Dry with paper towels and ensure the unit is dry before use.
- Place the oven on a flat counter or other stable surface. DO NOT OPERATE ON THE SAME POWER OUTLET WITH ANOTHER APPLIANCE.
- When operating the oven, keep at least 10 cm of space on all sides of the oven for adequate air circulation.
- Before connecting the appliance, be sure the timer control is in the “OFF” position.
- When using for the first time, set the temperature knob to 125ºC and the timer to 10 minutes. This will burn off any residue from the manufacturing process.
NOTE: A small amount of smoke and odour may be detected. This is normal for a new oven and should disappear after few minutes of use.
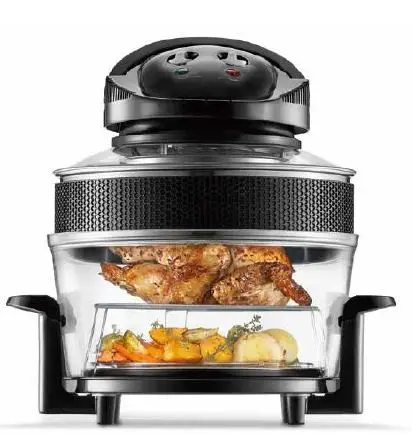
PARTS DESCRIPTION

INTRODUCTION
Convection oven cooking
With circulating hot air, the convection oven cooks food quickly, efficiently and uses much less energy. The hot air method of cooking ensures an even distribution of heat around the food. One of the effects of this is that the surface of food such as meat is quickly sealed, allowing it to retain the succulence of its original flavour.
Lid holder
The lid contains heating element and fan so it is very hot. Never place the lid directly onto any benchtop or other surface. Always place the lid into the lid holder as shown inb Fig.1. Ensure the electrical cord is facing down towards the bench top. Do not use the electrical cord to lift the lid.
Cooking with the extension ring
The extension ring is preferred when you need to cook something of a larger size, such as a whole chicken. Place the extension ring on the top of the bowl, to make the bowl bigger and give it the extra volume needed for cooking.
Safety handle
The convection oven will not work unless the safety handle is fully ‘clicked’ by folding it in downward position. To do this, press the safety button on the handle to lower into place. If you need to remove the lid during cooking, lifting the safety handle will stop the heater and the turbo fan. Replace the lid and place the safety handle in the down position to resume cooking.
Thermostat
Sets the cooking temperature from 125°C to 250°C.
Timer
The timer dial is marked in minutes and has a reminder bell, which sounds when the cooking time is completed. When setting the manual timer, always turn the timer past the time you wish to set, before turning the timer back to the correct time.
BASIC COOKING FUCNTION
Baking
Pre-heat the oven to 220-230°C, then bake at around 170-190°. If baking biscuits or scones, we recommend you use the multi-purpose baking dish to allow air to circulate. For cakes, we recommend ring tins which allow cakes to cook through to the center and checked that they fit in the oven before using. Always place the cake tin on the low rack, never directly onto the bottom of the bowl. Silicone bakeware is not suitable to use in the Oven.
Roasting
Roast at around 200-250°C. You can roast meats, vegetables, potatoes and wedges. We suggest lining the bottom of the bowl under the rack with aluminium foil turned up at the edges. This will catch drippings and make cleaning easier. Roasts will need to be turned at least once in the cooking cycle unless they are very small. For vegetables, it may be necessary to remove meat and let it stand whilst the vegetables finish cooking.
Note: Meat with bones will take longer than a boneless roast. Oven bags are not suitable to use in the Oven.
Grilling
Grill at around 220-250°C. Grill meats, seafood, vegetables and your favorite cheese topping. For grilling, the oven needs to be very hot and the food must not be too cold. Using cold food for grilling and for any of the other cooking functions, can extend cooking times.
Note: You will not achieve the same amount of browning as you would on a barbecue or in a frypan. A small amount of oil sprayed or wiped onto the food will help in browning.
Toasting
Toast at around 180-220°C. Toast sweet and savory breads, pastries, rolls and sandwiches. You can also toast cheese melts and pizzas.
Roasting Guide
Use these cooking times as a guide. Cooking times and temperatures will vary depending on factors such as weight, cut of the food and your personal taste. Similar to your built-in oven in your kitchen, you may need to adjust cooking times and temperatures to your requirements. Monitor the food as it’s cooking and modify accordingly. It is important to cook mince meat, sausages and poultry until well done. No pink should be visible, and juices should run clear.
Note: For meats weighing from 1-1.5kg, set temperature at 200°C
| Temperature (°C) | Food | Quantity | Approximate Cooking times (minutes) |
| 200 | Whole chicken | 2-1/4kg | 75-80 |
| 200 | Sliced Pork | 500g | 7-8 |
| 200 | Drumsticks | 8 Pieces | 15 |
| 250 | Fish | 10 Pieces | 7-8 |
| 200 | Clam | 500g | 5-7 |
| 250 | Shrimps | 500g | 5 |
| 250 | Corn | 4 Pieces | 10 |
| 150 | Cake | 1 Case | 20 |
| 250 | Potato | 500g | 25 |
| 250 | Red prawn | 4 Pieces | 15 |
| 250 | Crab meat | 500g | 10 |
Cook for the following (approximate) times:
| Type of meat | Minutes | |
| Beef, boneless, whole roast | rare: | 15-20 |
| medium: | 20-25 | |
| well done: | 25-30 | |
| Beef, rib roast, rump or chuck | rare: | 15-20 |
| medium: | 20-25 | |
| well done: | 25-30 | |
| Ham with bone & fully cooked | medium | 12-15 |
| Pork loin (boneless) | well done: | 20-25 |
| Loin with bone | well done: | 25-30 |
| Pork ribs | well done: | 25-30 |
Baking Guide
Suggest backing times and temperature.
| Food | Temperature (°C) | Minutes |
| Brownies | 150 | 18-20 |
| Buns | 200 | 10-12 |
| Cakes, layer | 150 | 18-20 |
| Cakes, loaf | 150 | 30-35 |
| Cornbread | 180 | 18-20 |
| Cookies: drop | 160 | 8-10 |
| Cookies: rolled | 169 | 10-12 |
| Muffins | 180 | 12-15 |
| Pies/pastries/pie crust | 200 | 8-10 |
| Bread, rolls | 180 | 12-15 |
| Loaf | 160 | 25-30 |
USING YOUR APPLIANCE
CAUTION: THE OVEN SURFACES ARE HOT DURING AND AFTER USE
Wear protective, insulated oven gloves when touching hot oven or hot dishes and food, or when inserting or removing the rack, pans or baking dishes.
- Prepare the bowl. While cooking the surface of the bowl will be considerably hot, be sure to place the appliance on a heatproof surface.
- Place the rack in the bowl and place food in the centre of the rack to receive best air circulation. Allow 1cm space between the food and bowl.
- Cover the bowl with the lid. Ensure it is sealed correctly.
- Connect the cord plug into a mains power outlet socket.
- Turn the thermostat to the desired temperature.
- Set the timer using the reference table as a guide. Push handle down activate the safety switch to start the oven. The red and green indicator lights will switch ON to indicate that cooking has started.
- The Air Fryer will automatically shut off when cooking time has been reached.
Note: The timer may continue to tick after the Air Fryer has shut off and finished cooking. This is normal - When roasting, line the bottom of the bowl with aluminium foil to catch any drippings.
CLEANING AND MAINTENANCE
- Remove plug from the mains power.
- Allow the glass bowl and accessories to cool down before cleaning.
- DO NOT immerse the lid of the oven in water other liquid.
- DO NOT clean the lid of the oven in a dishwasher.
- Clean the base unit by wiping it with a damp cloth. A little detergent can be added if the appliance is heavily soiled.
- Do not use scouring pads, steel wool or any form of strong solvents or abrasive cleaning agents to clean the appliance, as they may damage the outside surfaces of the appliance.
- Clean all accessories in warm soapy water, do not use any scouring pads, steel wool or any strong solvents or abrasive cleaning agents when cleaning accessories.
- Make sure that the appliance is cleaned after every use.
- Allow to dry fully after cleaning before using again.
- Do not use the appliance if damp. Ensure the appliance is completely clean and dry before storing.
To store your appliance: - Unplug power cord from the power outlet and clean as instructed.
- Store on a flat, dry level surface out of reach of children
IMPORTANT!
Surfaces in contact with food should be cleaned regularly to avoid cross contamination from different types of food. The use of hot clean water with a mild detergent is advisable when dealing with surfaces that come into contact with food. Correct food hygiene practices should always be followed at all times to avoid possibility of food poisoning / cross contamination.
TECHNICAL DATA
Voltage :220-240V~ 50-60Hz
Power :1300W
12 MONTH WARRANTY
Thank you for your purchase from Kmart.
Kmart Australia Ltd warrants your new product to be free from defects in materials and workmanship for the period stated above, from the date of purchase, provided that the product is used in accordance with accompanying recommendations or instructions where provided. This warranty is in addition to your rights under the Australian Consumer Law. Kmart will provide you with your choice of a refund, repair or exchange (where possible) for this product if it becomes defective within the warranty period. Kmart will bear the reasonable expense of claiming the warranty. This warranty will no longer apply where the defect is a result of alteration, accident, misuse, abuse or neglect.
Please retain your receipt as proof of purchase and contact our Customer Service Centre on 1800 124 125 (Australia) or 0800 945 995 (New Zealand) or alternatively, via Customer Help at Kmart.com.au for any difficulties with your product. Warranty claims and claims for expense incurred in returning this product can be addressed to our Customer Service Centre at 690 Springvale Rd, Mulgrave Vic 3170.
Our goods come with guarantees that cannot be excluded under the Australian Consumer Law. You are entitled to a replacement or refund for a major failure and compensation for any other reasonably foreseeable loss or damage. You are also entitled to have the goods repaired or replaced if the goods fail to be of acceptable quality and the failure does not amount to a major failure. For New Zealand customers, this warranty is in addition to statutory rights observed under New Zealand legislation.![]()