anko
Food Dehydrator

Read and save this manual for future reference.
Important Safeguards
When using electrical appliances, basic safety precautions should always be followed, including the following:
- Only connect the dehydrator if the mains voltage of the power outlet socket corresponds to the rating plate voltage specifications found on the product.
- Only connect the dehydrator to an easily accessible power outlet socket so that it can be quickly disconnected from mains power in the event of a fault.
- Do not operate the dehydrator if it is visibly damaged or if the mains cord or mains plug is defective.
- If the supply cord is damaged, DO NOT use. For electrical safety, any repairs to the product should be carried out by a qualified electrical person only or the product must be disposed.
- Do not open the housing; for electrical safety always consult a qualified electrical professional to carry out any repairs.
- Do not operate the dehydrator with an external timer or separate remote-control system.
- Do not immerse the dehydrator, the mains cord or mains plug in water or other liquids.
- Never touch the mains plug with damp hands.
- Never pull the mains plug out of the socket by the mains cord, always pull from the plug.
- Never use the mains cord as a carrying handle.
- Keep the dehydrator, mains plug and mains cord away from open flames and hot surfaces.
- Always place the supply cord in a way that it does not pose a tripping hazard.
- Do not kink the mains cord and do not lay it over sharp edges.
- Only use the dehydrator indoors. Never operate it in damp rooms or in the rain.
- Never store the dehydrator such that there is a risk of it falling into a water tub or basin.
- Never reach to retrieve an electrical device if it has fallen in water. In such a case, immediately disconnect the mains plug.
- Make sure that children do not insert any objects in the dehydrator.
- Always switch the dehydrator OFF and pull the mains plug out of the power socket when you are not using the dehydrator, when you intend to clean it or in the event of a fault.
- This appliance is not intended for use by persons (including children) with reduced physical, sensory or mental capabilities, or lack of experience and knowledge, unless they have been given supervision or instructions concerning use of the appliance by a person responsible for their safety.
- Children should be supervised to ensure that they do not play with the appliance.
- This appliance is not designed for commercial use.

CAUTION: The top part of the dehydrator becomes hot during operation.
1. Make sure that the dehydrator is placed on a stable surface. It must be set up on a flat, level location so that it does not wobble during use.
2. Do not touch hot parts or areas that become hot on the dehydrator with bare fingers during operation. Always use heat-insulated oven gloves or oven mitts to take hold of the dehydrator.
3. Clearly advise other users of the risks!- CAUTION: To prevent damage to the appliance, do not use alkaline cleaning agents when cleaning, use a soft cloth and mild detergent.
- When cleaning surfaces that come-in contact with food, please refer to section “Cleaning and Maintenance”.

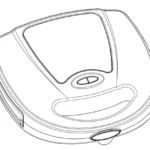
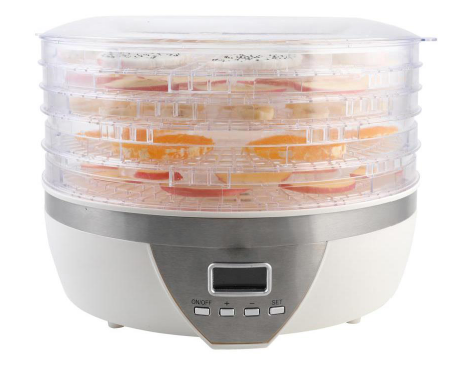
Know Your Food Dehydrator


- Cover (with steam vents)
- Drying tray, 5 x layers
- Base unit
- Plug and cord
- Hot air vent
- Control panel
- Display
- ON/OFF button
- Plus (+) button
- Minus (-) button
- Set button
First use
Before the first use, please check if all the parts of the appliance are received in good undamaged condition. If not, please return the product to Kmart for replacement.
- Take the dehydrator out of the packaging.
- Check to make sure that all parts are included.
- Check whether the dehydrator or the individual parts exhibit any damage. If any parts are damaged or missing, do not use the dehydrator.
Basic Cleaning
- Remove the packaging material and all protective foils.
- Before first use, clean all parts of the dehydrator as described in the section “Cleaning and Maintenance”: cover (1) & drying trays (2) & base unit (3).
Assembling The Dehydrator
- Place the base unit (3) on a dry, level, non-slip and heat-resistant surface located close to a socket.
- Place a drying tray (2) on the base unit and stack as many drying trays on top of one another as needed for the dehydration process.
Note: Make sure that the drying tray without the opening in the middle is always in the topmost position. - Place the cover (1) on the top drying tray.
Heating The Device Before First Use
To remove any residue from production, you have to heat up the dehydrator without any food for 1 hour before first use. Any odour that is emitted is normal and will disappear after a short time. This is not a malfunction of the dehydrator. If this occurs, make sure that you open windows for adequate ventilation.
- Connect the supply cord plug (4) into a mains power outlet socket.
The indicator on the display (7) of the control panel (6) will start to blink. - Push the plus button (9) once.
“01Hr” will appear on the display. - Start operation by pushing the ON/OFF button (8).
The fan will turn on and warm air will flow out of the hot air vent (5). The dehydrator will automatically switch off after one hour. - Pull the mains plug out of the socket and let the dehydrator cool off.
What To Consider Before Dehydrating
- Only use fresh, ripe, high-quality fruits and vegetable varieties.
- Clean vegetables and fruits as soon as possible after harvesting them and prepare them if necessary.
- Prevent unwanted changes in colour and/or flavour by blanching foods or immersing them in solutions (like lemon juice).
Preparing Food
- Wash all food thoroughly.
- Remove any damaged areas, seeds or pits.
- Prepare food according to the dehydration table below. If possible, cut the food into similarly sized pieces and remember that the pieces will shrink considerably during dehydration process.
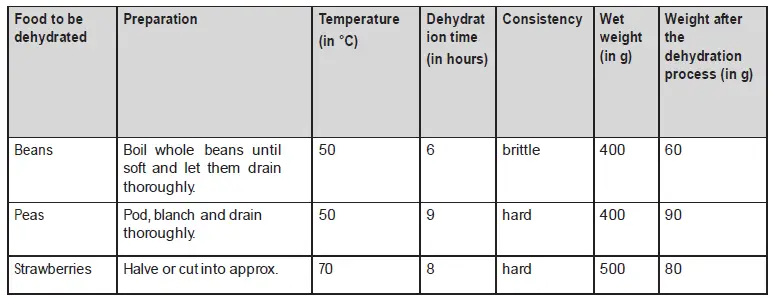
Dehydration Table Cooking Guide
NOTE: The values specified in the table serve only as a guideline. The dehydration time depends on the size and thickness of the pieces or slices cut. Decide yourself how you would prefer to enjoy your food.
- Meat must be sliced very thinly to be dried. Partially freeze meat for up to 1 hour. Remove and slice thinly across the grain.
- Place on the drying trays (2) right away.
- Seafood fillets should also be thinly sliced. If needed, partially freeze the fish first for up to 1 hour. Remove any bones, even small ones, for best results.
The Dehydration Process
Filling The Dehydrator
IMPORTANT!
Risk of damage!
Liquid may infiltrate electrified parts of the device and damage them.
- Never fill the dehydrator with liquid.
- Place fruits or vegetables on the drying trays (2), so that the warm air is still able to circulate properly.
- If you use food with different dehydration times, place the food with the longest dehydration time on the bottom drying tray as the temperature is the highest there.
- To the extent possible, use the same kind of food on all drying trays.
- Place the pieces of fruit on the drying trays upright and close together.
- In general, you should place the unpeeled fruit on the drying trays with the cutting surface up unless a recipe instructs otherwise.
- Arrange the sliced fruit on the drying trays in a scale-like pattern.
- Only arrange the vegetables on the drying trays in one layer.
- Stack the drying trays on top of one another so that the teeth on the drying tray extend into the designated holders on the bottom of the drying trays.
Starting The Dehydration Process
The drying temperature can be displayed both in Celsius (oC) and in Fahrenheit (oF).
- Connect the supply cord plug (4) into a mains power outlet socket.
- The indicator on the display on the control panel (6) will start to blink
- Set the desired dehydration time with the plus button (9) and/or the minus button (10).
- Push the SET button to be able to set the temperature.
- Set the desired temperature with the plus button and/or the minus button.
- Hold the SET button (11) down for 3 seconds to switch between Celsius (oC) and Fahrenheit (oF).
- Start operation by pushing the ON/OFF button (8).
The fan will turn on and warm air will flow out of the hot air vent (5).
The dehydrator will automatically switch off once the set dehydration time has elapsed.
During The Dehydration Process
The indicator on the display will alternate every 5 seconds between the remaining dehydration time and the dehydration temperature.
During the dehydration process, you can change the dehydration temperature and the dehydration time.
- Push the SET button (11) when the mode you would like to change is shown. The indicator on the display (7) will start to blink.
- Change the dehydration time or the dehydration temperature by pushing the plus button (9) and/or the minus button (10).
- Wait until the indicator on the display stops blinking to save the setting.
Replacing And Turning The Drying Trays
- To ensure uniform drying, replace and turn the drying trays (2) occasionally during the dehydration process.
- Make sure that the drying tray without the opening in the middle is always in the topmost position.
- As the food on the bottom trays is exposed to the hottest and driest air, move the bottom trays up and the top trays down.
Pausing/aborting The Dehydration Process
You can pause or abort the dehydration process at any time.
- To pause the dehydration process, briefly push the ON/OFF button (8). The reading PA will blink and appear on the display (7).
- Push the ON/OFF button again to continue to the dehydration process.
- To abort the dehydration process, hold the ON/OFF button down for 3 seconds.
- The reading 00 will appear on the display.
End of The Dehydration Process
Once the dehydration process ends, a signal will sound for a few seconds and the dehydrator will automatically switch off.
Pull the supply cord plug (4) out of the mains power outlet socket.
Cleaning And Maintenance
- Before cleaning, pull the supply cord plug (4) out of the mains power outlet socket.
- Let the dehydrator cool off completely.
- Remove the cover (1) and the drying trays (2).
- Use a damp cloth to wipe off the base unit (3), and never put it into water or rinse it with water.
- Wash the drying trays and the cover thoroughly with a mild detergent or put these parts in the dishwasher.
- Then let all parts dry completely.
Technical Data
- Voltage : 220-240Va.c. 50-60Hz
- Power : 350W
12 Month Warranty
Thank you for your purchase from Kmart.
Kmart Australia Ltd warrants your new product to be free from defects in materials and workmanship for the period stated above, from the date of purchase, provided that the product is used in accordance with accompanying recommendations or instructions where provided. This warranty is in addition to your rights under the Australian Consumer Law.
Kmart will provide you with your choice of a refund, repair or exchange (where possible) for this product if it becomes defective within the warranty period. Kmart will bear the reasonable expense of claiming the warranty. This warranty will no longer apply where the defect is a result of alteration, accident, misuse, abuse or neglect.
Please retain your receipt as proof of purchase and contact our Customer Service Centre on 1800 124 125 (Australia) or 0800 945 995 (New Zealand) or alternatively, via Customer Help at Kmart.com.au for any difficulties with your product. Warranty claims and claims for expense incurred in returning this product can be addressed to our Customer Service Centre at 690 Springvale Rd, Mulgrave Vic 3170.
Our goods come with guarantees that cannot be excluded under the Australian Consumer Law. You are entitled to a replacement or refund for a major failure and compensation for any other reasonably foreseeable loss or damage. You are also entitled to have the goods repaired or replaced if the goods fail to be of acceptable quality and the failure does not amount to a major failure.
For New Zealand customers, this warranty is in addition to statutory rights observed under New Zealand legislation.