![]()
Quick Start Guide
WEU15297 / Revised Edition V6 / March 2019
WEU15065_RT-AC66U_B1_QSG_V5.indb 1 2019/3/5 14:59:32
 RT-AC66U B1 AC adapter
RJ-45 cable Quick Start Guide
Warranty card

NOTE: If any of the items is damaged or missing, contact your retailer.
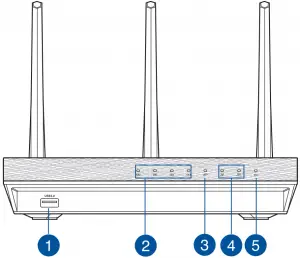

- USB 3.0 port
- LAN LED
- WAN LED
- 2.4GHz/5GHZ LED
- Power LED
- Power (DC-IN) port
- Power switch
- USB 2.0 port
- Reset button
- WAN port
- LAN ports
- WPS button
3
NOTES:
- USB External HDD/Flash disk:
• The wireless router works with most USB HDDs/Flash disks up to 2TB and supports read-write access for FAT16, FAT32, EXT2, EXT3, and NTFS.
• To safely remove the USB disk, launch the web GUI (http://router.asus.com), then in the Network Map page’s upper right corner, click the USB icon and click Eject USB 1.
• Incorrect removal of the USB disk may cause data corruption.
• For the list of file system and hard disk partitions that the wireless router supports, visit http://event.asus.com/networks/disksupport
- For the list of printers that the wireless router supports, visit http://event.asus.com/networks/printersupport
4
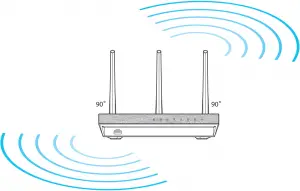
For the best wireless signal transmission between the wireless router and the network devices connected to it, ensure that you:
- Place the wireless router in a centralized area for a maximum wireless coverage for the network devices.
- Keep the device away from metal obstructions and away from direct sunlight.
- Keep the device away from 802.11g or 20MHz only Wi-Fi devices, 2.4GHz computer peripherals, Bluetooth devices, cordless phones, transformers, heavy-duty motors, fluorescent lights, microwave ovens, refrigerators, and other industrial equipment to prevent signal interference or loss.
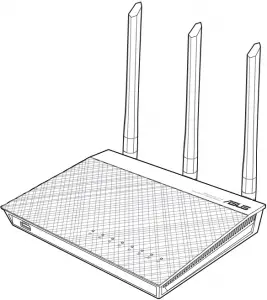
- To ensure the best wireless signal, orient the three detachable antennas as shown in the drawing below.
- For optimum performance, adjust the internal cooling system. Refer to the user manual for details.
- Always update to the latest firmware. Visit the ASUS website at http://www.asus.com to get the latest firmware updates.
5
-
Unplug and disconnect the wires/cables from your existing modem setup and release your computer’s outmoded IP address.
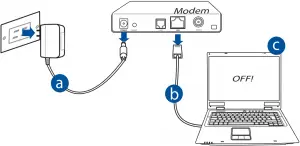
a: Unplug the AC adapter from the power outlet and disconnect it from your cable/ADSL modem.
b: Disconnect the network cable from your cable/ADSL modem.
c: Reboot your computer (recommended).

WARNING! Before disconnecting the wires/cables, ensure that your cable/ADSL modem has been turned off for at least two minutes. If your modem has a backup battery, remove it as well.
6
2. Set up your wireless environment.
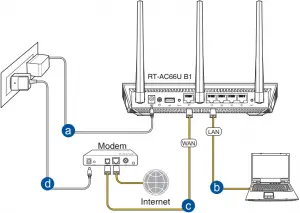
a: Insert your wireless router’s AC adapter to the DC-IN port and plug it to a power outlet.
b: Using the bundled network cable, connect your computer to your wireless router’s LAN port.

IMPORTANT! Ensure that the WAN and LAN LEDs are blinking.
c: Using another network cable, connect your modem to your wireless router’s WAN port.
d: Insert your modem’s AC adapter to the DC-IN port and plug it to a power outlet.
3. Disable some settings on your computer.
NOTE: For more details on disabling your computer settings, refer to Frequently Asked Questions (FAQs).
7
-
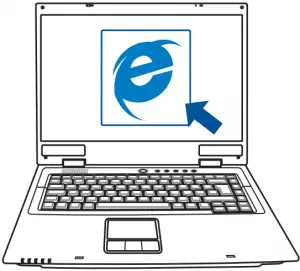
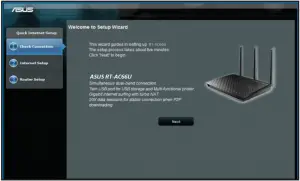
Configure your wireless settings via the wireless router’s web graphics user interface (web GUI).
a: Launch your web browser such as Internet Explorer, Firefox, Google Chrome, or Safari.
 ⇒
⇒ 
a b
NOTE: If QIS does not launch automatically, follow these steps to manually launch QIS:
• On your web browser, key in http://router.asus.com and run the Quick Internet Setup (QIS) Wizard again.
• Disable the proxy settings, dial-up connection, and set your TCP/IP settings to automatically obtain an IP address. For more details, refer to the FAQs section for auto-diagnosis.
8
b: The wireless router’s Quick Internet Setup (QIS) feature automatically detects if your ISP connection type is Dynamic IP, PPPoE, PPTP, L2TP, and Static IP. Key in the necessary information for your connection type.
NOTE: The auto-detection of your ISP connection type takes place when you configure the wireless router for the first time or when your wireless router is reset to its default settings.
IMPORTANT! Obtain the necessary information about your Internet connection type from your Internet Service Provider (ISP).
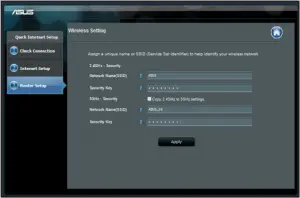
c: Assign the network name (SSID) and security key for your 2.4GHz and 5GHz wireless connection. Click Apply when done.
d: Your Internet and wireless settings are displayed. Click Next to continue.
e: Read the wireless network connection tutorial. When done, click Finish.
NOTE: You can assign a network name with up to 32 characters.
9
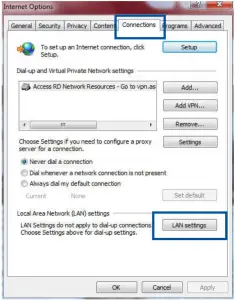
1. Click Start > Internet Explorer to launch the web browser.
2. Click Tools > Internet options > Connections tab > LAN settings.
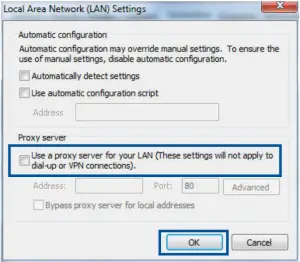
3. From the Local Area Network (LAN) Settings screen, untick Use a proxy server for your LAN.
4. Click OK when done.
10
MAC OS
1. From your Safari browser, click Safari > Preferences > Advanced > Change Settings…
2. From the Network screen, deselect FTP Proxy and Web Proxy (HTTP).
3. Click Apply Now when done.
NOTE: Refer to your browser’s help feature for details on disabling the proxy server.
Windows® 7
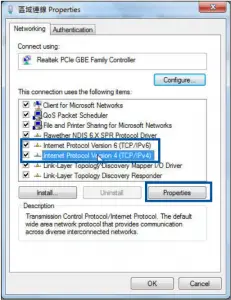
1. Click Start > Control Panel > Network and Internet > Network and Sharing Center > Manage network connections.
2. Select Internet Protocol Version 4 (TCP/IPv4), then click Properties.
11
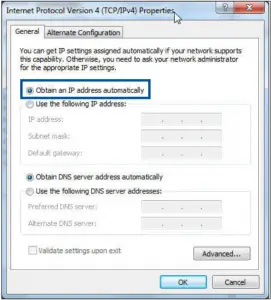
3. To obtain the iPv4 IP settings automatically, tick Obtain an IP address automatically.
4. Click OK when done.
MAC OS
1. Click the Apple icon ![]() located on the top left of your screen.
located on the top left of your screen.
2. Click System Preferences > Network > Configure…
3. From the TCP/IP tab, select Using DHCP in the Configure IPv4 dropdown list.
4. Click Apply Now when done.
NOTE: Refer to your operating system’s help and support feature for details on configuring your computer’s TCP/IP settings.
12
Windows® 7
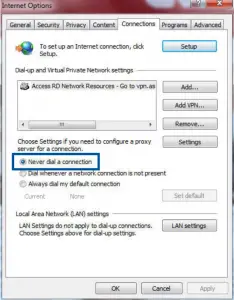
1. Click Start > Internet Explorer to launch the browser.
2. Click Tools > Internet options > Connections tab.
3. Tick Never dial a connection.
4. Click OK when done.
NOTE: Refer to your browser’s help feature for details on disabling the dial-up connection settings.
Out of Range:
- Put the router closer to the wireless client.
- Try to change the channel settings.
Authentication:
- Use wired connection to connect to the router.
- Check the wireless security settings.
- Press the Reset button at the rear panel for more than five seconds.
13
Cannot find the router:
- Press the Reset button at the rear panel for more than five seconds.
- Check the setting in the wireless adapter such as SSID and encryption settings.
- Move the router closer to the wireless client.
- Check whether the wireless adapter is connected to the correct wireless router.
- Check whether the wireless channel in use conforms to the channels available in your country/area.
- Check the encryption settings.
- Check if the ADSL or Cable connection is correct.
- Retry using another Ethernet cable.
- Ensure that all your cables are all properly connected.
- Disconnect the power cord from the ADSL or cable modem, wait a few minutes, then reconnect the cord.
- If the ADSL light continues to blink or stays OFF, contact your ADSL service provider.
- Try setting up the wired connection and configuring the wireless encryption again.
- Press the Reset button of the wireless router for more than five seconds.
- Factory default settings:
| User name / Password:
admin / admin |
IP address: | SSID:
Check the rating label on the back side of your router |
14
- Online FAQ site:
- Technical Support site:
- Customer Hotline: Refer to the Support Hotline in this Quick Start Guide
15
ASUS recycling and takeback programs come from our commitment to the highest standards for protecting our environment. We believe in providing solutions for you to be able to responsibly recycle our products, batteries, other components, as well as the packaging materials. Please go to http://csr.asus.com/english/Takeback.htm for the detailed recycling information in different regions.
Complying with the REACH (Registration, Evaluation, Authorisation, and Restriction of Chemicals) regulatory framework, we published the chemical substances in our products at ASUS REACH website at http://csr.asus.com/english/REACH.htm
This device complies with Part 15 of the FCC Rules. Operation is subject to the following two conditions:
- This device may not cause harmful interference.
- This device must accept any interference received, including interference that may cause undesired operation.
This equipment has been tested and found to comply with the limits for a class B digital device, pursuant to part 15 of the FCC Rules. These limits are designed to provide reasonable protection against harmful interference in a residential installation.
This equipment generates, uses and can radiate radio frequency energy and, if not installed and used in accordance with the instructions, may cause harmful interference to radio communications. However, there is no guarantee that interference will not occur in a particular installation. If this equipment does cause harmful interference to radio or television reception, which can be determined by turning the equipment off and on, the user is encouraged to try to correct the interference by one or more of the following measures:
- Reorient or relocate the receiving antenna.
- Increase the separation between the equipment and receiver.
- Connect the equipment into an outlet on a circuit different from that to which the receiver is connected.
- Consult the dealer or an experienced radio/TV technician for help.
WARNING! Any changes or modifications not expressly approved by the party responsible for compliance could void the user’s authority to operate the equipment.
159
This device and its antenna(s) must not be co-located or operating in conjunction with any other antenna or transmitter.
Radiation Exposure Statement: This equipment complies with FCC radiation exposure limits set forth for an uncontrolled environment. End users must follow the specific operating instructions for satisfying RF exposure compliance. To maintain compliance with FCC exposure compliance requirement, please follow operation instruction as documented in this manual.
WARNING! This equipment must be installed and operated in accordance with provided instructions and the antenna(s) used for this transmitter must be installed to provide a separation distance of at least 20 cm from all persons and must not be co-located or operating in conjunction with any other antenna or transmitter.
This device complies with Innovation, Science and Economic Development Canada licence exempt RSS standard(s). Operation is subject to the following two conditions: (1) this device may not cause interference, and (2) this device must accept any interference, including interference that may cause undesired operation of the device.
Operation in the band 5150–5250 MHz is only for indoor use to reduce the potential for harmful interference to co-channel mobile satellite systems.
CAN ICES-3(B)/NMB-3(B)
The radiated output power of the ASUS Wireless Device is below the Innovation, Science and Economic Development Canada radio frequency exposure limits. The ASUS Wireless Device should be used in such a manner such that the potential for human contact during normal operation is minimized.
This equipment should be installed and operated with a minimum distance of 20 cm between the radiator any part of your body.
This device has been certified for use in Canada. Status of the listing in the Innovation, Science and Economic Development Canada’s REL (Radio Equipment List) can be found at the following web address:
http://www.ic.gc.ca/eic/site/ceb-bhst.nsf/eng/h_tt00020.html
Additional Canadian information on RF exposure also can be found at the following web:
https://www.ic.gc.ca/eic/site/smt-gst.nsf/eng/sf08792.html
160
| Manufacturer | ASUSTeK Computer Inc. Tel: +886-2-2894-3447 Address: 4F, No. 150, LI-TE RD., PEITOU, TAIPEI 112, TAIWAN |
| Authorised representative in Europe | ASUS Computer GmbH Address: |
| Authorised distributors in Turkey | BOGAZICI BILGISAYAR TICARET VE SANAYI A.S. Tel./FAX No.: +90 212 331 10 00 / +90 212 332 28 90 Address: ESENTEPE MAH. BUYUKDERE CAD. ERCAN HAN B BLOK NO.121 SISLI, ISTANBUL 34394 |
| CIZGI Elektronik San. Tic. Ltd. Sti. Tel./FAX No.: +90 212 356 70 70 / +90 212 356 70 69 Address: GURSEL MAH. AKMAN SK.47B 1 KAGITHANE/ISTANBUL |
|
| KOYUNCU ELEKTRONiK BiLGi iSLEM SiST. SAN. VE DIS TIC. A.S. Tel. No.: +90 216 5288888 Address: EMEK MAH.ORDU CAD. NO:18, SARIGAZi, SANCAKTEPE ISTANBUL |
|
| ENDEKS BİLİŞİM SAN VE DIŞ TİC LTD ŞTİ Tel./FAX No.: +90 216 523 35 70 / +90 216 523 35 71 Address: |
|
| PENTA TEKNOLOJI URUNLERI DAGITIM TICARET A.S Tel./FAX No.: +90 216 528 0000 Address: |
163
| Region | Country/ Area | Hotline Number | Service Hours |
| Europe | Cyprus | 800-92491 | 09:00-13:00 ; 14:00-18:00 Mon-Fri |
| France | 0033-170949400 | 09:00-18:00 Mon-Fri | |
| Germany | 0049-1805010920
0049-1805010923 (component support) 0049-2102959911 (Fax) |
09:00-18:00 Mon-Fri
10:00-17:00 Mon-Fri |
|
| Hungary | 0036-15054561 | 09:00-17:30 Mon-Fri | |
| Italy | 199-400089 | 09:00-13:00 ; 14:00-18:00 Mon-Fri | |
| Greece | 00800-44142044 | 09:00-13:00 ; 14:00-18:00 Mon-Fri | |
| Austria | 0043-820240513 | 09:00-18:00 Mon-Fri | |
| Netherlands/ Luxembourg | 0031-591570290 | 09:00-17:00 Mon-Fri | |
| Belgium | 0032-78150231 | 09:00-17:00 Mon-Fri | |
| Norway | 0047-2316-2682 | 09:00-18:00 Mon-Fri | |
| Sweden | 0046-858769407 | 09:00-18:00 Mon-Fri | |
| Finland | 00358-969379690 | 10:00-19:00 Mon-Fri | |
| Denmark | 0045-38322943 | 09:00-18:00 Mon-Fri | |
| Poland | 0048-225718040 | 08:30-17:30 Mon-Fri | |
| Spain | 0034-902889688 | 09:00-18:00 Mon-Fri | |
| Portugal | 00351-707500310 | 09:00-18:00 Mon-Fri | |
| Slovak Republic | 00421-232162621 | 08:00-17:00 Mon-Fri | |
| Czech Republic | 00420-596766888 | 08:00-17:00 Mon-Fri | |
| Switzerland-German | 0041-848111010 | 09:00-18:00 Mon-Fri | |
| Switzerland-French | 0041-848111014 | 09:00-18:00 Mon-Fri | |
| Switzerland-Italian | 0041-848111012 | 09:00-18:00 Mon-Fri | |
| United Kingdom | 0044-1442265548 | 09:00-17:00 Mon-Fri | |
| Ireland | 0035-31890719918 | 09:00-17:00 Mon-Fri | |
| Russia and CIS | 008-800-100-ASUS | 09:00-18:00 Mon-Fri | |
| Ukraine | 0038-0445457727 | 09:00-18:00 Mon-Fri |
164
| Region | Country/ Area | Hotline Number | Service Hours |
| Asia-Pacific | Australia | 1300-278788 | 09:00-18:00 Mon-Fri |
| New Zealand | 0800-278788 | 09:00-18:00 Mon-Fri | |
| Japan | 0800-1232787 | 09:00-18:00 Mon-Fri 09:00-17:00 Sat-Sun | |
| 0081-570783886 ( Non-Toll Free ) | 09:00-18:00 Mon-Fri 09:00-17:00 Sat-Sun | ||
| Korea | 0082-215666868 | 09:30-17:00 Mon-Fri | |
| Thailand | 0066-24011717
1800-8525201 |
09:00-18:00 Mon-Fri | |
| Singapore | 0065-64157917 | 11:00-19:00 Mon-Fri | |
| 0065-67203835
( Repair Status Only ) |
11:00-19:00 Mon-Fri
11:00-13:00 Sat |
||
| Malaysia | 1300-88-3495 | 9:00-18:00 Mon-Fri | |
| Philippine | 1800-18550163 | 09:00-18:00 Mon-Fri | |
| India
India(WL/NW) |
1800-2090365 | 09:00-18:00 Mon-Sat
09:00-21:00 Mon-Sun |
|
| Indonesia | 0062-2129495000 | 09:30-17:00 Mon-Fri | |
| 500128 (Local Only) | 9:30 – 12:00 Sat | ||
| Vietnam | 1900-555581 | 08:00-12:00
13:30-17:30 Mon-Sat |
|
| Hong Kong | 00852-35824770 | 10:00-19:00 Mon-Sat | |
| Taiwan | 0800-093-456;
02-81439000 |
9:00-12:00 Mon-Fri; 13:30-18:00 Mon-Fri | |
| Americas | USA
Canada |
1-812-282-2787 | 8:30-12:00 EST Mon-Fri
9:00-18:00 EST Sat-Sun |
| Mexico | 001-8008367847 | 08:00-20:00 CST Mon-Fri
08:00-15:00 CST Sat |
|
| Brazil | 4003 0988 (Capital) 0800 880 0988 (demais localidades) | 9:00am-18:00 Mon-Fri |
165
| Region | Country/ Area | Hotline Number | Service Hours |
| Middle East + Africa | Egypt | 800-2787349 | 09:00-18:00 Sun-Thu |
| Saudi Arabia | 800-1212787 | 09:00-18:00 Sat-Wed | |
| UAE | 00971-42958941 | 09:00-18:00 Sun-Thu | |
| Turkey | 0090-2165243000 | 09:00-18:00 Mon-Fri | |
| South Africa | 0861-278772 | 08:00-17:00 Mon-Fri | |
| Israel | *6557/00972-39142800
*9770/00972-35598555 |
08:00-17:00 Sun-Thu
08:30-17:30 Sun-Thu |
|
| Balkan Countries | Romania | 0040-213301786 | 09:00-18:30 Mon-Fri |
| Bosnia
Herzegovina |
00387-33773163 | 09:00-17:00 Mon-Fri | |
| Bulgaria | 00359-70014411
00359-29889170 |
09:30-18:30 Mon-Fri
09:30-18:00 Mon-Fri |
|
| Croatia | 00385-16401111 | 09:00-17:00 Mon-Fri | |
| Montenegro | 00382-20608251 | 09:00-17:00 Mon-Fr | |
| Serbia | 00381-112070677 | 09:00-17:00 Mon-Fr | |
| Slovenia | 00368-59045400
00368-59045401 |
08:00-16:00 Mon-Fr | |
| Baltic Countries | Estonia | 00372-6671796 | 09:00-18:00 Mon-Fri |
| Latvia | 00371-67408838 | 09:00-18:00 Mon-Fri | |
| Lithuania-Kaunas | 00370-37329000 | 09:00-18:00 Mon-Fri | |
| Lithuania-Vilnius | 00370-522101160 | 09:00-18:00 Mon-Fri |
NOTES:
• UK support e-mail: [email protected]
• For more information, visit the ASUS support site at: https://www.asus.com/support/
166
Simplified EU Declaration of Conformity
ASUSTek Computer Inc. hereby declares that this device is in compliance with the essential requirements and other relevant provisions of Directive 2014/53/EU. Full text of EU declaration of conformity is available at https://www.asus.com/Networking/RT-AC66U-B1/HelpDesk_Declaration/.
Declaration of Conformity for Ecodesign directive 2009/125/EC
Testing for eco-design requirements according to (EC) No 1275/2008 and (EU) No 801/2013 has been conducted. When the device is in Networked Standby Mode, its I/O and network interface are in sleep mode and may not work properly. To wake up the device, press the Wi-Fi on/off, LED on/off, reset, or WPS button.
This equipment complies with EU radiation exposure limits set forth for an uncontrolled environment. This equipment should be installed and operated with minimum distance 20 cm between the radiator & your body.
All operational modes:
2.4GHz: 802.11b, 802.11g, 802.11n (HT20), 802.11n (HT40), 802.11ac (VHT20), 802.11ac (VHT40)
5GHz: 802.11a, 802.11n (HT20), 802.11n (HT40), 802.11ac (VHT20), 802.11ac (VHT40), 802.11ac (VHT80)
The frequency, mode and the maximum transmitted power in EU are listed below:
2400-2483.5MHz (802.11ac VHT40 NCS0/Nss1): 19.81 dBm
5150-5250MHz (802.11ac VHT80 NCS0/Nss1): 22.07 dBm
5250-5350MHz (802.11ac VHT80 NCS0/Nss1): 22.1 dBm
5470-5725MHz (802.11ac VHT40 NCS0/Nss1): 29.21 dBm
The device is restricted to indoor use only when operating in the 5150 to 5350 MHz frequency range.
The adapter shall be installed near the equipment and shall be easily accessible.
 |
AT | BE | BG | CZ | DK | EE | FR |
| DE | IS | IE | IT | EL | ES | CY | |
| LV | LI | LT | LU | HU | MT | NL | |
| NO | PL | PT | RO | SI | SK | TR | |
| FI | SE | CH | UK | HR | UA |
- Use this product in environments with ambient temperatures between 0°C(32°F) and 40°C(104°F).
- Refer to the rating label on the bottom of your product and ensure your power adapter complies with this rating.
- DO NOT place on uneven or unstable work surfaces. Seek servicing if the casing has been damaged.
- DO NOT place or drop objects on top and do not shove any foreign objects into the product.
- DO NOT expose to or use near liquids, rain, or moisture. DO NOT use the modem during electrical storms.
- DO NOT cover the vents on the product to prevent the system from getting overheated.
- DO NOT use damaged power cords, accessories, or other peripherals.
- If the Adapter is broken, do not try to fix it by yourself. Contact a qualified service technician or your retailer.
- To prevent electrical shock hazard, disconnect the power cable from the electrical outlet before relocating the system.
167