User Guide
![]()
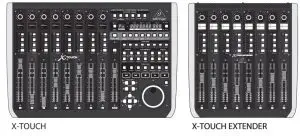
behringer X-Touch Extender
X-TOUCH EXTENDER
X TOUCH EXTENDER with 8 Touch-Sensitive Motor Faders,
LCD Scribble Strips, USB Hub and Ethernet/USB Interfaces
Important Safety Instructions


- Read these instructions.
- Keep these instructions.
- Heed all warnings.
- Follow all instructions.
- Do not use this apparatus near water.
- Clean only with dry cloth.
- Do not block any ventilation openings. Install in accordance with the manufacturer’s instructions.
- Do not install near any heat sources such as radiators, heat registers, stoves, or other apparatus (including amplifiers) that produce heat.
- Do not defeat the safety purpose of the polarized or grounding-type plug. A polarized plug has two blades with one wider than the other. A grounding-type plug has two blades and a third grounding prong. The wide blade or the third prong are provided for your safety. If the provided plug does not fit into your outlet, consult an electrician for replacement of the obsolete outlet.
- Protect the power cord from being walked on or pinched particularly at plugs, convenience receptacles, and the point where they exit from the apparatus.
- Use only attachments/accessories specified by the manufacturer.

- Use only with the cart, stand, tripod, bracket, or table specified by the manufacturer, or sold with the apparatus. When a cart is used, use caution when moving the cart/apparatus combination to avoid injury from tip-over.
- Unplug this apparatus during lightning storms or when unused for long periods of time.
- Refer all servicing to qualified service personnel. Servicing is required when the apparatus has been damaged in any way, such as power supply cord or plug is damaged, liquid has been spilled or objects have fallen into the apparatus, the apparatus has been exposed to rain or moisture, does not operate normally, or has been dropped.
- The apparatus shall be connected to a MAINS socket outlet with a protective earthing connection.
- Where the MAINS plug or an appliance coupler is used as the disconnect device, the disconnect device shall remain readily operable.

- Correct disposal of this product: This symbol indicates that this product must not be disposed of with household waste, according to the WEEE Directive (2012/19/EU) and your national law. This product should be taken to a collection center licensed for the recycling of waste electrical and electronic equipment (EEE). The mishandling of this type of waste could have a possible negative impact on the environment and human health due to potentially hazardous substances that are generally associated with EEE. At the same time, your cooperation in the correct disposal of this product will contribute to the efficient use of natural resources. For more information about where you can take your waste equipment for recycling, please contact your local city office, or your household waste collection service.
- Do not install in a confined space, such as a book case or similar unit.
- Do not place naked flame sources, such as lighted candles, on the apparatus.
- Please keep the environmental aspects of battery disposal in mind. Batteries must be disposed-of at a battery collection point.
- Use this apparatus in tropical and/or moderate climates.


LEGAL DISCLAIMER
Music Tribe accepts no liability for any loss which may be suffered by any person who relies either wholly or in part upon any description, photograph, or statement contained herein. Technical specifications, appearances and other information are subject to change without notice. All trademarks are the property of their respective owners. Midas, Klark Teknik, Lab Gruppen, Lake, Tannoy, Turbosound, TC Electronic, TC Helicon, Behringer, Bugera, Auratone and Coolaudio are trademarks or registered trademarks of Music Tribe Global Brands Ltd. © Music Tribe Global Brands Ltd. 2019 All rights reserved.
LIMITED WARRANTY
For the applicable warranty terms and conditions and additional information regarding Music Tribe’s Limited Warranty, please see complete details online at musictribe.com/warranty.
Zhongshan Eurotec Electronics Limited
No. 10 Wanmei Road, South China Modern Chinese Medicine Park, Nanlang Town, 528451, Zhongshan City, Guangdong Province, China
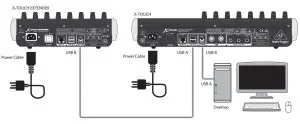
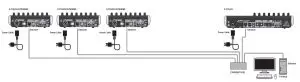
X-TOUCH EXTENDER Hook-up
Step 1: Hook-Up
TYPICAL SIMPLE SYSTEM
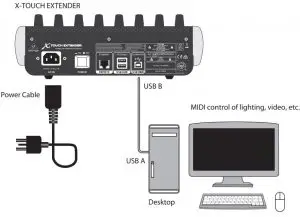
TYPICAL CONNECTION METHOD TO AN X-TOUCH
IMPORTANT NOTE: Not all DAWs support more than one hardware controller of the same type.
TYPICAL CONNECTION METHOD USING USB

TYPICAL CONNECTION METHOD USING ETHERNET NETWORK
X-TOUCH EXTENDER Controls
Step 2: Controls
The function of the X-TOUCH EXTENDER controls will vary widely depending on the implementation of your DAW. The following descriptions are for the ideal case in MC mode, if your DAW supports these features. If you look into the features of your DAW, such as MIDI Learn mode, you will be able to assign the physical controls to operate a wide variety of software and plug-in controls.
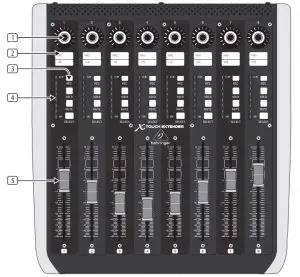
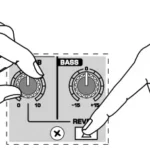
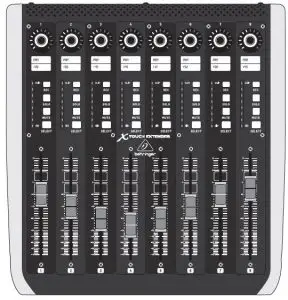
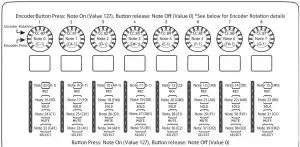
- Push encoder knobs – these 8 endless encoders each have a detent and push function (not illuminated), and a 13-segment amber LED ring. These are typically used in Digital Audio Workstation (DAW) applications for fine control of parameters such as aux send and pan control of each channel.
- Scribble strips – these 8 LCD displays indicate various parameters and labels as shown in the DAW software. They are also used to view various settings and adjustments of the unit that can then be adjusted with the encoders.
- Channel buttons – these 4 buttons per channel are used for individual DAW mixer channel applications:
Rec – arms the channel for recording.
Solo – isolates a channel in the mix.
Mute – mutes the channel.
Select – this selects the channel for editing. The mixer controls are then dedicated to setting up the selected channel, with details shown in each scribble strip. - Channel meters – these 8-LED meters show the signal level of each channel, and indicate when a signal (SIG LED) is present, and when it is clipping (CLIP LED).
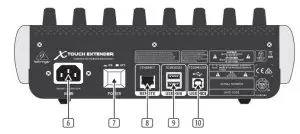
- Faders – these touch-sensitive motorized 100 mm faders are typically used for fine control of level functions in DAW applications. Rear Panel
- AC IN – securely connect the supplied AC power cord here. Connect the other end of the cord to your local AC mains supply. Do not defeat the safety ground.
- POWER switch – press in to turn on the unit, press out to turn it off. Do not turn it on until all connections have been made.
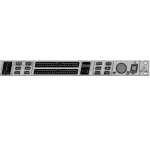
- REMOTE – this port is an Ethernet interface for connection to a DAW supporting RTP MIDI.
- USB HUB – these 2 USB type A connectors are used for connecting external USB hardware such as a USB mouse, a keyboard, USB MIDI controllers such as the X-TOUCH MINI, and USB MIDI keyboards. The Hub communicates directly to the computer and not to the X-TOUCH EXTENDER. Each connector can supply 5V USB power. The hub is only active when the X-TOUCH EXTENDER is powered on, and connected to a live computer via the USB MIDI connector.
- USB MIDI – this USB type B connector is used to connect to a computer’s USB port for MIDI data transfer (send/receive), and USB Hub communications.
X-TOUCH EXTENDER Getting started
Step 3: Getting started
OVERVIEW
This Getting Started guide will help you set up the X-TOUCH EXTENDER and briefly introduce its capabilities. The X-TOUCH EXTENDER allows you to control your software DAW with the accurate touch and feel of a high quality controller. With 32 handy illuminated buttons, 8 rotary push-encoders, and 8 touch sensitive motorized 100 mm faders, it can operate a wide variety of DAWs in various operation modes.
OPERATION MODES
The X-TOUCH EXTENDER supports HUI and Mackie Control (MC) communication protocols for seamless integration with every compatible music production software. The unit can work in “Mackie Control” surface mode when used alone, or in “Mackie Control XT” mode when used with an X-TOUCH unit.
Ctrl is the MIDI Controller mode, where each element can send fixed MIDI messages.
CtrlRel is the same as the Ctrl MIDI Controller mode, except that the encoders send out relative MIDI messages. The procedure for changing modes is shown in the configuration menu, see below.
SOFTWARE SET-UP
The X-TOUCH EXTENDER is a USB Class Compliant MIDI device, and so no driver installation is required.
CONFIGURATION MENU
- To enter the X-TOUCH EXTENDER’S configuration menu, press and hold down Channel 1 SELECT button and then turn on the unit’s power switch. The channel scribble
- displays show the various parameters to be changed.
- Rotate encoder 1 to change the emulation mode between MC, HUI, Ctrl, or CtrlRel.
- Rotate encoder 2 to select the interface from USB or Network. Setup the network details using encoders 3 to 7 where required.
- Rotate encoder 8 to adjust the display contrast from 0-100%.
- Press Channel 1 SELECT button again to save the settings and start the selected emulation.
HARDWARE SETUP
- Make all connections in your system.
- Apply AC power to the X-TOUCH EXTENDER and turn on its power switch.
- The setup depends upon the X-TOUCH EXTENDER interface you have selected, USB or Network.
- USB: connect the X-TOUCH EXTENDER directly to an available USB port on your computer using the supplied USB cable.
- Network: after all the IP, Mask and other settings are made, connect its remote ethernet port to your network.
- If using the network interface, search for the X-TOUCH EXTENDER on your network.
- In your DAW software, select the X-TOUCH EXTENDER as your MIDI controller, and enjoy.
FIRMWARE UPDATE
- To show the current firmware version, hold down the channel 1 REC button while you turn on the power switch.
- Check our website’s X-TOUCH EXTENDER product page for any firmware updates. If there is a firmware version later than the currently-loaded firmware, download the new file onto your host computer.
- To enter the firmware update mode, hold down the channel 8 REC button while you turn on the power switch. The REC button will blink during update mode. The new firmware can be dumped via USB. Follow the instructions in the firmware file.
X-TOUCH EXTENDER Configuration Mode
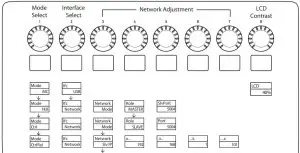
CONFIGURATION SETUP MODE:
- To enter the configuration setup mode: Hold the CH 1 SELECT button while powering on.
- To choose a mode of operation, rotate Encoder 1 to cycle through the modes.
- To choose the interface from USB or Network, rotate Encoder 2.
- To change the Network settings use Encoders 3 to 7.
- To change the LCD contrast, rotate encoder 8.
- To exit the configuration setup mode: Press the CH 1 SELECT button to exit.
Firmware Version:
To show the current firmware version: Hold the CH1 REC button while powering on.
To exit the menu: Release the CH1 REC button.
Firmware Update:
To enter the firmware update mode: Hold the CH8 REC button while powering on.
The REC button will blink.
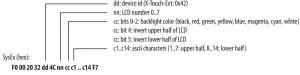
Now the SysEx MIDI file can be dumped via USB.
X-TOUCH EXTENDER MIDI Receive
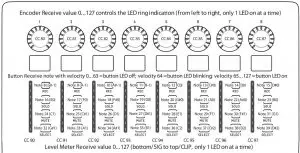
In MIDI Receive, CTRL mode and CTRL REL mode are identical
LCDs:
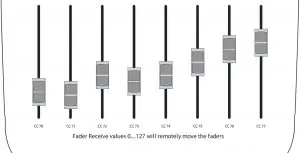
X-TOUCH EXTENDER MIDI Send
* In CTRL Mode:Encoder Rotation Values (left to right end): 0…127
* In CTRL REL Mode:Encoder Rotation Left turn (decrement) = value 1 / Right turn (increment) = value 65
Apart from the difference to the Encoder Rotation function, CTRL mode and CTRL REL mode are identical
Using the X-TOUCH EXTENDER with RTP MIDI
The X-TOUCH EXTENDER can be used as an RTP MIDI device over a Network connection. This is useful in systems where long USB cables would otherwise be required.
The following instructions show the general preparation of the X-TOUCH EXTENDER for RTP MIDI operation, and then further details for use with an OS X* network, and a Windows* network.
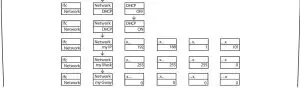
Preparing the X-TOUCH EXTENDER for RTP MIDI operation
- On the X-TOUCH EXTENDER, press and hold the SELECT button of CH1 during power up, to enter the Settings menu. Observe the text in the scribble-strip displays.
- Turn the 2nd encoder to select NETWORK.
- The 3rd encoder allows you to select either MODE or DHCP:
MODE selects between using the X-TOUCH EXTENDER as an RTP SLAVE or an RTP MASTER. In SLAVE mode, you need to enter the IP address of the X-TOUCH EXTENDER into your computer’s RTP MIDI settings. In MASTER mode you can enter the IP address of the computer by turning the 3rd encoder one tick to the right, and use encoders 4-7 to enter the sets of 3-digits that make up the address. You may use Port 5004 in both cases, as this is the standard port for RTP MIDI.
DHCP can be set to ON or OFF. When DHCP is set to ON, the X-TOUCH EXTENDER will get its IP address automatically within the connected network from the DHCP server. When DHCP is set to OFF, the IP, Subnet mask, and Gateway have to be entered manually by turning the 3rd encoder to the right and accessing the following pages: my IP, my Mask, and my Gway. You can enter the IP addresses using encoders 4-7.
4. Exit the X-TOUCH EXTENDER setup by pressing the SELECT button of CH1 again. You will see the following in the display: IP: 000.000.000.000 Wait…
5. The IP will first switch to an internal IP before it shows the actual IP (for example IP: 010.100.001.029) within the network when DHCP is used. When the X-TOUCH EXTENDER is connected to the computer via the network, the Wait message will disappear.
Using X-TOUCH EXTENDER as an RTP MIDI device within OS X
For OS X systems, no external driver is required for RTP MIDI operation.
Slave
- Make sure your computer and the X-TOUCH EXTENDER are within the same network.
- Open AUDIO/MIDI-Settings on the computer.
- Open MIDI Studio / MIDI Devices window.
- Double-click on “Network.”
- Click on “+” underneath the DIRECTORY field to add a device. Insert Name, the IP of your X-TOUCH EXTENDER and the port (5004).
- Create a Session by pressing “+” underneath the “My Sessions” field and activate the session created.
- Activate the X-TOUCH EXTENDER and click “Connect.”
- The X-TOUCH EXTENDER is now available as an RTP MIDI controller. Open the preferences of your DAW and add it as control surface. Within most DAWs, it will be detected automatically.
Master
- Make sure your computer and the X-TOUCH EXTENDER are within the same network.
- Open AUDIO/MIDI-Settings on the computer.
- Open MIDI Studio / MIDI Devices window.
- Double-click on “Network.”
- Create a Session by pressing “+” underneath the “My Sessions” field and activate the session created.
- For “Who may connect to me:” choose “Anyone.” X-TOUCH EXTENDER should appear as a participant of the session.
- The X-TOUCH EXTENDER is now available as an RTP MIDI controller. Open the preferences of your DAW and add it as control surface. Within most DAWs, it will be detected automatically.
Using X-TOUCH EXTENDER as an RTP MIDI device with Windows
Windows systems require the use of a third-party external driver for RTP MIDI. For example, do an internet search for “rtpMIDI” then download and install it on your computer.
Slave
- Make sure your computer and the X-TOUCH EXTENDER are within the same network.
- Open the rtpMIDI driver.
- Click on “+” underneath the DIRECTORY field to add a device. Insert Name, the IP including port address (e.g. 10.100.1.29:5004) of your X-TOUCH EXTENDER.
- Create a Session by pressing “+” underneath the “My Sessions” field and activate the session created.
- Activate the X-TOUCH EXTENDER and click “Connect.”
- The X-TOUCH EXTENDER is now available as an RTP MIDI controller. Open the preferences of your DAW and add it as control surface.
Master
- Make sure your computer and the X-TOUCH EXTENDER are within the same network.
- Open the rtpMIDI driver.
- Create a Session by pressing “+” underneath the “My Sessions” field and activate the session created.
- For “Who may connect to me:” choose “Anyone.” X-TOUCH EXTENDER should appear as a participant of the session.
- The X-TOUCH EXTENDER is now available as an RTP MIDI controller. Open the preferences of your DAW and add it as control surface.
Specifications

Other important information
Important information Aspectos
- Register online. Please register your new Music Tribe equipment right after you purchase it by visiting behringer.com. Registering your purchase using our simple online form helps us to process your repair claims more quickly and efficiently. Also, read the terms and conditions of our warranty, if applicable.
- Malfunction. Should your Music Tribe Authorized Reseller not be located in your vicinity, you may contact the Music Tribe Authorized Fulfiller for your country listed under “Support” at behringer.com. Should your country not be listed, please check if your problem can be dealt with by our “Online Support” which may also be found under “Support” at behringer.com. Alternatively, please submit an online warranty claim at behringer.com BEFORE returning the product.
- Power Connections. Before plugging the unit into a power socket, please make sure you are using the correct mains voltage for your particular model. Faulty fuses must be replaced with fuses of the same type and rating without exception.
FEDERAL COMMUNICATIONS COMMISSION COMPLIANCE INFORMATION

Responsible Party Name: Music Tribe Commercial NV Inc.
Address: 5270 Procyon Street
Las Vegas, NV 89118
USA
Phone Number: +1 702 800 8290
X-TOUCH EXTENDER
complies with the FCC rules as mentioned in the following paragraph:
This equipment has been tested and found to comply with the limits for a Class A digital device, pursuant to part 15 of the FCC Rules. These limits are designed to provide reasonable protection against harmful interference when the equipment is operated in a commercial environment. This equipment generates, uses, and can radiate radio frequency energy and, if not installed and used in accordance with the instruction manual, may cause harmful interference to radio communications. Operation of this equipment in a residential area is likely to cause harmful interference in which case the user will be required to correct the interference at his own expense.
This equipment complies with Part 15 of the FCC Rules. Operation is subject to the following two conditions:
- This device may not cause harmful interference, and
- This device must accept any interference received, including interference that may cause undesired operation.
This product conforms with essential requirements of the EMC Directive 2014/30/EU, the LV Directive 2014/35/EU,
RoHS Directive 2011/65/EU and WEEE Directive – 2012/19/EU .
Warning: Operation of this equipment in a residential environment could cause radio interference.