behringer X-Touch One User Guide

X-TOUCH ONE
Universal Control Surface with Touch-Sensitive Motor Fader and LCD Scribble Strip
X-TOUCH ONE Hook-up
Typical simple DAW control system

Typical studio system with MIDI Keyboard/Controller

X-TOUCH ONE Controls

Operation Modes
The X-TOUCH ONE supports Mackie Control, HUI, and MIDI communication protocols for seamless integration with every compatible music production software. The procedure for changing modes and adjusting the display brightness and contrast is shown in the Getting Started section of this guide.
The exact function of the buttons of the X-TOUCH ONE will vary widely from one Digital Audio Workstation (DAW) to the next. We recommend that you read your DAW’s documentation regarding how it operates with external control surfaces.
Overlay Templates
The X-TOUCH ONE shipping box contains various overlays for the most popular DAWs. These fi t over the X-TOUCH ONE top panel, and are marked with text labels that indicate the typical button functions for each DAW.
If you are using a different DAW, you can use the “MC User” Template and mark it with your own assignments for what each button does in your DAW.
Typical Operation
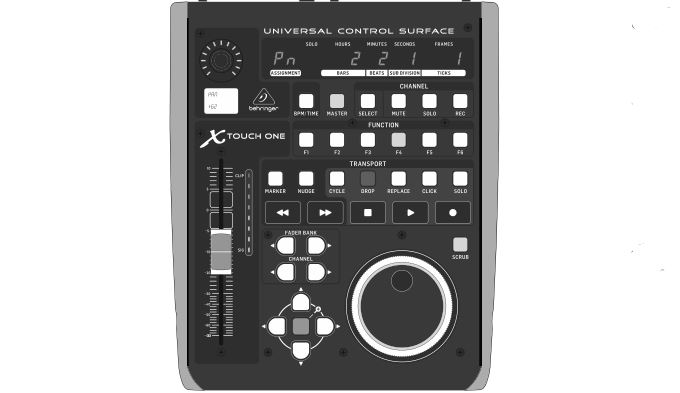
The X-TOUCH ONE comes from the factory in standard Mackie Control mode, and the top panel printing is for this mode. The following details show some of the typical uses of the X-TOUCH ONE controls in DAW applications in standard Mackie Control mode:
- Push encoder knob – this endless encoder has a detent and push function (not illuminated), and a 13-segment amber LED ring. This is typically used in DAW applications for fi ne control of the channel left/ right Pan.
- LCD Display – this display indicates various parameters and labels as shown in your DAW. (The DAW completely controls which items are displayed.) The display will also show the mode during the procedure for changing the operation mode.
- BPM/Time – Press this to toggle the display between BPM display or Time display.
- Fader – this touch-sensitive motorized 100 mm fader is typically used for fi ne Level control of the currently selected channel in DAW applications. If the MASTER button is engaged, then the fader will adjust the Master level in your DAW.
- Channel meter – this 8-LED meter shows the signal level of the channel, and indicates when a signal is present (SIG LED), and when it is clipping (CLIP LED). The meter reading is completely controlled by your DAW.
- Display – the display can show SMPTE timecode of hours, minutes, seconds and frames, or BBT bars, beats, and ticks. The BPM/Time button is used to switch between these two display modes.
- Master/Channel Select buttons – these buttons are used for individual DAW mixer channel applications:
Master – this allows the X-TOUCH ONE fader to be used for fine control of the Master Level.
Select – this selects the current channel for editing. The mixer controls are then dedicated to setting up the selected channel.
Mute – mutes the channel.
Solo – isolates the channel in the mix.
Rec – arms the channel for recording. - Transport buttons – the five lower buttons have familiar markings used for DAW transport applications (REWIND, FAST FORWARD, STOP, PLAY, and RECORD).
Note: the STOP button can also be used to change operation modes. Press and hold it and then press the encoder knob. Rotate the knob to select the operation mode. - Fader Bank and Channel – the left or right bank buttons move the channels up and down by 8 channels at a time. The channel buttons move the channels up and down in single steps.
- Jog/Shuttle – the wheel is used for editing the audio in the DAW. Press the SCRUB button to switch the wheel between Jog and Shuttle.
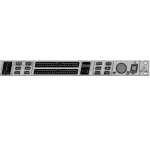
- Navigation buttons – these allow you to navigate up/down and left/right, and zoom within the DAW screen. Rear Panel
- DC IN – securely connect the supplied 9 VDC power adapter here. Connect the other end of the power adapter to your local AC mains supply. Use only the supplied power adapter.
- USB HUB – these 2 USB type A connectors are used for connecting external USB hardware such as a USB mouse, a keyboard, and USB MIDI keyboards.
The hub communicates directly to the computer and not to the X-TOUCH ONE. Each connector can supply 5V USB power. The hub is only active when the X-TOUCH ONE is powered on, and connected to a live computer via the USB MIDI connector. - USB MIDI – this USB type B connector is used to connect to a computer’s USB port for MIDI data transfer (send/receive), and USB Hub communications.
- Foot Switch – this ¼” connector is used for standard sustain pedals for MIDI data control.
- Kensington Lock – this security hole allows the connection of anti-theft devices.
X-TOUCH ONE Getting started
OVERVIEW
This Getting Started guide will help you set up the X-TOUCH ONE and briefly introduce its capabilities. The X-TOUCH ONE allows you to control your software DAW with the accurate touch and feel of a high quality controller. With 34 handy illuminated buttons, a rotary push-encoder, a large jog/shuttle wheel, and a touch sensitive motorized 100 mm fader, it can operate a wide variety of DAWs in various operation modes.
SOFTWARE SET-UP
The X-TOUCH ONE is a USB Class Compliant MIDI device, and so no driver installation is required for Windows or Mac OS operation.
HARDWARE SETUP
Connect the X-TOUCH ONE directly to an available USB port on your computer using the supplied USB cable. Make all other connections in your system. Apply AC power to the supplied power supply adapter connected to the X-TOUCH ONE, and it will turn on. The current firmware version number will be indicated briefly (for example 1.02).
OPERATION MODES
The X-TOUCH ONE supports Mackie Control, HUI, and MIDI communication protocols for seamless integration with every compatible music production software.
The text printed on the unit corresponds to the standard Mackie Control MC protocol. Other modes have their own dedicated printed overlays that fi t over the front panel.
MC – there are eight MC modes, each set up for a different popular DAW. One of these is the standard Mackie Control mode, which is the default mode for the X-TOUCH ONE from the factory. Another mode is the “MC User” mode where individual buttons can be assigned by the user as desired.
HUI – there are two HUI modes: one standard and one HUI PRO for Pro Tools.
MIDI – there are four MIDI Controller modes, where each element can send fixed MIDI messages. Two are modes where the buttons send out Note messages, and two where they send Control Change CC messages. Each mode has the encoder either absolute, or relative. The various operation modes are shown in the table on page 34.
CHANGING THE OPERATION MODE
- To change the operation mode of the X-TOUCH ONE, press and hold down the Encoder Knob while you turn on power to the X-TOUCH ONE.
- Alternatively, if the unit is already on, press and hold the large STOP transport button and then press the encoder knob to enter the setup mode.
- Rotate the encoder knob until the desired mode is shown in the LCD display.
- Press the encoder knob again and rotate it to adjust the LCD display contrast.
- Press the encoder knob again and rotate it to adjust the LED display brightness.
- Press the encoder knob to save the settings and return to normal operation.
- Choose the appropriate overlay template for your operation mode, and lay it on top.
MC USER MODE
In MC User mode, you can assign a function to any of the buttons from the list of available MC functions shown on page 37 (except for the top five buttons in the Master/Channel section). Please see the diagram on page 36.
The assignment of the buttons is done just after putting the X-TOUCH ONE into MC User mode (before adjusting the LCD contrast and LED brightness).
- Press and hold down any desired button, and the text “ASSIGN” will appear in the LCD display.
- With the button still held down, rotate the encoder knob to select the new MC function of the button from the list. Then release the button.
- Repeat Steps 1 and 2 until all buttons are assigned to your liking.
- Press the encoder knob again to adjust the LCD contrast and LED brightness and return to the normal operation of the X-TOUCH ONE.
DAW SETUP
In your DAW software, select the appropriate control surface as follows:
MC – If you are using the X-TOUCH ONE in an MC mode, select Mackie Control (or Mackie Control Universal) as the control surface in your DAW. The X-TOUCH ONE in MC mode emulates the operation of the Mackie Control, so this is the control surface you must choose in your DAW. The different MC operation modes are matched to different DAWs. If you are not happy with the pre-assignment, you can choose “MC User” operation mode and make your own assignment for your DAW.
HUI – If you are using the X-TOUCH ONE in a HUI mode, select Mackie HUI as the control surface in your DAW. Select HUI PRO
if you are using Pro Tools.
MIDI – If you are using the X-TOUCH ONE in a MIDI mode, select it in your DAW as a MIDI controller. Become familiar with your DAW’s MIDI Learn functions, and you will be able to map each button and feature of the X-TOUCH ONE to a function and control on your DAW, or plug-in controls.
FIRMWARE UPDATE
Please check the X-TOUCH ONE product page on our website for any firmware updates. If there is a firmware version later than the currently-loaded firmware, download the new fi le onto your host computer. (The unit’s firmware version is briefly displayed after power on.)
To enter the firmware update mode, hold down the REC button in the CHANNEL section in the top right corner, while you turn on power to the X-TOUCH ONE.
You will need a MIDI utility such as MIDI OX in order to send the firmware fi le using SysEx commands. Follow the detailed instructions that come with the firmware download.