POWER AMPLIFIER
GTA 460


Operating and Installation Instruction
CAUTIONS
Proper system planning is vital in order to maximize the device’s performance and road safety. Plan your installation carefully to avoid compromising the performance reliability of the system. Consult an authorized Blaupunkt dealer for installation or reparation. Read the manual carefully before operating the device for the first time.
Safety Notes
Ensure to follow below safety notes during installation and wiring connection :
- Disconnect the negative terminal of the battery. Refer to the safety notes of the vehicle manufacturer.
- Ensure positions of the holes are nowhere near the vehicle component to avoid any damage during drilling.
- Ensure the cross-section of the cable is no less than 2.5mm2 if the positive and negative cables are too long.
- Incorrect installation may result in the malfunction of the device or the car sound system.
Installation and Connection Instructions
- The amplifier is designed to use 4-8 AWG power and ground cable.
- Select a dry and well-ventilated location to install the device.
- The device must not be installed in overly exposed locations such on the rear shelf, rear seat etc.
- The installation location must be suitable for screw holes and have stable ground support.
- Ensure to connect the ground wire of the unit properly the vehicle chassis.
- Ensure to use leads that is larger than 10-gauge (AWG 10) when connecting to +12V and GND terminals.
- Connect the +12V power input lead only when the rest of the connections has been properly set.
Disclaimer
- In no event shall Blaupunkt be liable for any direct, indirect, punitive, incidental, special consequential damages, to property or life, improper storage, whatsoever arising out of or connected with the use or misuse of our products.
- USA & CANADA: Product not intended for sale in the United States and Canada. If purchased in the U.S. or Canada, this product is purchased as-is. No warranty, express or implied is provided in the U.S. and Canada.
Voltage Supply
- Use the supplied power extension cable to connect to the positive battery terminal.
- Firmly and carefully connect the ground lead to a bare metal point on the vehicle chassis.
- The control of the device should be a two-channel control, either via the preamplifier outputs or the loudspeaker, the output of the car sound system.
- A control solely via the right or left channel is also possible since the low-frequency portion of the music is generally identical on both channels.
Integrated Fuse
The integrated fuse in the device protects the output voltage and the entire electrical system in case of malfunction. Do not replace the damaged fuse with a higher current.
Switching On/Off
This device will automatically turn on if a music signal is detected. The device will also automatically turn off if no music signal is received.
Recycling and Disposal
 Please dispose of it responsibly.
Subject to change.
FUNCTION & WIRING DIAGRAM

SPECIFICATION
| Power | |
| Voltage Supply | 10-14.4V |
| Idling Current | 0.5A |
| Fuse 15A | 15A |
| Consumption @ 2Ω, 14.4 VDC (Max Musical Power) | 12A |
| Amplifier | |
| Amplifier Class | CLASS AB |
| Channel 4 | 4 |
| PCB Layer D | Double |
| Max Output Power @ 4 ohms | 60W x 4 |
| RMS Power 4 ohms | 35W x 4 |
| Signal-To-Noise Ratio | 96dB |
| Frequency Range | 20-22kHz |
| Gain Adjust | 150mV-4V |
| Hi-volt Input Level | 3V-6V |
| Total Harmonic Distortion | 0.10% |
| RCA Output | 2-channel |
| Speaker Input | 4 -channel |
| Dimension (W x H x D) | 177 x 108 x 48.5mm |
| Net Weight | 0.715kg |
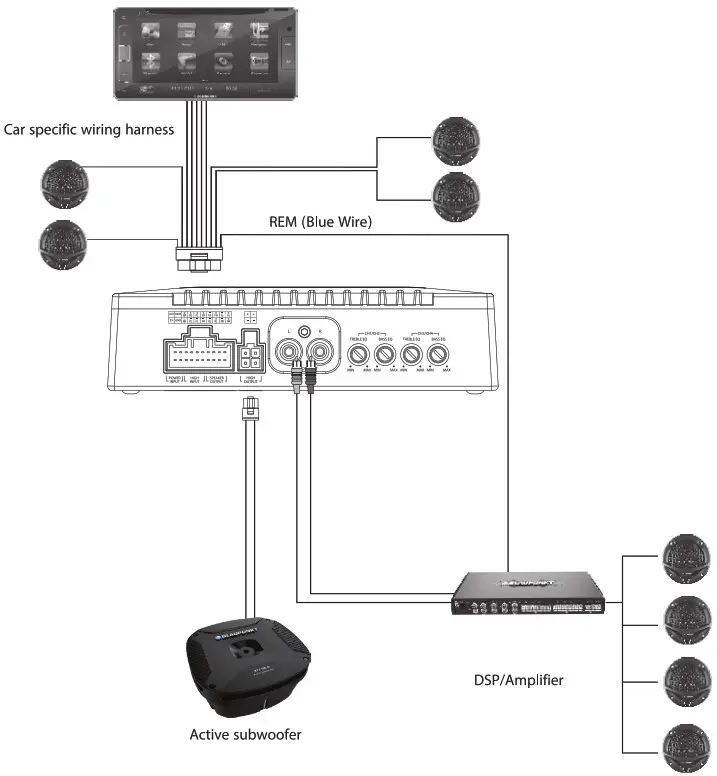
WIRING DIAGRAM
Speaker Connection
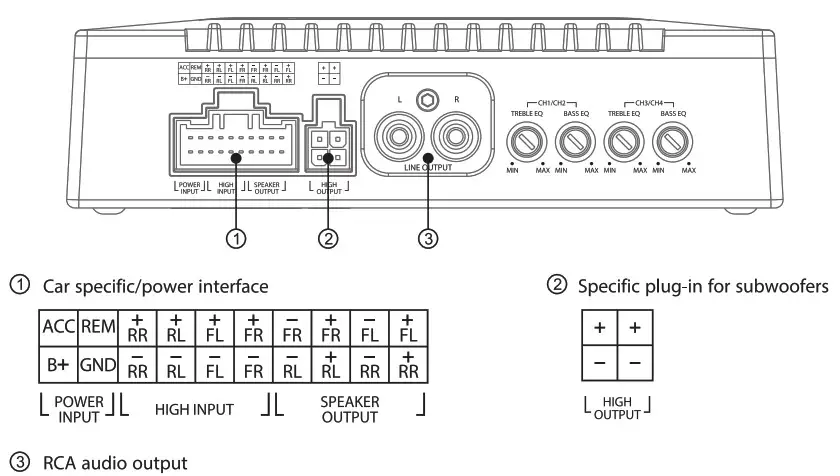
Using a dual amplifier configuration, the main unit amplifier has total control over the sub-unit amplifier. When using a dual amplifier to operate the subwoofer, the positive terminal of the subwoofer voice coil must be connected to the positive terminal of the main unit amplifier and the negative terminal of the subwoofer voice coil must be connected to the positive terminal of the sub-unit amplifier. Dual amplifier setup will release high output power, please ensure subwoofers are capable of handling such output.
Speakers load cannot be lower than 2 ohms when configuring the dual amplifier. Low impedance load may damage the device and void warranty.
TROUBLESHOOT
Examine if your wiring diagram is correct by referring to Diagram 1 & Diagram 2 in case of device operation or performance failure. The following table indicates other possible problems and solutions. Refer an authorized Blaupunkt dealer if the problem persists.
| Problem | Solution |
| Amplifier power up failure | Examine if the ground connection is intact. |
| Examine if remote input has at least 5V DC. | |
| Examine if battery power is connected correctly to the + terminal. | |
| Ensure supplied voltage is minimum 12V. | |
| Examine if the fuse is broken and replace if necessary. | |
| Restart the device if the protection LED light is on. | |
| Protection LED lights on when amplifier turn on | Examine speaker wire had short-circuited. |
| Turn the volume down from the head unit to prevent overdriving the device. | |
| Device might need service or repair if the protection LED light is still on after resetting the device. | |
| No sound output | Examine fuses and replace if necessary. |
| Examine ground connection is intact. | |
| Examine if remote input has at least 5V DC. | |
| Examine if RCA audio cables are connected to the right inputs. | |
| Examine if speaker wiring is intact. | |
| Low sound output | Reset Level Control |
| Examine the Crossover Control setting. | |
| Buzzing noise | Observe if the device is still producing noise after turning on and off the amplifier. If yes, examine if the cables are correctly connected and if the cables and radio are in good condition. |
| Repair or replace if the cables or the radio are not in good condition. | |
| Squealing noise interference | Ensure RCA connections are properly connected. |
| Distorted sound output | Ensure the input level of the device matches the signal level of the head unit. |
| Always set the input level to the lowest. | |
| Examine if crossover frequency is set correctly. | |
| Examine if the speaker wire had short-circuited. | |
| Amplifier temperature increased | Examine the minimum speaker impedance for the amp models is correct. |
| Ensure good air ventilation around the device. Add an external cooling fan if necessary. | |
| Engine noise (static sound) interference | Usually caused by poor RCA cable quality, which releases noise. Use only the best quality cables and route them away from power cables. |
| Engine noise (alternator whine) interference | Examine if RCA cables are nowhere near or attached to the vehicle chassis. |
| Examine if the head unit is properly connected to the wires. |
https://www.facebook.com/blaupunkt.asia
Designed and engineered by Blaupunkt Competence Centre
1 121 19 012 02 01
HEADREST MONITOR
FLORENCE 900 HRM![]()
 Enjoy it!
Operating and Installation Instructions
Attention
Contents and instructions are subject to change.
Ensure all wires are connected properly, and that the unit is functioning well before fitting the unit into the mount.
Any unauthorized installation, modification, or repair may cause malfunction to the unit and void of warranty coverage.
Consult authorized dealer if installation requires modifications on the vehicle. Do not expose the monitor to high heat, sunlight, dust, dirt or excessive vibration. Keep monitor dry and clean. Reset or restart unit in case of a program error.
Disclaimer-In no event shall Blaupunkt be liable for any direct, indirect, punitive, incidental, special consequential damages, to property or life, improper storage, whatsoever arising out of or connected with the use or misuse of our products.
USA & CANADA: Product not intended for sale in the United States and Canada. If purchased in the U.S. or Canada, this product is purchased as-is. No warranty, express or implied is provided in the U.S. and Canada.
Features
Mercedes-Benz plug & play OE upgrade headrest monitor with 10.1″ capacitive touch screen, tailor-made for selected models
| Florence 900 HRM 10.1″ Capacitive Touch Screen LCD 1024 x 600 Display Resolution Viewing Angle : 80° (Left / Right / Up / Down) Power Supply: 12V DC Android 4.4.4 1G RAM, 8G Flash Support MPEG/MP3/WMA, AVI/MKV/MP4/MOV/FLAC, JPG/BMP/GIF Built-in Speaker Built-in IR/FM/Bluetooth transmitter 1 x 3.5mm Headphone Jack 1 x AN Input 1 x Micro SD (Up to 64gb, not included) 1 x USB (Up to 128GB, not included) Current: Max. 700MA Operating Temperature: -10°C — 60°C |
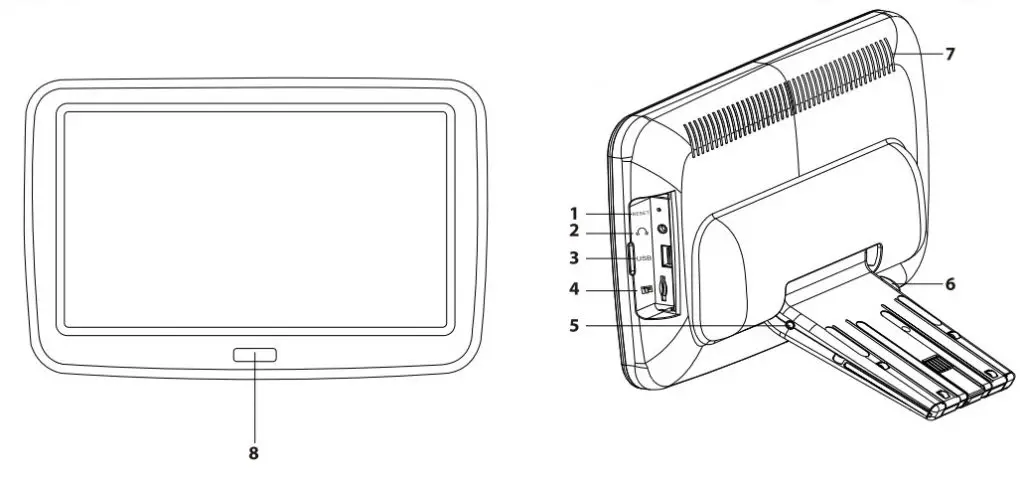
Function Diagram 1. Reset button 2.3.5mm headphone jack 3. USB port 4. Micro SD port 5.AV input 6. Headrest release button 7. Speaker 8. Power button |
Installation
Make sure the vehicle has a built-in monitor slot behind the seat. See Exhibit 1.
Carefully insert/remove the device into/from the slot to assemble. See Exhibit 2.
Press Headrest Release Button to the device from the slot. See Exhibit 3.

Operation
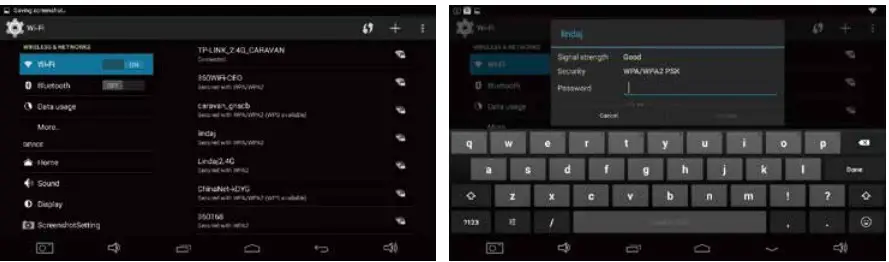
Wi-Fi
Go to settings to activate or deactivate the Wi-Fi feature to connect to a Wi-Fi network and access the internet or other network devices.
Disclaimer: The WLAN can be operated indoors only without restrictions.
Bluetooth
Go to SETTING to activate or deactivate the Bluetooth feature to pair with headphones.
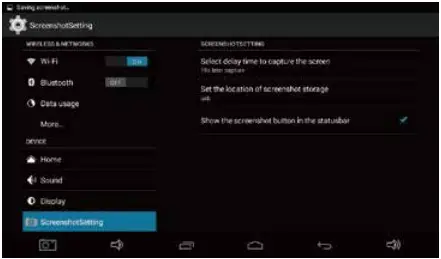
ScreenShot
Go to SETTING to activate or deactivate the ScreenShot function by allowing the ScreenShot button to appear on the status bar.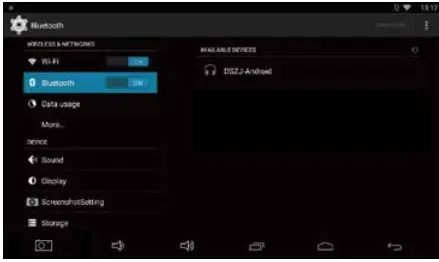
Backup & Reset
Go to SETTING to Backup or reset the device. Set backup account on the device before resetting the device.
V
VIDEO DECODER
| MPEG-1/2 | |
| Video Codec | MPEG-1/2 |
| Supported Image Size | 48x48pixels to 1920x1088pixels |
| Maximum Frame Rate | 30fps |
| Maximum Bit Ratel | 80Mbps |
| File Format | DAT, MPG, VOB, TS |
| Remark | Support Field Coding |
| MPEG-4 | |
| Video Codec | MPEG4 |
| Supported Image Size | 48x48pixels to 1920x1088pixels |
| Maximum Frame Rate | 30fps |
| Maximum Bit Rate | 38.4Mbps |
| File Format | AVI, MKV, MP4, MOV, 3GP |
| Remark | Not support MS MPEG4 y1/y2/y3 |
| Not support GMC | |
| H.264 | |
| Video Codec | H.264 |
| Supported Image Size | 48x48pixels to 1920x1088pixels |
| Maximum Frame Rate | 30fps |
| File Format | AVI, MKV, MP4, MOV, 3GP, TS, FLV |
| Remark | Support Field Coding |
| Support MBAFF | |
| MVC | |
| Video Codec | H.264 MVC |
| Supported Image Size | 48x48pixels to 1920x1088pixels |
| Maximum Frame Rate | 60fps |
| Maximum Bit Rate | 38.4Mbps |
| File Format | MKV, TS |
| Remarks | Support Stereo High Profile only |
| H.265/HEVC | |
| Video Codec | H.265/HEVC |
| Supported Image Size | 48x48pixels to 1920x1088pixels |
| Maximum Frame Rate | 60fps |
| Maximum Bit Rate | 57.2Mbps |
| File Format | MKV, MP4, MOV, TS |
| GOGGLE VP8 | |
| Video Codec | VP8 |
| Supported Image Size | 48x48pixels to 1920x1088pixels |
| Maximum Frame Rate | 30fps |
| Maximum Bit Rate | 38.4 Mbps |
| File Format | WEBM,MKV |
| H.263 | |
| Video Codec | H.263 |
| Supported Image Size | SQCIF(128×96), QCIF(176×144), CIF(352×288),4CIF(704×576) |
| Maximum Frame Rate | 30fps |
| Maximum Bit Rate | 38.4Mbps |
| File Format | 3GP, MOV, MP4 |
| Remark | Not support H.263+ |
| VC-1 | |
| Video Codec | VC-1 |
| Supported Image Size | 48x48pixels to 1920x1088pixels |
| Maximum Frame Rate | 30fps |
| Maximum Bit Rate | 45Mbps |
| File Format | WMV, ASF, TS, MKV, AVI |
| MOTION JPEG | |
| Video Codec | MJPEG |
| Supported Image Size | 48x48pixels to 1920x1088pixels |
| Maximum Frame Rate | 30fps |
| Maximum Bit Rate | 38.4Mbps |
| File Format | AVI |
| VIDEO ENCODER | |
| H.264/AVC | |
| Video Codec | H.264 |
| Supported Image Size | 96x96pixels to 1920x1088pixels |
| Maximum Frame Rate | 30fps |
| Maximum Bit Rate | 20Mbps |
| Remark | Not support MBAFF |
| Google VP8 | |
| Video Codec | VP8 |
| Supported Image Size | 96x96pixels to 1920x1088pixels |
| Maximum Frame Rate | 30fps |
| Maximum Bit Rate | 10Mbps |
| Remark | WEBM |
Audio Format
AUDIO DECODER
| MPEG Audio | |
| Audio Codec | MPEG1/2/2.5 Audio Layers/2/3 |
| Channel | 2 |
| Bit rate | 8kbps-320Kbps, CBR and VBR |
| Sampling rate | 8KHZ-48KHz |
| File Format | MP1, MP2, MP3 |
| Windows Media Audio | |
| Audio Codec | WMA Version 4,4.1, 7, 8, 9, wmapro |
| Channel | 2 |
| Bit rate | 8kbps-320Kbps |
| Sampling rate | 8KHZ-48KHz |
| File Format | WMA |
| Remarks | Not support WMA Pro, lossless and MBR |
| WAV Audio | |
| Audio Codec | MS-ADPCM, IMA-ADPCM, PCM |
| Channel | 2 |
| Sampling rate | 8KHZ-48KHz |
| File Format | WAV |
| Remark | Support 4bit MS-ADPCM,IMA-ADPCM |
| OGG Audio | |
| Audio | Codec Q1— Q10 |
| Channel | 2 |
| Sampling rate | 8KHZ-48KHz |
| File Format | OGG, OGA |
| FLAC Audio | |
| Audio Codec | Compress Level 0-8 |
| Channel | 2 |
| Sampling rate | 8KHZ-48KHz |
| File Format | FLAC |
| AAC Audio | |
| Audio Codec | ADIF, AIDS Header AAC-LC and AAC-HE, AAC-ELD |
| Channel | 5. |
| Sampling rate | 8KHZ-48KHz |
| File Format | AAC, M4A |
| AMR Audio | |
| Audio Codec | AMR-NB, AMR-WB |
| Channel | 1 |
| Bit rate | AMR-NB 4.75-12.2kbps@8kHz AMR-WB 6.60-23.85kbps@16kHz |
| Sampling rate | 8KHZ, 16KHz |
| File Format | 3GP |
| MIDI Audio | |
| Audio Codec | MIDI Type 0 and 1, DLS version 1 and 2, XMF and |
| Mobile XMF, RTTTURTX, OTA, iMelody | |
| Channel | 2 |
| File Format | XMF, MXMF, RTTTL, RTX, OTA, IMY |
| AUDIO ENCORDER | |
| AMR Audio | |
| Audio Codec | AMR-NB, AMR-WB |
| Channel | 2 |
| Bit rate | 4.75kbps-12.2Kbps, CBR |
| Sampling rate | 8KHZ, 16KHZ |
| Container | 3GPP |
| AAC Audio | |
| Audio Codec | AMR-NB, AMR-WB |
| Channel | 2 |
| Bit rate | 4.75kbps-12.2Kbps, CBR |
| Sampling rate | 8KHZ, 16KHZ |
| Container | 3GPP |
Image Format
IMAGE DECODER
| JPEG | |
| Image Codec | JFIF file format 1.02 |
| Support Image Size | 48x48pixels to 8176x8176pixles |
| Container | JPG, JPEG |
| Remark | Base and progressive |
| Software support SRGB JPEG | |
| Software support Adobe RGB JPEG | |
| BMP | |
| Image Codec | BMP |
| Support Image Size | No Restriction’ |
| Container | BMP |
| GIF | |
| Image Codec | GIF |
| Support Image Size | No Restriction |
| Container | GIF |
| PNG | |
| Image Codec | PNG |
| Support Image Size | No Restriction |
| Container | PNG |
| WEBP | |
| Image Codec | WEBP |
| Support Image Size | No Restriction |
| Container | WEBP |
| IMAGE ENCODER | |
| JPEG | |
| Image Codec | JPEG Baseline |
| Support Image Size | 96x32pixels to 8176x8176pixles |
| Maximum Data Rate2 | 90Mpixels/Second |
| File Format | JFIF file format 1.02 |
Designed and engineered by Blupunkt
]]>
CAUTIONS
Safety Notes
This roof monitor has been manufactured according to established safety guidelines. However, dangers may still occur if the safety notes in this manual is not observed. This manual is intended to familiarize the user with the roof monitor’s important functions. Read this carefully, prior to using the roff monitor. Keep this manual in an easily accessible location. In addition, do observe the instructions of the devices used in conjunction with this roof monitor.
Attentions
- Protect power line from damages such as folding, tangle, stretch, bending, pulling or heating. Fasten seat belt when watching from the rear seat.
- Do not apply heavy pressure on the device. Do not drop the device. Heavy impact on the device may break the LCD or the entire device.
- Wrong/inappropriate operation may cause casualty due to electric shock or endangering others and properties.
- Wiring and installation should be performed by experience and professional technicians.
- Fastened the lead correctly to prevent loose screws and rails.
- Please turn down the sound volume before shutting down device to prevent hearing damage.
- Regularly clean and check the connecting part of power line to prevent dust, dirt or any objects from covering the power supply, do not cover or block the vent hole, which may lead to fire when overheat.
- Device position should not restrict driver’s movement or distract driver. To prevent accidents and injuries, it is recommended to position device away from driver such as steering wheel, shift lever, handbrake areas or front windshield area. Device may cause injury in case of braking if not installed correctly.
- Use rated voltage fuse box (2A) only to prevent damage to device.
- Use only specified wire to avoid damage of power supply or catching fire.
- Pay attention to electric shock.
- Unauthorized disassembling, repair or modification may void the warranty of the device. Please consult authorized Blaupunkt reseller for more info.
- Immediately disconnect power supply in case of smoke appearing or any abnormal sound, this is to prevent fire or electrical shock.
- Keep device at cool and dry place to prevent device from catching fire, sending electric shock, discolouration and deformation.
- Do not touch the product or the power plug after thunder to prevent electric shock.
This manual may be updated from time to time without any notice.
Disclaimer
In no event shall Blaupunkt be liable for any direct, indirect, punitive, incidental, special consequential damages to property or life and whatsoever arising out of or connected with the use or misuse of our products.
USA & CANADA: This product is not intended for sale in the United States and Canada. If purchased in the U.S. or Canada, this product is purchased on as-is basis. No warranty, whether expressed or implied is provided in the U.S. or Canada.
STRUCTURE & REMOTE CONTROL

FUNCTIONS
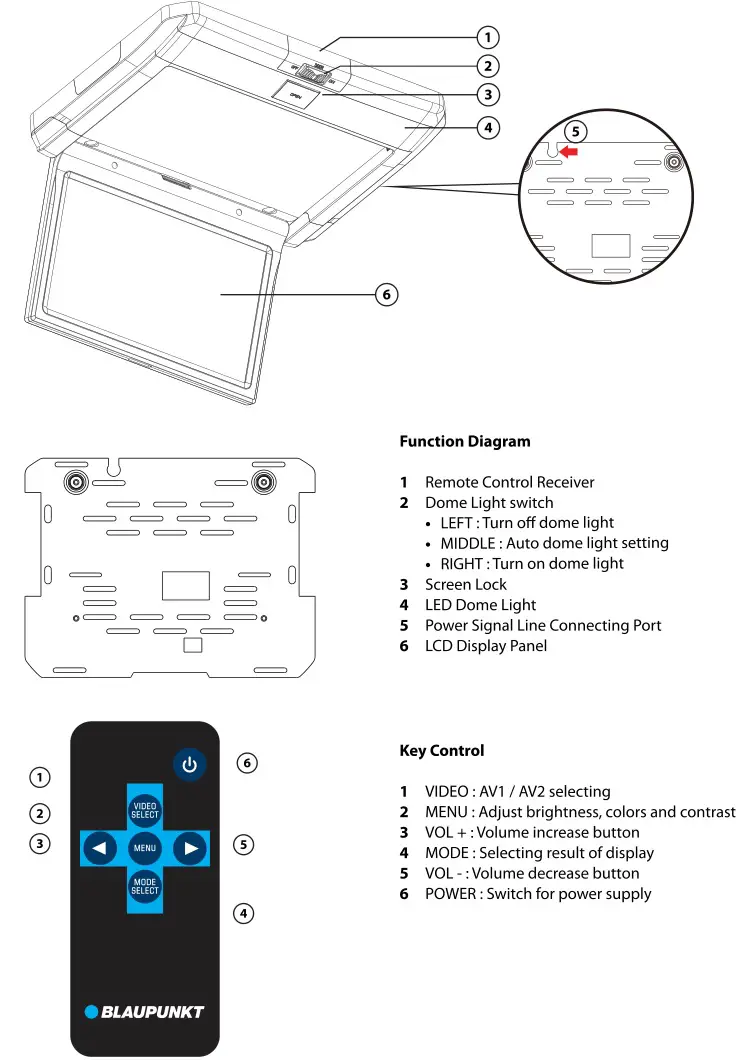
Specification
• 10.1″ Fixed panel IPS Screen with white LED dome light
• Built-in anti-glare (AG) screen coating
• Resolution : 1024 x 600 (WSVGA)
• Viewing angle: Up 50″, Down 70″, Left 70″, Right 70″
• Adjustable flip down angle: 0″ to 180″ (for safety purpose)
•Voltage/ current: 12V DC/ 1 A (monitor), 12V DC/ 0.3A (room light)
• Power consumption : Approx. 1 SW
•Input: AVl/ AV2
• Operating Temperature: 0″C ~ S0″C
• Storage Temperature: -1 0″C ~ 60″C
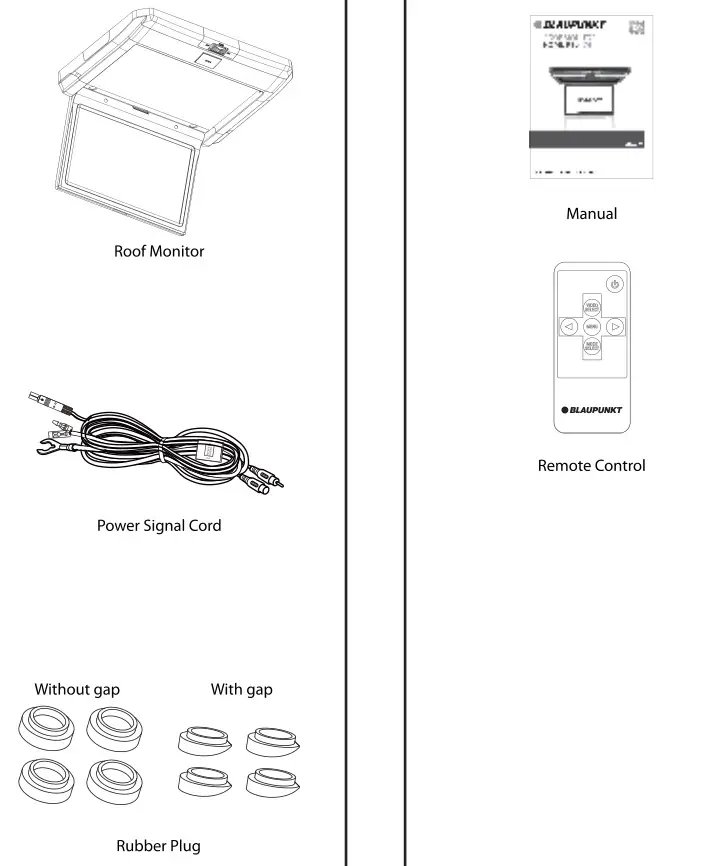
•Includes: Remote controller, power signal cord, rubber plug
•Dimension: 316mm (L) x241mm (W) x 33 mm(H)
•Weight: 1.7kg
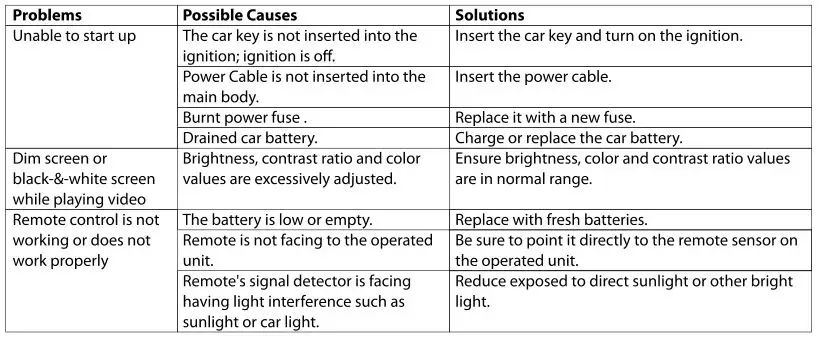
TROUBLESHOOTING
If any ofthe following problem occur, please resort to Troubleshooting for the possible solutions. Consult Blaupunkt authorized dealer if problem persist.

WIRING DIAGRAM
ACCESSORIES

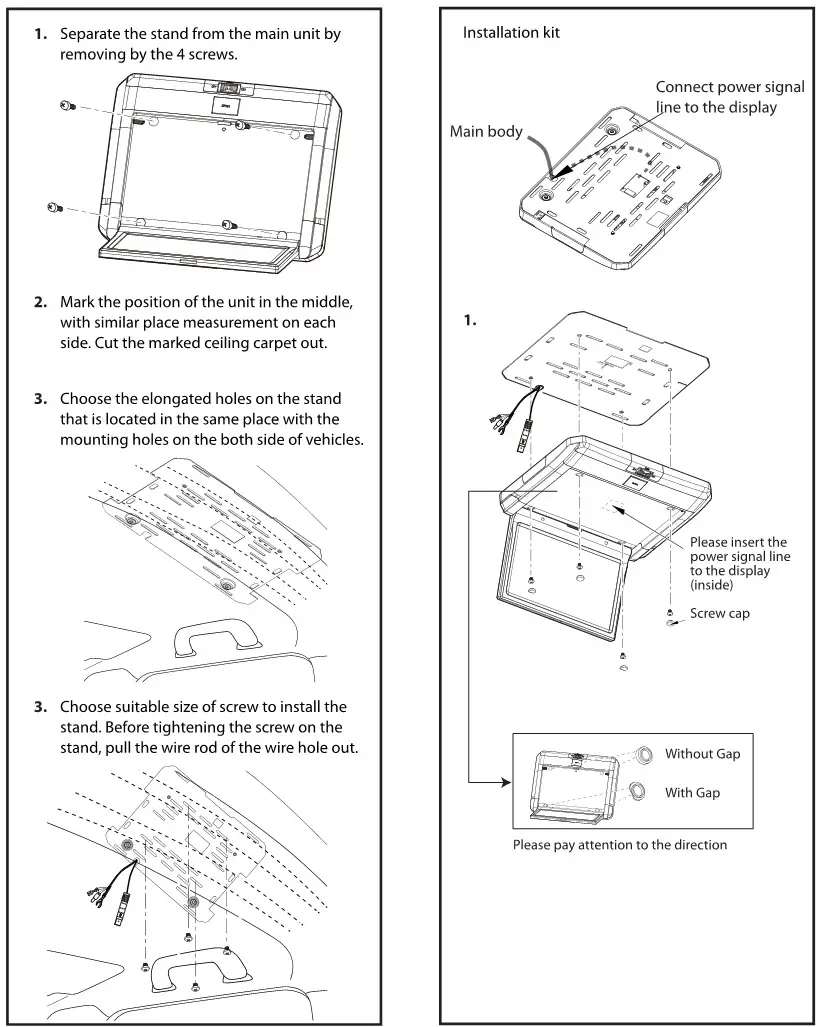
INSTALLATION INSTRUCTION
https://www.facebook.com/blaupunkt.asia
Designed and engineered by Blaupunkt Competence Centre
1105190023301
]]>
BLAUPUNKT Steam station Iron

IMPORTANT NOTES
- To achieve the utmost in enjoyment and performance, and in order to become familiar with its features, please read this manual carefully before attempting to operate this product.
- Before using this device read the instruction manual and follow the instructions inside. The manufacturer is not liable for any damages caused by the misuse of this device due to inappropriate handling. Please keep this manual for future reference.
- This device is for domestic use only. Do not use for any other purposes.
- The device should only be connected to an earthed socket with values corresponding to the values on the rating label.
- It is necessary to check, if total current consumption of all devices plugged into the wall outlet does not exceed the fuse in the circuit.
- If you are using an extension cord, make sure that the total power consumption of the equipment plugged into the extension cord does not exceed the extension cord power rating. Extension cords should be arranged in such a way as to avoid tripping hazards. Make sure the cable is grounded, 3-cores with a socket and an earth cable.
- Do not let cord hang over edge of counter, or touch any hot surface.
- The device is not designed to be controlled via an external timer, separate remote control, or other equipment that can turn the device on automatically.
- Before maintenance work always disconnect the unit from the power supply.
- When unplugging the power cord from electrical outlet, hold it by the plug only and remove the plug carefully. Never pull the cable as it may cause damage to the plug or power cord. Damage to the power cord or plug can lead to an electrocution hazard.
- Never leave the product connected to the power source without supervision.
- Never put the power cable, the plug or the whole device into the water or any other liquids.
- The device should be cleaned regularly complying with the recommendations described in the section on cleaning and maintenance.
- Do not place the device near sources of heat, flame, an electric heating element or a hot oven. Do not place on any other device.
- This equipment can be used by children aged 8 years and over as long as supervision is provided. People with reduced physical or mental capabilities, as well as people with no previous experience of using this equipment must be supervised and made aware of the risks. The instruction manual should be used as a reference for the safe use of this equipment. Children should not play with the equipment. Children without ensured supervision should not be allowed to perform the cleaning and maintenance of equipment. Additional precautions should be taken when using this device in the presence of children or pets.
- Do not allow children to play with the device.
- Never use the product close to combustibles.
- Never expose the product to atmospheric conditions such as direct sun light or rain, etc…
- Never use the product in humid conditions (like bathroom or camping house).
- The power cable should be periodically checked for damage. If the power cable is damaged the product should be taken to a professional service location to be fixed or replaced to prevent any hazards from arising.
- Never use the product with a damaged power cable or if it was dropped or damaged in any other way or if it does not work properly. Do not try to repair the defected product by yourself as it can lead to electric shock. Always return the damaged device to a professional service in order to repair it. All the repairs should only be performed by authorized service professionals. Any attempted unauthorised repairs performed can be a hazard to the user.
- Only Original accessories should be used, as well as accessories recommended by the manufacturer. Using accessories which are not recommended by the manufacturer may result in damage of the device and may render the device unsafe for use.
- The tank can only be filled with water. The steam station has a built-in anti-scale filter and is adapted to the use of tap water. It is advised that demineralized water be used. Do not add any substances such as perfume, starch, vinegar, or descaling agents to the water.
- If the steam station will not be used for a long time, empty the water tank.
- The iron should be placed on the base unit.
- Do not iron fabrics which are not intended for ironing, e.g. synthetic fabrics (elastane, spandex, etc.) printing on clothing.
- Hot steam comes out of the iron. Special care must be taken while ironing and smoothing fabrics. Do not iron clothes whilst on a person.
- The soleplate cools down very slowly. Until the steam station completely cools down, store it in a safe place which prevents accidental touching and out of reach of children.
Functions
- Control Panel
1a. DRY TANK – Information about the empty water tank (see FILLING THE WATER TANK)
1b. The “greater-steam-flow” icon
1c. The “ECO steam flow” icon
1d. Control lamp – information about thermostat operation. When the light flashes, the steam station heats up. When it is on continuously, the steam station is ready for ironing.
1e. Switch
1f. Set – steam-flow-intensity selection button (intensive / Eco)
1g. Service button (iron cleaning)
1h. Sleep-mode icon - Steam-burst button
- Soleplate
- Steam hose
- Iron stand
- Water tank
- Water inlet
- Steam-hose bands
BEFORE FIRST USE
Remove all papers, cartons, and foils protecting the appliance and its parts.
The iron may emit a delicate smoke and smell the first time it is used. It is recommended to warm up the iron before ironing and use it on an old fabric few times.
FILLING THE WATER TANK
Make sure that the steam station is disconnected from the power supply before filling the tank. Open the water-inlet cap and fill the tank through the inlet with the beaker.
Do not exceed the maximum level (1.6 l)
IRONING
After filling the water tank, connect the steam station to the power source. Turn off the steam station by pressing the button (1e). Set the required steam intensity by pressing the steam-intensity button (SET – 1f ). The chosen setting will be presented by a highlighted symbol within the control panel. When the steam-readiness lamp (1d) stops blinking and lights permanently, the ironing can start. Press the steam-release button to release the steam from the iron.
The no-water indicator light will come on after 30 seconds, when there is no water in the tank. Water must be poured into the tank through the water inlet.
When the ironing is finished, turn off the steam station by pressing the power button for 3 seconds (1e).
SWITCHING OFF THE STEAM STATION
To switch off the steam station, press and hold the power button for 3 seconds. Any icons and indicator lamps will go out. Then disconnect the steam station from the power source.
THE ADDITIONAL STEAM-EMISSION FUNCTION
If increased steam emission is required, press the steam-release button twice. The iron will release the increased amount of steam and then return to a constant level of steam generation.
THE AUTOMATIC SHUT-OFF FUNCTION
The iron automatically switches off when it remains still for 10 minutes. The indicator light and the sleep-mode icon will flash, and the steam station will emit a sound signal.
Press the steam button to continue ironing. Wait for the indicator light to begin glowing continuously before ironing.
CLEANING AND MAINTENANCE
Never immerse the iron or the steam station in water. Make sure that the iron and the station have cooled down. Wipe the body of the iron and the station with a slightly damp cloth, then wipe until they are dry. The soleplate should be wiped with a soft cloth.
The iron’s cleaning mode should be activated periodically, every 1-3 months, depending on the hardness of the water. The water from the tank will be transferred through the steam ducts of the iron at elevated temperatures. To do this, place the steam station near a sink. Fill the water tank. Connect the steam station to a power source. Start the steam station, wait until it heats up (the control lamp will be on continuously). Place the iron over the sink. Start the iron-cleaning mode by holding down the service button (1g) for 3 seconds. Hot water with steam will start flowing through the iron. When the operation is complete, the iron will produce a sound signal and the cleaning icon will go out.
NOTE: the water flowing out of the iron is very hot. Use extreme caution.
Device is compliant with EU directives:
- Low voltage directive (LVD)
- Electromagnetic compatibility (EMC) Device marked CE mark on rating label
When this crossed-out wheeled bin symbol is attached to a product it means that the product is covered by the European Directive 2012/19/EU. Please inform yourself about the local separate collection system for electrical and electronic products. Used appliance should be delivered to the dedicated collecting points due to hazardous components, which may affect the environment. Do not dispose this appliance In the common waste bin.
Environmental information
All unnecessary packaging has been omitted. We have tried to make the packaging easy to separate into three materials: cardboard (box), polystyrene foam (buffer) and poly ethylene (bags, protective foam sheet). Your system consists of material which can be recycled and reused if disassembled by a specialized company. Please observe the local regulations regarding the disposal of packaging materials, exhausted batteries and old equipment.
Your products is designed a manufactured with high quality materials and components, which can be recycled and reused.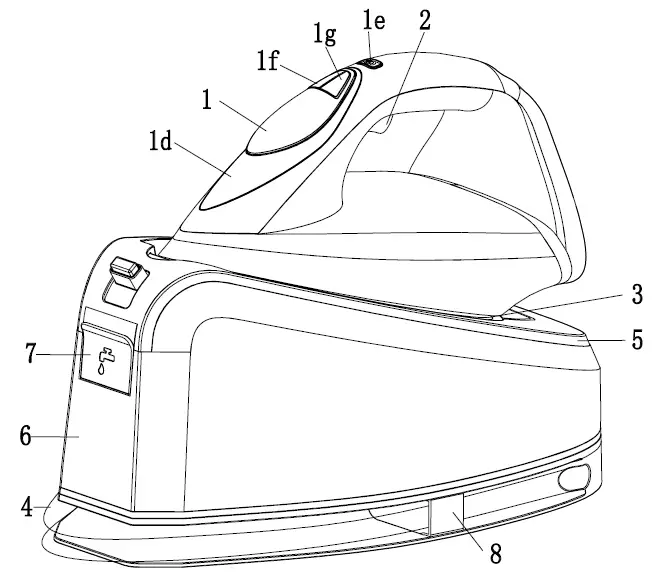

12V/24V
DIGITAL VIDEO RECORDER
BP 7.1 2-CHANNEL
![]()

Operating and Installation Instructions
CAUTIONS
- Please insert the micro SD card in the right direction to avoid damage to the card or the device. If the device shows an error message, please format the micro SD card from the device menu. Please reset the device or change the micro SD card if a similar error continues.
Note: All files will be deleted when formatting micro SD card or firmware update, please backup the important files prior to that. When the reset function is selected, the device will return to the default setting. - Blaupunkt does not warrant the performance of the device if used with other Micro SD cards other than the Blaupunkt Micro SD card
- New Micro SD card must be formatted for first use. Micro SD must be formatted once every 6-month.
- Ensure the bracket is installed correctly & firmly on the windscreen to avoid damage to the device and for a better recording angle.
- Please do not use the product in a wet environment as the device is not waterproofed/ water-resistant.
- Please do not record or take pictures facing sunlight.
- To obtain a clear image, please clean the windscreen and device lens regularly. Avoid using devices in dusty environments.
- Handle the device with care and avoid a direct impact on the device. Avoid using devices in high electromagnetic environments.
- Please operate the product within the temperature of -20°C ~ 80°C. Continuous exposure to sunlight, especially when locked in the cabin where the temperature exceeds 80°C may result to devise malfunction, color change, housing, and image distortion.
Disclaimer :
- Blaupunkt is not liable for any loss or damage caused or resulting from unauthorized disassembly or modification of the product.
- In no event shall Blaupunkt be liable for any direct, indirect, punitive, incidental, special consequential damages, to property or life, improper storage, whatsoever arising out of or connected with the use or misuse of our products.
- USA & CANADA: Products not intended for sales in the United States and Canada. If purchased in the U.S. or Canada, this product is purchased as-is.
No warranty, expressed or implied is provided in the U.S. and Canada. - This device is NOT intended to be used for illegal purposes, surveillance and shall not be used in any form as evidence for claim purposes.
- Some countries prohibit drivers from mounting anything on the windshield or restrict mounting to specific areas of the windshield. It is the owner’s responsibility to mount the device in compliance with local laws.
- The error may occur depending on the surrounding environment and the voltage of the car.
- Blaupunkt is not liable/responsible for the non-recorded events, missing files, etc.
- If the car battery voltage is lesser than the setting value of cut-off voltage, the device will stop recording even at park recording mode.
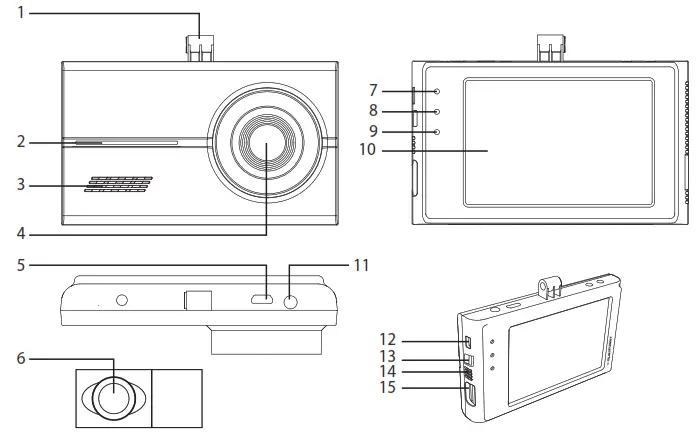
STRUCTURE

1. Bracket slot
2. Operation indicator light
– Flashes during normal / park mode
– Off during shock / SOS mode
– Blink during motion/shock detection in park mode
3. Speaker
4. Lens
5. Rear DVR cable input
6. Rear DVR lens
7. GPS indicator light
– Lights up in blue when GPS is connected
– Light o in parking mode
8. PWR (Power) indicator light
– Lights up in green during normal recording mode
– Light off during park mode
9. Event indicator light
– Lights up in red during shock / SOS mode
– Flashes when SD card reading fail
– Light off during park mode
10. Front DVR 3.5” LCD touch screen
11. 12-24V D power supply
12. SOS: Record shock video manually
13. Power On/Off
14. Microphone
15. Micro SD card slot
Features
- Resolution : Front 5MP FHD 1920 x 1080 30 fps, Rear 5MP HD 1280 x 720 (15fps)
- Wide viewing angle: Front – 120°, Rear – 110°
- Screen display: Front, Rear, PIP (picture in picture)
- 3.5” touch screen LCD display
- Automatic park recording with smart motion / time-lapse (24-hour park monitoring)
- Format-free, G-sensor, loop recording
- Built-in microphone & speaker
- Language: English, Chinese Simplifed, Chinese Traditional, Japanese, Korean
- High temperature & low car battery voltage cut-off
- Support up to 64GB Micro SD, class 10 & above
- Offline ADAS
FUNCTION
• Format-free
Engineered with TAT technology, the device is capable to arrange or overwrite saved data according to folders.
• Low Voltage Cut-off
Function only after vehicle ignition is turned off. This function prevents vehicle battery drainage. Adjust at Environment Settings > Recording Settings > Voltage. •
• Automatic High-Temperature Cut-off
Function only after vehicle ignition is turned off. The device will automatically turn off when a high temperature is detected.
• Offline ADAS (Advanced driver-assistance system)
It supports LDWS (Lane Departure Warning System) and FVSA (Front Vehicle Start Alert). Optional GPS is available to improve accuracy and driving speed for PC viewer. Adjust at Environment Settings > ADAS Settings.
• Super Capacitor
This technology ensures video files are saved even if sudden power cut-off
• Park Mode (Park Monitoring)
Switch between Motion or Time-lapse at Environment Setting > Recording Settings > Parking Mode.
• Smart Motion (12fps)
This mode will begin operating 30-sec after the vehicle ignition is turned off. Recording begins when impact or motion is detected. Adjust sensitivity at Environment Settings > Recording Settings > Motion Intensity.
• Time-lapse (2fps)
This mode selects 2 frames per second (fps) instead of recording 12fps (Front & Rear DVR). Adjust sensitivity at Environment Settings > Recording Settings > Motion Intensity.
• Event Mode
The device begins saving recording when the assigned sensitivity intensity is detected. Video file of 10-sec before and after detection will be saved under the Event file. Adjust sensitivity in Environment Settings > Recording Settings > Event Intensity.
•SOS (Manual Mode)
When SOS button is pressed, a video file of 10-sec before and after the press will be saved under the Event file.
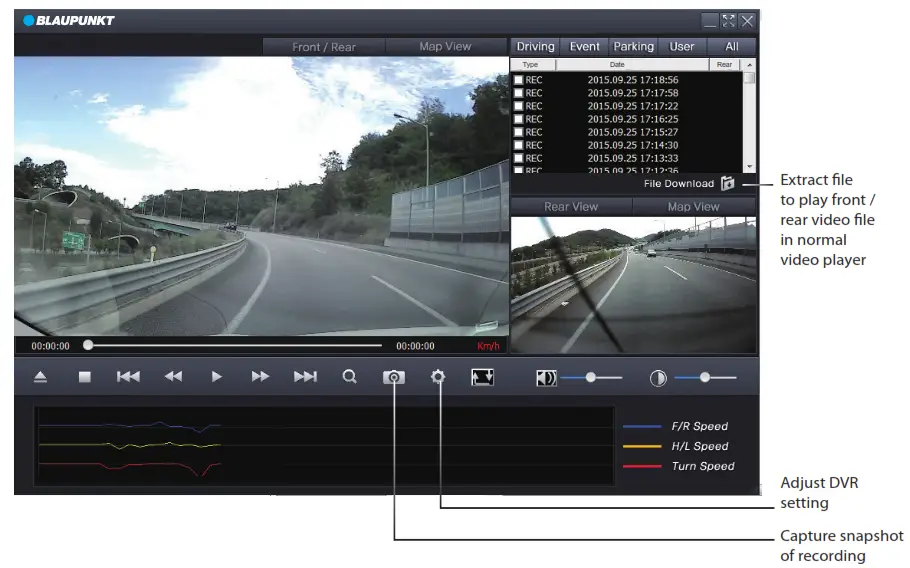
• PC Viewer
View video playback using BP7.1 PC Viewer. Download PC viewer (Windows only) from www.blaupunkt.com/ase
| Mode | Category | Function |
| Live View | Real-time Image | |
| Video recording View | Continuous Recording | 1-min / 62MB |
| Event Recording | 20-sec / 20MB | |
| Park Recording | 1-min / 62MB or time-lapse | |
| Manual Recording (SOS) | 20-sec / 20MB | |
| Environment Settings | Recording Settings | Event Intensity |
| Motion Intensity | ||
| Voltage | ||
| Parking Mode | ||
| ADAS Settings | FVS Notice | |
| LDWS Notice | ||
| Bonnet Line Settings | ||
| Audio Settings | System Vol. | |
| Voice | ||
| Effect | ||
| Voice Rec. | ||
| ADAS Alarm | ||
| System Settings | Language | English |
| Chinese Simplified | ||
| Chinese Traditional | ||
| Japanese | ||
| Time Settings | YYYY/MM/DD | |
| HH/MM/SS | ||
| LCD Time | ON | |
| lm | ||
| 3m | ||
| 5m | ||
| Clock Screen | ON | |
| OFF | ||
| Touch Calibration | ||
| Memory Card Format | All data will be deleted. | |
| (Ensure important files are saved before formatting) | ||
| Information | BP7.1 Version | |
| Initialize Settings | Reset device to default setting. |
Blaupunkt DVR BP 7.1 PC Viewer
PC Viewer will automatically detect micro SD card when it’s inserted into the computer.
Note: Older files will be overwritten when the memory card is full and requires new storage space. Files will be overwritten according to file arrangement Continuous / Event / Park / Manual (SOS). Backup recordings regularly to prevent important files from being overwritten.
INSTALLATION
SAFETY NOTE
- Assign mounting location that will not obstruct driver in any circumstances. Or cause injuries to drivers and passengers in case of emergency brake or accident.
- Ensure all wires are connected properly, and that the device is functioning well before installing on the windscreen.
- Any unauthorized installation and modification may cause malfunction to the device and void the warranty of the product. Always use the parts included with the device only.
- Contact Blaupunkt dealer or vehicle’s manufacturer if the information provided here does not fit your specific requirement.
POWER CABLE HARDWIRING
1. Use the hardwire power cable
2. BATT (+)
• Connect the wire cable to the permanent power fuse box. (Eg : Hazard light, dome light, tail light etc)
3. Acc (+)
• Connect the wire cable to the fuse that receives power through ignition (Eg : Cig lighter, audio system etc)
4. GND
• Connect the cable to the vehicle chassis or vehicle bolts.
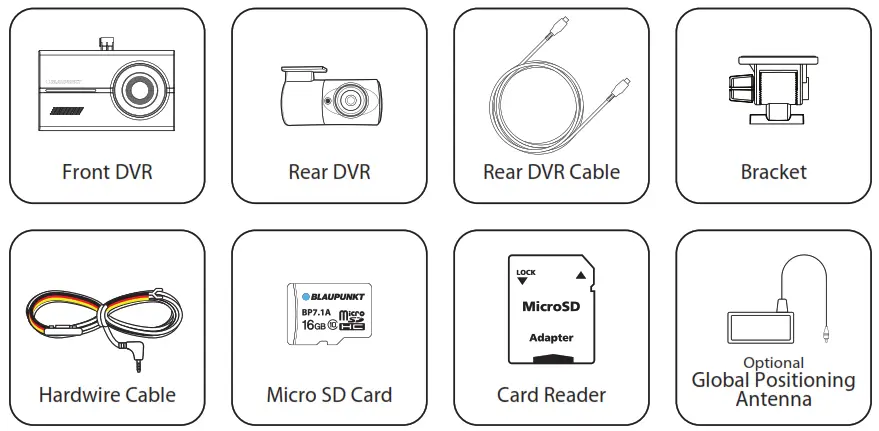
ACCESSORIES

 https://www.facebook.com/blaupunkt.asia
Designed and engineered by Blaupunkt
]]>
BT22TWS
Owner’s Manual
True Wireless Stereo Bluetooth speaker
Important Notes
- This safety and operating instruction should be retained for future reference.
- The apparatus should not be exposed to dripping or splashing or placed in a humid atmosphere such as a bathroom.
- Do not install the product in the following areas:
- Places exposed to direct sunlight or close to radiators.
- On top of other stereo equipment that radiate too much heat.
- Blocking ventilation or in a dusty area.
- Areas where there is constant vibration.
- Humid or moist places.
- Do not place near candles or other naked flames.
- Operate the product only as instructed in this manual.
- Before turning on the power for the first time, make sure the power adaptor is properly connected.
For safety reasons, do not remove any covers or attempt to gain access to the inside of the product. Refer any servicing to qualified personnel.
Do not attempt to remove any screws, or open the casing of the unit; there are no user serviceable parts inside. Refer all servicing to qualified service personnel.
SAFETY INSTRUCTIONS
- Read Instructions – All the safety and operating instructions must be read before the product is operated.
- Retain Instructions – The safety and operating instructions should be kept with the product for future reference.
- Heed warnings – All warnings on the product and in the operating instructions should be adhered to.
- Follow instructions – All operating and users’ instructions should be followed.
- Installation – Install in accordance with the manufacturer’s instructions.
- Power sources – This product should be operated only from the type of power source indicated by the marking adjacent to the power cord entry. If you are not sure of the type of power supply to your home, consult your product dealer or local power company.
- Water and moisture – To reduce the risk of fire or electric shock, do not expose the product to train, dripping, splashing or excessive moisture such as in a sauna or bathroom. Do not use this product near water, for example, near a bathtub, washbowl, kitchen sink, laundry tub, in a wet basement or near a swimming pool (or similar).
- Object and Liquid Entry – Never push objects of any kind into this product through openings, as they may touch dangerous voltage points or short-circuit parts that could result in a fire or electric shock. Never spill liquid of any kind on the product. Do not place any object containing liquid on top of the product.
- Servicing – Do not attempt to service this product yourself, as opening or removing covers may expose you to dangerous voltage or other hazards. Refer all servicing to qualified service personnel.
- Replacement parts – When replacement parts are required, ensure that the service technician has used replacement parts specified by the manufacturer or have the same characteristics as the original part. Unauthorized substitutions may result in fire, electric shock or other hazards.
- The highest environmental temperature suitable for this product is 35°C.
- ESD hints – If the product maybe reset or not reset to operation of control due to electrostatic discharge, just switch off and reconnect again, or move the product to another location.
ERP2 (Energy Related Products) note
This product with ecodesign complies with the stage 2 requirements of Commission Regulation (EC) NO. 1275/2008 implementing Directive 2009/125/EC regard to standby and off mode electric power consumption of electronic household and office equipment.
WARNING
This appliance is not intended for use by persons (including children) with reduced physical sensory or mental capabilities, or lack of experience and knowledge, unless they have been given supervision or instruction concerning use of the appliance by a person responsible for their safety. Children should be supervised to ensure that they do not play with the appliance.
- Never use the device unsupervised! Switch off the device whenever you are not using it, even if this only for a short while.
- The appliance is not intended to be operated by means of an external timer or separate remote control system.
- If the supply cord is damaged, it must be replaced by the manufacturer, its service agent or similarly qualified persons in order to avoid a hazard.
- Before operating this system, check the voltage of this system to see if it is identical to the voltage of your local power supply.
- To prevent fire or shock hazard, do not expose this equipment to hot places, rain, moisture or dust.
- Do not place this unit close to a strong magnetic field.
- Do not place the unit on a amplifier or receiver.
- Do not place this unit in a damp area as the moisture will affect the life of electric components.
- If the system is brought directly from a cold to a warm location, or is placed in a very damp room, moisture may condense on the lens inside the player. If this occurs, the system will not operate properly. Please leave the system turned on for about an hour until the moisture evaporates.
- Do not attempt to clean the unit with chemical solvents as this might damage the finish. Wipe with a clean, dry or slightly damp cloth.
NOTICE
Conformity Hereby, Blaupunkt Competence Center 2N-Everpol Sp. z o.o., declares that this equipment is in compliance with the essential requirement and other relevant provisions of Directive 2014/53/EU. Declaration of conformity can be obtained from the product page at www.blaupunkt.com. Responsible party: 2N-Everpol Sp. z o.o, Pulawska 403A, 02-801 Warsaw, Poland, Phone: +48 22 331 99 59, E-mail: [email protected] Your products is designed a manufactured with high quality materials and components, which can be recycled and reused. When this crossed-out wheeled bin symbol is attached to a product it means that the product is covered by the European Directive 2012/19/EU. Please inform yourself about the local separate collection system for electrical and electronic products. Please cat according to your local rules and do not dispose of your old products with your normal household waste. Correct disposal of your old product helps to prevent potential negative consequences for the environment and human health. Your product contains batteries covered by the European Directive 2006/66/EC, which cannot be dispose with normal household waste. Please inform yourself about the local rules on separate collection of batteries because correct disposal helps to prevent negative consequences for the environmental and human health. Environmental information All unnecessary packaging has been omitted. We have tried to make the packaging easy to separate into three materials: cardboard (box),polystyrene foam(buffer) and poly ethylene (bags, protective foam sheet). Your system consists of material which can be recycled and reused if disassembled by a specialized company. Please observe the local regulations regarding the disposal of packaging materials, exhausted batteries and old equipment. Recording and playback of material might require consent. See Copyright Act 1956 and The Performer’s Protection Acts 1958 to 1972.
Many thanks to purchase our mode, please read and reference the manual before operating this unit. Please keep the manual for future operation reference.
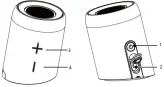
Location of controls
1-Power button;
2-DC 5V microUSB power jack;
3-volume up;
4-volume down;
5-signal indicator;
6-hook hole;
7-rubber bracket.
Battery charging
This unit had built-in rechargeable lithium battery inside. Before start the playing, please follow up below step for charging.
- Using the supplied 1pcs USB to 2pcs microUSB type charging cable connects the speaker with your USB charger (USB adaptor or USB output port like on PC, USB rating output: 5V/1A, other USB charger with current equal or above 1A). The microUSB connector should connect with the DC 5V power jack of speaker, and the another terminal connect with USB charger. Then plug your USB charger into the household AC power.
- The charging LED will light on in red color during charging, and the red color LED will off when the battery is fully charged.
- The speaker will off automatically when the battery power exhausted, please arrange recharge for playing.
- The output sound may intermittent due to lower power. This is not malfunction. Please arrange it for recharging.
Important:
We recommend connect the USB charger with rating output spec at DC 5V/1A, or equal or above 1A output current USB power. The general USB output on PC (personal computer) is 5V/1A (please reference your PC spec for checking). There may have some charging noise or abnormal function from speaker if the charging current is too low. If it happened, please remove the charging power and put the speaker in a while, then the speaker will reset the function in normal. Please kindly note this is not malfunction.
Notes:
Your battery lifetime will last longer if you follow up below simple guidelines for charging and storing.
a. For charging first time, charge it at least 10 hours.
b. Recharge and store the unit within the temperature range of 5°C~35°C (40°F~95°F).
c. Do not charge longer than 24 hours. Excessive charging or discharging may shorten the battery’s life.
d. Battery life naturally shortens slowly over time.
e. Please turn off the speaker if long time not to use.
f. The speaker can play music during charging.
g. Due to prolong charging and discharging, the unit battery life will be affected and playback time will also be shortened. We cannot guarantee the same playback consistently throughout and this is not include in our warranty and service.
Bluetooth operation
Before start to do the operation, you can choose to enjoy the music as all-in-one speaker(two speaker attached together); or shift off the speaker from the rubber bracket, then rotate the top speaker in clockwise direction to separate them for two speakers playing; in case of assemble the two speakers, please put them attached together, then rotate it in counterclockwise direction for tighten.

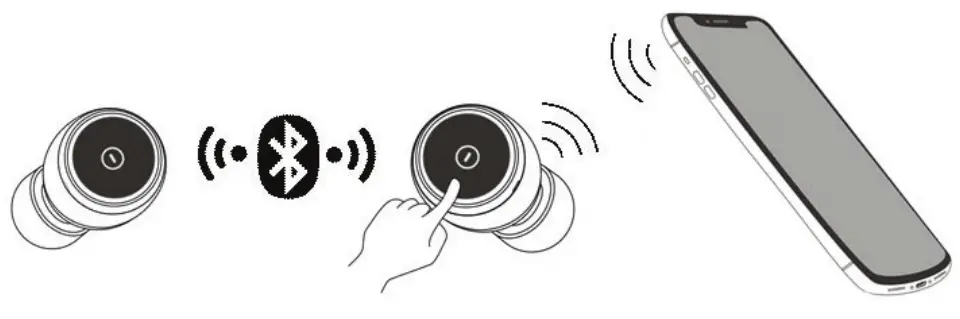
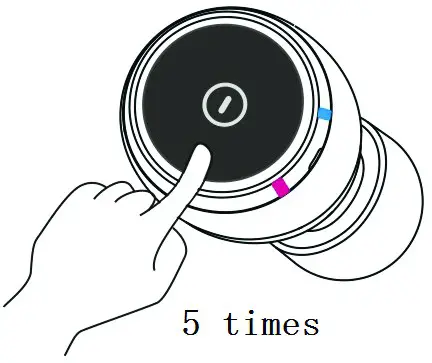
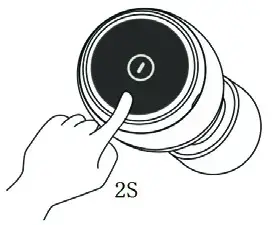
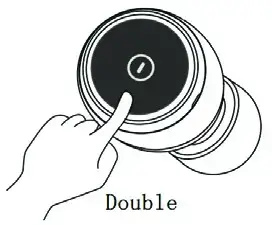
TWS playback (two speakers playing at same time): For first time being used, long press the power button to power on the two speakers at the same time; put the two speakers together within 30cm and wait a while; then the speaker will pair each other automatically. There will have a short notice sound come from the speaker after paired successful, and the signal LED on the master speaker will flicker in high speed for Bluetooth pairing; the LED on the slave speaker (another speaker) will light on in stable. Turn on the Bluetooth function on your device (Details please reference the manual of device for operation), check the available Bluetooth device list on your device, select” BP BT22″for pairing; there will have two short notice sound come out from the master speaker after paired successful. Select and play the music from your Bluetooth device, then the sound will wireless playback from two speakers. And the best working distance is within 10 meters between two speakers. The another speaker will be controlled correspondently in case of you do below operation on one side speaker during TWS playback mode: a. Short press the +/- button to switch the playing track; press and hold the +/- button to increase or decrease the volume. b. Short press the power button to play/pause the music. c. Short press the power button twice to quit the current Bluetooth pairing with other device. d. Short press the power button 3 times to disconnect TWS speaker connection. e. Long press the power button to turn off the speaker; And the two speakers can pair with your device automatically after power on again. Single playback (one speaker playing): The Bluetooth operation is similar to TWS playback mode; but power on and has sound output in one speaker only. Please pay attention the Bluetooth pairing name is “BP BT22” as well during pairing. Phone call hands free: when the cell phone was paired with speaker, and an incoming call is arriving; short press the power button can pick up the call; answer the phone call and talk aim to the microphone (locate next to inner driver) within 30cm (suggested distance) in order get better conversation sound quality; short press the power button again can end the phone call and resume the music playback; short press the power button twice to reject the phone call. The phone call or talking voice will output on one speaker only in hands free mode, but there was built-in microphone in each speaker. We suggest to take one speaker for phone call hands free operation.
Notes:
a. All Bluetooth devices are not guaranteed to pair successfully due to different design and brand.
b. Please do not put your cell phone very close to the speaker during phone call hands free conversation, in order to avoid interference which will impact the conversation sound quality.
c. The Bluetooth best working distance is within 10 meters without any obstacle in between.
d. The unit will power off automatically in case of unpaired with device lasting 10mins in order to save battery power. Trouble shooting
- The unit cannot power on. a. Please charge the unit and try again. b. Please contact the service center in case of issue remains.
- There is no or intermittent sound output in Bluetooth mode. a. Please turn off the Bluetooth, and repair with the speaker. b. Please put your Bluetooth device closer with the speaker.
- The two speakers cannot pair each other successfully(TWS pair failed).
a.Please try to power off both speakers first, then power on the two speakers at same time, and put them together for a while. Then the speaker will connect each other.
b.Please contact the service center in case of issue remains. Specification Power source: DC5V, 1A; (or DC 5V, rating current above 1A). Bluetooth version: 4.2, best working distance within 10 meters. Rated power: 2 x 8W. Battery power: 2 x 3.7V/1500 mAh rechargeable lithium battery. Charging time: 2.5~3 hours base on DC5V, 1A input. Music playback time: 6~8 hours. Waterproof:IPX 7 supported. Power consumption: 13.6Watt. Standby power consumption: < 0.5Watt. Accessory:1 pcs x USB charging cable. (The above spec may revise without prior notice)

Enjoy it.
Operating and Installation Instructions
USER MANUAL
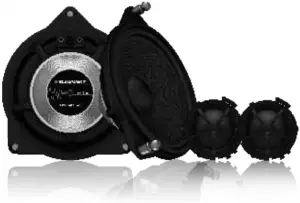
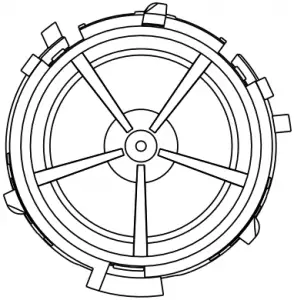
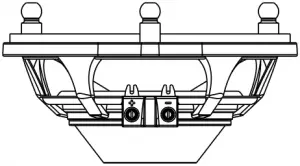
Thank you for purchasing the BLAUPUNKT brand speaker, which is a specially designed and developed for your Mercedes-Benz car dedicated series speakers.
Safety instructions:
- Before installing this product, make sure that the installation space is appropriate and read and understand all the instructions. If you do not follow the instructions, you will not be able to enjoy the warranty.
- Use the supplied mounting accessories to ensure safe and secure installation.
- Do not use the loudspeaker beyond maximum power.
- To prevent noise interference, make sure that the wiring is away from the engine, high voltage wires, and other potential noise sources.
- To prevent short circuits, make sure that wiring avoids moving parts and sharp edges.
1
SPEAKER INSTALLATION GUIDE MPS 1402C MB
The plug that connects the Midrange and Tweeter output signals.
2
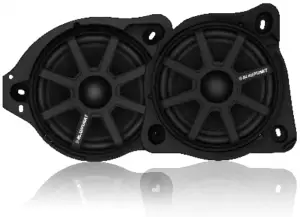
SPEAKER INSTALLATION GUIDE MPW 1801 MB
Connector with integrated crossover
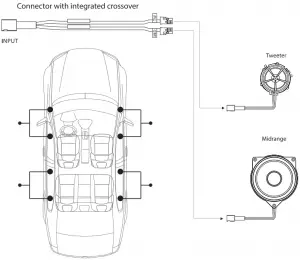
Connect the long wire “WE” Connect the short wire “WE”
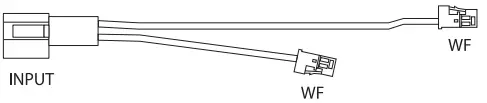

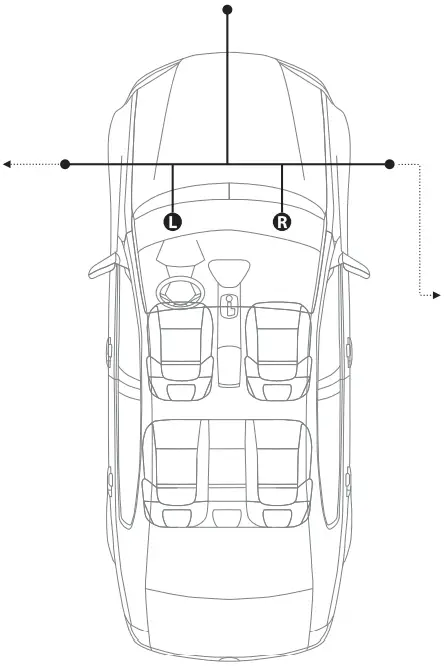
Subwoofer L Subwoofer R
3
TECHNICAL SPECIFICATIONS
Tweeter
Nominal impedance : 5.3Ω
Frequency response : 1500Hz-22KHz
Rated power : 25W
Maximum power : 50W
Sensitivity : 91dB
Midrange
Nominal impedance : 3.6Ω
Frequency response : 90Hz-10KHz
Rated power : 15W
Maximum power : 30W
Sensitivity : 89dB
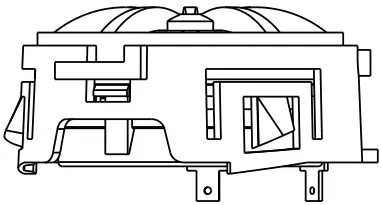
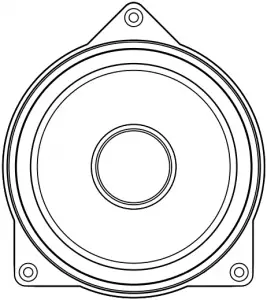
Subwoofer
Nominal impedance : 2Ω
Frequency response : 55Hz-2KHz
Rated power : 50W
Maximum power : 120W
Sensitivity : 86dB
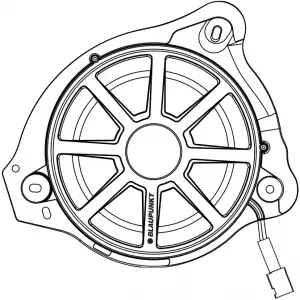
Subwoofer L Subwoofer R
4

Designed and engineered by Blaupunkt Competence Center
]]>

What is in box?

IMPORTANT NOTES
- To achieve the utmost in enjoyment and performance, and in order to become familiar with its features, please read this manual carefully before attempting to operate this product.
- Before using this device read the instruction manual and follow the instructions inside. The manufacturer is not liable for any damages caused by the misuse of this device due to inappropriate handling. Please keep this manual for future reference.
- This device is for domestic use only. Do not use for any other purposes.
- The device should only be connected to an earthed socket with values corresponding to the values on the rating label.
- It is necessary to check, if total current consumption of all devices plugged into the wall outlet does not exceed the fusain the circuit.
- If you are using an extension cord, make sure that the total power consumption of the equipment plugged into the extension cord does not exceed the extension cord power rating. Extension cords should be arranged in such a way as to avoid tripping hazards. Make sure the cable is grounded, 3- cores with a socket and an earth cable.
- Do not let cord hang over edge of counter, or touch any hot surface.
- The device is not designed to be controlled via an external timer, separate remote control, or other equipment that can turn the device on automatically.
- Before maintenance work always disconnect the unit from the power supply. When unplugging the power cord from electrical outlet, hold it by the plug only and remove the plug carefully. Never pull SMS401 2 the cable as it may cause damage to the plug or power cord. Damage to the power cord or plug can lead to an electrocution hazard.
- Never leave the product connected to the power source without supervision.
- Never put the power cable, the plug or the whole device into the water or any other liquids.
- The device should be cleaned regularly complying with the recommendations described in the section on cleaning and maintenance.
- Do not place the device near sources of heat, flame, an electric heating element or a hot oven. Do not place on any other device.
- This equipment can be used by children aged 8 years and over under as long as supervision is provided. People with reducedphysical or mental capabilities, as well as people with no previous experience of using this equipment must be supervised and made aware of the risks. The instruction manual should be used as a reference for the safe use of this equipment. Children should not play with the equipment. Children without ensured supervision should not be allowed to perform the cleaning and maintenance of equipment.
- Additional precautions should be taken when using this device in the presence of children or pets. Do not allow children to play with the device.
- Never use the product close to combustibles.
- Never expose the product to atmospheric conditions such as direct sun light or rain, etc… Never use the product in humid conditions (like bathroom or camping house).
- The power cable should be periodically checked for damage. If the power cable is damaged the product should be taken SMS401 3 to a professional service location to be fixed or replaced to prevent any hazards from arising.
- Never use the product with a damaged power cable or if it was dropped or damaged in any other way or if it does not work properly. Do not try to repair the defected product by yourself as it can lead to electric shock. Always return the damaged device to a professional service in order to repair it. All the repairs should only be performed by authorized service professionals. Any attempted unauthorized repairs performed can be a hazard to the user.
- Only Original accessories should be used, as well as accessories recommended by the manufacturer. Using accessories which are not recommended by the manufacturer may result in damage of the device and may render the device unsafe for use.
- Due to the high temperature caution is needed when removing cooked food, removal of hot grease or other hot liquids. The appliance can emit hot steam during operation.
 This appliance has heating function. Surfaces, also different than the functional surfaces can develop high temperatures. The appliance shall be touched only at intended handles and gripping surfaces and protective gloves are recommended (like kitchen gloves)
- Before storing, let the appliance cool down.
- Do not put into the appliance any products made of cardboard, paper, plastic materials or any other flammable or meltable objects.
- Do not move the appliance during operation and after operation, before the appliance cool down.
- Do not use metal utensils or sharp kitchen tools because they SMS401 4 may damage the non-stick coating of the plates.
 Device is compliant with EU directives:
– Low voltage directive (LVD)
– Electromagnetic compatibility (EMC)
Device marked CE mark on rating label
 When this crossed-out wheeled bin symbol is attached to a product it means that the product is covered by the European Directive 2012/19/EU. Please inform yourself about the local separate collection system for electrical and electronic products. Used appliance should be delivered to the dedicated collecting points due to hazardous components, which may affect the environment. Do not dispose this appliance In the common waste bin.
Environmental information
All unnecessary packaging has been omitted. We have tried to make the packaging easy to separate into three materials: cardboard (box), polystyrene foam (buffer) and poly ethylene (bags, protective foam sheet). Your system consists of material which can be recycled and reused if disassembled by a specialized company. Please observe the local regulations regarding the disposal of packaging materials, exhausted batteries and old equipment.
 Your products is designed a manufactured with high quality materials and components, which can be recycled and reused.
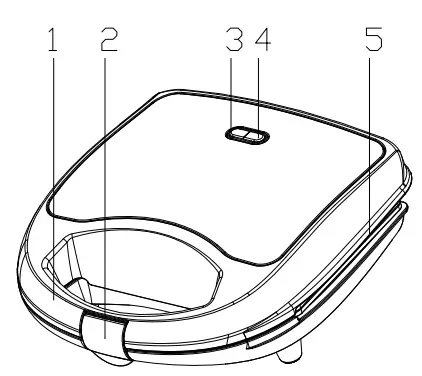
- Lid
- Buckle
- Power indicator
- Thermostat indicator
- Plates
BEFORE FIRST USE
- Remove all the cardboards, papers, foils which secure the appliance and it’s parts. It is recommended to turn on the device first to „burn it out”. Keep the appliance operate for few minutes to get rid of manufacturing odour. Device could emit some smoke. That’s normal.
- Clean the device with suggestion mentioned in chapter CLEANING AND MAINTENECE.
USING THE DEVICE
Prepare all ingredients.
- Connect the device to the mains. Power indicator and thermostat indicator will light up. Device will start to heat up.
- When thermostat indicator will go off, appliance reaches high temperature and it is ready to work.
- Place the ingredients evenly over the bottom heating plate.
- Close the lid
- During operation the thermostat control light will light up and down. Thermostat will keep the optimal temperature.
- The cooking time is usually from 5 to 15 minutes, depends on the ingredients used and the taste preferences.
CLEANING AND MAINTENANCE
- Before cleaning, disconnect the plug from mains and wait until device cool down.
- Clean with dump cloth, then dry with dry cloth or paper towel.
- To clean stubborn remains spread a small amount of cooking oil, and after a few minutes, gently
remove it with a wooden spatula. - Do not clean the heating plates with sharp, abrasive cloths or sponges, or use scouring powder
because they can damage the smooth non-stick coating of the plates. - Do not immerse device in water.
Instruction Manual

TRUE WIRELESS
BTW-01

Welcome to use this True Wireless Bluetooth headset, BTW-01. Please read this user’s manual carefully before use.
Brief introduction
BTW-01 is a True Wireless Bluetooth Headset, each earpiece comes with a Microphone that can be used individually or used together for stereo sound. The headset supports music and calling functions, as well as touch-sensitive playback and pause control.
Before Use
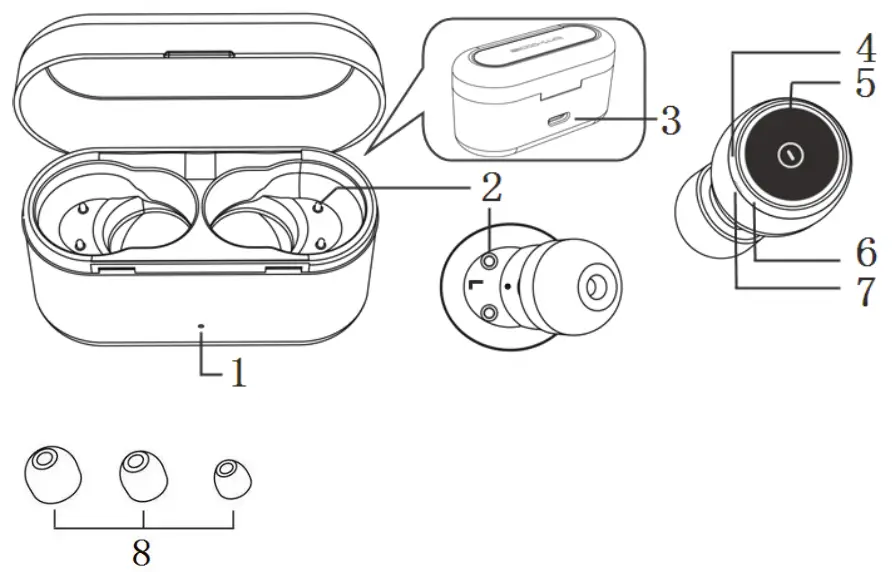
Overview

| 1 | Charging indicator light | 5 | MFB touch-button |
| 2 | Charging metal contact | 6 | LED indicator (blue) |
| 3 | Charging jack | 7 | Microphone |
| 4 | LED indicator (red) | 8 | Big/medium/small Ear tips |
Charging for headset
When the headset is low on power, the headset emits”Battery low”once every 2 minutes and the red Led flashes slowly four times every 1 minute. Please recharge the battery of the headset.
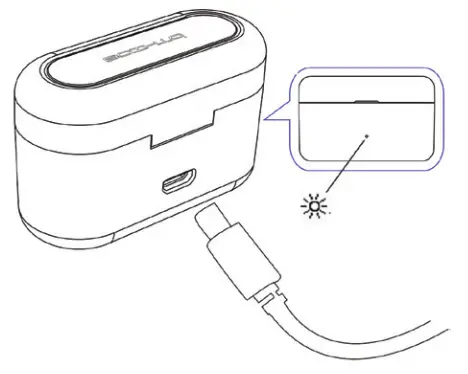
The way of charging for the earbuds as following: Using USB cable
- Put the earbuds into the charging case to ensure that the charging device connect well, and start charging when you see the red indicator light of the earbuds on. Red light on: Charging Red light off: Finish charging
- Charging should be completed in roughly 1.5 hours.
Remarks:
• The left and right earbuds on charging case of an arbitrary charge can be charged. • Please cover the charging case cover, so that the earbuds and the charging case connect well when it is charging. - Charging for charging case
When any of the following situations occurs during the use, it indicates that the charging case has gone into sleep mode with low power. You need to charge the charging case:
1) After putting the earphone into the charging case, the earphone will not automatically shut down or turn on the red light.
2) During charging, the headset suddenly turn on automatically.
3) Removing the earbuds from the charging case will not automatically turn on.
The way of charging for the charging case as following:
Using USB cable
1) Plug the micro USB charging cable into the case’s charging jack.
2) Plug the USB cable into a USB port of PC or a 5Volt USB charge. Red light on: Charging Red light off: Finish charging
3) Charging should be completed in roughly 1.5 hours.
4) If the earbuds are in the charging case, it can charge the earbuds while charging the charging case.
 Remarks:
1) The battery is recyclable.
2) Batteries (battery pack or batteries installed) shall not be exposed to excessive heat place, such as sunshine, fire or the like.
3) Please make sure the charging jack is dry before charge.
Getting Started
Wearing headset
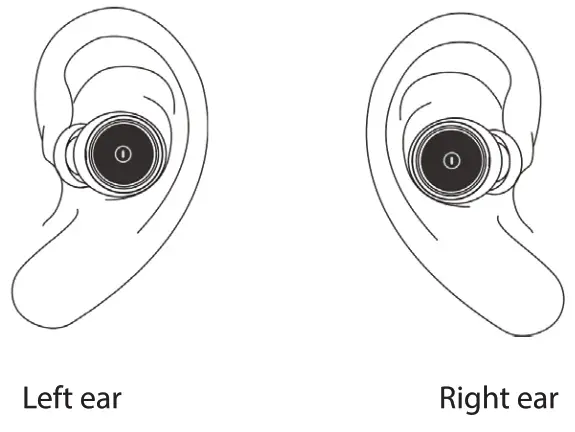
a. Choose the suitable size ear tips
b. Ensure each earbud is worn on the correct ear. “L” should be worn on the left ear and “R” worn on the right ear.
One earbud connecting with cellphone
Each earbuds can be worn singly as Bluetooth headset.
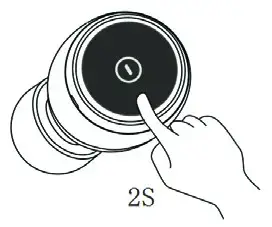
- Power on
1) When charging, the earbuds will turn on automatically when they are taken out of the charging case.
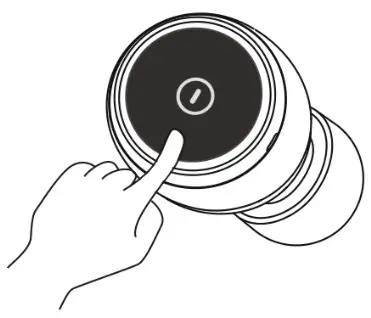
2) Press touch button for about 3s until blue LED flashes as the same time the headset emits”Power on”.Then release. This is now in the “Power on”state. - Pairing
1) Press the touch-button for about 5s and release it when the red LED and blue LED flash quickly and alternately. The earbuds are in”Pairing” mode
2) When the earbuds and the cellphone fails to connect back, the earbuds will automatically enter the matching state.
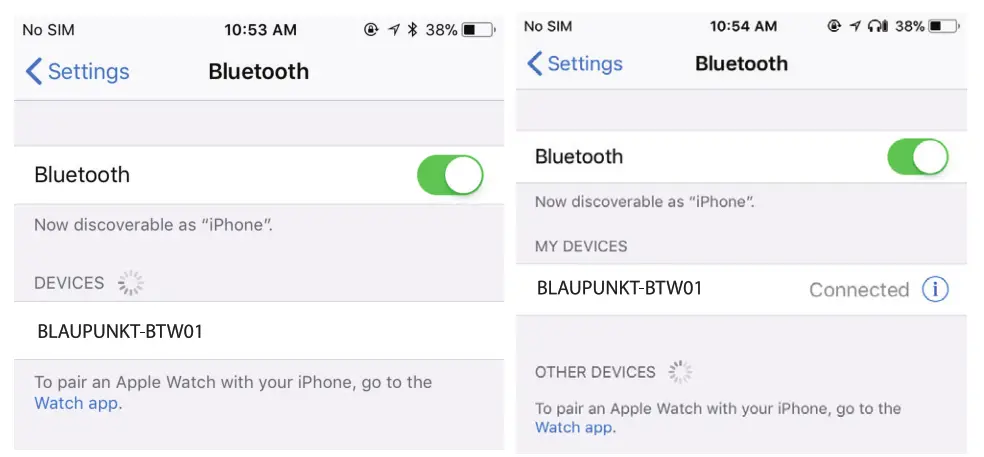
Connecting
To connecting your headphone to a Bluetooth device, first, ensure the device has Bluetooth enable and it is in pairing mode (See your device manual for setting pairing mode). Then put your headphones into pairing mode by pressing the power button until the LED light flashes red and blue alternatively.
Once your headphones are in pairing mode, you should be able to see it in the list of Bluetooth devices.
You should see BLAUPUNKT-BTWO1-L for left earbuds and BLAUPUNKT-BTWO1-R for the right earbuds appear in your contactable devices list.
You need to connect both to use them as a stereo headset. However, if you want to use them singly, only connect the desired ear L or R.
Power off
1) Auto power off once put into charging case
2) Press touch-button about 3s and release it till red LED is on, and earbuds prompt “Power off”.
Remark:
• The earbuds will automatically connect with the latest Bluetooth device when power on again. If the earbuds are not connected, they will enter into pairing mode automatically.
• Each earbuds will automatically switch to standby mode if disconnected from device (blue LED flash once every 2 seconds), and will power off automatically after 2 minutes to save power.
• The operation of single earbud is the same as that of double earbuds.
3. Two earbuds connecting with cellphone
In this mode use two earbuds at the same time to enjoy stereo sound.
 Turn on the main earbud (BTWO1-L) and connect it with you Bluetooth device,then power on the other earbud and it will connect with each other automatically.
Remarks:
• Pairing mode lasts for 2 minutes, the headsets will switch to power off mode if no device connected within that time.
• The headset will connected with the latest device and successfully paired automatically when powered on.
• If the headset is disconnected from the device beyond the distance, it will automatically power off after 5 minutes, and it will automatically connect when it returns to the effective distance within the first 3 minutes.
Earbuds pairing/connecting
Please use this step if two headset can not be connect with each other.
1.Turn off two earbuds respectively(don’t put them into the charging case).
2. Clear the pairing list: Choose one of the earbuds. Firstly, enter the pairing mode. Then hit the touch button 5 times, while the red light turns on for 1 second. The pairing list will be cleared when emits “Power off” after a “clang” prompt. The other headset cleans the pairing list by doing the same.
 3. The earbuds will enter TWS pairing mode automatically when they are turned on (indicator light status: red and blue lights flash slowly). After successful connection, the master earbud(L) will emits connected and ‘Pairing’, which indicator light status will be: red LED and blue LED flash alternately(it keeps waiting to be paired with your phone), while the secondary earbud(R) will emits connected and indicator status will be: blue LED flash twice time every 10 seconds.
Remarks:
• In normally the two earbuds will connect automatically once you have taken out of the charging case,which set in factory.
• You can connect the two earbuds according above operation if they failed connecting.
• TWS mode : Only left earbuds can be the master one, which can connect the right earbuds and the phone’s Bluetooth at the same time. When the right earbuds connect with left earbuds in the TWS mode, it cannot connect with the phone’s Bluetooth.
Function operation-use one earbud
a. Answering /rejecting phone calls
When calling (blue LED quick flash), clicking the touch button once will answer the call. Clicking the touch button a second time will hang up the call.
Tap touch button to answer/reject a call
b. Reject calling
When your paired phone rings (blue LED quick flash), long press the touch button and release to reject the call. You will hear an audio confirmation tone.
 Long press touch button about 2s to reject a call
c. Voice assistant
After connecting your headphone with a Bluetooth compatible music player (blue LED flash twice every 10s), triple clicking the touch button (prompt’Voice dial’) will actively voice assistants like Siri

Triple-click the touch button to active voice assistant
d. Transfer conversation between earbuds and mobile phone
Transfer conversation to mobile phone : During a call , long-press the touch button about 2 second while you will hear a ‘dang’ tone. Long press the touch button again to Transfer conversation to earbuds.

Long press touch button about 2s
e. Playing/Pause
After connecting your headphone with a Bluetooth-compatible music player, double clicking the touch button will play music, double clicking again will pause playback.
Double click
f. last song
Pressing the left earbud’s touch button for about 2s while playing music. (There is only the operation of previous song but no the operation of next song when you use the left earbud only)
Long press left touch button about 2s
g. Next song
Pressing the right earbud’s touch button for about 2s while playing music. (There is only the operation of next song but no the operation of previous song when you use the right earbud only)

Long press right touch button about 2s
Function operation- use two earbuds connecting with cellphone
Music and voice of operation are same for one earbud or two earbuds.
a. If two earbuds connect with a cellphone,one of earbuds power off, the other one will power off also.
b. If two earbuds connect with a cellphone,operate any one earbud can control playing/pause/next song/answering /rejecting phone calls and voice assistant.
Remarks:
•If headset in calling mode, both earbuds have voice and can operate function, but only the earbud which connecting with cellphone can pick up sound.
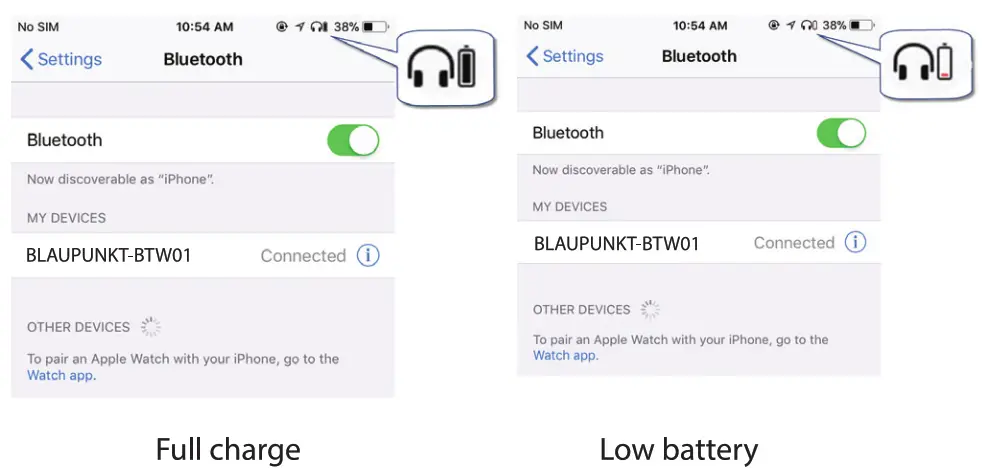
Battery display
When the earbuds are connected to an 105 device, it will display the battery of earbuds on the device. When the earbuds is low on power, the battery indicator will turn red and show a depleted battery icon. The headphone will also give an audio prompt to charge your headset.
Prompt tone
| Status of headset | Prompt tone |
| Connect with phone | ‘Phone connected’ |
| TWS connection | ‘Connected ‘ |
| Low battery | Emits “Battery Low” every 2 minutes |
| Headset out of range | Emits “Out of rang ” only once |
| Other earphone is out of range | Emits “Out of rang ” only once |
Factory Reset
When the earbuds are in the pairing mode, five times click the touch button, and the factory reset when the red light turns on for 1 second. At the same time, you will hear “Power off” prompt after a “clang” tone and turn off.
Five times click the touch button
Remarks:
- After factory reset, the paired list of two earbuds as well as earbuds and mobile phone will be deleted. The earbud does not automatically reconnect the mobile phone and the other earbud after turning on.
- After factory reset, when the earbud turns on again, it will automatically enter the TWS pairing mode (red and blue lights flash slowly). Two earbuds will be paired automatically. After TWS connection, left earbuds will continue to wait for pairing with the mobile phone (red and blue lights flash alternately).
Care and maintenance
Read the following recommendations carefully before using BTW-01. Following these, you will be able to enjoy this product for many years.
- Keep it dry and don’t put it in the dump place to avoid the product’s internal circuit being affected. Don’t wear the headset when in strong exercise to avoid sweat enter.
- Keep the product away from direct sunlight or hot places. High temperatures will shorten the life of electronic devices, destroy the battery or distort certain plastic parts.
- Don’t expose the product to cold areas. It may damage the internal circuit board.
- Don’t try to disassemble the product as it may get damaged if you are not professional.
- Don’t let it fall down onto the floor or other hard surfaces. The internal circuit might get damaged.
- Don’t use intensive chemical products or detergents to clean the product.
- Don’t scratch the surface with sharp things.
- Don’t use this product during strenuous exercise. It may get damaged by sweat.
In case the product doesn’t function properly, send it to the store you bought it. The staff will help you to solve the problem.
FAQs
- What does it mean when a red LED flashes four times every one minute slowly? Battery is low power, needs to be recharged.
- Why is the red LED off when charging? a) The charging case may not have enough power to charge the headset. Please charge the charging case. b) Make sure the metal contacts of the earbud and charging case are free of obstacles. c) The battery may dry up. Please charge the battery for 30 minutes, and then the red LED will be on.
- Why can’t I hear the sound on the headset? a) Make sure the volume is not too low or muted; b) Make sure the headset connects with the mobile phone correctly; c) Make sure the distance between the headset and the cell phone is in the available Bluetooth range.
- Why can’t I hear the sound clearly on the headset? a) Make sure the mobile phone is in the strong signal area; b) Make sure the headset is in the available range. and no other block0
- Why the pause/play, last/next song not function when playing music? Make sure your Bluetooth device supports AVRCP (AudioNideo Remote Control profile)
Specifications
| Bluetooth version | Bluetooth V5.0 |
| Bluetooth profiles | HFP, HSP,A2DP and AVRCP |
| Operating distance | 10 meters |
| Music time(one earbud) | Up to 6.5 hours |
| Music time(two earbuds) | Up to 5 hours (maximum volume) |
| Up to 8.5 hours (50% volume) | |
| Talk time | UP to 6.0 hours |
| Standby time | About 130 hours |
| Charging time for earbud | About 1.5 hours |
| Charging time for case | About 1.5 hours |
| Charging input | DC 5.0V /500mA |
| Weight | One earbud:5.5 g |
| Charging case:29g | |
| Measure | Earbud:23.5*17.2*24.7mm |
| Charging case:58*25 36mm |
Warranty Information 1 Year*
If you have issue with our BTW-01 product please contact our service center.
Authorized Service Center Blaupunkt Speakers
Address: Envent World Wide Pvt. Ltd.,
Khasra No- 15/15 (4-16), Village Samalkha, Tehsil Vasant Vihar, New
Delhi-110037. E-Mail: [email protected]
Tel: 1800 843 4333
Please prepare and submit the following information during the telephone or e-mail notification to facilitate the process:
– Serial number – Date of purchase
– A copy of proof of purchase in case of warranty
Note – Important information:
Please use the original packaging or another suitable packaging to protect the unit in transit.
Instruction Manual
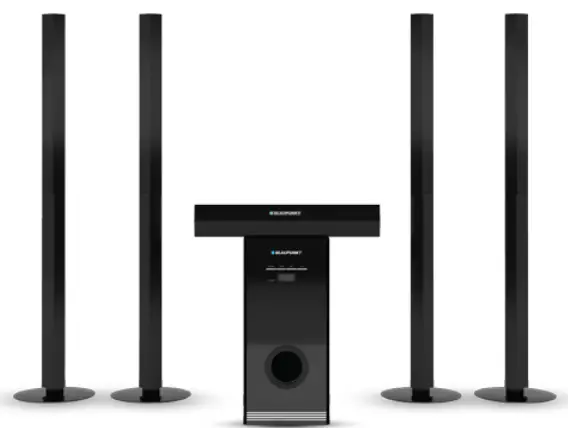
5.1 CH SOUNDBARSBW500
SBW500
Product description
The product is a 5.1 channel home theater system with high performance / high power /acoustic field location accuracy.
Model Name: Blaupunkt SBW500 (SKU-TV LS 275-5)
With PCM decoding and real surround sound eect.
2.4 GHz wireless for rear speakers.
Modern design / Easy to install / Remote control operation.
Important Safety Instructions
Important Safety Instructions
Caution:
To reduce the risk of electric shock, do not dismantle the product and do not expose the apparatus to rain or moisture. No user-serviceable parts inside. Refer servicing to
qualified personnel only.
Explanation of Graphical Symbols:
The lightning flash within an equilateral triangle is intended to alert you to the presence of uninsulated dangerous voltage within the product’s enclosure that may be of sufficient magnitude to constitute an electric shock to a person or persons.
The exclamation point within an equilateral triangle is intended to alert you to the presence of important operating and maintenance (servicing) instructions in the literature accompanying the product.
To achieve the utmost in enjoyment and performance, and in order to become familiar with its features, please read this manual carefully before attempting to operate this product. This will assure you years of trouble-free performance and listening pleasure.
Important Notes
- Safety and operating instruction manual should be retained for future reference.
- The apparatus should not be exposed to dripping or splashing or placed in a humid atmosphere such as a bathroom.
- Do not install the product in the following areas:
- Places exposed to direct sunlight or close to radiators.
- On top of other stereo equipment that radiates too much heat.
- Blocking ventilation or in a dusty area.
- Areas where there is constant vibration.
- Humidor moist places.
- Do not place near candles or other naked flames.
- Operate the product only as instructed in this manual.
- Before turning on the power for the first time, make sure the power adaptor is properly connected.
For safety reasons, do not remove any covers or attempt to gain access to the inside of the product. Refer any servicing to qualfied personnel.
Do not attempt to remove any crews, or open the casing of the unit; there are no user-serviceable parts inside. Refer all servicing to qualified service personnel.
Safety Instructions
- Read Instructions – All the safety and operating instructions must be read before the product is operated.
- Retain Instructions – The safety and operating instructions should be kept with the product for future reference.
- Heed warnings – All warnings on the product and in the operating instructions should be adhered to.
- Follow instructions – All operating and users’ instructions should be followed.
- Installation – Install in accordance with the manufacturer’s instructions.
- Power sources – This product should be operated only from the type of power source indicated by the marking adjacent to the power cord entry. If you are not sure of the type of power supply to your home, consult your product dealer or local power company.
- Grounding or polarization – the product is not required to be grounded. Ensure that the plug is fully inserted into the wall outlet or extension cord receptacle to prevent lade or pin exposure. Some versions of the product are equipped with a power cord fitted with a polarized alternating line plug (a plug having one blade wider than the other). This plug will fit onto the power outlet only one way. This is a safety feature. If you are unable to insert the plug fully into the outlet, try reversing the plug. If the plug should still fail oft, contact your electrician to replace your obsolete outlet. Do not defeat the safety purpose of the polarized plug. When using an extension power-supply cord or a power-supply cord other than that supplied with the appliance, it should be fitted with the appropriate molded plugs and carry safety approval appropriate to the country of use.
- Power cord protection – Power-supply cords should be routed so that they are not likely to be walked on, kinked or pinched by items placed on or against them, paying particular attention to cords from plugs, receptacles and the point where they exit from the product.
- Overloading – Do not overload wall outlets, extension cords, or multiple sockets, as this can result in a risk of fre or electric shock.
- Ventilation – The product must be properly ventilated. Do not place the product on a bed, sofa, or another similar surface. Do not cover the product with any items such as tablecloths, newspapers, etc.
- Heat – The product should be situated away from heat sources such as radiators, heat registers, stoves, or other products, including amplifiers that produce heat. No naked flame sources, such as lighted candles, should be placed on the apparatus.
- Water and moisture – To reduce the risk of fire or electric shock, do not expose the product to train, dripping, splashing, or excessive moisture such as in a sauna or bathroom. Do not use this product near water, for example, near a bathtub, washbowl, kitchen sink, laundry tub, in a wet basement or near a swimming pool (or similar).
- Object and Liquid Entry – Never push objects of any kind into this product through openings, as they may touch dangerous voltage points or short-circuit parts that
could result in a fire or electric shock. Never spill liquid of any kind on the product. Do not place any object containing liquid on top of the product. - Cleaning – Unplug the product from the wall outlet before cleaning. Dust in the woofer may be cleaned with a dry cloth. If you wish to use an aerosol cleaning spray, do not spray directly on the cabinet; spray onto the cloth. Be careful not to damage the drive units.
- Attachments – Do not use attachments not recommended by the product
manufacturer, as they may cause hazards. - Accessories – Do not place this product on an unstable cart, stand, tripod, bracket, or table. The product may fall, causing serious injury to a child or adult, and serious damage to the product. Use only with a cart, stand, tripod, bracket, or table recommended by the manufacturer or sold with the product. Any mounting of the product should follow the manufacturer’s instructions and should use a mounting accessory recommended by the manufacturer.
- Moving the product – A product and cart combination should be moved with care. Quick stops, excessive force, and uneven surfaces may cause the product and cart
combination to overturn. - Unused periods – The power cord of the appliance should be unplugged from the outlet during lightning storms or when the apparatus is left unused for a long
period of time. - Servicing – Do not attempt to service this product yourself, as opening or removing covers may expose you to dangerous voltage or other hazards. Refer all servicing to
qualified service personnel. - Please remove the power plug from the main power source or wall power source when not in use. When plugged into a power source, the system is in standby mode,
so the power is not entirely cut off. - Replacement parts – When replacement parts are required, ensure that the service technician has used replacement parts specified by the manufacturer or have the same characteristics as the original part. Unauthorized substitutions may result in fire, electric shock, or other hazards.
- Mains fuses – For continued protection against fire-hazard, use fuses only of the correct type and rating. The correct fuse specification for each voltage range is marked on the product.
- Do not turn up the volume while listening to a section with very low-level inputs or no audio signals. If you do, the speaker may be damaged when a peak level section is suddenly played.
- The only means of completely disconnecting the product from the power supply is by removing the power cord from the wall outlet or the product. The wall outlet or the power cord entry to the product must remain freely accessible at all times while the product is in use.
- Try to install the product near a wall socket or extension cord and shall be easily accessible.
- The highest environmental temperature suitable for this product is 35°C.
- ESD hints – If the product may be reset or not reset to the operation of control due to electrostatic discharge, just switch of and reconnect again, or move the product to another location.
- Battery
- The batteries must not be exposed to excessive heat such as sunshine, fire or the like.
- The batteries should be drawn to the environmental aspects of the battery disposal.
- Battery usage CAUTION-to prevents battery leakage which may result in bodily injuries, property damage, or damage to the apparatus:
- Install all batteries correctly, + and – as marked on the apparatus.
- Do not mix batteries (old and new or carbon and alkaline, etc.)
- Remove batteries when the unit is not used for a long time.
ERP 2- (Energy Related Products Directive) note:
This product with ecodesign complies with the Stage 2 requirements of the Commission Regulation (EC) NO. 1275/2008 implementing Directive 2009/125/EC regarding to standby and of mode electric power consumption of electronic household and office equipment. After 15 minutes without any audio input, the system will automatically switch into standby mode. Follow up the instruction manual to resume the operation.
Important note:
This device is equipped with an energy-saving mode: if no signal is given during 15 minutes the device will switch automatically into standby mode in order to save energy (ERP 2 standard). Please note that low volume setting in the audio source may be recognized as “no audio signal” : this will afect the capability of signal detection from the device and can also originate an automatic switch into standby mode. If this happens please reactivate the audio signal transmission or increase the volume setting on the audio source player (DVD player, TV, etc.), in order to resume playback. Please contact the local service center if the problem remains.
Warning
This appliance is not intended for use by persons (including children) with reduced physical sensory or mental capabilities, or lack of experience and knowledge unless they have been given supervision or instruction concerning the use of the appliance by a person responsible for their safety. Children should be supervised to ensure that they do not play with the appliance.
- To prevent possible hearing damage, do not listen at high volume levels for long time periods respectively a sudden high volume level.
- Never use the device unsupervised! Switch of the device whenever you are not using it, even if this is only for a short while.
- The appliance is not intended to be operated by means of an external timer or separate remote control system.
- If the supply cord is damaged, it must be replaced by the manufacturer, its service agent or similarly qualified persons in order to avoid a hazard.
- Before operating this system, check the voltage of this system to see if it is identical to the voltage of your local power supply.
- The unit should not be impeded by covering the ventilation opening with items such as newspaper, tablecloths, curtains, etc. Make sure that there is at least 20 cm of space above and at least 5 cm of space on each side of the unit.
- The apparatus must not be exposed to dripping or splashing and that objects flledwith liquids, such as vases, must not be placed on the apparatus.
- To prevent fre or shock hazards, do not expose this equipment to hot places, rain, moisture, or dust.
- Do not locate this unit near any water sources e.g. taps, bathtubs, washing machines, or swimming pools. Ensure that you place the unit on a dry, stable surface.
- Do not place this unit close to a strong magnetic feld. Do not place the unit on an amplifier or receiver.
- Do not place this unit in a damp area as the moisture will fect the life of electric components.
- If the system is brought directly from a cold to a warm location or is placed in a very damp room, moisture may condense on the lens inside the player. If this occurs, the
system will not operate properly. Please leave the system turned on for about an hour until the moisture evaporates. - Do not attempt to clean the unit with chemical solvents as this might damage the .fnish. Wipe with a clean, dry or slightly damp cloth.
- When removing the power plug from the wall outlet, always pull directly on the plug, never pull on the cord.
- Depending on the electromagnetic waves used by a television broadcast, if a TV is turned on near this unit while it is also on, lines might appear on the TV screen.
Neither this unit nor the TV is malfunctioning. If you see such lines, keep this unit well away from the TV set. - The mains plug is used as the disconnect device, the disconnect device must remain readily operable.
Subwoofer Front Panel – Controls and Functions
- STANDBY: Power Standby button.
INPUT: Audio input source selection button.
VOL-: Volume Downwards Adjustment button.
VOL+: Volume Upwards Adjustment button. - STANDBY: Subwoofer Standby Status indicator.
- Display Screen
Subwoofer Rear Panel – Controls and Functions

- Stereo 1 input
- Stereo 2 input
- Coaxial 2 input
- AC Power cord
- Coaxial 1 input
- Optical input
- Front left speaker output
- Front right speaker output
- Center speaker output
- Power On/O switch
Remote Control – Controls and Functions
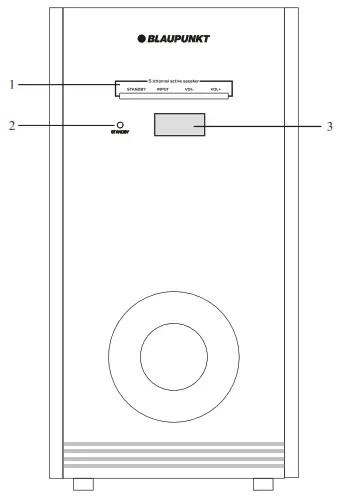
- STANDBY: Power Standby
- COAXIAL 1: coaxial 1 select button
- OPT: Optical input button
- ST1 Input button
- 2.1CH: 2.1 channel play mode button
- NORMAL: by-pass sound play mode
- VOL+: Main volume upwards adjustment
- SW-: SW volume downwards adjustment
- FR+: Front speaker volume upwards adjustment
- FR-: Front speaker volume downwards adjustment
- CEN+: center speaker volume upwards adjustment
- CEN-: center speaker volume downwards adjustment
- MUTE: mute function button for sound (silence)
- COA 2: coaxial 2 select button
- ST2 Input button
- 5.1CH: 5.1mode button.
- EQ: EQ model select button includes 6 eects (only available on 2.1 mode) Classic / Jazz / Rock / Pop / Ballad / Dance
- SW+: SW volume upwards adjustment
- RST: reset sound settings
- VOL-: Main volume downwards adjustment
- Rear+: rear speaker volume upwards adjustment.
- Rear-: rear speaker volume downwards adjustment.
SBW500
- Before using the remote control, please insert the correct type of batteries into the battery compartment.
- The remote control uses 2 x 1.5V/AAA batteries.
- Please insert the batteries as indicated below.
a. Remove the battery compartment cover.
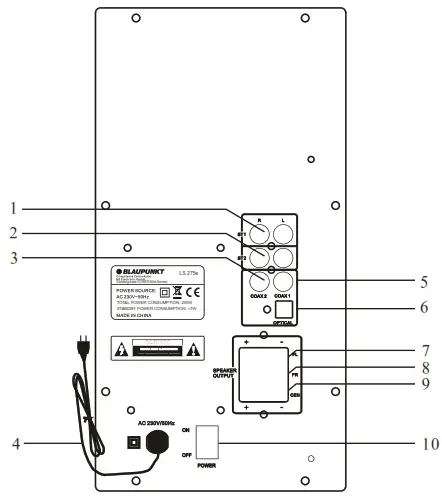
b. Insert 2 batteries as per the polarities marked inside the battery compartment.
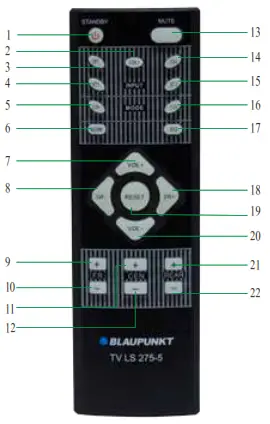
c. Close the battery cover.
- If the remote control does not work, please check the batteries or replace them with new batteries before consulting technical personnel.
Tower Speaker Assembly Drawing
The tower speakers are detachable. Please follow up on the below drawing for assembly.
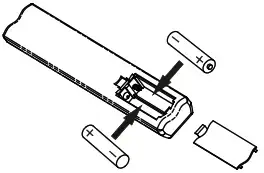
Placement Instructions
After Finishing the assembly of the tower speaker, please place the speaker system according to the below drawing. Please kindly note that the distance between both tower speakers shall be over 2.5m in order to get a better surround sound effect in 5.1 modes.
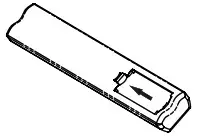
System Connection Instructions
Please use the speaker cable to connect the front tower speakers and center speakers with the subwoofer according to the below drawing.
Please make sure that the “Grey” color speaker cable is connected with the “Red” color terminal in “+” polarity, and that the “Black” color speaker cable is connected with
“Black” color terminal in “-” polarity on the rear panel of the subwoofer.
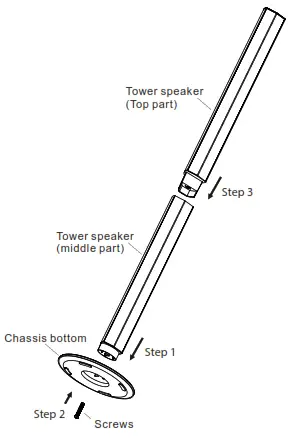
Digital Inputs and Analog Inputs Connection Instructions Connecting Subwoofer / DVD Player / TV Analog audio connect t Digital inputs
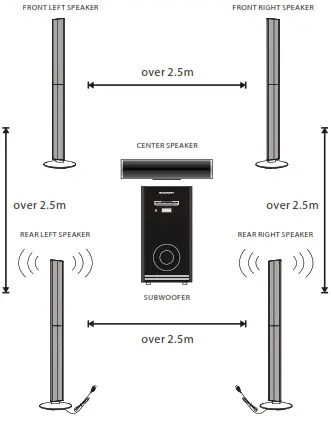
Analog inputs
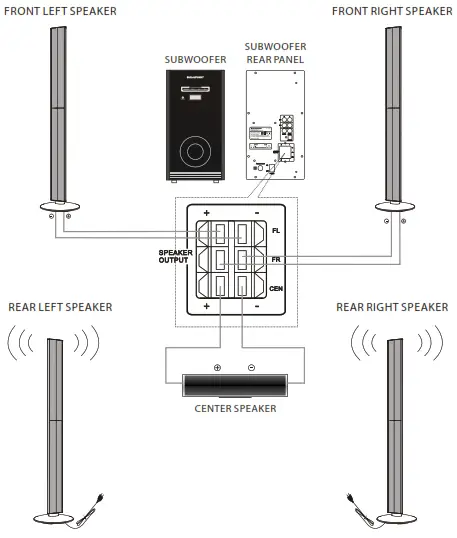
Wireless Pairing Operation Guide
Pairing wireless rear speakers
The speaker system has been already paired in the production line. Once you turn on the subwoofer and then turn on the rear wireless speakers the system will pair them automatically.
If the communication between the subwoofer and wireless speakers is not established automatically (synchronization failure or presence of several WiFi devices in the same area), there is no sound from the rear speaker. Please try and follow up below procedure for manual pairing.
- Turn oF the subwoofer and rear wireless speakers
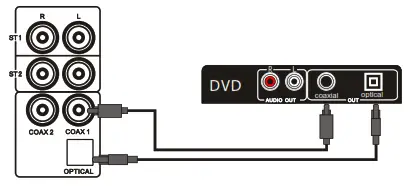
- Plug on AC power supply for subwoofer and rear wireless speakers. Switch on the subwoofer and press the “standby” button to power on the subwoofer. Switch on the rear left and right speakers within 20 seconds after power on the subwoofer.
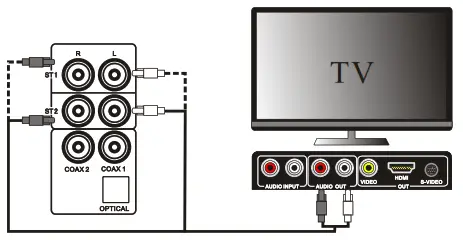
- After 30 seconds, the LED light on the rear speaker will in blue color: the system has
Finished the pairing. You can start enjoying the music.
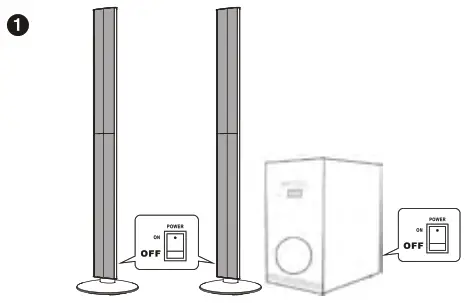
- After successful manual pairing, the system can memory the pairing, and can pair them automatically within 10~15 seconds the next time that you switch on.
Important Note:
a. Please make sure that you turn on both wireless rear speakers within 20 seconds after power-on subwoofer during the manual pairing procedure, otherwise, the pairing will fail.
b. If the wireless subwoofer can not access the soundbar pairing, or there is no output from the subwoofer due to frequency from other WiFi devices please try to switch off the soundbar and the subwoofer, and switch on again according to the above procedure. Or you can move it to another place for playing.
c. The LED light on the wireless speaker will show blue color after the wireless speakers have paired successfully with the subwoofer.
d. The LED light on wireless speakers will flash in blue and purple during the pairing process.
e. This product has been paired on the production line.
Operation Instructions
A. Switch On/O the Product
1. Before turning on the system, please connect it according to the System Connection Instruction.
2. Connect AC power for subwoofer and rear left/right speakers. (Caution: Power source must be consistent with this product.)
3. Press on the power switch button on the Rear Panel of the subwoofer to switch on the system, press it once again to switch o the unit.
4. Press on the power switch button on the rear panel of the rear tower speakers to switch on.
B. VOLUME
1. Press the Volume + button on the front panel of the subwoofer or VOL + button on the remote control to adjust property the sound volume.
2. Press the Volume – button on the front panel of the subwoofer or VOL – button on the remote control to adjust property the sound volume.
C. SUBWOOFER SPEAKER
1. Press SW + button on the remote controller to increase the subwoofer output.
2. Press the SW – button on the remote controller to decrease the subwoofer output.
D. FRONT SPEAKER
1. Press the FRONT + button on the remote control to increase the Front Speaker output.
2. Press the FRONT – button on the remote control to decrease the Front Speaker output.
E. CENTER SPEAKER
1. Press the CEN+ button on the remote control to increase the Center Speaker output.
2. Press CEN- button on the remote control to decrease the Center Speaker output.
F. REAR SPEAKER
1. Press the Rear + button on the remote control to increase the rear Speaker output.
2. Press the Rear – button on the remote control to decrease the rear Speaker output.
G. 2.1 CH PLAY MODE DECODER (PCM AND EQ SOUND EFFECT)
The speaker system supports PCM decode signal from a DVD player or TV. You can enjoy PCM sound effects from digital or analog inputs. Before start playing the music, please check and make sure that the digital output on the audio setup menu of your DVD player or TV is in the “PCM” position. Some TV or DVD players on the market do not have PCM output settings. In this case please follow the instruction manual of your DVD player or TV. On 2.1 ch output mode, you can press the “EQ” button on the remote controller for different sound eFects: Classic / Jazz / Rock / Pop / Ballad / Dance.
H. 5.1 CH PLAY MODE AND REAL SURROUND SOUND EFFECT
On digital and analog input mode, you can press the “5.1ch” button to switch to 5.1ch output. But the real surround sound effect is only possible to have via digital inputs (coaxial or optical). Before start playing the music and enjoying real surround sound effects, you need to check and make sure that the digital output on the audio setup menu of our DVD player or TV is on original source output position (like Dolby, AC-3, DTS, etc., depending on the DVD player and TV). For details please follow the instruction manual f our VD player or TV. Please kindly note that they also have 5.1ch output on analog input mode (ST1 and ST2). But there will not exist real surround sound eFect output, because there is only stereo signal input, not digital.
Adjust all output settings including VOLUME, SW, FRONT, CEN, REAR (if necessary) now to enjoy the wonderful and tremendous Home Theater eFFects.
I. MUTE
1. Press the MUTE button on the remote controller once to keep the performance silent.
2. MUTE on the front panel will then indicate ”UOO”.
3. Press it again to resume the performance.
J. RESET
Press the RESET button on the remote control and it will reset all settings including SW Speaker output, Front Speaker output, CENTER Speaker output, Rear Speaker output to factory default settings
Trouble Shooting
1. NO OUTPUT
(1). Check whether the system is connected correctly.
(2). Check whether the Volume is set at a minimum. Adjust it accordingly.
(3). Check whether the Audio Input is in PLAY mode.
(4). Check whether the volume on TV or DVD player is set property.
2. NO SOUND FROM FRONT LEFT SPEAKER
(1). Check whether the system is connected correctly with the Front Left speaker.
(2). Check whether the system is connected correctly with the audio source.
3. NO SOUND FROM FRONT RIGHT SPEAKER
(1). Check whether the system is connected correctly with the Front Right speaker.
(2). Check whether the system is connected correctly with the audio source.
4. NO SOUND FROM CENTER SPEAKER
(1). Check whether the system is connected correctly with the Center speaker.
(2). Check whether the system is connected correctly with the audio source.
(3). Check whether 2.1CH is selected as audio output.
5. NO SOUND FROM REAR SPEAKER
(1). Check whether the system is connected correctly with the Rear speaker.
(2). Check whether the system is connected correctly with the audio source.
(3). Check whether 2.1CH is selected as audio output.
(4). Check whether 5.1CH is selected as audio output.
6. CAN NOT GET REAL SURROUND SOUND EFFECT
(1). Check whether the system is on 5.1 play mode.
(2). Check whether the input mode is on digital input coaxial and optical.
7. THE REAR SPEAKER CAN NOT PAIR WITH THE SUBWOOFER AUTOMATICALLY AFTER POWER ON
(1). Please follow up on the manual pairing for operation again.
(2). Please contact the local service center for support.
8. CAN NOT ENJOY REAL SURROUND SOUND CAN ENJOY
(1). Please check whether the DVD/TV output signal setting is on “AC-3” and “Dolby” mode.
(2). Please check whether the input audio signal is from coaxial or optical.
Specifications
1.Power Supply: AC 230V/50Hz
2.Total Power Consumption: 200 Watt
3. Input Sensitivity (Subwoofer): 550 mV ±50 mV
4. Input Sensitivity (Satellite): 700 mV ±50 mV
5.Front Speaker Impedance: 4 Ohm
6.Center Speaker Impedance: 8 Ohm
7.Subwoofer Speaker Impedance: 4 Ohm
8.Rear Speaker Impedance: 4 Ohm
9. S/N (A Weight) : 76 dB
10.Subwoofer Power Output: 80 Watt
11. Front Speaker Power Output: 20 Watt x 2
12. Center Speaker Power Output: 40
13. Rear Speaker Power Output: 20 Watt x 2
14. THD (1kHz, 1W) : 0.5%
15. Frequency Response: 40 Hz ~ 20 kHz±5 dB
16. L/R Separation (1kHz): 30 dB
17. L/R Balance (Stereo): ±2 dB
18. Power consumption in standby mode: < 1 Watt
19. Power consumption in on mode: 200 Watt
Packing contents:
| 1. Subwoofer | x 1 pc |
| 2. Center speaker | x 1 pc |
| 3. Tower speaker | x 4 pcs (8 separate pieces) |
| 4. Classic base stand | x 4 pcs |
| 5. Remote control | x 1 pc |
| 6. Speaker cable | x 3 pcs |
| 7. Instruction manual | x 1 pc |
| 8. Warranty card | x 1 pc |
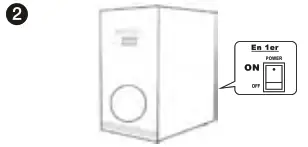 This symbol on the product or in the instructions means that your electrical and electronic equipment should be disposed at the end of its life separately from your household waste.
WARRANTY INFORMATION 1 YEAR*
If you have an issue with our SBW500 product please contact our service center. Authorized Service Center Blaupunkt Speakers
Address: Event World Wide Pvt. Ltd.,
KH NO-96/2, Village-Bamnoli, Sector-28, Dwarka, Bamnoli West, Delhi – 110077
E-Mail: [email protected]
Tel: 1800 843 4333
Please prepare and submit the following information during the telephonic or e-mail notification to facilitate the process:
– Serial number
– Date of purchase
– A copy of proof of purchase in case of warranty
Note – Important information:
Please use the original packaging or another suitable packaging to protect the unit in transit.