D-Link Nuclias Cloud-Managed Wave 2 Outdoor Access Point Installation Guide
Quick Installation Guide Nuclias Cloud-Managed Wave 2 Outdoor Access Point / Guide
This document will guide you through the basic installation process for your new D-Link Nuclias Cloud-Managed Access Point. / Ce document vous guidera tout au long de la procédure
d’installation de votre nouveau point d’accès D-Link Nuclias Cloud-Managed
About This Guide
This installation guide provides basic instructions for installing the DBA-3620P Nuclias Cloud- Managed Wave 2 Outdoor Access Point on your network. For additional information about how
to use the Access Point, please see the User Manual, which is available on the D-Link support website.
Before You Begin
This installation guide provides instructions for installing the DBA-3620P on your network. Additional documentation is also available on the D-Link support website.
- D-Link Nuclias User Manual: For additional information and instructions on how to configure the device using D-Link Nuclias Cloud.
System Requirements
- Windows®, Macintosh®, or Linux-based operating system
- Ethernet port or installed Ethernet adapter
- Internet Explorer 11, Safari 7, Firefox 28, Google Chrome 33 or higher
Unpacking the Product
Open the shipping carton and carefully unpack its contents. Please consult the packing list below to make sure all items are present and undamaged. If any item is missing or damaged, please contact
your local D-Link reseller for a replacement.
- DBA-3620P Nuclias Cloud-Managed Wave 2 Outdoor Access Point
- Shielded Cat 5E Ethernet Cable
- Mounting Ties (Qty. 2)
- Wall Mount Base
- Console Cable
- Grounding Wire
Note: To power the DBA-3620P, please use any D-Link IEEE 802.3at/af-compliant PoE switch or the D-Link DPE-311GI PoE injector.
Optional Accessories
– PoE Injector (Model: DPE:311GI)
Note: These accessories are not included in the package. If any of these items are required, please contact your reseller to order it.
Hardware Overview
LEDs
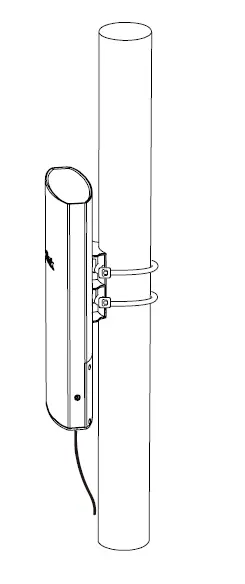
Figure 1. DBA-3620P LEDs
LED |
Status |
Description |
| Power/ Cloud | Solid Orange | Device is performing startup procedure |
| Blinking
Orange |
Device is resetting to
its default settings or it is upgrading its firmware |
|
| Solid Green | Device is currently in
cloud mode |
|
| Blinking Green | Device is trying to connect to D-Link Nuclias Cloud | |
| Solid Red | Device is not working
properly in cloud mode |
|
| LAN
(PoE in) |
Solid Green | Link Present |
| Blinking Green | Sending or receiving data packets | |
| Light Off | Link down or
unplugged |
|
| WLAN (2.4GHz
/5 GHz) |
Solid Green | Device Ready |
| Blinking Green | Sending or receiving packets | |
| Light Off | Radio off/ device is
undergoing boot process |
Interfaces
Figure 2. DBA-3620P Rear Panel
* DBA-3620P can be powered via PoE from LAN (PoE)
** A manual reboot is needed when switching from internal to external antennas, and vice versa.
*** (Optional) RP-SMA connectors for external 2.4/5 GHz dual-band antennas.
*** For external antennas, the toggle switch must be switched to EXT ANT
Configuring the Access Point
Using D-Link Nuclias
Note: To use D-Link Nuclias, the DBA-3620P must be connected to the Internet.
The DBA-3620P is designed to be managed through
D-Link Nuclias Cloud. Refer to the D-Link Nuclias User Manual for detailed configuration instructions.
Figure 3: Connecting through D-Link Nuclias
- On an Internet-connected PC, open a web browser and go to www.nuclias.com.
- Enter your D-Link Nuclias user name and password.
Manual Configuration
Note: D-Link recommends manually configuring the device before mounting it. If you are unable to connect to D-Link Nuclias Cloud,
you may need to manually configure the DBA-3620P using its web user interface (UI). Refer to the D-Link
NucliasUser Manual for detailed configuration instructions. Use one of the following methods to access the web user interface:
Connecting through Ethernet
Note: The management PC must be in the same subnet as the DBA-3620P.
- Use an Ethernet cable to connect the DBA-3620P to the management PC or to the switch or router the management PC is connected to.
- Open a web browser and type in the default host name of the DBA-3620P and press Enter. The default host name is DBA-3620P-XXXX where XXXX represents the last 4 characters of the MAC address listed on the device label located on the bottom of the device.
- When prompted, enter the default login credentials: User name: admin Password: admin
Connecting Wirelessly
- Connect the management PC to the default SSID of the DBA-3620P. The SSID will be in the format DBA-3620PXXX where XXXX represents the last 4 characters of the MAC address listed on
the device label located on the bottom of the device. - Open a web browser and type in the default host name of the DBA-3620P and press Ent e r . The default host name is DBA-3620PXXXX where XXXX represents the last 4 characters of the MAC address listed on the device label located on the bottom of the device.
- When prompted, enter the default login credentials: User name: admin Password: admin
Installation
Figure 4. Deployment Example
Configure the access point
To set up and manage the DBA-3620P, use one of the following methods:
- LAN on DBA-3620P to Ethernet Port labeled POE on PoE Adapter
- Connect the Power Cord to the PoE Adapter and a power outlet
- Connect Computer to Ethernet Port labeled LAN on PoE Adapter
- Manage the access point from the computer: Connect the access point and your computer directly via a straight-through Ethernet cable.
- Manage the access point from the computer via the Switch or Router: Connect the access point and your computer to the same switch or router
Mounting Options
Pole Mount and Wall Mount are the two mounting options for the DBA-3620P.
Cable Requirement
Use a Cat 5 cable with an even sheath. The Ethernet ports on the DBA-3620P access point cannot accept a Cat 5 cable that has an uneven sheath; the RJ-45 connector on the cable will not fit
properly into the receptacle on the access point
Pole Mounting Installation
Installation
- Open the bottom panel with a Phillips screwdriver.
- Plug one end of Cat 5 cable into the LAN port on the DBA-3620P, and the other end to the port labeled POE on the PoE Adapter.
- Choose a gasket (6 mm or 4 mm) to fit the Ethernet cable; if CONSOLE is not in-use, please put on the black gasket.
- Close the bottom panel with a Phillips screwdriver.
- Attach a grounding wire. Instructions for the installation of that conductor to building earth by a SKILLED PERSON.
- Attach access point to a pole
- Fasten the mounting ties.
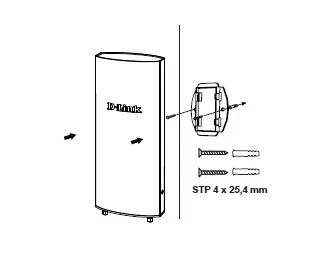
Wall Mounting Installation
Installation
- Use the supplied screws to attach the Wall Mount Base to the wall.
- Attach DBA-3620P to the Wall Mount Base. Thread and fasten the Mounting Ties.