![]()
CHM79

- Slide the power switch
 to ON or OFF.
 - Press the vibration button
 to turn vibrations on. Press again to turn it off.
 - Press the music
 or sound effects
  button to play sounds. Press again to turn music or sounds off.
 - Press the volume buttons
 to adjust the volume level.
IMPORTANT! Read all instructions before use of the infant bouncer seat. Keep instructions for future use.
- Adult assembly is required. Tools needed for assembly: Phillips screwdriver (not included).
Assembly instructions on the backside of this sheet. - Requires three C (LR14) alkaline batteries (not included) for soothing unit operation.
- Use from birth until baby starts trying to sit up or has reached 20 lb (9 kg), whichever comes first.
- Product features and decorations may vary from photographs.
 WARNING WARNING |
| Fall Hazard: Babies have suffered skull fractures falling while in and from bouncers. • Use bouncer ONLY on the floor. • ALWAYS use restraints. Adjust to fit snugly, even if baby falls asleep. • NEVER lift or carry a baby in the bouncer. • NEVER use a toy bar as a handle. |
| Suffocation Hazard: Babies have suffocated when bouncers tipped over on soft surfaces. • NEVER use it on a bed, sofa, cushion, or another soft surface. • NEVER leave baby unattended. |
| To prevent falls and suffocation: • ALWAYS use restraints. Adjust to fit snugly, even if baby falls asleep. • STOP using bouncer when baby starts trying to sit up or has reached 20 lb (9 kg), whichever comes first. This product is not intended to replace a crib or bassinet for prolonged periods of sleep. |
IMPORTANT! Before assembly and each use, inspect this product for damaged hardware, loose joints, missing parts, or sharp edges. Do not use this infant bouncer if it is damaged or broken. Do not use accessories or replacement parts other than those approved by the manufacturer.
Setup and Use

Securing Your Infant
- Place your child in the seat. Position the restraint pad between your child’s legs.
- Fasten the restraint belts to the restraint pad.
Make sure you hear a “click” on both sides. - Check to be sure the restraint system is securely attached by pulling it away from your child. The restraint system should remain attached.
- Tighten each waist belt so that the restraint system is snug against your child. Please refer to the next section for instructions to tighten the waist belts.
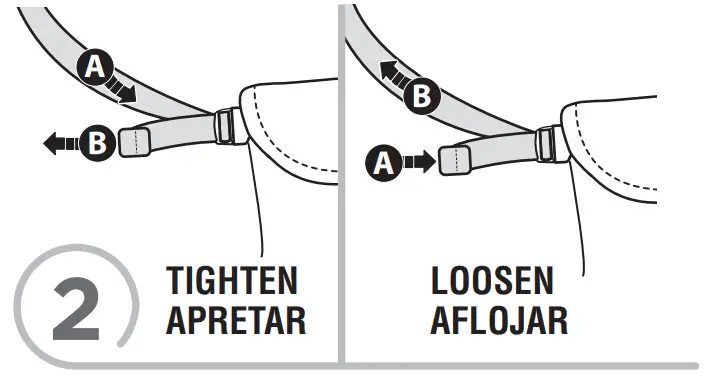
To tighten the restraint belts:
• Feed the anchored end of the restraint belt up through the buckle to form a loop A . Pull the free end of the restraint belt B .
To loosen the restraint belts:
• Feed the free end of the restraint belt up through the buckle to form a loop A . Enlarge the loop by pulling on the end of the loop toward the buckle. Pull the anchored end of the restraint belt to shorten the free end of the restraint belt B .
Battery Installation
IMPORTANT! Low battery power causes this product to operate erratically: no vibrations and the product may not turn off. Remove and properly dispose of the batteries and replace them with three new C (LR14) alkaline batteries.

- Unfasten the pad straps on the back of the pad around the soothing unit
A. - Pull to remove the pad from around the tabs and the soothing unit
B. - Remove the pad bottom pocket from the footrest
C.
For longer life, use alkaline batteries.
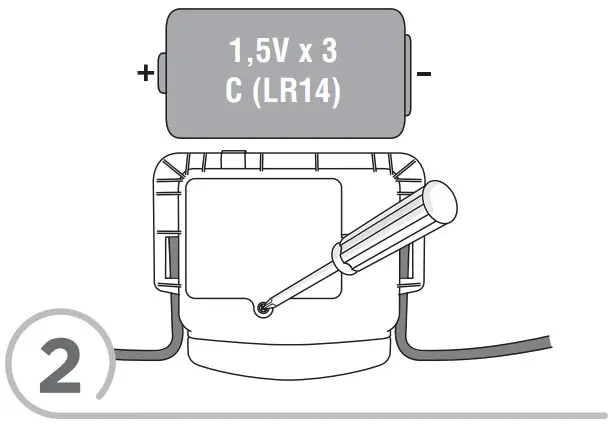
- Loosen the screw in the battery compartment door. Remove the battery compartment door.
- Insert three C (LR14) alkaline batteries into the battery compartment.
- Replace the battery compartment door and tighten the screw.
- Pull and fit the pad seat bottom pocket around the soothing unit and footrest.
- Fasten the pad straps on the back of the pad around the soothing unit. Make sure you hear a “click”.
- If this product begins to operate erratically, you may need to reset the electronics. Slide the power switch off and then back on.
Battery Safety Information
In exceptional circumstances, batteries may leak fluids that can cause a chemical burn injury or ruin your product. To avoid battery leakage:
- Do not mix old and new batteries or batteries of different types: alkaline, standard (carbon-zinc), or rechargeable.
- Insert batteries as indicated inside the battery compartment.
- Remove batteries during long periods of non-use. Always remove exhausted batteries from the product. Dispose of batteries safely. Do not dispose of the product in a fire. The batteries inside may explode or leak.
- Never short-circuit the battery terminals.
- Use only batteries of the same or equivalent type as recommended.
- Do not charge non-rechargeable batteries.
- Remove rechargeable batteries from the product before charging.
- If removable, rechargeable batteries are used, they are only to be charged under adult supervision.

CAN ICES-3 (B)/NMB-3 (B)
Operation is subject to the following two conditions: (1) this device may not cause interference, and (2) this device must accept any interference, including interference that may cause undesired operation of the device.
Care Mantenimiento
- The pad and infant support are machines washable. Wash them separately in cold water on the gentle cycle. Do not use bleach. Tumble dry separately on low heat and remove promptly.
- The frame, toy bar, and toys may be wiped clean using a mild cleaning solution and damp cloth. Do not immerse the frame. Do not use bleach. Do not use harsh or abrasive cleaners. Rinse clean with water to remove residue.
To remove the pad:
- Unfasten the straps on the back of the seat.
- Remove the bottom pocket of the pad from the footrest.
- Lift to remove the pad.
- To replace the pad, refer to Assembly steps 6 – 10.

Assembled Parts
IMPORTANT! Please remove all parts from the package and identify them before assembly. Some parts may be packed in the pad.

 Note: Shown actual size. Tighten or loosen all screws with a Phillips screwdriver. Do not over-tighten the screws. |
Assembly

- Place the base tube on a flat surface.
- Position the left and right base wires, as shown.
- Fit the left base wire and right base wire into the base tube.

- Position the feet so the non-skid surface is down.
- With the peg side facing inward, fit the feet to the base tube.
- Insert a screw through the outside of each foot and tighten.

- Push the soothing unit until it “snaps” into place.
- Position the footrest so that the soothing unit is upright.
- Fit the footrest onto the ends of the base wires.

- Fit the seat back onto the ends of the base wires.
- Push the seatback to be sure it is completely on the base wires.

- Place and hold a connector to a bare wire, as shown.
- Insert a screw through the seat back, base wire, and into the connector. Tighten the screw.
- Repeat this procedure to assemble the other connector to the other side of the seatback tube.
- Pull the seatback tube up to be sure it is secure. If you can remove either end of the seatback tube, you have not assembled the connectors correctly. Remove the screws, reread and repeat Assembly steps 4 and 5.

- Fit the upper pocket on the back of the pad onto the seatback.

- Lift the footrest. Fit the lower pocket on the back of the pad onto the footrest.

- Fasten the pad straps on the back of the pad around the soothing unit. Make sure you hear a “click”.

- Fit the opening on each side of the pad around the tabs on each side rail.
- Fit the opening in the front edge of the pad around the front of the soothing unit.

- Place the infant support on top of the pad.
- Insert the restraint pad through the slot in the infant support. Make sure the restraint pad is not twisted.
- Insert the restraint belts through the slots in the infant support.

- While pressing the button on the toy bar, fit the hub onto the toy bar and push to “snap” it in place.
Hint: The hub is designed to fit onto the toy bar one way. If it does not seem to fit turn it around and try again.

- Insert and “snap” the toy bar into the toy bar socket.
Hint: The toy bar is removable. Press the button to release the toy bar.
Consumer Information
FCC STATEMENT (UNITED STATES ONLY)
This equipment has been tested and found to comply with the limits for a Class B digital device, pursuant to Part 15 of the FCC rules. These limits are designed to provide reasonable protection against harmful interference in a residential installation. This equipment generates uses and can radiate radio frequency energy and, if not installed and used in accordance with the instructions, may cause harmful interference to radio communications. However, there is no guarantee that interference will not occur in a particular installation. If this equipment does cause harmful interference to radio or television reception, which can be determined
by turning the equipment off and on, the user is encouraged to try to correct the interference by one or more of the following measures:
- Reorient or relocate the receiving antenna.
- Increase the separation between the equipment and receiver.
- Consult the dealer or an experienced radio/ TV technician for help.
NOTE: Changes or modifications not expressly approved by the manufacturer responsible for compliance could void the user’s authority to operate the equipment.
This device complies with Part 15 of the FCC
Rules. Operation is subject to the following two conditions: (1) This device may not cause harmful interference, and (2) this device must accept any interference received, including interference that may cause undesired operation.
©2017 Mattel.
PRINTED IN CHINA
CHM79-2C73-G1
1100420945-2LC