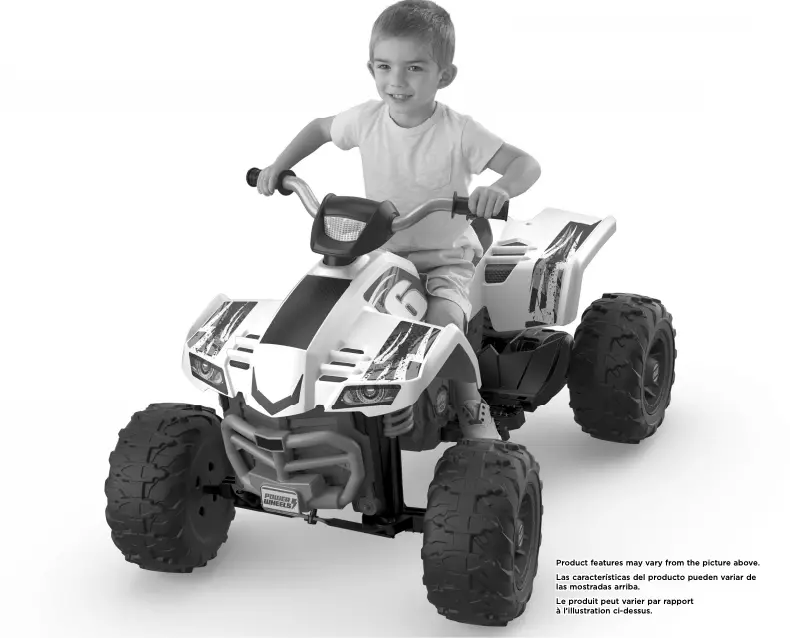
Fisher-Price Power Wheels Racing ATV Owner’s Manual
with Assembly Instructions


Please read this manual and save it with your original sales receipt.
Adult assembly is required.
 Tool needed for assembly:
Phillips screwdriver (not included).

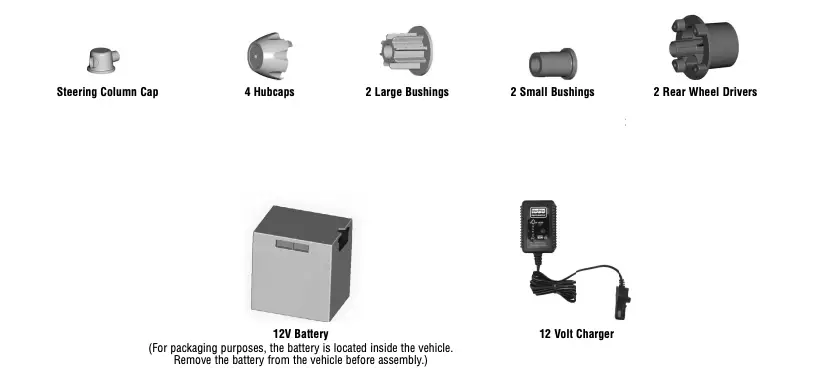
Requires 1 – 12V, 12 Ah, non-spillable, sealed lead acid battery (included).
Requires 1 – 12V charger (included).
CONSUMER INFORMATION
- Read this manual carefully for important safety information and operating instructions before using your vehicle. Keep these instructions for future reference, as they contain important information.
- Age: 3-7 years. Weight Limit: 29,5 kg (65 lb).
- Your new vehicle requires adult assembly. Please set aside at least 45 minutes for assembly.
- The Parts pages and the Assembly instructions begin on page 6.
- Use this vehicle ONLY outdoors. Most interior flooring can be damaged by riding this vehicle indoors. Fisher-Price® will not be responsible for damage to the floor if the vehicle is used indoors.
- Use ONLY a Power Wheels® battery and charger with this product. Use of any other battery or charger will damage your vehicle.
- Before first time use, you must charge the battery at least 18 hours (but no more than 30 hours). Please see the Battery Charging section for detailed instructions.
- The battery charger is not a toy.
- Your Power Wheels® 12 volt battery is equipped with a built-in thermal fuse. The thermal fuse is a self-resetting safety device which automatically “trips” and shuts down operation of the vehicle if the vehicle is overloaded or the driving conditions too severe. Once a fuse has “tripped”, remove your foot from the pedal and wait approximately 25 seconds before operating the vehicle again. To avoid repeated automatic shut-downs, avoid severe driving conditions.
- If a thermal fuse in a battery continually trips under normal driving conditions, please call us at 1-800-348-0751 (US and Canada) or 59-05-51-00 Ext. 5206 or 01-800-463-59-89 (México).
- Power Wheels® maintains an independently owned and operated Authorized Service Center network in the United States and Canada. These authorized service centers will repair or replace parts under warranty at no extra charge, and can perform non-warranty repairs for a minimal charge. To find the authorized service center near you, please visit us online at powerwheels.com or call 1-800-348-0751.
- Register your vehicle (United States and Canada). Please visit us at powerwheels.com.
- This product may come with replacement warning labels. If English is not your primary language, select the warning label with the appropriate language and apply over the factory applied warning label.
VEHICLE USE

WARNING
Prevent injuries and deaths
- Direct adult supervision required.
- Never ride at night.
- Keep children within safe riding areas. These areas must be:
- away from swimming pools and other bodies of water to prevent drownings.
- generally level to prevent tipovers.
- away from steps, steep inclines, cars, roads and alleys.
- Riding rules – Make sure children know and follow these rules for safe driving and riding.
- Always sit on the seat.
- Always wear shoes.
- Only 1 rider at a time.
BATTERY USE
DANGER/ POISON
- KEEP OUT OF THE REACH OF CHILDREN.
- DO NOT OPEN BATTERY.
WARNING
To prevent injury.
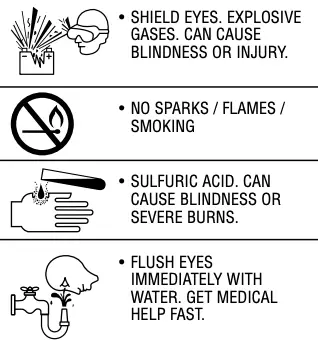
- Do not make direct contact between battery terminals, as this can cause an explosion or fire.
- Only adults should charge batteries.
- Battery can fall out and injure a child if vehicle tips over. Always use battery retainer.
- The battery must be handled by adults only. The battery is heavy and contains sulfuric acid (electrolyte). Dropping the battery could result in serious injury.
To prevent fire.
- Do not operate the vehicle near flammable vapors (gasoline, paint thinner, acetone, etc.). The vehicle’s electrical switches and motors emit an internal spark which could cause an explosion or fire.
- Examine the battery, charger and their connectors for excessive wear or damage each time you charge the battery. If damage or excessive wear is detected, do not use the charger or the battery until you have replaced the worn or damaged part.
- Never modify the electrical system. Alterations could cause a fire.
- Use only a Power Wheels® battery and charger. Other batteries or chargers could cause a fire or explosion.
BATTERY CHARGING
Adults note: Periodically examine this battery charger for damage to the cord, housing or other parts that may result in the risk of fire, electric shock or injury. If the battery charger is damaged, do not use it.
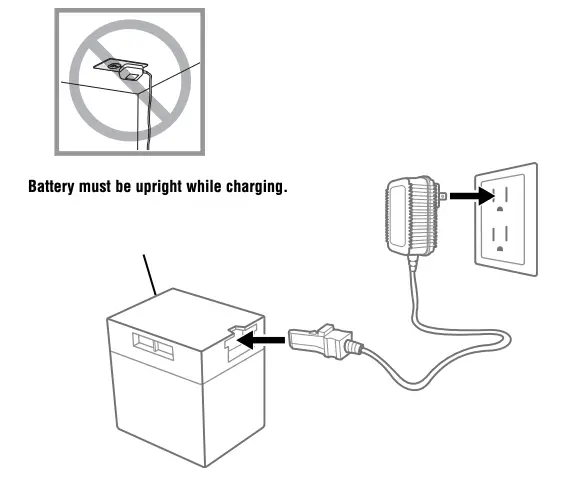
- Make sure you charge the battery for at least 18 hours using the enclosed Power Wheels® 12 volt charger before operating your vehicle for the first time. Charge the battery for at least 14 hours after each use of the vehicle.
- You do not need to remove the battery from your vehicle to recharge it. Never charge the battery longer than 30 hours. Failure to follow these instructions may damage your battery and will void your warranty.
- Before charging the battery, examine the battery case for cracks and other damage which may cause sulfuric acid (electrolyte) to leak during the charging process. If damage is detected, do not charge the battery or use it in your vehicle. Battery acid is very corrosive and can cause severe damage to surfaces it contacts.
- Do not place the battery on a surface (such as kitchen counter tops) which could be damaged by the acid contained inside the battery. Take precautions to protect the surface on which you place your battery.
- Charge the battery in a well ventilated area.
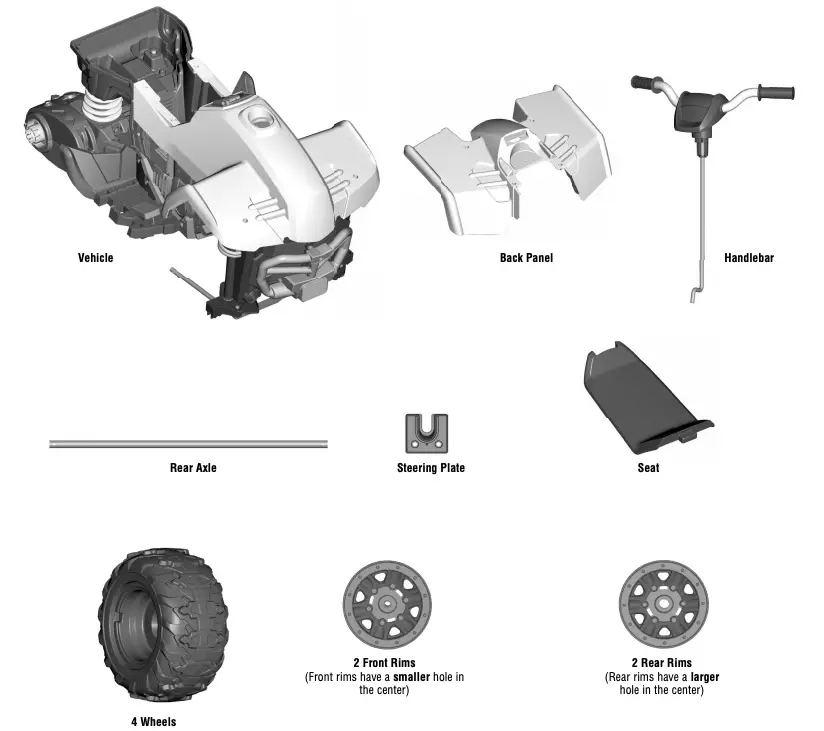
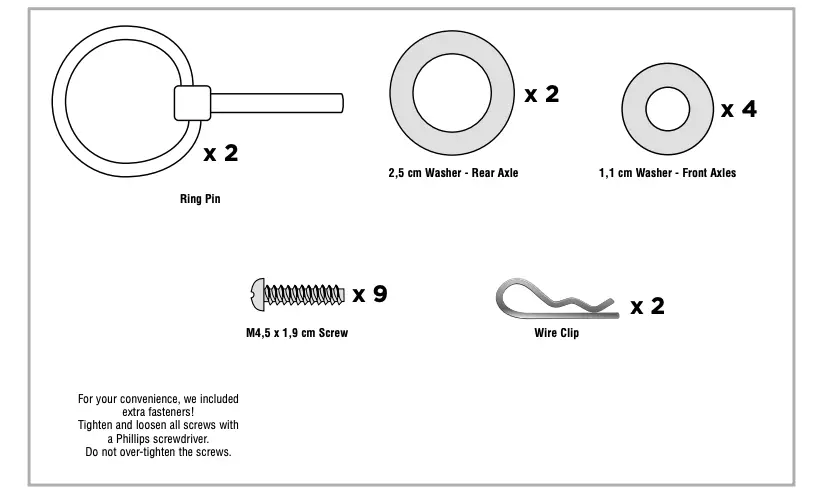
PARTS
- If you experience a problem with this product, or are missing a part, please call us at 1-800-348-0751 (US and Canada), 59-05-51-00 Ext. 5206 ó 01-800-463-59-89 (México) rather than return this product to the store.
- Please identify all parts before assembly and save all packaging material until assembly is complete to ensure that no parts are discarded.
- Metal parts have been coated with a lubricant to protect them during shipment. Wipe all metal parts with a paper towel to remove any excess lubricant.
- Wipe the surface of each part with a clean, dry cloth to remove any dust or oils.
ASSEMBLY
WARNING
- Children can be harmed by small parts, sharp edges and sharp points in the vehicle’s unassembled state, or by electrical items. Care should be taken in unpacking and assembly of the vehicle. Children should not handle parts, including the battery, or help in assembly of the vehicle.
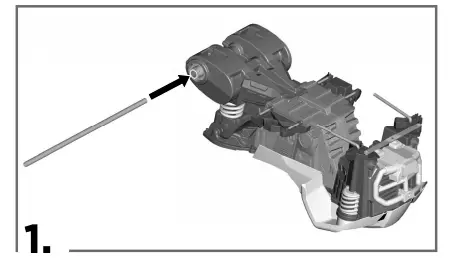
- Carefully turn the vehicle over.
- Slide the rear axle through the holes in the back of the vehicle.
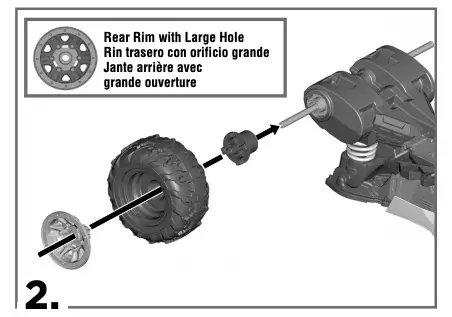
- Slide a rear wheel driver, gear side first, onto the rear axle. Fit the gears to the gearbox on the back end of the vehicle.
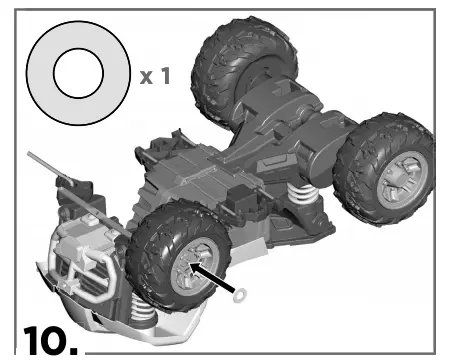
- Slide a wheel, flat side first, onto the rear axle.
- Fit a rear rim onto the rear axle.
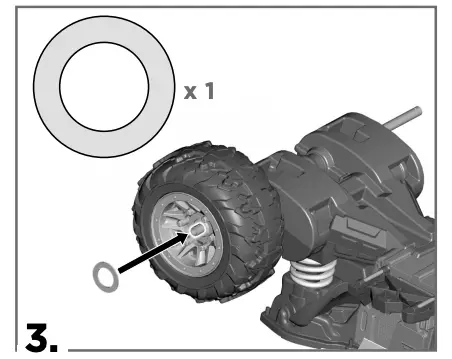
- Fit a 2,5 cm washer onto the rear axle.
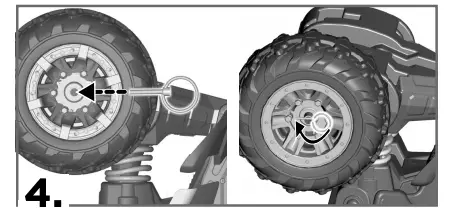
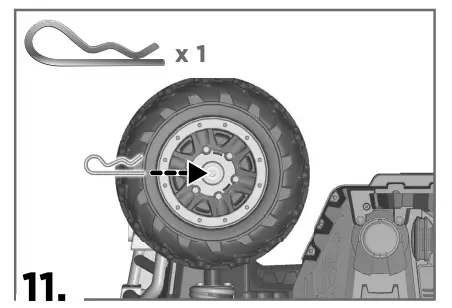
- Insert the straight end of a ring pin through the hole in the rear axle.
- Lift the ring end of the pin and then rotate it over the axle.
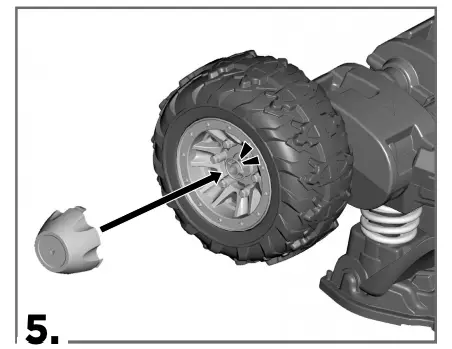
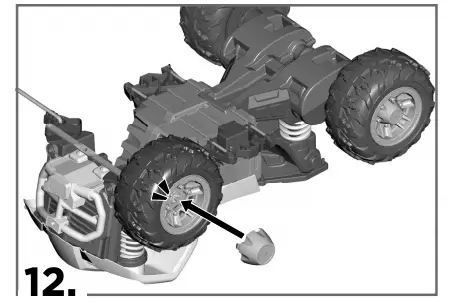
- “Snap” a hubcap to the rear rim.
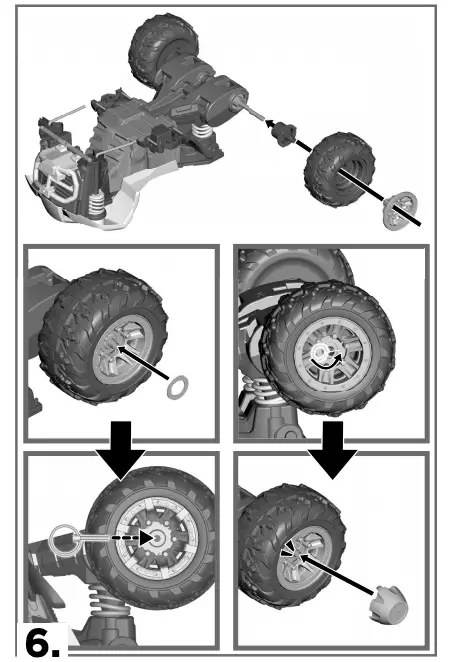
- Repeat steps 2-5 to assemble the other rear wheel driver, rear wheel, rear rim, washer, ring pin and hubcap to the rear axle.
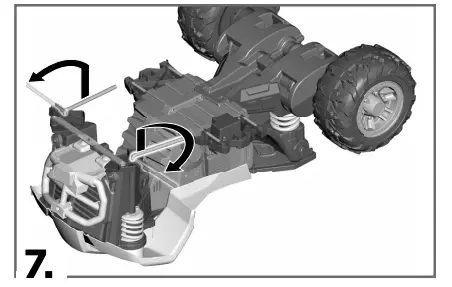
- Lift and pull to rotate the front axles completely towards the front of the vehicle.
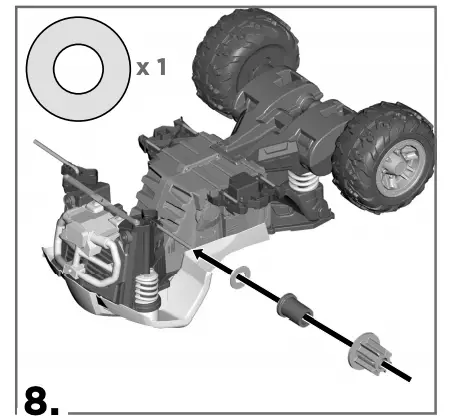
- Slide a 1,1 cm washer onto the front axle.
- Slide the small bushing, ring end first, onto the front axle.
- Slide the large bushing, ring end first, onto the front axle.
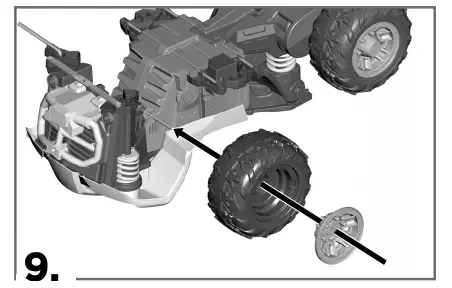
- Slide a wheel onto the front axle.
- Fit a front rim onto the front axle.
- Fit a 1,1 cm washer onto the front axle.
- Insert the straight side of the clip through the hole in the front axle.
- “Snap” a hubcap to the front rim.
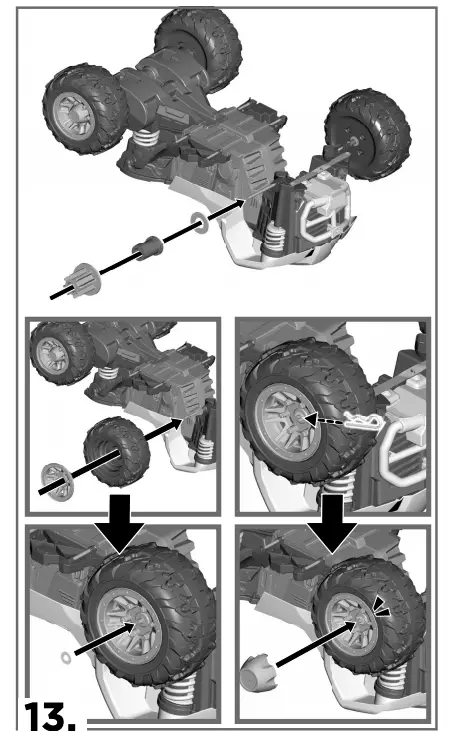
- Repeat steps 8-12 to assemble the remaining washers, bushing, wheel, front rim, wire clip and hubcap to the front axle.
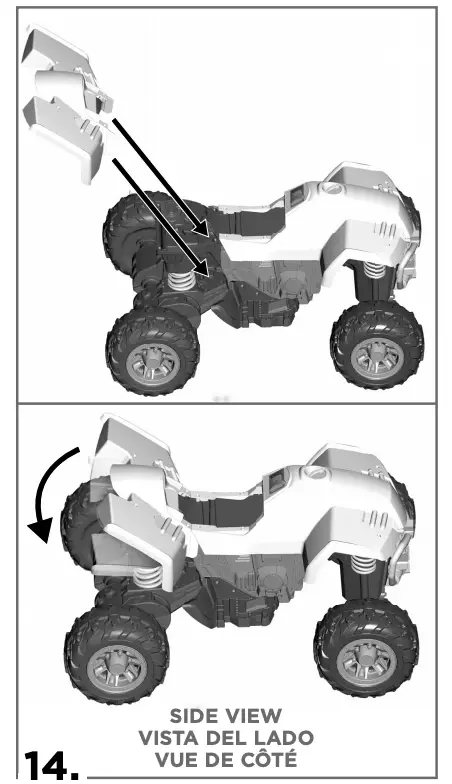
- Fit the rear fender assembly to the back end of the vehicle.
- Carefully turn the vehicle upright.
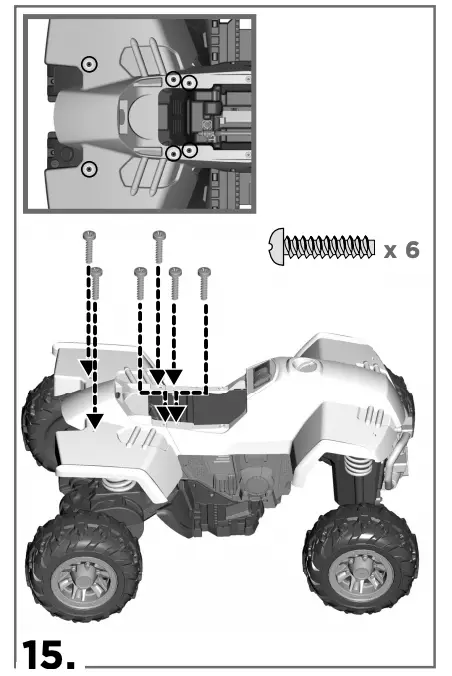
- Insert six M4,5 x 1,9 cm screws into the rear fender assembly and tighten.
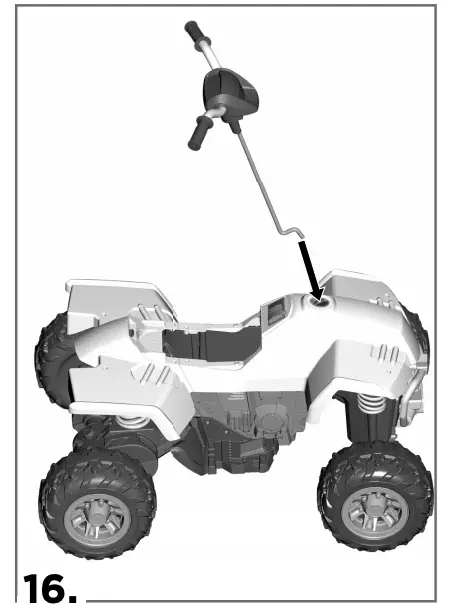
- Insert the steering column into the opening in the top side of the vehicle and out through the hole in the steering linkage underneath the vehicle.
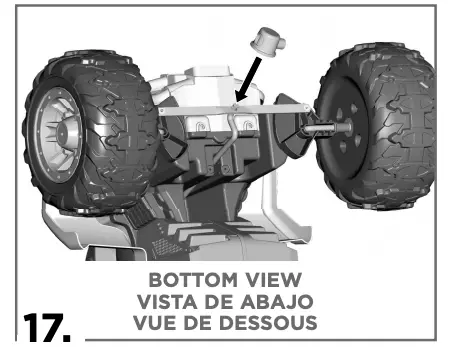
- Carefully turn the vehicle over.
- Fit the steering column cap onto the end of the steering column.
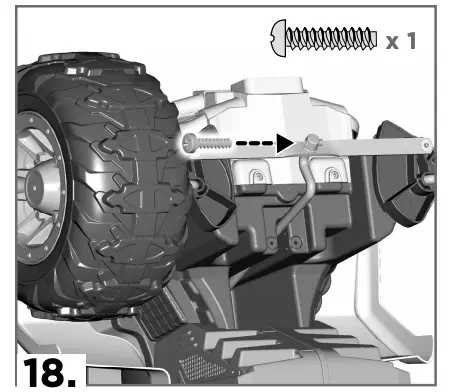
- Insert an M4,5 x 1,9 cm screw through the hole in the steering column cap.
- While holding the steering column cap in place, tighten the screw.

- Slide the steering plate behind the steering linkage and onto the steering column.
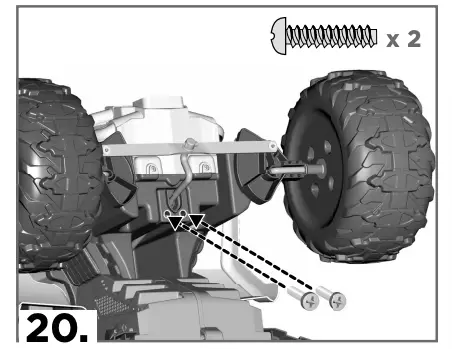
- Insert two M4,5 x 1,9 cm screws into the steering plate and tighten.
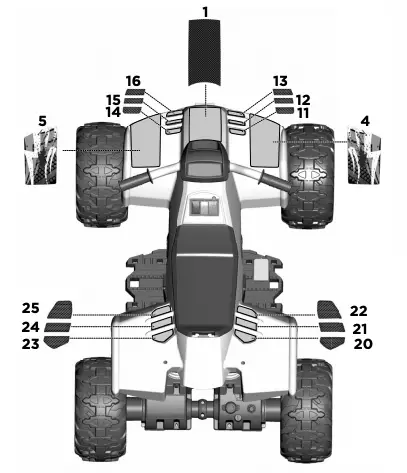
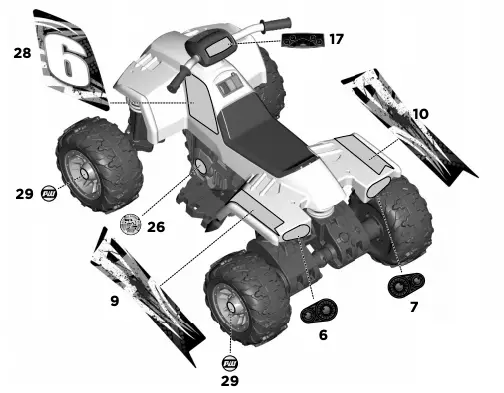
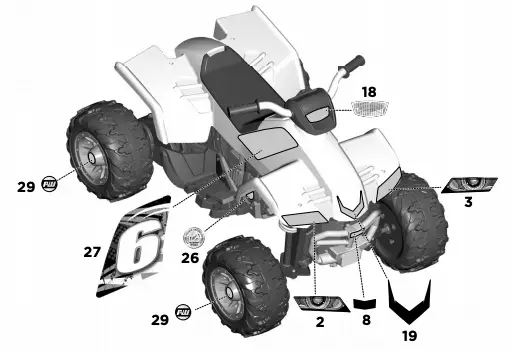
DECORATION
- Place the labels exactly as shown in the illustrations. For best results, avoid repositioning a label once it has been applied to the vehicle.
BATTERY INSTALLATION
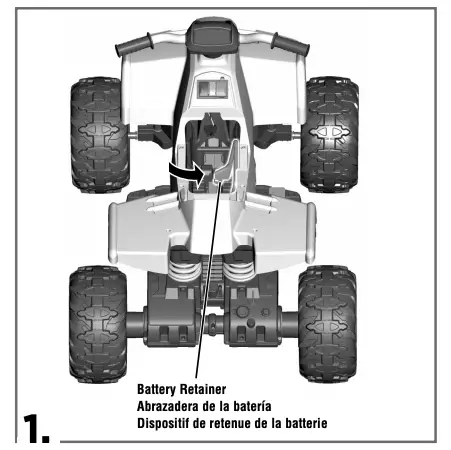
- Push the battery retainer against the side of the vehicle.
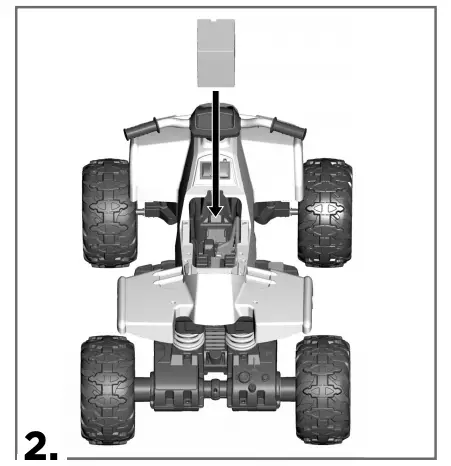
- Place the battery upright in the battery compartment.
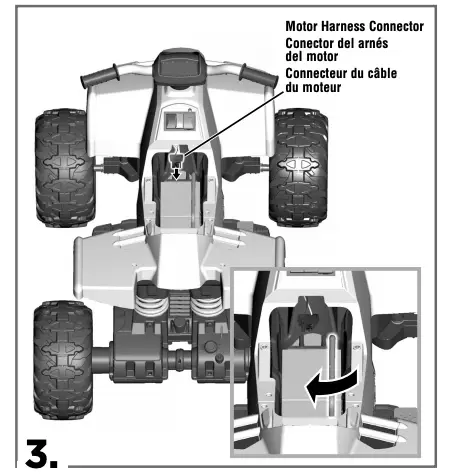
- Plug the motor harness connector into the battery. Push firmly.
- Slide the battery retainer back into place over the battery to secure it.
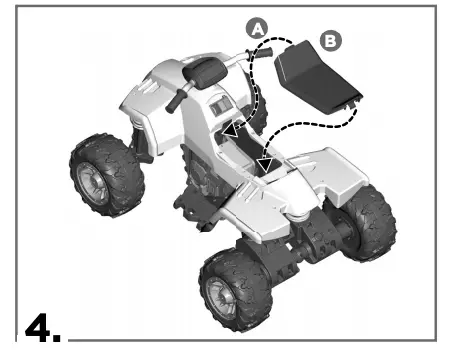
- Fit the tab at the front of the seat into the slot near the drive buttons A.
- “Snap” the tab at the back of the seat into the slot near the rear of the vehicle B .
SAFE DRIVING RULES
WARNING
Prevent injuries and deaths
- Direct adult supervision required.
- Never ride at night.
- Keep children within safe riding areas. These areas must be:
- away from swimming pools and other bodies of water to prevent drownings.
- generally level to prevent tipovers.
- away from steps, steep inclines, cars, roads and alleys.
- Riding rules – Make sure children know and follow these rules for safe driving and riding.
- Always sit on the seat.
- Always wear shoes.
- Only 1 rider at a time.
Before children use this vehicle, an adult should carefully evaluate the driving area as well as the child’s skill level and ability to drive the vehicle safely. Teach appropriate safety rules to your child before allowing operation of this vehicle. These rules should also be reviewed with other playmates who want to drive the vehicle.
- Use vehicle on grass, asphalt (and other hard surfaces) and generally level ground ONLY!
- A child who is not sitting on the seat could fall off, cause a tip over or block the driver’s view.
- Only operate the vehicle in the daytime in a well-lit area.
- Driving near steep inclines can cause:
- The vehicle to gain unsafe speed, even if the pedal is released to stop.
- The vehicle to tilt and tip over.
- The wheels to lose traction, causing the vehicle to slip.
- The vehicle could roll backwards at an unsafe speed.
- To prevent unsupervised use of the vehicle, disconnect the motor harness from the battery when the vehicle is not in use.
VEHICLE OPERATION

- Help your child practice steering to learn how far and how quickly to turn the handlebar when driving, and knows how to stop.
Yellow Button – Low Speed
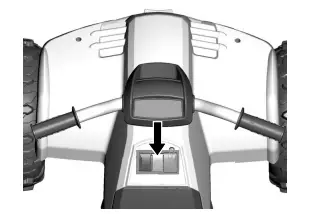
- Press the yellow low speed button on the tank.
- Press the foot pedal. The vehicle moves forward at a maximum of 4,8 km/h (3 mph).
Red Button – Reverse
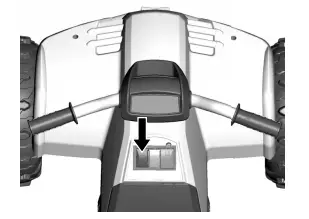
IMPORTANT! To prevent damaging the motors and gears, teach your child to stop the vehicle before switching direction.
- Press the red reverse button on the tank.
- Press the foot pedal. The vehicle backs up at a maximum of 4,8 km/h (3 mph).
Green Button – High Speed
- Before allowing your child access to the green high speed button, make sure your child knows how to steer, start and stop the vehicle, and knows the safe driving rules.
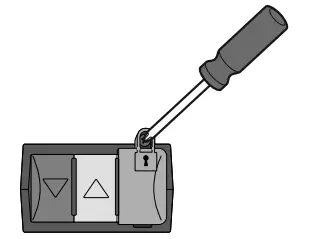
- Using a Phillips screwdriver, loosen and remove the high speed lockout cover.
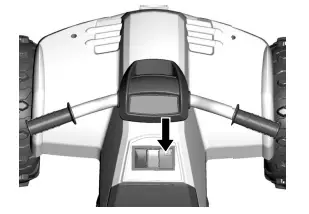
- Press the green high speed button on the tank.
- Press the foot pedal. The vehicle drives forward at a maximum of 9,6 km/h (6 mph).
12V BATTERY CARE AND DISPOSAL
BATTERY CARE
- If a battery leak develops, avoid contact with the leaking acid and place the damaged battery in a plastic bag. See next section for proper disposal.
- Do not allow the battery to run down completely before charging.
- Charge the battery before storing the vehicle, and at least once per month, even if the vehicle has not been used.
- Charge the battery after each use, regardless of how long the vehicle was used.
- Leaving the battery in a discharged condition will ruin it.
- Do not store the battery in temperatures above 24° C (75° F) or below -23° C (-10° F).

- Protect the environment by not disposing of this product or any batteries with household waste. This symbol indicates that this product shall not be treated as household waste. Check your local authority for recycling advice and facilities.
BATTERY DISPOSAL

- CONTAINS SEALED LEAD BATTERY. BATTERY MUST BE RECYCLED.
- Recycle or dispose of the battery in an environmentally sound manner.
- Do not dispose of a lead acid battery in a fire. The battery may explode or leak.

- For customers in the USA or Canada: This product contains a rechargeable/recyclable lead acid battery. You can help preserve our environment by returning your used lead acid battery to the collection and recycling location nearest you.
United States
http://www.call2recycle.org/locator/
Canada
http://www.call2recycle.ca/locator/
VEHICLE CARE
- Check all screws, fasteners and their protective coverings regularly and tighten as required. Check plastic parts on a regular basis for cracks or broken pieces.
- During snowy or rainy weather, store the vehicle inside or under a protective cover. Charge the battery at least once per month while your vehicle is not in regular use.
- Avoid operating the vehicle in wet or snowy conditions, and do not spray the vehicle with a hose. Do not wash the vehicle with soap and water. Water or moisture in the motors or electrical switches can cause them to corrode, and could cause switch or motor failure.
- Avoid operating the vehicle on sand, loose dirt or gravel. Sand, loose dirt or gravel in the motors or electrical switches can cause them to jam, and could cause switch or motor failure.
- Wipe the vehicle with a soft, dry cloth. For a shiny finish, use a non-wax furniture polish and soft cloth. Do not use automotive wax.
CONSUMER INFORMATION
FCC STATEMENT (UNITED STATES ONLY)
This equipment has been tested and found to comply with the limits for a Class B digital device, pursuant to Part 15 of the FCC rules. These limits are designed to provide reasonable protection against harmful interference in a residential installation. This equipment generates uses and can radiate radio frequency energy and, if not installed and used in accordance with the instructions, may cause harmful interference to radio communications. However, there is no guarantee that interference will not occur in a particular installation. If this equipment does cause harmful interference to radio or television reception, which can be determined by turning the equipment off and on, the user is encouraged to try to correct the interference by one or more of the following measures:
- Reorient or relocate the receiving antenna.
- Increase the separation between the equipment and receiver.
- Connect the equipment into an outlet on a circuit different from that to which the receiver is connected.
- Consult the dealer or an experienced radio/TV technician for help.
NOTE: Changes or modifications not expressly approved by the manufacturer responsible for compliance could void the user’s authority to operate the equipment.
This device complies with Part 15 of the FCC Rules. Operation is subject to the following two conditions: (1) This device may not cause harmful interference, and (2) this device must accept any interference received, including interference that may cause undesired operation.
Before first-time use, you must charge the battery 18 hours!
Charge the battery immediately after each use. Charge the battery once a month, even if the vehicle is not used or stored.
Do not return your vehicle to the store, we can help!
Visit us online for our Troubleshooting Guide – service.fisher-price.com