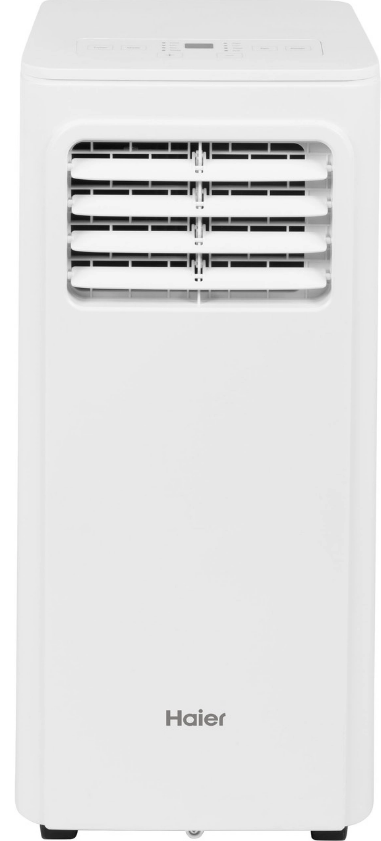
Manufactured by Haier
Storage
If the unit is not being used for a long period of time: To Empty the Internal Water Tank:
- Unplug or disconnect power.
- Drain the water from the water tank. (See “Internal Water Tank section” above.)
- Use the original packaging to repack the unit to avoid a buildup of dust or dirt.
- Store the air conditioner in a cool, dry location.
Insert the Batteries in the Remote Control
- Remove the battery cover by sliding it according to the arrow direction.
- Insert new batteries, making sure that the (+) and (–) of battery are installed correctly.
- Reattach the cover by sliding it back into position.
NOTES:
- Use 2 “AAA” (1.5 volt) alkaline batteries. Do not use rechargeable batteries.
- Remove the batteries from the remote control if the system is not going to be used for a long time.
- Do not mix old and new batteries. Do not mix alkaline, standard (carbon-zinc) or rechargeable (ni-cad, ni-mh, etc) batteries.
BEFORE YOU BEGIN
Read these instructions completely and carefully.
- IMPORTANT — Save these instructions for local inspector’s use.
- IMPORTANT — Observe all governing codes and ordinances.
- Note to Installer – Be sure to leave these instructions with the Consumer.
- Note to Consumer – Keep these instructions for future reference.
- Skill level – Installation of this appliance requires basic mechanical skills.
- Completion time – Approximately 1 hour
- We recommend that two people install this product.
- Proper installation is the responsibility of the installer.
- Product failure due to improper installation is not covered under the Warranty.
- You MUST use all supplied parts and use proper installation procedures as described in these instructions when installing this air conditioner.
ELECTRICAL REQUIREMENT
Some models require a 115/120-volt AC, 60-Hz grounded outlet protected with a 15-amp time-delay fuse or circuit breaker. The 3-prong grounding plug minimizes the possibility of electric shock hazard. If the wall outlet you plan to use is only a 2-prong outlet, it is your responsibility to have it replaced with a properly grounded 3-prong wall outlet.
CAUTION
Do not, under any circumstances, cut or remove the third (ground) prong from the power cord. Do not change the plug on the power cord of this air conditioner. Aluminium house wiring may present special problems—consult a qualified electrician.

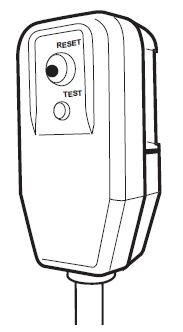
The power cord includes a current interrupter device. A test and reset button is provided on the plug case. The device should be tested on a periodic basis by first pressing stay engaged, discontinue use of the air conditioner and contact a qualified service technician.
LOCATION REQUIREMENTS
- Place the air conditioner on a flat, level surface in a location that is at least 30” (76.2 cm) from any wall.
NOTE: A minimum clearance of 30” (76.2 cm) from the air conditioner to the wall must be maintained to ensure proper airflow. - Maintain a minimum 30” (76.2 cm) clearance around the air conditioner to not block airflow.
- Keep the air conditioner free of any obstructions such as drapes, curtains, blinds, etc.
- The exhaust hose should be free of any obstructions.
- Do not place the air conditioner on an unstable or raised surface because it could fall and cause damage or injury.
- Do not place the air conditioner in direct sunlight or near a heat source such as baseboard heaters, stoves, etc.
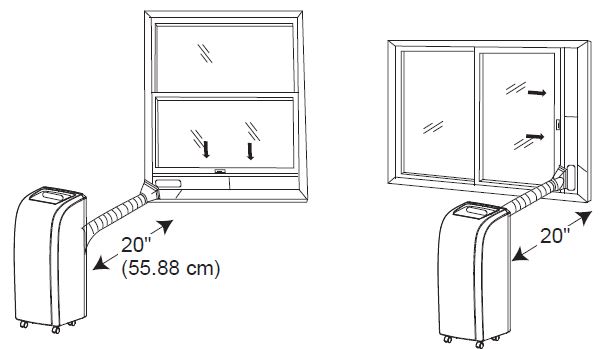
- The window panel can be installed in a window with a minimum 20” (55.88 cm) to a maximum 46” (121.92) opening.

INSTALLATION INSTRUCTIONS
PARTS INCLUDED:
(Appearance may vary)

- Control Panel
- Swing Air Louvers
- Casters
- Exhaust hose assembly
- Window sealing plate assembly
- Remote Control
- Filter Panel
- Power Cord Hook (2)
- Handle (2)
- Air Vent – exhaust
- Continuous Drainage hole
- Air inlet grille
- Drainage hole
- Power Cord and plug


UNPACK AIR CONDITIONER
WARNING
- Remove packaging materials. Save the carton and the foam packaging for storing the air conditioner when not in use.
NOTE: There are NO packing materials inside the air conditioner to remove—Do Not open the cabinet. - Properly dispose of/recycle all packing material.
- Handle the air conditioner gently.
- Keep the air conditioner upright and level. Do not set the air conditioner on its side, front, back or upside down.
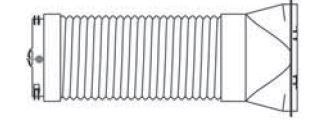
INSTALL EXHAUST HOSE
Install the exhaust hose assembly by screwing the hose counterclockwise into the exhaust port on the back of the Air Conditioner.

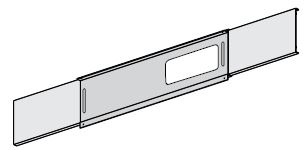
INSTALL WINDOW PANELS
- Measure the window opening. For a 20” opening, use just the middle panel of the Window Kit with the opening for the Exhaust Hose Adapter. For openings from 20” to 33”, insert one side panel to the middle panel, for openings from 33” to 46”, insert both side panels.
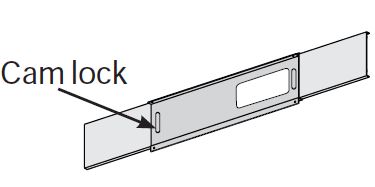
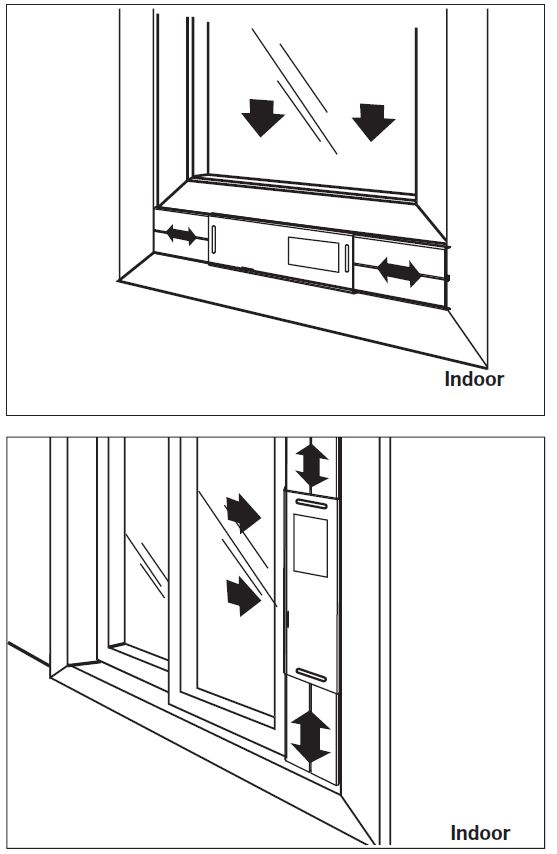
- Place the Window Kit into the window opening (the Cam Locks should be towards you) and slide the side panels (if being used) outward to fill the opening. Lock the panels in place with the Cam Locks. Apply the foam seals to the top, bottom and ends to provide the best seal. Slide the window shut against the Window Kit.


CONNECT THE EXHAUST HOSE TO THE WINDOW PANEL
Place the Air Conditioner close to the window ensuring there is at least 20” of clearance from the wall and any other obstructions. Extend the hose so that it reaches the Window Kit. Insert the Exhaust Hose Adapter into the opening in the Window Kit and slide it into the locking position. Ensure that the hose runs straight to the window with no excess extension. Important: The Air Conditioner must be vented to the outside. Do not use a longer hose or extend the hose included with the Air Conditioner or the unit will not cool properly and will overheat.
COMPLETE INSTALLATION
- Plug the power cord into a grounded 3 prong outlet.
- Press the Reset button on the plug to ensure the safety plug is providing power to the Air Conditioner.
- Allow 20” of clearance around the Air Conditioner for proper air circulation
- When removing the Air Conditioner, be sure to remove the Window Kit.