Sections in this Manual
- Turn Off Power to Heating/Cooling System
- Remove Old Thermostat
- Label Wires with Tags
- Separate Wallplate from New Thermostat
- Wallplate
- Connect Wires
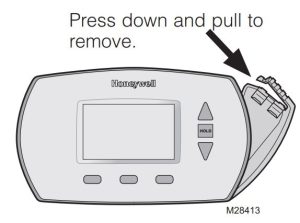
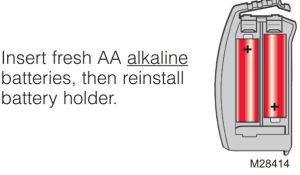
- Install Batteries
- Install Thermostat onto Wallplate
- Turn Power Back On
- Advanced Installation
- Changing Settings
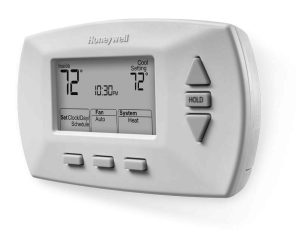
- About your new thermostat
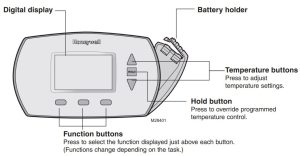
- Thermostat controls
- Program Schedule
- Built-in compressor protection
- Battery replacement
- Troubleshooting
- Warranty
- FAQs
About your new thermostat
Your new Honeywell thermostat has been designed to give you many years of reliable service and easy-to-use, push-button climate control.
- Easy-to-follow menu programming.
- One-touch temp control overrides program schedule at any time.
- Large, clear, backlit display is easy to read — even in the dark.
- Displays both room temperature and temperature setting.
- Removable battery holder for fast, easy replacement.
- Built-in compressor protection.
Thermostat controls
Set the time and day
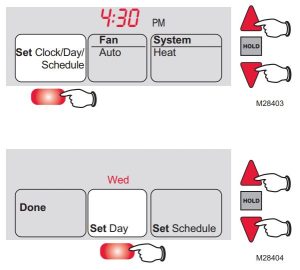
- Press SET CLOCK/DAY/SCHEDULE, then press ▲ or ▼ to set the clock time.
- Press the SET DAY button, then press ▲ or ▼ to select the day of the week.
- Press DONE to save & exit.
NOTE: If the SET CLOCK/DAY/SCHEDULE option is not displayed, press DONE or RUN SCHEDULE.
NOTE: If the display flashes Set Clock, the thermostat will follow your settings for the weekday “Wake” time period until you reset the time and day.
Program Schedule
You can program four time periods each day, with different settings for weekdays and weekends. We recommend the pre-set settings (shown in the table below), since they can reduce your heating/ cooling expenses.
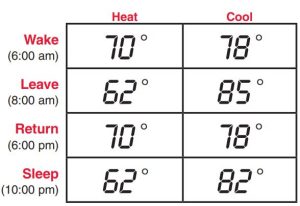
- Wake – Set to the time you awaken and the temperature you want during the morning, until you leave for the day.
- Leave – Set to the time you leave home and the temperature you want while you are away (usually an energy-saving level).
- Return – Set to the time you return home and the temperature you want during the evening, until bedtime.
- Sleep – Set to the time you go to bed and the temperature you want overnight (usually an energy-saving level).
NOTE: Leave and Return periods can be canceled on weekends
To adjust program schedules
(RTH6350 and RET93E only)
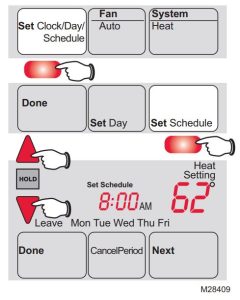
- Press SET CLOCK/DAY/SCHEDULE, then SET SCHEDULE.
- Press ▲ or ▼ to set your weekday Wake time (Mo-Fr), then press NEXT.
- Press ▲ or ▼ to set the temperature for this time period, then press NEXT.
- Set time and temperature for the next time period (Leave). Repeat steps 2 and 3 for each weekday time period.
- Press NEXT to set weekend time periods (Sa & Su), then press DONE to save & exit.
NOTE: Make sure the thermostat is set to the system you want to program (Heat or Cool).
NOTE: You can press CANCEL PERIOD to eliminate unwanted time periods (except Wake).
To adjust program schedules (RTH6450 and RET95E only)
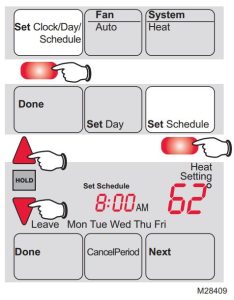
- Press SET CLOCK/DAY/SCHEDULE, then SET SCHEDULE.
- Press ▲ or ▼ to set your weekday Wake time (Mo-Fr), then press NEXT.
- Press ▲ or ▼ to set the temperature for this time period, then press NEXT.
- Set time and temperature for the next time period (Leave). Repeat steps 2 and 3 for each weekday time period.
- Press NEXT to set Saturday time periods.
- Press NEXT to set Sunday time periods, then press DONE to save & exit.
NOTE: Make sure the thermostat is set to the system you want to program (Heat or Cool).
NOTE: You can press CANCEL PERIOD to eliminate unwanted time periods (except Wake).
Program schedule override (temporary)
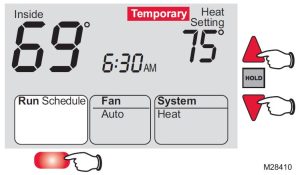
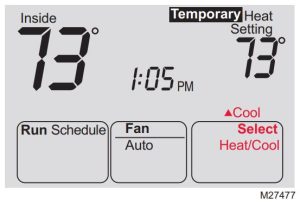
Press ▲ or ▼ to immediately adjust the temperature. This will temporarily override the temperature setting for the current time period.
“Temporary” will appear on the display and the current program period will flash.
The new temperature will be maintained only until the next programmed time period begins (see page 13).
To cancel the temporary setting at any time, press RUN SCHEDULE.
NOTE: Make sure the thermostat is set to the system you want to control (heat or cool).
Program schedule override (permanent)
Press HOLD to permanently adjust the temperature. This will override the temperature settings for all time periods.
The “Hold” feature turns off the program schedule and allows you to adjust the thermostat manually, as needed.
Whatever temperature you set will be maintained 24 hours a day, until you manually change it, or press RUN SCHEDULE to cancel “Hold” and resume the program schedule.
NOTE: Make sure the thermostat is set to the system you want to control (heat or cool).
Auto Changeover (RTH6450 and RET95E only)
Use this feature in climates where both air conditioning and heating are used on the same day. When the system mode is in Auto, the thermostat automatically selects heating or cooling depending on the indoor temperature.
While in the Auto mode, if a schedule override takes place (temporarily or permanently) the thermostat will automatically adjust the cooling and heating settings to maintain a 3-degree separation between the cool and heat settings.
For example, if the heat temperature is raised to where it gets within 3-degrees of the cool setting, the display will show an up arrow next to “cool” to show the thermostat is raising the cool setting up to maintain a 3-degree separation.
Press the Select Heat/Cool button to select between the heat and cool to view/adjust either mode.
NOTICE: To avoid possible compressor damage, do not use Auto Changeover if the outside temperature drops below 50ºF (10ºC).
Smart Response® Technology
Smart Response® Technology: This feature allows the thermostat to “learn” how long the furnace and air conditioner take to reach programmed temperature settings, so the temperature is reached at the time you set. For example: Set the Wake time to 6 am, and the temperature to 70°. The heat will come on before 6 am, so the temperature is 70° by the time you wake at 6. The message “In Recovery” is displayed when the system is activated before a scheduled time period.
Built-in compressor protection
This feature helps prevent damage to the compressor in your air conditioning or heat pump system.
Damage can occur if the compressor is restarted too soon after shutdown. This feature forces the compressor to wait a few minutes before restarting.
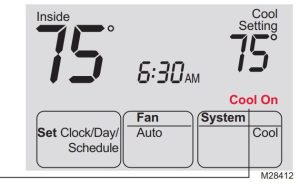
During the wait time, the display will flash the message Cool On (or Heat On if you have a heat pump). When the safe wait time has elapsed, the message stops flashing and the compressor turns on.
Battery replacement
Install fresh batteries immediately when REPLACE BATTERY begins flashing. The warning flashes about two months before the batteries are depleted.
Replace batteries once a year, or when you will be away for more than a month.
If batteries are inserted within two minutes, the time and day will not have to be reset. All other settings are permanently stored in memory and do not require battery power.
