IKOHS B083WNWC9S Windcalm DC Ceiling Fan User Manual
WELCOME
Thank you for choosing our ceiling fan. Before using the appliance, and to ensure the best use, carefully read these instructions.
Following these safety precautions correctly reduces the risk of death, injury and electric shock. Keep this manual in a safe place for future reference, along with the completed warranty card, purchase receipt and package. If applicable, pass these instructions on to the next owner of the appliance. Always follow basic safety precautions and acci-dent-prevention measures when using an electrical appliance. We assume no liability for customers failing to comply with these requirements.
SAFETY INSTRUCTIONS
When using any electrical appliance, basic safety precautions should always be observed.
- This appliance is not intended for use by persons with reduced physical, sensory or mental capabilities or lack of experience and knowledge, unless they are under supervision, or have been given instruction concerning the safe use of the appliance and understand the hazards involved.
- Children do not recognise the dangers that may occur when operating a ceiling fan. Keep children away from ceiling fans.
- Do not expose the ceiling fan to rain or moisture. Do not operate the ceiling fan outdoors or with wet hands.
LOCATION AND INSTALLATION REQUIREMENTS
Mechanical issues
- According to safety regulations, the lowest point of the fan blade must be at least 2.3m (7 feet) from the floor.
- Please make sure the chosen location will not allow the rotating fan blades to come into contact with any objects.
- Ensure ceiling joists are sound and are large and strong enough to support the weight of the fan.
- To reduce the risk of fire, electric shock or personal injury, ensure that the fan mounting bracket is attached directly to the building structure. DO NOT mount to an outlet box.
- The mounting bracket must be firmly screwed to a load bearing structure, e.g. a concrete ceiling, steel structure or timber frame. If a timber frame is added, it must be securely nailed or screwed between two beams.
- To reduce risk of personal injury and property damage, do not bend or damage the downrod or the fan blades when handling or installing them. If you notice any product imperfections, please contact our after-sales service before proceeding to install the fan.
- Make sure the ceiling fan is securely fastened to the ceiling. All set screws must be checked and re-tightened where necessary before fan operation.
Electrical issues
- Always turn the power off before servicing the ceiling fan, and turn off the circuit breaker that feeds the power to the light. To avoid possible electric shock, make sure electricity is turned off at the fuse box or circuit breaker panel before wiring.
- The fan, mounting bracket and light kit must be earthed. Ensure all spliced connections are adequately insulated.
- Check and confirm that all connections are proper and secure. When all the electrical connections are done, store all wires neatly.
- Do not attempt to control this fan from any wall switch or remote control that is not approved by the manufacturer for use with this fan. DO NOT use a solid state controller. The use of an unapproved wall switch or remote control will void the warranty.
- Do not connect the ceiling fan to a dimmer switch or a regulator.
CAUTIONS AND WARNINGS
- Use only CREATE replacement parts.
- To reduce the risk of personal injury, attach the fan directly to the support structure of the building according to these instructions, and use only the hardware supplied.
- To avoid possible electrical shock, before installing your fan, disconnect the power by turning off the circuit breakers to the outlet box and associated wall switch location. If you cannot lock the circuit breakers in the off position, securely fasten a prominent warning device, such as a tag, to the service panel.
- All wiring must be in accordance with national and local electrical codes and ANSI/NFPA 70. If you are unfamiliar with wiring, use a qualified electrician.
- To reduce the risk of personal injury, do not bend the blade attachment system when installing, balancing, or cleaning the fan. Never insert foreign objects between rotating fan blades.
- To reduce the risk of fire, electric shock, or motor damage, do not use a solid-state speed control with this fan. Use only CREATE speed controls.
Note: The important safety precautions and instructions in this manual are not meant to cover all possible conditions and situations that may occur. It must be understood that common sense and caution are necessary factors in the installation and operation of this fan.
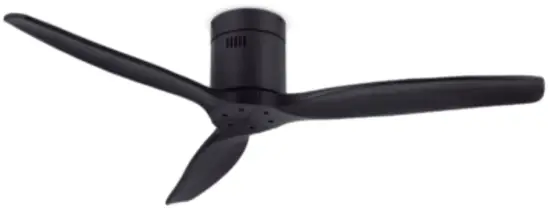
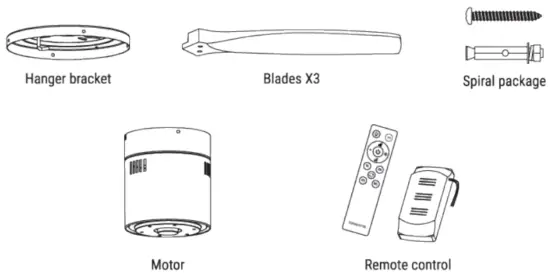
PARTS LIST
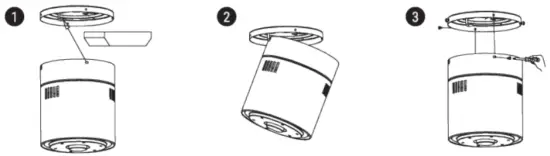
Carefully open the packaging. Remove items from Styrofoam inserts. Remove motor housing and place on carpet or Styrofoam to avoid damage to finish. Check against parts inventory that all parts have been included.
INSTALLATION INSTRUCTIONS
Fixing the mounting bracket
The outlet box and joist must be securely mounted and capable of reliably supporting at least the weight of the fan.
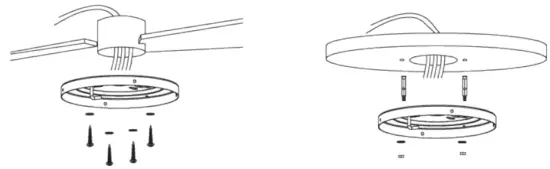
Wooden ceiling
Securely attach the mounting bracket with wood screws and washers to the ceiling joints.
Concrete ceiling
Bore holes with an 8mm drill, according to the length of the expansion screws. After that, fix the mounting bracket to the ceiling with the expansion screws.
Don’t fix the mounting bracket directly on ceilings thinner than 10mm to avoid the risk of the screw coming loose.
Remote control connection
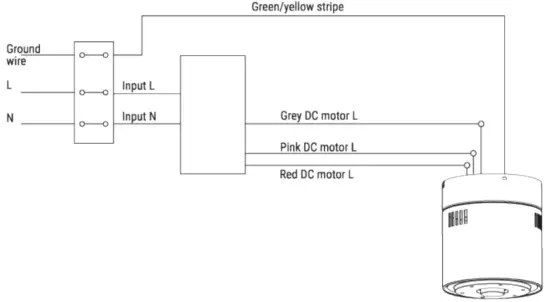
Receiver place: Hook the motor on the left hook, and then conduct wiring
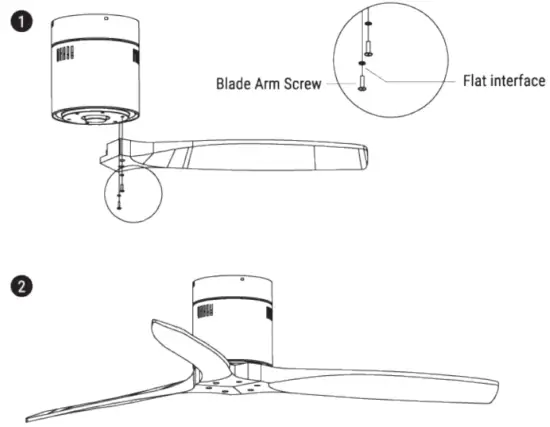
Blade Assembly
Time Saver: Washers for blade screws can be set on each blade screw prior to installing blades.
Align blade holes with motor screw holes, then securely tighten all the screws once all the blades are attached. Before securing screws permanently, repeat with remaining blade arms.
Note: Tighten blade screws twice.
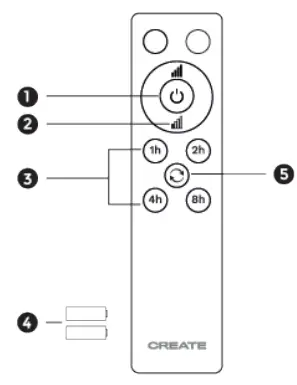
REMOTE CONTROL
RF wireless digital transmission, two-way control, coincident code rate is less than one millionth.(Transmitter and receiver must be sent back to factory for maintenance if damaged.) The remote control can control the receiver from any angle or direction up to the stated limit distance.
- ON / OFF button
- Fan speed control
- Timer
- Batteries (2 x AAA)
- Reverse function
PLEASE REMEMBER:
- If the remote control is not working, please check the batteries are in the correct position and fully charged.
- If the remote control is not working, please whether there are any similar remote controlled products nearby and running, because remote controls using the same frequency will interfere with each other’s signals.
- If the battery is low this will affect the sensitivity of the transmitter and weaken signal reception (the indicator light will flash to warn when the battery is low). Batteries must be replaced if low.
- Please remove the battery from the remote control if it will not be used for a long time.
- For the maximum electricity voltage, see the above TOWER PARAMETER LIST’
Please connect the ground wire correctly, otherwise it may cause the lights to dim or flicker. - When installing the fan, make sure the fan ceiling cover does not place any pressure on the antenna (or other wire), which may damage the wire and cause a short circuit.
TECHNICAL SPECIFICATIONS
| EN | Characteristics |
| Power | 40 W |
| Voltage | 220 – 240V |
| Motor | Sly – DC |
| Speeds | 6 + Reverse |
| On/Off Function | Remote control |
| Timer | 1h-2h-4h-8h |
| Size | 132 cm /52″ |
| Certificates | Ce, RoHS, CB |
In compliance with Directives: 2002/950E, 2002,15/CE and 2003/108/CE on the restriction of the use of dangerous substances in electric and electronic equipment as well as their waste disposal. The symbol with the crossed dustbin shown on the package indicates that the product at the end of its service life shall he collected as separate waste. Therefore, any products that have reached the end of their useful life must be given to waste disposal centres specialising in separate collection of waste electrical and electronic equipment, or given back to the retailer at the time of purchasing new similar equipment, on a one for one basis. The adequate separate collection for the subsequent start-up of the equipment sent to be recycled, treated and disposed of in an environmentally compatible way contributes to preventing possible negative effects on the environment and health and optimises the recycling and reuse of components making up the apparatus. Abusive disposal of the product by the user involves application of the administrative sanctions according to the laws.