

User Manual
Thank you for choosing our air fryer. Before using the appliance, and to ensure the best use, carefully read these instructions. The safety precautions enclosed herein reduce the risk of death, injury, and electrical shock when correctly adhered to. Keep the manual in a safe place for future reference, along with the completed warranty card, purchase receipt, and package. If applicable, pass these instructions on to the next owner of the appliance. Always follow basic safety precautions and accident prevention measures when using an electrical appliance. We assume no liability for customers failing to comply with these requirements.
SECURITY INSTRUCTIONS
When using any electrical appliance, basic safety precautions should always be observed.
- The unit may be used only for the intended purposes. The manufacturer will not be held responsible for damages resulting from improper use or faulty handling.
- Do not use outdoors or for commercial purposes. This appliance is intended for household use only. Using the appliance for commercial purposes will void the warranty.
- Always unplug the appliance before cleaning and when not in use.
- Children should be supervised to ensure that they do not play with the appliance.
- This appliance can be used by children and persons with reduced physical, sensory or mental capabilities or lack of experience and knowledge if they have been given supervision or instruction concerning the use of the appliance in a safe way and understand the hazards involved.
- Never immerse the cord, plug or main body of the appliance in water or other liquids. Should the appliance fall Into the water, immediately unplug it from the mains and have the appliance checked by an expert before using it again? It may cause fire, electric shock, injury or death.
- Always put the ingredients that you wish to fry in the basket, to prevent it from coming Into contact with the heating elements.
- Do not cover the air inlet and the air outlet while the appliance is operating.
- Do not fill the pan with oil as this may cause a fire hazard.
- Ensure that the voltage indicated on the Technical Specification matches the mains voltage before plugging in the appliance.
- Do not pick up or operate the appliance if the power supply cord or the plug are damaged, or if the unit is malfunctioning or has been dropped or damaged in any way. In case of damage, contact the aftersales service. A damaged cord or plug must be exclusively replaced by the manufacturer or a qualified person in order to avoid injuries.
- Do not let the cord hang over the edge of a table or benchtop. Do not operate the appliance near hot surfaces, avoid proximity to open fires and all types of heat and sources of ignition.
- Do not plug in or operate the appliance with wet hands.
- Only connect the appliance to an earthed socket. Always make sure it’s plugged in properly.
- Never connect this appliance to an external timer switch in order to avoid hazardous situations.
- When using this appliance, make sure there’s enough room above and on all sides for air circulation (10cm). Do not operate the appliance if it’s touching or if it’s near curtains, clothing, towels, or other flammable materials.
- While the appliance is air frying, hot steam is released through the air outlet openings. Keep your hands and face at a safe distance from the steam and from the air outlet openings. Also, be careful of hot steam and air when you remove the pan from the appliance.
- The accessible surfaces may become hot during use.
- If you see dark smoke coming out of the appliance, unplug it immediately. Wait for the smoke to stop coming out before you remove the pan from the appliance.
- The baking tray gets hot when it is used in the air fryer. Always use oven mitts when handling the baking tray.
- Place the air fryer on a hard, flat, level, heat-resistant surface. Do not place it on a soft surface such as a carpet. Avoid placing it where it may tip over during operation
- There are no user-serviceable parts inside. Do not attempt to disassemble or repair this product. Please contact our aftersales service.
- Let the appliance cool down for approx. 30 minutes before you move it or clean it.
- Make sure the ingredients prepared in this appliance come out golden-yellow instead of dark or brown. Remove any burnt food. Do not fry fresh potatoes at a temperature above 2002 (to minimize the production of acrylamide).
BEFORE FIRST USE
Remove all packaging materials and any stickers or labels from the appliance. Thoroughly clean the basket and pan with hot water, some washing-up liquid and a non-abrasive sponge. Wipe the inside and outside of the appliance with a damp cloth. This is an air fryer that works on hot air. Do not fill the pan with oil or frying fat.
PREPARING THE APPLIANCE
- Place the air fryer on a hard, flat, level heat-resistant surface.
- Place the basket in the pan properly.
- Pull the cord out of the cord storage compartment on the bottom of the appliance.
- Do not fill the pan with oil or any other liquid.
- Do not cover the appliance as it disrupts the airflow and affects the hot air frying result.
PARTS LIST
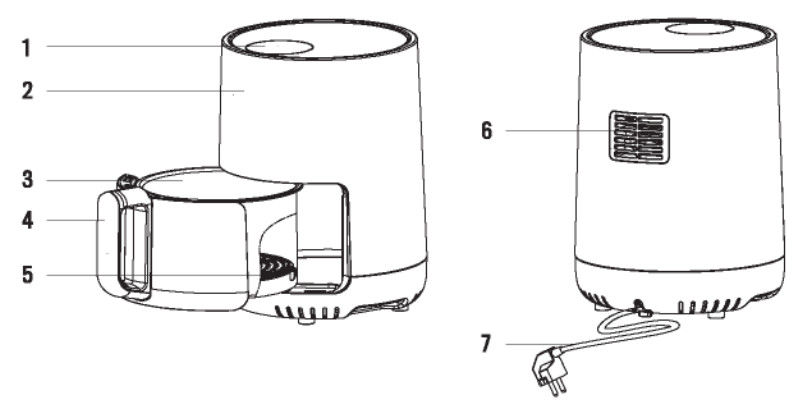
- Control panel
- Housing
- Basket
- Basket handle
- Tray
- Air outlet
- Power cord
CONTROL PANEL
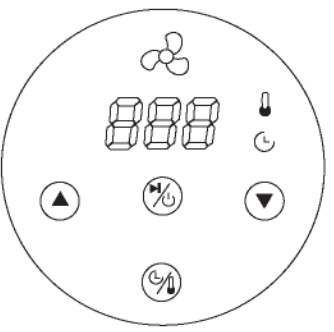

Once the pan and the frying basket are properly placed in the main unit, the Power Button will light up. Press and hold the power button for 2 seconds to set (by default) the temperature to 180 2C and the cooking time to 15 minutes. Press it again to start the cooking process. Press and hold the power button for 2 seconds to stop the appliance during operation. All the lights will turn off and the fan will stop working.
Note: While the appliance Is working, you can use the button to pause and start the appliance.

Press this button to enter temperature and timer configuration. Use the arrows to set your desired time and temperature.


You can use the arrows to set the time and temperature. The temperature range is 80 °C to 200 °C.
The time range is 0 minutes to 60 minutes.

Timer indicator
Fan indicator
OPERATING INSTRUCTIONS
- Plugin the appliance.
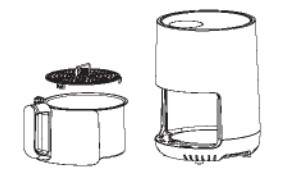
- Carefully pull the pan out of the fryer.
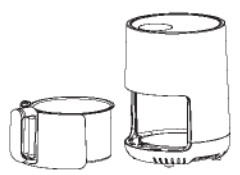
- Put the ingredients in the basket.
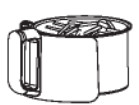
- Slide the pan back into the hot-air fryer.
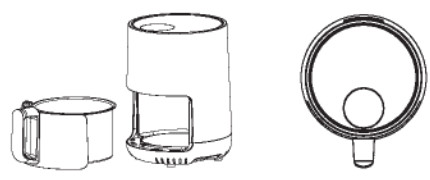
- Determine the required preparation carefully aligning it with the guides In time for the ingredients (refer to the body of the fryer. ‘Settings’ section).
Never use the pan without the basket in it Caution: Do not touch the pan during and straight after use, as it gets very hot. Only hold the pan by the handle. - Set your desired time and temperature.
- Some ingredients require stirring halfway through the preparation process (refer to the ‘Settings’ section). To stir the ingredients, pull the pan out of the appliance by the handle and give it a gentle shake. Then slide the pan back into the fryer.
- When you hear the buzzer alarm beep it means the set preparation time has run out At this point, the fan will stop working and you can pull the pan out of the appliance and place it on a heat-resistant surface.
- Check if the ingredients are ready.
- If the ingredients are not ready yet, simply slide the pan back into the appliance and set the timer to a few extra minutes.
- To remove the food (e.g. chips), pull the pan out of the Hot-air fryer and place it on a heat-resistant surface.
- Do not turn the basket upside down with the pan still attached to it, as any excess oil that may have collected on
- the bottom of the pan will leak onto the ingredients.
- The pan and the ingredients are hot Depending on the type of food in the fryer. steam may escape from the pan.
- Empty the basket into a bowl or onto a plate. Tip: To remove large or fragile ingredients, lift the ingredients out of the basket using a pair of tongs.
- When a batch of ingredients is cooked, the air fryer is instantly ready for preparing another batch.
SETTINGS
The following table will help you select the basic settings for the different types of ingredients. Note: Keep in mind that these settings are illustrative. Ingredients with different shapes and sizes will require different time and temperature settings. Since the Quick-Air technology instantly reheats the air inside the appliance, briefly pulling the pan out of the appliance during operation will barely disturb the process.
TIPS
- Smaller Ingredients usually require a slightly shorter preparation time than larger Ingredients. As well as larger amounts of food require a slightly longer preparation time than smaller amounts of food.
- Giving smaller ingredients a gentle shake halfway through the preparation optimizes the end result and can help prevent unevenly fried food.
- Lightly coat your fresh potatoes on some oil before frying them for a crispier result.
- Do not prepare extremely greasy ingredients, such as sausages, in the hot-air fryer.
- Snacks that can be prepared in an oven can also be prepared in the hot air fryer.
- The optimal amount for preparing crispy chips is 300 grams.
- The store-bought dough requires a shorter preparation time than homemade dough.
- You can place silicone muffin cups and silicone liners inside of the appliance if you wish to bake a cake, a quiche, cupcakes or delicate and filling ingredients.
- You can also use the hot air fryer to reheat food. Just set the temperature to 150 °C for up to 10 minutes.
| AMOUNT (G) | TIME (MIN.) | TEMP. (°C) | SHAKE | EXTRA INFO. | |
| POTATO & CHIPS | |||||
| Thin frozen chips | 200-300 | 18 -20 | 200 | Yes | |
| Thick frozen chips | 200-300 | 20-25 | 200 | Yes | |
| Potato gratin | 300 | 20-25 | 200 | Yes | |
| MEAT & POULTRY | |||||
| Steak | 100-300 | 10-15 | 180 | ||
| Pork chops | 100-300 | 10-15 | 180 | ||
| Hamburger | 100-300 | 10-15 | 180 | ||
| Sausage roll | 100-300 | 13-15 | 200 | ||
| Drumsticks | 100-300 | 25-30 | 180 | ||
| Chicken breast | 100-300 | 15-20 | 180 | ||
| SNACKS | |||||
| Spring rolls | 100-250 | 8-10 | 200 | Yes | Use oven-ready |
| Frozen chicken nuggets | 100-300 | 6-10 | 200 | Yes | Use oven-ready |
| Frozen fish fingers | 100-260 | 6-10 | 200 | Use oven-ready | |
| Frozen breadcrumbed cheese snacks | 100-250 | 8-10 | 180 | Use oven-ready | |
| Stuffed vegetables | 100-250 | 10 | 160 | ||
| BAKING | ||||
| Cake | 250 | 20-25 | 160 | Use baking tin |
| Quiche | 300 | 20-22 | 180 | Use baking tin |
| Muffins | 250 | 15-18 | 200 | Use baking tin |
| Sweet snacks | 250 | 20 | 160 | Use baking tin |
Note: If you haven’t preheated your air fryer, add 3 minutes to the preparation time to allow your appliance to heat up.
CLEANING AND MAINTENANCE
Clean the appliance after every use. The pan, baking tray, separator, basket, and the inside of the appliance have a non-stick coating. Do not use metal kitchen utensils or abrasive cleaning materials to clean them, as this may damage the non-stick coating.
- Unplug the appliance and let it cool down. Note: Remove the pan to let the air fryer cool down quicker.
- Wipe the outside of the appliance with a damp cloth.
- Clean the pan, baking tray, separator, and basket with hot water, some washing-up liquid, and a non-abrasive sponge. You can use a grease remover liquid to get rid of any remaining residues. Note: The pan, baking tray, separator and basket are dishwasher-safe. Tip: If there is food stuck to the basket, the baking tray, or the bottom of the pan, fill the pan with hot water with some washing-up liquid. Put the basket in the pan and let them soak for approximately 10 minutes.
- Clean the heating element with a cleaning brush to remove any food residues. Unplug your air fryer and make sure all parts are clean and dry before storing the appliance.
TROUBLESHOOTING
| PROBLEM | CAUSE | SOLUTION |
| The appliance is not plugged- get in. | Plug the appliance to an earthed socket | |
| The hot air fryer does not work. | You have not set the timer. | To tum on the appliance, use the timer control button and the arrows to set the required preparation time |
| There Is too much food in the basket | Remove some food. Smaller batches fry more evenly. | |
| The ingredients are not done | The set temperature is too low. | Program the temperature to a higher setting. |
| The preparation time is too short. |
Set more Urns to allow the food to cook completely | |
| . The ingredients are fried unevenly. |
Certain types of ingredients need to be stirred halfway through the preparation time. | Remove the pan from the main body and give it a gentle shake halfway through the preparation process. |
| Fried snacks are not crispy. | The snacks were meant for a traditional deep fryer. | Use oven snacks or lightly coat the ingredients in some oil for a crispier result |
| The pan does not fit into | Too much food in the basket | Remove some food. Smaller batches fry more evenly |
| the appliance properly | The basket is not placed correctly. | Push the basket down Into the pan until it clicks. |
| White smoke comes out of the appliance. | You are preparing greasy ingredients. | When you fry greasy ingredients in the air fryer, a large amount of oil will leak into the pan and it produces white smoke. The pan may heat up more than usual This does not affect the performance or the end result. |
| There’s grease from previous use. | Make sure you clean the pan properly after each 1 use. | |
| Fresh chips are fried unevenly. | You didn’t rinse the chip’s property before frying them. | Rinse the chips properly to remove all the starch from the outside. |
| Fresh chips are not crispy when they come out of the air fryer. |
The crispiness of the fries depends on the amount of oil and water in the fries. | Cut the potato smaller and add slightly more oil for a crispier result. |
