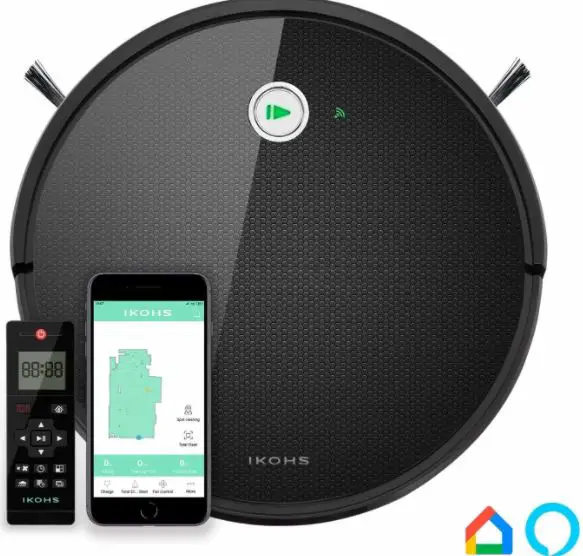
IKOHS Netbot S15 Smart Vacuum Cleaning Robot
WELCOME
Thank you for choosing our wine cooler. Before using the appliance, and to ensure the best use, carefully read these instructions. The safety precautions enclosed herein reduce the risk of death, injury and electrical shock when correctly adhered to. Keep the manual in a safe place for future reference, along with the completed warranty card, purchase receipt and package. If applicable, pass these instructions on to the next owner of the appliance. Always follow basic safety precautions and accident-prevention measures when using an electrical appliance. We assume no liability for customer failing to comply with these requirements.
INSTALLING AND USING THE APP
Downloading the APP and Wi-Fi configuration instructions.
- Scan the QR code to download and install the APP on an iOS device, or use the one on the right to download the APP on an Android device.
- Open the App and log in if you have a account. It you don’t, select “New User• to sign up, and click on “add device· once you log in.
- Scan the QR code on the bottom of the Vacuum Cleaner, or manually enter the Device name to confirm the device model, turn on the “Power switch” by following the instructions in the APP and go to the next step.
- Confirm your Wi-Fi network and enter the password.
- You will hear a voice prompt that says: “Robot is networking” and the Wi-Fi light will flash. Enter the “Networking mode”. The App will confirm that it’s activated. Enter the device connection interface. Depending on the strength of the Wi-Fi signal, it may take a little longer. Once it is successfully paired, enter the device management interface. Click on the device to enter device control, or click the option in the upper right corner for device options and other operations. If it failed to pair the device, please confirm whether the Wi-Fi password has been entered correctly; and whether your home router’s wireless network frequency is 2.4G.
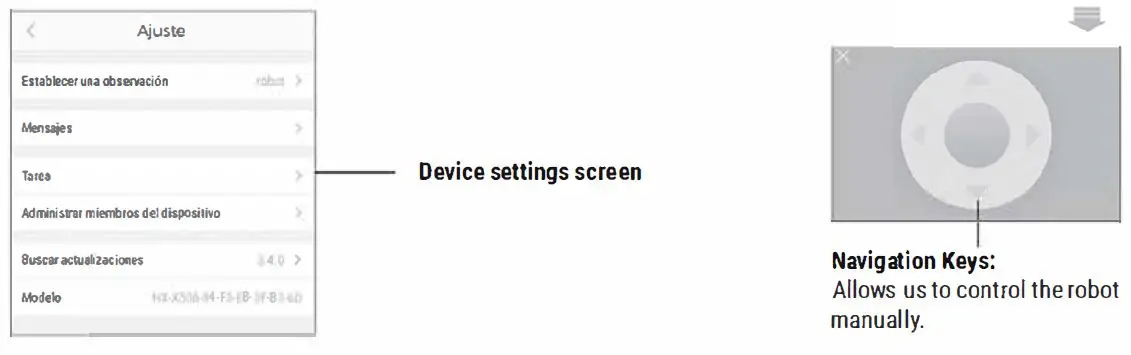
- The device control interface allows for multi-mode control of the device or display of the device status and other information.
- Press to set the Device’s name or schedule.
APP FUNCTIONS
Home Page
1. Choose device.
2. Battery level.
3. Device settings.
4. Add device.
5. Go to home page.
6. Settings.
Account Settings
1. Username.
2. Registered mobile number.
3. Notifications.
4. Check for updates.
5. Log out
Functions
1. Current robot status.
2. Cleaning map.
3. Cleaning info (sq. ft., battery
& time)
4. Start cleaning.
5. Fan Mode.
6. Load.
7. More options.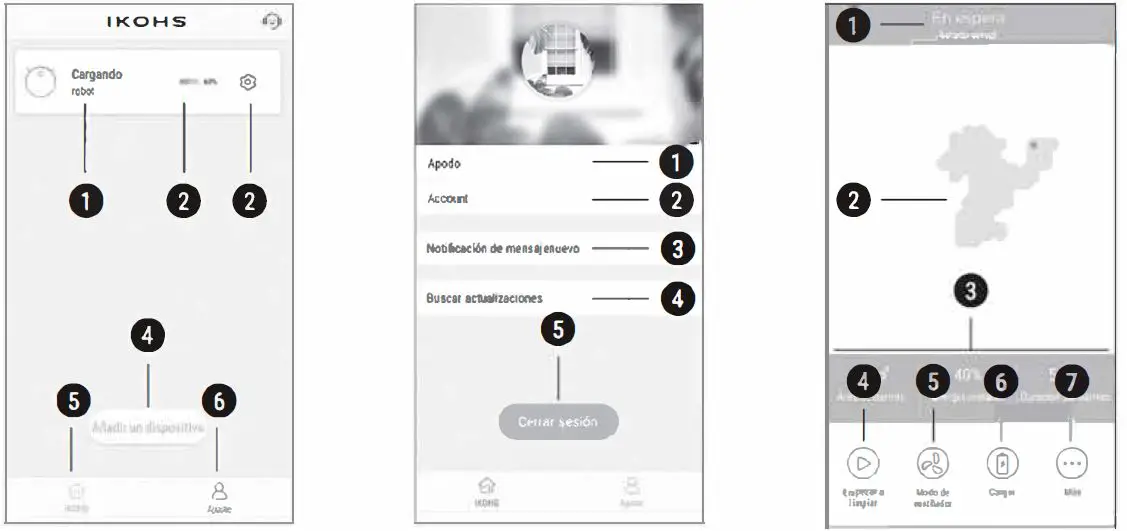
THIRD-PARTY CONNECTIONS
The IK0HS/NETB0T App allows us to connect our robot vacuum cleaner to popular voice-controlled devices such as Amazons Echo – Alexa and Google Home. Press on ‘Third-Party Connection’ on the Settings page of the account to obtain detailed instructions.
Contents of the box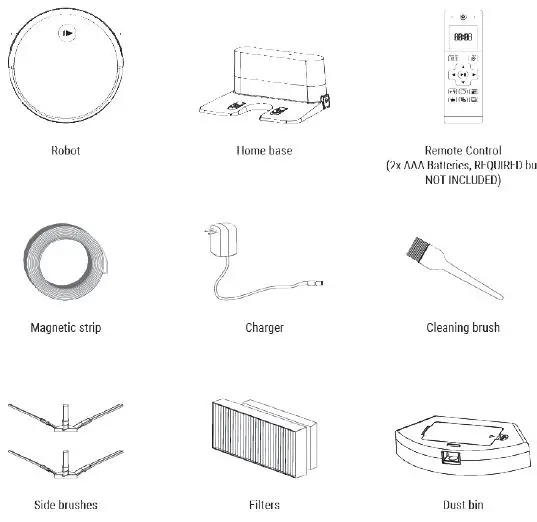

PARTS LIST
Top view
1. Control Button.
2. Bumper.
3. Dustbin release.
4. On/Off button.
5. DC input.
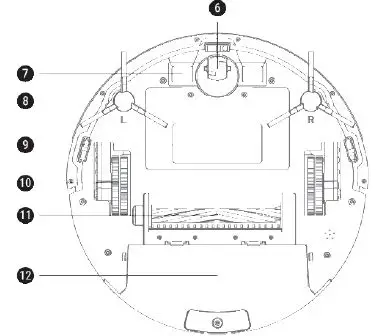
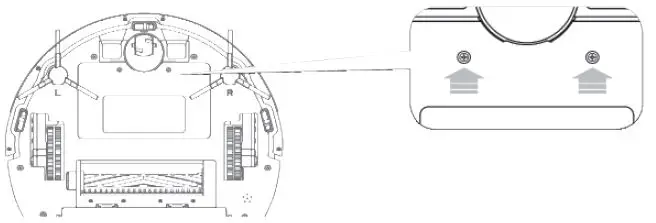
Bottom view
6. Caster wheel.
7. Charging contact pins.
8. Side brush.
9. Battery cover.
10. Wheels.
11. Rolling brush components.
12. Dustbin.
Note: Each side-brush is marked with a predetermined position (L > Left or R > Right). Make sure that each brush is placed into the correct position in order to avoid damages to the vacuum cleaner robot.
DUSTBIN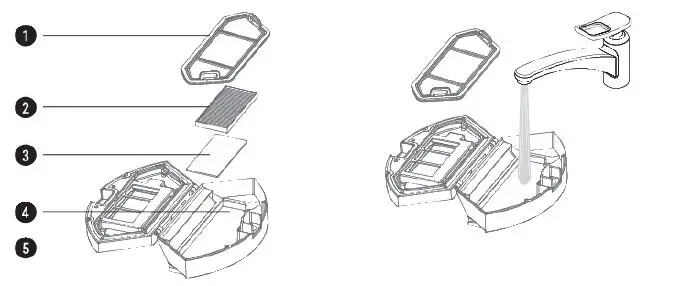
1. Pre-filter
2. Filter
3. Filter sponge
4. Dustbin
5. Dustbin cover
The Dustbin can be cleaned with water
The Dustbin and the pre-filter can be easily rinsed with water, allowing us to avoid secondary contamination caused by dust.
HOME BASE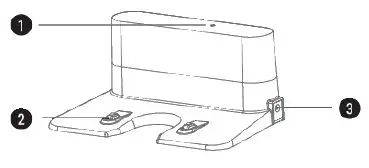
1. Charging indicator
2. Charging contact pins
3. DC Power jack
RANGE OF APPLICATION
The product is suitable for cleaning houses, hotel rooms, and small offices. It provides thorough cleaning for various carpets (with carpet wool less than 0.8 inches long), wooden floors, hard floors, floor tiles, etc.
REMOTE CONTROL INSTRUCTIONS
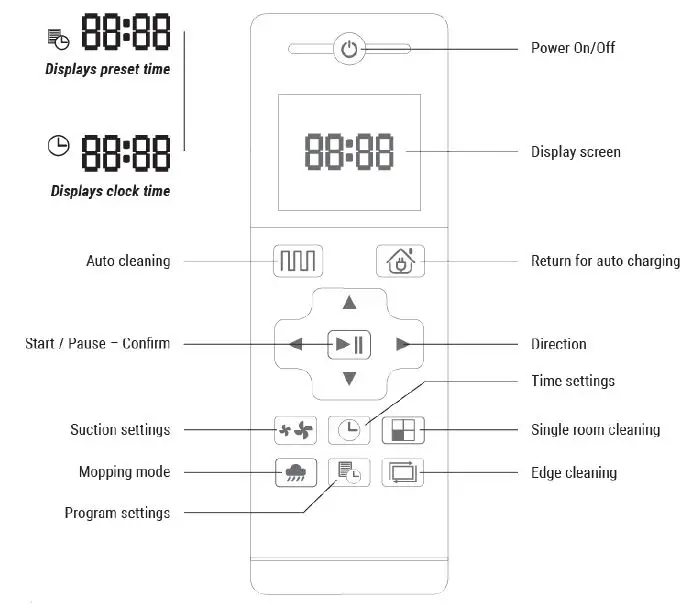 Auto-cleaning button
In any cleaning mode, press this button to enter the auto cleaning mode.
Auto charging
Press this button to enter the auto charging mode. The robot will go back to the home base.
Forward/+
On standby mode, press this button to continue moving forward, and release it to return to the standby mode. When on the Program mode or the Time Settings mode, press this button to increase the number.
Backward / –
On standby mode, press and hold this button to rotate 180 degrees and clean forward in that direction, release the button to return to then standby mode. When on the Program mode or the Time Settings mode, press this button to decrease the number.
Left arrow
On standby mode, press this button to continue turning left, and release it to return to the standby mode. When on the Program mode or the Time Settings mode, press this button to switch from minutes to hours.
► Right arrow
On standby mode, press this button to continue turning right, and release it to return to the standby mode. When on the Program mode or the Time Settings mode, press this button to switch from hours to minutes.
► II Start/Pause – Confirm button
During operation, press this button to stop the robot. Press again to continue cleaning. When on the Program or Time Settings mode, press this button to save the settings.
Suction settings button
In any cleaning mode, except •• press this button to adjust the suction power.
Time settings button
Press this button to enter the Time Settings mode and press the OK button to exit.
Single room cleaning button
Press this button to enter the Single Room Cleaning Mode.
Mopping mode button
Press this button to enter the Mopping Mode.
Program button
On the standby mode, press this button to enter the pre-setting mode, and the display will flash the icon. When on the program mode, press this button to save the data and exit the mode, and the screen will display the ‘9 icon. In the program mode, press the button for 3 seconds to cancel the function, and the l’9 icon will disappear.
Edge cleaning button
Press this button to enter the Edge Cleaning mode.
Note: When the robot is near the charging base and the virtual protection wall, I may not be able to distinguish the instructions issued by the remote control. If you are not going to use the remote for a long time, please remove the batteries.
INSTALLING THE CHARGING BASE
Place the base flat against the wall. Do not place any objects within 3.3 ft. to either side and 6.6 ft. in the front. Do not place any mirrors or other reflective objects within this distance.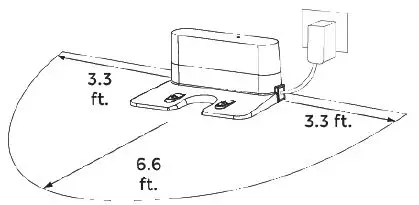
CHARGING MODES
Charging by user command
In any mode, select the Return or Auto Charging button on the remote control to make the robot return to the home base for charging.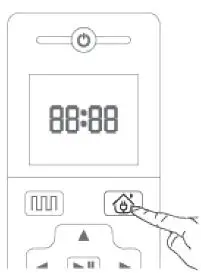
Auto charging
When cleaning is completed or the battery is too low, the robot will automatically start looking for the charging base to charge itself. Please keep the charging base connected, otherwise the machine will not be able to find the charging base.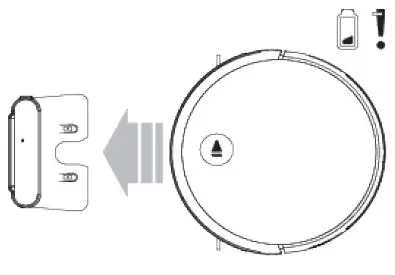
CHARGING INSTRUCTIONS
- The battery must only be repaired and replaced by authorized personnel.
- When you use the robot for the first time, please let it run out of battery.
- Once the robot is completely charged, the Control button will flash green.
- Please, charge the robot as soon as possible after the battery runs out.
- Only use the charger provided by the manufacturer.
- Before you use the robot for the first time, please charge it for 12 hours.
Note: If you are not going to use the vacuum for a long time, please turn off the power switch.
SWITCHING MODES
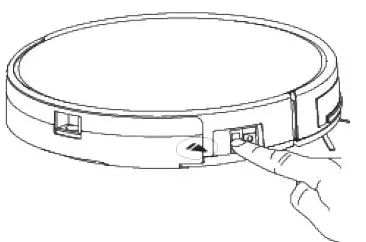
Start-up
Make sure the power switch on the side of the robot is turned on. Press the Control button or the Cleaning mode on the remote control to start the robot.
Pause
The pause function is for switching the robot from the operating mode to the selected mode. To pause the robot:
- Press the Control button on the robot to pause it.
- Press the power on/off button on the remote control to pause the robot.
Stand by
Stand by mode means that the robot is stopped and the indicator light is off. If the robot is not active for 10 minutes, the robot will enter the Stand by mode automatically.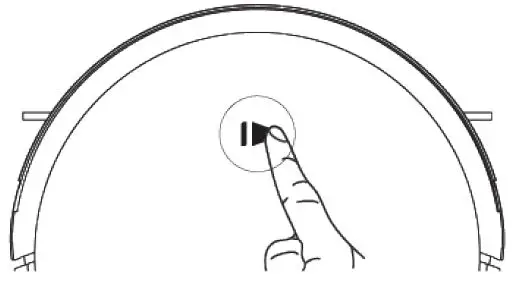
PRESET CLEANING
You can programme the cleaning times through the remote control. To do this, the first step is to set the local time. Press the Time Settings button C9 and use the arrow buttons to set the time. To save the time, press the On/Pause button ►II .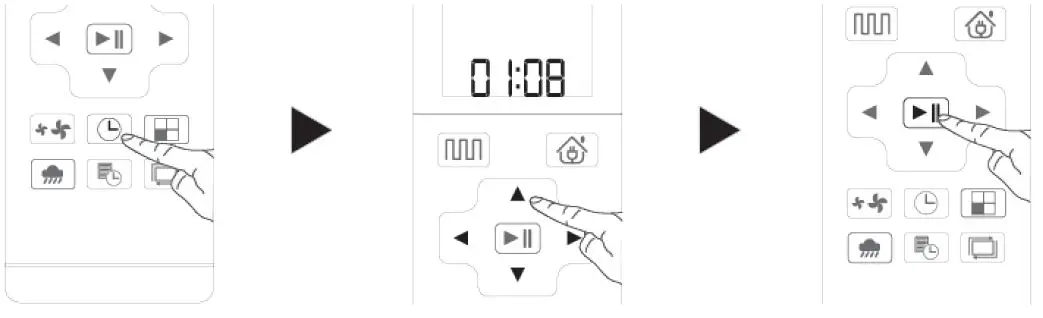
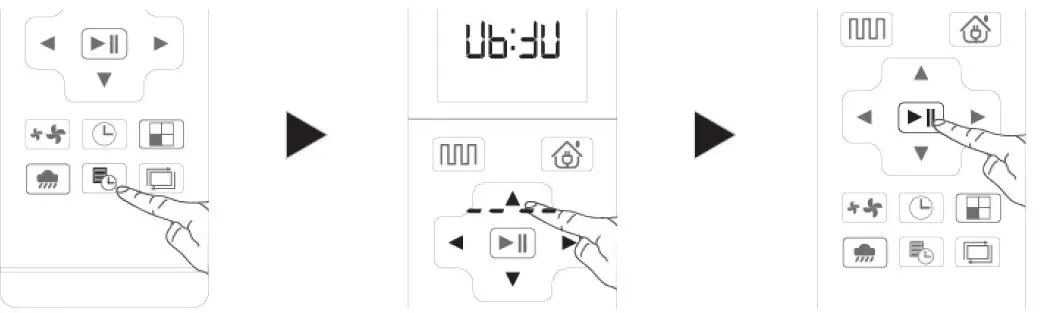
To establish a preset cleaning time for the robot, follow these steps:
- Press the Programme button “9 to enter the mode and set the time on the remote control. (E.g. If you set the time to 6:30 am, the vacuum will start cleaning at 6:30 am every day).
- The remote needs to be facing the robot. To save, press the Power On/Pause button or the programme button.
- If you need to cancel the presetting, hold down the Programme button for 3 seconds.
Note: At the programme cleaning mode, all operations will be prompted to confirm. Once you turn the power switch off. all pre-settings will be cancelled.
CLEANING MODES
 Auto cleaning
The robot will perform the smart Auto Cleaning according to the layout of the room. In Auto Cleaning Mode, you do not need to control it manually because it has a precise cleaning plan to cover the entire floor surface intelligently.
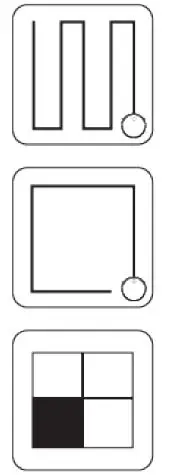
Edge Cleaning
The robot will clean around the edges of the room.
Single Room Cleaning
The robot will clean creating a Zigzag motion according to the layout of the room. It will go back to the starting point and cover all areas.
Mopping Mode
The robot will clean creating a Zigzag motion according to the layout of the room. You shouldn’t control it manually as it has a precise cleaning plan, otherwise it could reframe the cleaning route and cover an already cleaned area.
SIDE BRUSH CLEANING AND REPLACEMENT
Check the side brush’s condition frequently to see if it has been damaged or has become entangled with other objects. Clean the side brush with a cleaning tool or cloth. If the side brush is damaged and cannot be used, replace it as soon as possible.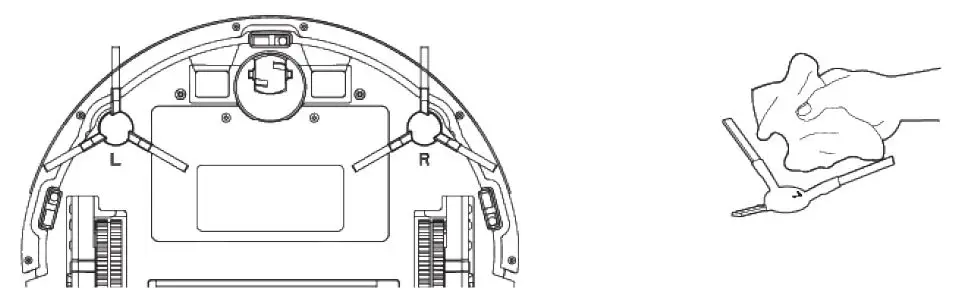
CLEANING THE DUSTBIN AND FILTER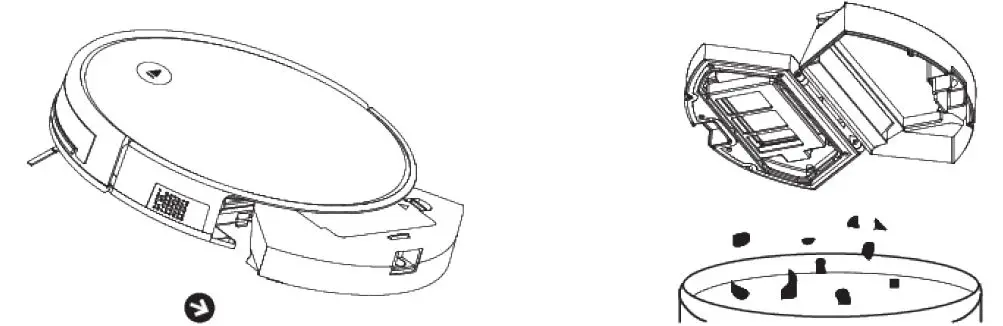
- Press the release button on the dustbin to remove it.
- Empty the dustbin into the garbage.
- Remove the pre-filter.
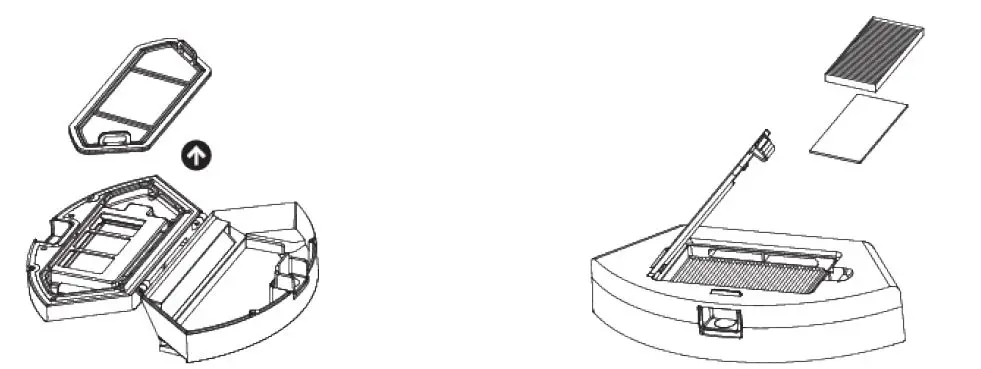
- Open the filter cover and remove the filter and filter sponge. Please, carefully pat off the dust.
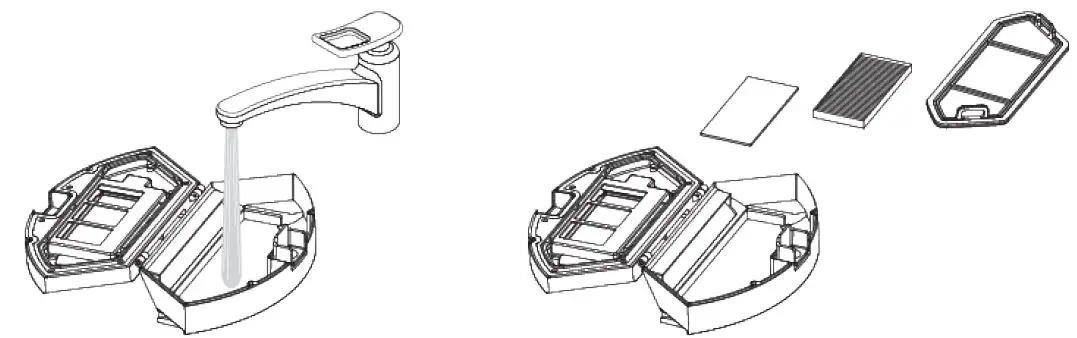
- Wash the dustbin and filter. Dry the dustbin and filter components.
- Reinstall the pre-filter and filter in the dustbin. Before installing the filter, make sure that the filter and the pre-filter are dry.
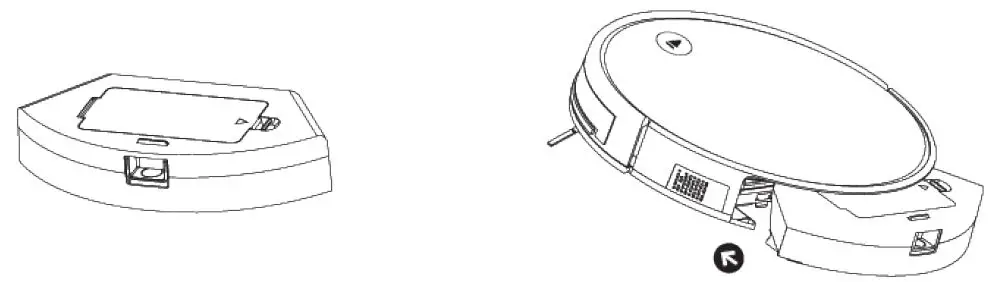
- Close the Dustbin and place it back into the body of the robot vacuum.
Note: - It’s recommended that you don’t wash the high-efficiency filter with water.
- Keep the dustbin and filter components dry to ensure longer service life.
- Please, wash the pre-filter after using it for 15-30 days.
- The maximum service life of the filter is 3 months.
- Do not expose the filter and the pre-filter to direct sunlight.
MAINTENANCE OF ROLLING BRUSH COMPONENTS
- Open the rolling brush compartment.
- Remove the rolling brush shaft and clean off any dust and hair.
MAINTENANCE OF THE CHARGING BASE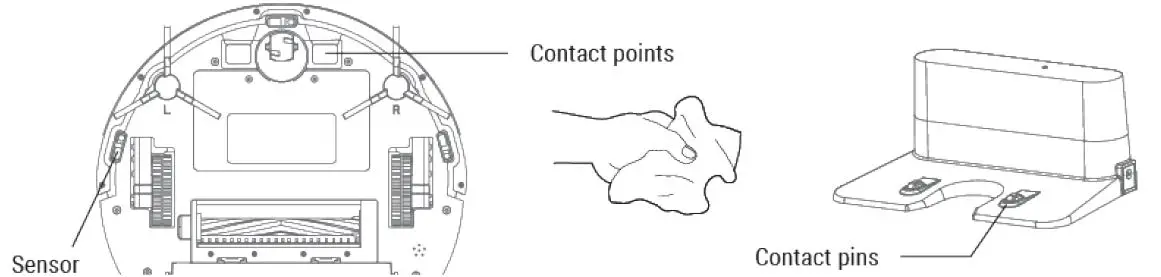
Use the cleaning tools or a dry soft cloth to periodically clean the charging plate of the robot’s body and sensor window.
INSTALLATION AND USE OF THE WATER TANK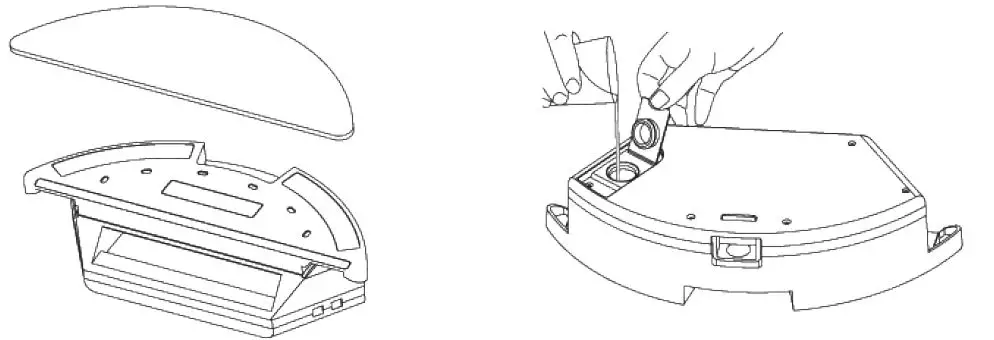
- Place the absorbent cloth on the velcro at the bottom of the tank.
- Remove the plug and fill the tank with water. The capacity is 600 ml max.
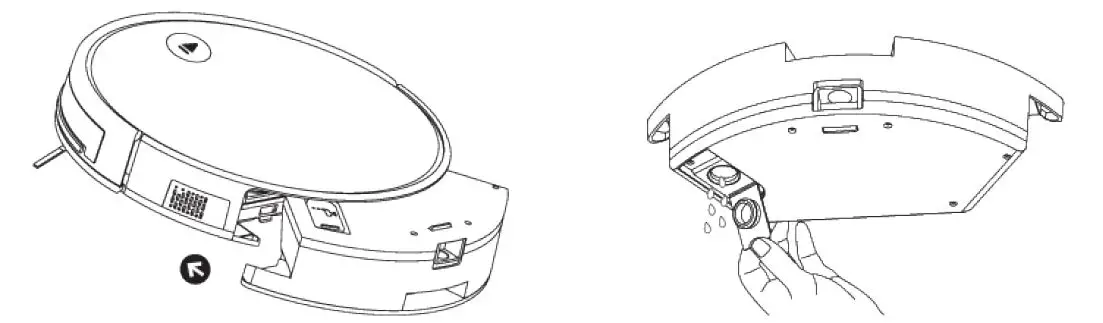
- Place the absorbent cloth on the velcro at the bottom of the tank.
- Place the tank in the robot. Make sure it’s properly inserted. Once the cleaning is finished, completely empty the tank and clean with a dry cloth.
Note: Never charge the robot with the water tank installed.
REPLACEABLE COMPONENTS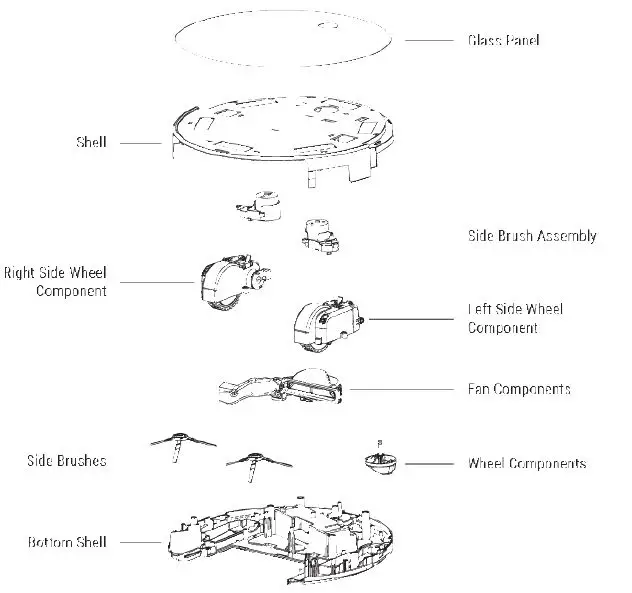
 MAGNETIC STRIP
The magnetic tape is used to delimit the areas where you do not want the vacuum cleaner to perform cleaning tasks and for avoiding uneven floors and obstacles.
SAFETY INSTRUCTIONS
The safety precautions enclosed herein reduce the risk of fire, electrical shock and injury when correctly adhered to. Keep the manual in a safe place for future reference, along with the completed warranty card, purchase receipt and package.
Warnings about the robot and components:
- Do not attempt to disassemble, repair or modify the unit to avoid injuries and/or damaging the product.
- To avoid damaging the product, do not heat, pull, bend or load weight onto the product.
- Do not use the product in an environment where there’s risk of fire or explosion.
- Do not use near open flames such as candles or lighters.
- Do not stand or sit on this product; doing so could damage the product.
- When the metallic part on the power plug is dusty, please wipe it with a dry cloth.
- Do not clean or submerge the main body and electronic accessories in water to avoid causing a short circuit and damaging the product.
- During cleaning, please pay attention to the safety of toddlers and elders to avoid tripping. Do no touch the wheel or side brush to avoid injury. (Pay special attention to babies and toddlers.)
- This product is for indoor use only. Please, do not use outdoors.
- Do not touch the product with wet hands as it can cause an electric shock.
- Please, do not place the product in places where it could easily fall, such as on tables, chairs, high surfaces, etc. Protect the appliance from long-term exposure to direct sunlight.
- Do not use in humid environments, such as in the bathroom.
- Turn off the power switch on the side of the robot if the product is not going to be used for a long time. Carefully check to see if the power adapter is connected to the socket prior to its use, to avoid damage to the robot. Before using the product, please remove all fragile items, such as lamps, from the floor. Remove all wires and curtains that may get tangled with the side brush and obstruct the suction passages.
- After each use, empty the bin and clean the filter.
- Please, do not use the product to clean construction waste.
- The operating temperature of the product ranges from 0°C to 40°C, do not use it in environments that surpass the maximum recommended temperature.
- Before the product is disposed of, please remove the battery from the robot. When you remove the battery, please ensure that the product is not connected to a power supply. Please recycle the battery safely to protect the environment.
- This appliance is not recommended to be used by children from 8 years and below and persons with reduced physical, sensory or mental capabilities or lack of experience and knowledge, unless they are supervised or have been given instructions concerning use of the appliance in a safe way and understand the hazards involved.
Battery Warnings:
- Do not use any chargers other than that provided by the manufacturer.
- Do not allow metal objects to come into contact with the battery to avoid short-circuiting.
- Do not transport or store with metal objects.
- Do not burn or heat-up the battery.
- If you notice abnormal overheating during charging, stop use immediately.
- If you are not going to use your robot for an extended period of time, remove the battery and store it in a dry cool place, to make the most out of the battery life.
- If you notice any abnormalities (e.g. discolouration or deformation) stop using it immediately.
- Always use tape to insulate the battery’s electrode when recycling or disposing of it.
- If skin or clothing is exposed to the battery’s electrolyte, immediately wash with clean water to avoid skin inflammation, etc.
- Do not use the rechargeable battery on other devices. This battery is only suitable for this robot.
- If the battery’s outer box is found to be deformed and expanded, or leakage of electrolytes is found, do not charge or continue to use the device to avoid danger.
- Do not throw or inflict a strong impact on the battery; doing so may cause leakage, heating or rupture.
- Do not disassemble the battery pack; doing so may cause battery rupture and electrolyte leakage, leading to an explosion or other dangers.
- This appliance contains batteries that can only be replaced by qualified personnel.
- For the purposes of recharging the battery, only use the detachable supply unit provided with this appliance.
- The power supply must be removed from the socket-outlet before cleaning or maintaining the appliance.
- The battery must be removed from the appliance before it is thrown away.
- The appliance must be disconnected from the mains when removing the battery.
- The battery should be safely disposed of.
How to remove the battery:
- Remove the two screws on the battery cover with a screwdriver.
- Take out the battery cover.
- Take out the battery and unplug the electric wires to remove the battery.