Sections in this Manual
How To Use
Remove existing permissions
To remove the existing permissions:
- Close Logitech Options software.
- Go to System Preferences -> Security & Privacy. Click the Privacy tab, and then click Accessibility.
- Uncheck Logi Options and Logi Options Daemon.
- Click on Logi Options and then click on the minus sign ‘–’ .
- Click on Logi Options Daemon and then click on the minus sign ‘–’ .
- Click on Input Monitoring.
- Uncheck Logi Options and Logi Options Daemon.
- Click on Logi Options and then click on the minus sign ‘–’.
- Click on Logi Options Daemon and then click on the minus sign ‘–’.
- Click Quit and Reopen.
Add the permissions
To add the permissions:
- Go to System Preferences > Security & Privacy. Click the Privacy tab and then click Accessibility.
- Open Finder and click on Applications or press Shift+Cmd+A from the desktop to open Applications on Finder.
- In Applications, click Logi Options. Drag and drop it to the Accessibility box in the right panel.
- In Security & Privacy, click on Input Monitoring.
- In Applications, click Logi Options. Drag and drop it to the Input Monitoring box.
- Right-click on Logi Options in Applications and click on Show Package Contents.
- Go to Contents, then Support.
- In Security & Privacy, click on Accessibility.
- In Support, click Logi Options Daemon. Drag and drop it to the Accessibility box in the right pane.
- In Security & Privacy, click on Input Monitoring.
- In Support, click Logi Options Daemon. Drag and drop it to the Input Monitoring box in the right pane.
- Click Quit and Reopen.
- Restart the system.
- Launch the Options software and then customize your device.
The keyboard backlight did not reset and go to automatic light detection after sleep
If your MX Keyboard doesn’t turn on the keyboard backlight after you wake it up, we recommend updating the firmware using the instructions below:
- Download the latest Firmware Update Tool from the download page.
- If your mouse or keyboard is connected to a Unifying receiver, follow these steps. Otherwise, skip to step 3.
– Make sure to use the Unifying receiver that originally came with your keyboard/mouse.
– If your keyboard/mouse uses batteries, please take the batteries out and put them back in or try replacing them.
– Unplug the Unifying receiver and reinsert it into the USB port.
– Turn off and on the keyboard/mouse using the power button/slider.
– Press any button on the keyboard/mouse to wake up the device.
– Launch the downloaded Firmware Update Tool and follow the on-screen instructions. - If your keyboard/mouse still does not work, please reboot your computer and repeat the steps at least two more times.
– If your mouse or keyboard is connected using Bluetooth and is still paired to your Windows or macOS computer:Turn off and on your computer’s Bluetooth or reboot your computer.
– Turn off and on the keyboard/mouse using the power button/slider.
– Launch the downloaded Firmware Update Tool and follow the on-screen instructions.
– If your keyboard/mouse still does not work, please reboot your computer and repeat the steps at least two more times. - If your mouse or keyboard is connected using Bluetooth but is no longer paired:
– Remove the Bluetooth pairing from the computer (if any).
– Unplug the Unifying receiver (if any).
– Launch the downloaded Firmware Update Tool and follow the on-screen instructions.
– On the ‘connect receiver’ window, press any button on the keyboard or mouse to wake up the device.
– The devices will be connected and the firmware update should proceed.
– If the issue persists, please contact our customer support team.
Can I switch my mouse and keyboard at the same time using one Easy-Switch button?
It is not possible to use one Easy-Switch button to at the same time change both your mouse and keyboard to a different computer/device.
We do understand that this is a feature that a lot of customers would like. If you are switching between Apple macOS and/or Microsoft Windows computers, we offer Flow. Flow allows you to control multiple computers with a Flow-enabled mouse. Flow automatically switches between computers by moving your cursor to the edge of the screen, and the keyboard follows.
In other cases where Flow is not applicable, one Easy-Switch button for both mouse and keyboard might look like a simple answer. However, we cannot guarantee this solution at the moment, as it is not easy to implement.
Volume keeps increasing after I press the volume button on my keyboard
If the volume keeps increasing or decreasing after you press the volume button on your MX Keys keyboard, please download the firmware update that addresses this issue.
For Windows
For Mac
NOTE: If the update doesn’t install the first time, please try running it again.
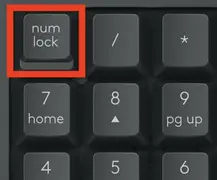
My NumPad/KeyPad is not working, what should I do?
– Make sure that the NumLock key is enabled. If pressing the key once doesn’t enable NumLock, press and hold the key for five seconds.
– Verify that the correct keyboard layout is selected in Windows Settings and that the layout matches your keyboard.
– Try enabling and disabling other toggle keys such as Caps Lock, Scroll Lock, and – – Insert while checking if the number keys work on different apps or programs.
– Disable Turn on Mouse Keys:
1. Open the Ease of Access Center — click the Start key, then click Control Panel > Ease of Access and then Ease of Access Center.
2. Click Make the mouse easier to use.
3. Under Control the mouse with the keyboard, uncheck Turn on Mouse Keys.
– Disable Sticky Keys, Toggle Keys & Filter Keys:
1. Open the Ease of Access Center — click the Start key, then click Control Panel > Ease of Access and then Ease of Access Center.
2. Click Make the keyboard easier to use.
3. Under Make it easier to type, make sure all checkboxes are unchecked.
– Verify the product or receiver is connected directly to the computer and not to a hub, extender, switch, or something similar.
– Make sure the keyboard drivers are updated. Click here to learn how to do this in Windows.
– Try using the device with a new or different user profile.
– Test to see if the mouse/keyboard or receiver on a different computer
Play/Pause and media control buttons on macOS
On macOS, the Play/Pause and media control buttons by default, launch and control the macOS native Music app. The default functions of keyboard media control buttons are defined and set by macOS itself and therefore cannot be set in Logitech Options.
If any other media player is already launched and running, for example, playing music or a movie onscreen or minimized, pressing the media control buttons will control the launched app and not the Music app.
If you wish your preferred media player to be used with the keyboard media control buttons it must be launched and running.
Logitech Keyboard, Presentation and Mice Software – macOS 11 (Big Sur) Compatibility
Apple has announced a forthcoming update macOS 11 (Big Sur) due to be released in the fall of 2020.
|
|
Limited Full Compatibility Logitech Control Center will be fully compatible with macOS 11 (Big Sur), but only for a limited compatibility period. macOS 11 (Big Sur) support for Logitech Control Center will end early 2021. |
|
Fully Compatible |
Fully Compatible
|
|
|
|
Mouse or keyboard stopped working during firmware update and blinks red and green
If your mouse or keyboard stops working during a firmware update and starts to blink repeatedly red and green, this means the firmware update has failed.
Use the instructions below to get the mouse or keyboard working again. After you download the firmware, select how your device is connected, either using the receiver (Logi Bolt/Unifying) or Bluetooth and then follow the instructions.
1. Download the Firmware Update Tool specific to your operating system.
2. If your mouse or keyboard is connected to a Logi Bolt/Unifying receiver, follow these steps. Otherwise, skip to Step 3.
– Make sure to use the Logi Bolt/Unifying receiver that originally came with your keyboard/mouse.
– If your keyboard/mouse uses batteries, please take the batteries out and put them back in or try replacing them.
– Unplug the Logi Bolt/Unifying receiver and reinsert it into the USB port.
– Turn off and on the keyboard/mouse using the power button/slider.
– Press any button on the keyboard/mouse to wake up the device.
– Launch the downloaded Firmware Update Tool and follow the on-screen instructions.
– If your keyboard/mouse still does not work, please reboot your computer and repeat the steps at least two more times.
3. If your mouse or keyboard is connected using Bluetooth and is still paired to your Windows or macOS computer:
– Turn off and on your computer’s Bluetooth or reboot your computer.
– Turn off and on the keyboard/mouse using the power button/slider.
– Launch the downloaded Firmware Update Tool and follow the on-screen instructions.
– If your keyboard/mouse still does not work, please reboot your computer and repeat the steps at least two more times.
Do not remove the device pairing from the System Bluetooth or Logi Bolt when the device is blinking red and green.
If the issue persists, please contact our customer support team.
Logitech Options and Logitech Control Center macOS message: Legacy System Extension
If you are using Logitech Options or Logitech Control Center (LCC) on macOS you may see a message that legacy system extensions signed by Logitech Inc. will be incompatible with future versions of macOS and recommending to contact the developer for support. Apple provides more information about this message here: About legacy system extensions.
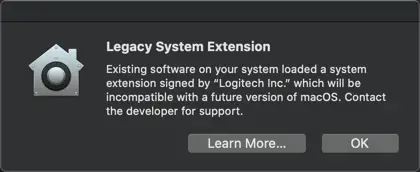
Logitech is aware of this and we are working on updating Options and LCC software to ensure we comply with Apple’s guidelines and also to help Apple improve its security and reliability.
The Legacy System Extension message will be displayed the first time Logitech Options or LCC loads and again periodically while they remain installed and in use, and until we have released new versions of Options and LCC. We do not yet have a release date, but you can check for the latest downloads here.
NOTE: Logitech Options and LCC will continue to work as normal after you click OK.
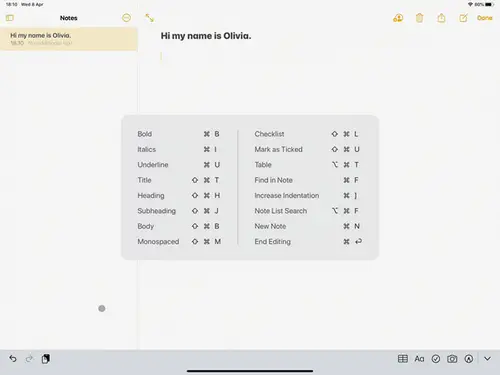
External keyboard shortcuts for iPadOS
You can view the available keyboard shortcuts for your external keyboard. Press and hold the Command key on your keyboard to display the shortcuts.
Change modifer keys of external keyboard on iPadOS
You can change the position of your modifier keys at any time. Here’s how:
– Go to Settings > General > Keyboard > Hardware keyboard > Modifier Keys.
Toggle between multiple languages on iPadOS with an external keyboard
If you have more than one keyboard language on your iPad, you can move from one to the other using your external keyboard. Here’s how:
1. Press Shift + Control + Space bar.
2. Repeat the combination to move between each language.
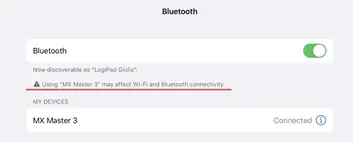
Warning message when Logitech device is connected to iPadOS
When you connect your Logitech device, you might see a warning message.
If this happens, make sure to connect only the devices you’ll be using. The more devices that are connected, the more interference you might have between them.
If you are having connectivity issues, disconnect any Bluetooth accessories that you’re not using. To disconnect a device:
– In Settings > Bluetooth, tap the information button next to the device name, then tap Disconnect.
Bluetooth mouse or keyboard not recognized after reboot on macOS (Intel-based Mac) – FileVault
If your Bluetooth mouse or keyboard does not reconnect after a reboot at the login screen and only reconnects after the login, this might be related to FileVault encryption.
When FileVault is enabled, Bluetooth mice and keyboards will only re-connect after login.
Potential solutions:
– If your Logitech device came with a USB receiver, using it will solve the issue.
– Use your MacBook keyboard and trackpad to login.
– Use a USB keyboard or mouse to login.
Note: This issue is fixed from macOS 12.3 or later on M1. Users with an older version might still experience it.
Pair to a second computer with Easy-Switch
Your mouse can be paired with up to three different computers using the Easy-Switch button to change the channel.
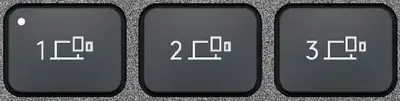
1. Select the channel you want and press and hold the Easy-Switch button for three seconds. This will put the keyboard in discoverable mode so that it can be seen by your computer. The LED will start blinking quickly.
2. Choose between two ways to connect your keyboard to your computer:
– Bluetooth: Open the Bluetooth settings on your computer to complete the pairing. More details here.
– USB receiver: Plug the receiver to a USB port, open Logitech Options, and select: Add devices > Setup Unifying device, and follow the instructions.
3. Once paired, a short press on the Easy-Switch button will allow you to switch channels.
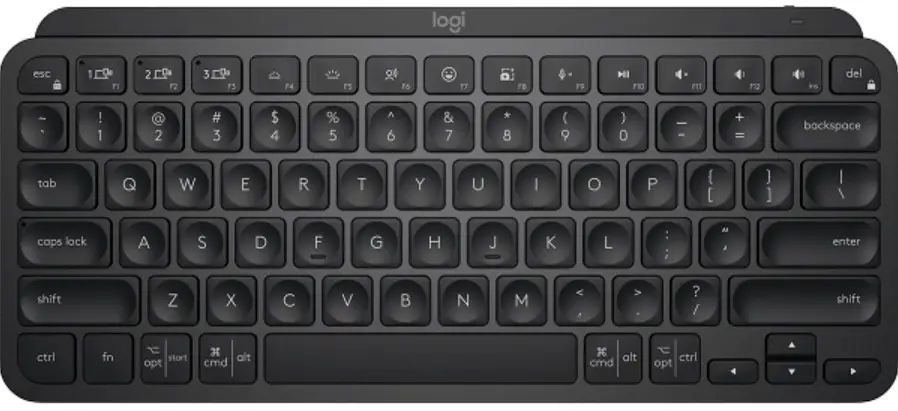
How to enable direct access to F-keys
Your keyboard has by default access to the Media and Hotkeys such as Volume Up, Play/Pause, Desktop view, and so on.
If you prefer to have direct access to your F-keys simply press Fn + Esc on your keyboard to swap them.
You can download Logitech Options to get on-screen notifications when you swap from one to the other. Find the software here.