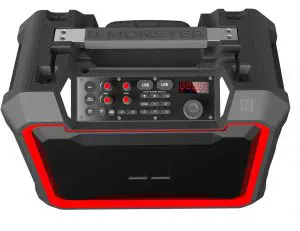
MONSTER Rockin Roller

THANK YOU FOR CHOOSING MONSTER
Congratulations on your Rockin’ Roller 4 indoor/ outdoor wireless speaker. Please take your time to explore all of the features and utilities we have built into this product.
We put all of our products through rigorous testing and quality control. We take great pride in presenting this product to you now. For your peace of mind, we offer a one-year limited warranty against manufacturing defects and workmanship. Please refer to the warranty section of the user manual for more details
Included with your Rockin’ Roller 4 purchase:

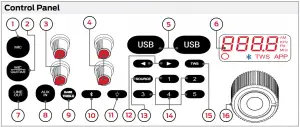
Control Panel
MIC ¼” Input
MIC/GUITAR ¼” Input
GAIN Knob (x2)
ECHO Knob (x2)
USB Power Bank (x2)
LED Display
LINE OUT
AUX IN
BASS/TREBLE Button
BLUETOOTH Button
LED LIGHT Button
ARROW Buttons
SOURCE Button
NUMBER Buttons
TWS Button
VOLUME Knob
LED Display
SSD Display
AM Indicator
FM Indicator
STANDBY Indicator
BLUETOOTH Indicator
TWS Indicator
APP Indicator

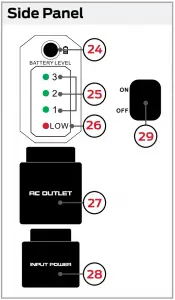
Side Panel
BATTERY Indicator Button
BATTERY Level Indicator LEDs
BATTERY LOW Indicator LED
AC OUTLET Port (Pass Through)
INPUT POWER Port
POWER ON/OFF Switch
| Before first use, charge for ~6 hours |
Power/Charging
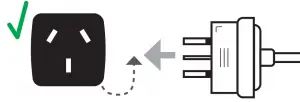
- Connect the INPUT POWER port to an external power source using the included power cord

|
– achieved in 7 hours while powered OFF – achieved in 15 hours while powered ON |
 DO NOT use the speaker’s AC Outlet port DO NOT use the speaker’s AC Outlet port– it will not charge or power the speaker. |
• Flip the switch UP to turn ON the speaker.
(“” will appear on the display. The speaker will connect to the last selected source.)
• Flip the switch DOWN to turn OFF the speaker.

AC Pass Through Outlet
- Connect the AC OUTLET port to an external device to power that device through the speaker.
| The speaker must be connected to a power source in order to use AC pass through. (See Power/Charging Speaker.) |
Battery Level Indicator
- Press the button above the LED indicators to check the current battery level .
- indicates a full to low battery.
- Flashing indicates the battery is very low and needs to be charged.
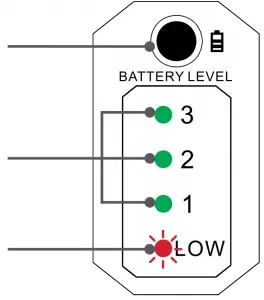
| The indicator is only active while the speaker is on. – Indicator shows current battery level each time the speaker is turned ON. |
USB Power Banks
- Connect up to two devices to the speaker via the 5V/2.1A USB ports to charge those devices from the speaker’s internal battery. (USB cable not included.)

| USB ports are for charging ONLY – they will not make audio connections. |
Bluetooth Pairing
1 Place your mobile device within 1 m of the speaker.

Make sure Bluetooth is enabled on your mobile device.

2 Press the BLUETOOTH button to set the speaker to Bluetooth mode.
The speaker will automatically enter pairing mode
The speaker will make audible and visual confirmation.
will flash in pairing mode.

If the is NOT flashing, press and hold the BLUETOOTH button to manually enter pairing mode.
3 Select “MONSTER RR4 ANZ” on your mobile device to pair with the speaker.
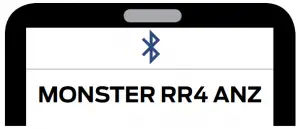
The speaker will make audible confirmation and the will stop flashing.

| ˜9 meters max connection range after paired. Moving devices outside this range may cause disruption or signal loss. |
NFC Pairing (
1 Enable NFC on the music device you wish to pair.

2 Press the BLUETOOTH button to set the speaker to Bluetooth mode.
The speaker will automatically enter pairing mode.
The speaker will make audible and visual confirmation. will flash in pairing mode.
If the is NOT flashing, press and hold the BLUETOOTH button to manually enter pairing mode.
3 Place your music device directly on the speaker’s NFC logo until paired.

The speaker will make audible confirmation and the will stop flashing
| ˜9 meters max connection range after paired. Moving devices outside this range may cause disruption or signal loss. |
¼” Guitar/Mic Inputs and Gain/Echo Controls
- Connect an instrument, microphone, or other device to the MIC/GUITAR or MIC port(s) with a standard 6.35 mm jack.
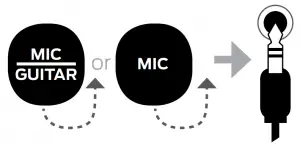
The device(s) will automatically transmit audio playback through the speaker in the current mode.
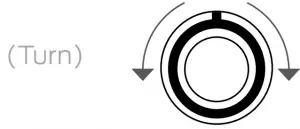
- Turn GAIN and ECHO control knobs clockwise to increase their effect, and counter-clockwise to decrease their effect.

Each 6.35 mm port has its own GAIN and ECHO knobs that can be adjusted independently
| Devices plugged into the ¼ inch ports will transmit audio playback in all modes/sources. |
AUX-IN (
- Connect a music device to the AUX IN port with a standard 3.5 mm jack. The speaker will automatically change to AUX mode.
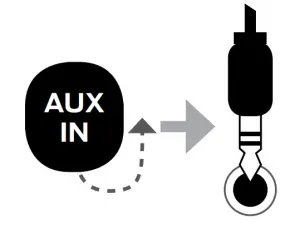
Speaker will make audible and visual LED display confirmation.

True Wireless System (
Wirelessly connect two Rockin’ Roller 4 speakers together.
- Place two Rockin’ Roller 4 speakers within 3 meters of each other.

- Connect your music device to one of the speakers via BLUETOOTH.

Leave the second speaker in BLUETOOTH mode without connecting to a device.
- Press the TWS pairing button on both speakers to activate TWS pairing. The speakers will automatically connect with each other.
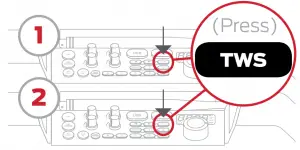
Speaker will make audible confirmation. will be displayed on both speakers displays when connected.

To disconnect a speaker, press the TWS button |
| ~9 meters max connection range after paired. Moving devices outside this range may cause disruption or signal loss. |
Bass/Treble Adjustment
- Press the BASS/TREBLE button ONCE to enter bass level mode.

- Press the BASS/TREBLE button TWICE to enter treble level mode.

- Turn the VOLUME knob clockwise to increase or counter-clockwise to decrease the bass/treble levels ( to ).

| Pressing the BASS/TREBLE button a third time will revert to the audio source mode. The menu will revert to the audio source mode after ~5 seconds of being idle. |
AM/FM Radio
- Press the SOURCE button to change the speaker to AM or FM RADIO.

Speaker will make audible and visual LED display confirmations.

- Press the ARROW buttons to change radio frequency. Press and hold the ARROW buttons to scan for a station.

Equalizer Presets (
- Press a NUMBER BUTTON (1-5) to change the speaker’s equalizer settings.
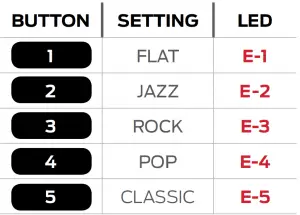
Setting will show on the speaker’s display

Saving Radio Stations (
- Save the current radio station by pressing and holding one of the NUMBER BUTTONS (1-5).

The display will confirm the saves station (, etc.)

Press the NUMBER KEY while in radio mode to go to the corresponding station. |
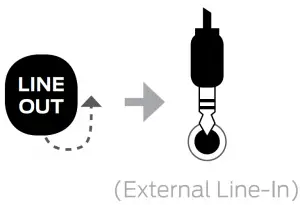
LINE-OUT (
- Connect a second speaker to the Rockin’ Roller 4 via the LINE OUT port with a standard 3.5 mm jack. Audio playback will transmit through the Rockin’ Roller 4 and the second speaker simultaneously.
FEATURES
Standby Mode
- Press and hold the VOLUME knob for ~3 seconds to put the speaker in standby mode.

indicators will shut off. Power icon will turn on.

- Press any button or turn the VOLUME knob to wake the speaker up from standby.
| The speaker will automatically enter standby mode after ~15 minutes of inactivity or lack of connection. Standby mode can be manually enabled in any mode. |
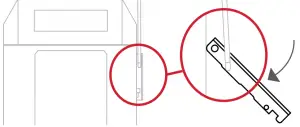
Telescoping Handle
- Pull the telescoping carry handle UP and away from the speaker to extend it.
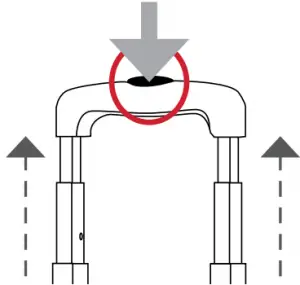
- Press the BUTTON on the grip area to adjust the carry handle to a comfortable length.
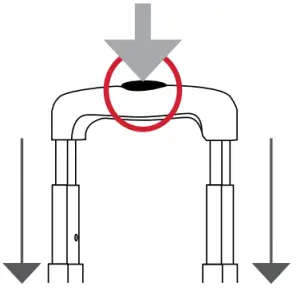
| DO NOT use the carry handle when speakers are stacked. The handle is graded to only carry the weight of one Rockin’ Roller 4 speaker. |
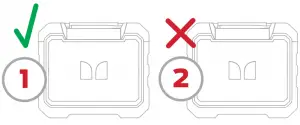
Stacking System
Stack two Rockin’ Roller 4 speakers on top of each other.
- Place the FIRST Rockin’ Roller 4 on a stable, nonslippery surface.

- Lift the SECOND Rockin’ Roller 4 on top of the first speaker and slide the “hooked” feet in first.
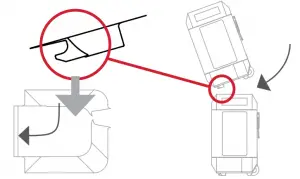
- Pull the latch UP to release the locking mechanism on the bottom speaker.
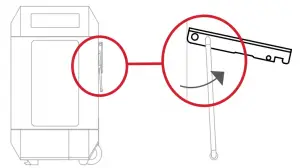
- Swing the locking arm UP and into the top speaker’s mounting hook.
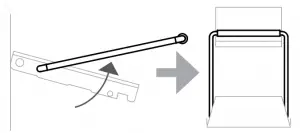
- Push the latch DOWN until it locks securely into place.
| Some assembly required. Make sure the upper and lower locking brackets are installed with all 8 screws tightly in place. |
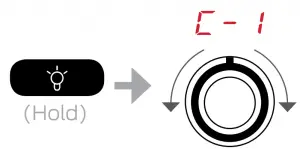
LED Lights
- To turn on the LED lights, press the LIGHT button. Press up to four times to increase the brightness level (25%, 50%, 75%, 100%). Press again to turn off the LED lights.

- To change the LED light color, press and hold the LIGHT button to activate color selection ( etc.). Turn the VOLUME knob to change the color mode.
= White = Rainbow
= Red = Blue
= Green = Purple
= Yellow = Turquoise

| Color selection display will revert to source display after ~2 seconds of being idle. LED lights revert to white color and off when the speaker is turned off or enters standby mode. |
| Speaker is not powering on |
|
| Buttons are not responding |
|
| No music is playing |
|
| Bluetooth/NFC audio quality is poor |
|
| Bluetooth/NFC device is not pairing |
|
| Contact our support team for additional services | Call: 1300-762-219 Email: [email protected] |
SPECIFICATIONS
| General | |
| Bluetooth Version | 4.0 |
| Power Input | 240V – 50Hz |
| Speaker Drivers | 30W (x 1) / 15W (x 1) |
| THD + Noise | <10% |
| Cabinet Material | Plastic |
| Battery Capacity | 12V 9000mAh (18~22 hours at max volume and light settings) |
| USB Bank Output | 5V/2.1A |
| Dimensions (W x H x D | 45.72 x 40.64 x 22.86 |
| Weight | 25.5 lbs |
| Operating Temperature | |
| Operating Temperature Range | 0°C – 40°C |
| Operating Humidity Range | 40~90% RH |
| Storage Temperature Range | -10°C – 70°C |
- Read these instructions – All the safety and operating instructions should be read before this product is operated.
- Keep these instructions – The safety and operating instructions should be retained for future reference.
- Heed all warnings – All warnings on the appliance and in the operating instructions should be adhered to.
- Follow all instructions – All operating and use instructions should be followed.
- This apparatus can be used in wet location conditions after disconnected the AC Mains supply and closing the water proof cap for the AC inlet. It must not be used in wet location conditions when charging. Do not use this apparatus near water-The appliance should not be used near water or moisture – for example, in wet basement or near a swimming pool.
- Clean only with dry cloth.
- Do not block any ventilation openings, install in accordance with the manufacturer’s instructions.
- Do not install near any heat sources such as radiations, heat registers, stoves, or other apparatus (including amplifiers) that produce heat.
- Do not defeat the safety purpose of the polarized or grounding plug. A polarized plug has two blades with one wider than the other. A grounding plug has two blades and a third grounding prong. The wide blade or the third prong is provided for your safety. If the provided plug does not fit into your outlet, consult an electrician for replacement of the obsolete outlet.
- Protected the power cord from being walked on or pinched particularly at plugs, convenience receptacles, and the point where they exit from the apparatus.
- Only use attachments/accessories specified by the manufacturer.
- Use only with the cart, stand, tripod, bracket, or table specified by the manufacturer, or sold with the apparatus. When a cart or rack is used, use caution when moving the cart/apparatus combination to avoid injury from tip-over.

- Unplug this apparatus during lighting storms or when unused for long periods of time.
- Refer all servicing to qualified service personnel. Servicing is required when the apparatus has been damaged in any way, such as power-supply cord or plug is damaged, liquid has been spilled or objects have fallen into the apparatus, the apparatus has been exposed to rain or moisture, does not operate normally, or has been dropped.
- Mains plug is used as the disconnect device, the disconnect device shall remain readily operable.
- Do not install this equipment in a confined or building-in space such as a book case or similar unit, and remain a well ventilation conditions at open site. The ventilation should not be impeded by covering the ventilation openings with items, such as newspapers, table-cloth, curtains, etc.
- No naked flame sources, such as lighted candles, should be placed on the apparatus.
- Attention should be drawn to the environmental aspects of battery disposal.
- The use of apparatus in moderate climate.
- The apparatus shall not be exposed to dripping or splashing and that no objects filled with liquids, such as vases, shall be placed on the apparatus.
Extension Cord Warnings:
- Keep all electrical cords in good condition. Do not use worn, bare, or frayed cords, which can cause electrical shock when RR4 is connected to wall power.
- If you must use an extension cord, use only grounded extension cords that are rated for outdoor use and equipment with a third-wire ground.
- Avoid using excessively long extension cords, which can cause voltage drops, causing the cord to overheat.
- When using long extension cords with RR4, use a heavier cord with a larger wire size to reduce the voltage drop (the longer or thinner the cord, the greater the voltage drop).
Outdoor Use & Care:
Though RR4 is water-resistant and able to tolerate splashing water, please review the tips below to get the best performance from RR4:
- RR4 must only be used outdoors with power outlets or extension cords that are rated for outdoor use.
- Bring RR4 indoors during extreme weather.
- Please do not place RR4 in standing water.
- Please do not connect the power cable to RR4 in a wet environment. Make sure the power input, power cable, and power outlet are all completely dry before making any connections.
- RR4 is Fitted with Wheels for extreme portability. For longevity of wheels please ensure you clean the wheels with a dry brush and keep them free from mud, sand and heavy soiling and avoid leaving soaked in water. Lubricate using bearing oil if wheels become noisy or have difficulty turning.
- WARNING: Keep any non-water-resistant devices (phones, music players, etc.) in a dry place where they will not be affected by water and cause a risk of electric shock.
WARNING: To reduce the risk of fire or electric shock, do not expose this apparatus to rain or moisture.
WARNING: The batteries shall not be exposed to excessive heat such as sunshine, fire or the like.
CAUTION: Danger of explosion if battery is incorrectly replaced. Replace only with the same or equivalent type. Protective earthing terminal. The apparatus should be connected to a mains socket outlet with a protective earthing connection.
 Protective earthing terminal. The apparatus should be connected to a mains socket outlet with protective earthing connection.
ARISIT PTY LTD PRODUCT WARRANTY OF MONSTER RR4 SPEAKER AUSTRALIA & NEW ZEALAND
The Warranty
Subject to the following terms, Arisit Pty Limited will repair or replace any part of any eligible Arisit product that is defective within the warranty period indicated in the table below or refund you the cost of the replacement. The benefits to a consumer given by this warranty are in addition to other rights and remedies of the consumer under a law in relation to the goods or services to which the warranty relates.
Eligibility
- To claim the benefit of this warranty you must:
(a) be the original purchaser of a genuine Arisit product from an authorised reseller (this warranty is not transferable);
(b) produce proof of your purchase; and
(c) provide the details required in the ‘How to Claim’ section below. - This warranty is limited to defects that arise:
(a) In the course of normal installation and use; and
(b) within the warranty period identified for the product in the table below, commencing on the date of original purchase. - This warranty excludes:
(a) defects arising from misuse, accident, neglect or improper care, fluctuation in electrical current, incorrect or failed software upgrade, damage or malfunction from incorrect assembly or installation, defects from alteration or modification, unauthorised service or repair. - Arisit may elect between repair, replacement or refund to honour this warranty, at its sole discretion.
In making a claim under this warranty, you agree that if, following receipt of your claim under this warranty, Arisit or its authorised service centre determine that your claim in respect of a product is invalid or you have provided false, inaccurate or misleading information with your claim, Arisit or its authorised service centre may charge you for any labour, parts or transport costs incurred.
How to Claim:
In order to make a claim under this warranty, take the following steps:
- Attach your proof of purchase document(s) to this card and complete the following details:
Brand: ____________________________ Model No: __________________________________
Date of Purchase: ___________________ Where Purchased: ____________________________ - a) AUSTRALIA – Contact Arisit by telephone in Melbourne, Australia on 1300 726 219, or by emailing [email protected] or by letter to ATTN: Product Returns, Arisit Pty Limited, 40-44 Mark Anthony Drive, Dandenong South, VIC 3175 and submit such details of your claim as Arisit requires.
b) NEW ZEALAND – Contact Arisit by telephone in Auckland on (+64) 9 306 1020, or by e-mailing [email protected] or by letter to ATTN: Product Returns, Arisit Pty Limited, 1a Howe Street, Newton, Auckland 1145, NZ and submit such details of your claim as Arisit requires. - Deliver the product(s) to the address above or the original place of purchase.
- You must bear any expense you incur in claiming this warranty.
Notice to Australian Consumers
Our goods come with guarantees that cannot be excluded under the Australian Consumer Law. You are entitled to a replacement or refund for a major failure and compensation for any other reasonably foreseeable loss or damage. You are also entitled to have the goods repaired or replaced if the goods fail to be of acceptable quality and the failure does not amount to a major failure.
Notice to New Zealand Consumers
Our goods come with guarantees that cannot be excluded under the Consumer Guarantees Act 1993. This warranty should not be construed as any attempt to contract out of or exclude any or the guarantees available to any consumers under this Act provided that you agree that the provisions of the Consumer Guarantees Act 1993 will not apply if you are acquiring the goods for the purpose of a business.
Warranty Period Use:
Brand Category Warranty Period
MONSTER AUDIO 1 (One) Year
Arisit Pty Limited Australia, 40-44 Mark Anthony Drive, Dandenong South, VIC 3175 Australia Tel: 1300 762 219
Arisit Pty Limited NZ, 1a Howe Street, Newton, Auckland, 1145 NZ, Tel: (+64) 9 306 1020
MUSIC WITHOUT LIMITS
Monster and the Monster logo are registered trademarks of Monster Inc., and it’s subsidiaries in the U.S. and other countries, used under license.
The Bluetooth® word mark and logos are registered trademarks owned by Bluetooth SIG, Inc. Other trademarks and trade names are those of their respective owners.
The N-Mark is a trademark or registered trademark of NFC Forum, Inc. in the United States and in other countries.
•1300-762-219 • [email protected] • monsterproducts.com.au