PENTAIR Screenlogic Interface Wireless Connection Kit
IMPORTANT SAFETY INSTRUCTIONS READ AND FOLLOW ALL INSTRUCTIONS
SAVE THESE INSTRUCTIONS
Technical Support
Sanford, North Carolina (8 A.M. to 4:30 P.M.)
Phone: (800) 831-7133
Fax: (919) 566-8920
Moorpark, California (8 A.M. to 4:30 P.M.)
Phone: (800) 831-7133 (Ext. 6502)
Fax: (805) 530-0194
Web sites: visit www.pentairpool.com and www.staritepool.com
Related manual: ScreenLogic® Interface User’s Guide (P/N 520493)
FCC Regulatory Safety Notice – This equipment has been tested and found to comply with the limits for a Class B digital device, pursuant to Part 15 of the FCC Rules. These limits are designed to provide reasonable protection against harmful interference in a residential installation. This equipment generates, uses and can radiate radio frequency energy and, if not installed and used in accordance with the instructions, may cause harmful interference to radio communications. However, there is no guarantee that interference will not occur in a particular installation. If this equipment does cause harmful interference to radio or television reception, which can be determined by turning the equipment off and on, the user is encouraged to try to correct the interference by one or more of the following measures:
- Reorient or relocate the receiving antenna.
- Increase the separation between the equipment and receiver.
- Connect the equipment into an outlet on a circuit different from that to which the receiver is connected.
- Consult the dealer or an experienced radio/TV technician for help.
- Modifications not expressly approved by the party responsible for FCC compliance could void the user’s authority to operate the equipment.
In this Installation Guide
Use the information in this manual for installing the ScreenLogic® Interface Wireless Connection kit contents.
- For ScreenLogic Interface system operating instructions, refer to the ScreenLogic Interface User’s Guide (P/N 520493)
ScreenLogic® Interface Wireless Connection Kit
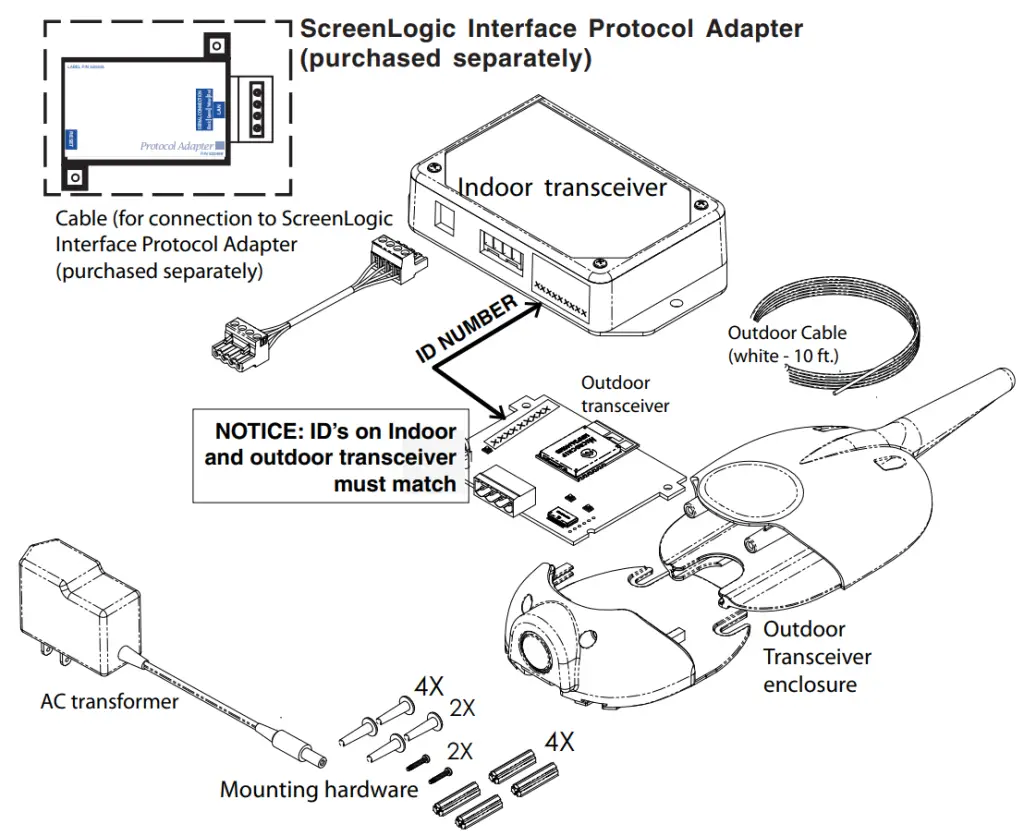
The ScreenLogic® Interface Wireless Connection interface consists of an indoor and outdoor wireless 2.4 GHz transceiver. Note: The transceivers ship from the factory as a matched pair. The ID numbers on each transceiver must be the same number to function correctly. Transceivers are replaced as a matched pair. For more information, call Customer Support (880) 831.7133.
The transceivers provides a wireless connection between the ScreenLogic Interface Protocol adapter and the IntelliTouch® or EasyTouch® Control System Load Center located at the equipment pad. This wireless connection eliminates the existing hard wire connection from inside your home to the equipment pad.
Wireless Connection Kit Contents
The following items are included in the Wireless Connection kit.
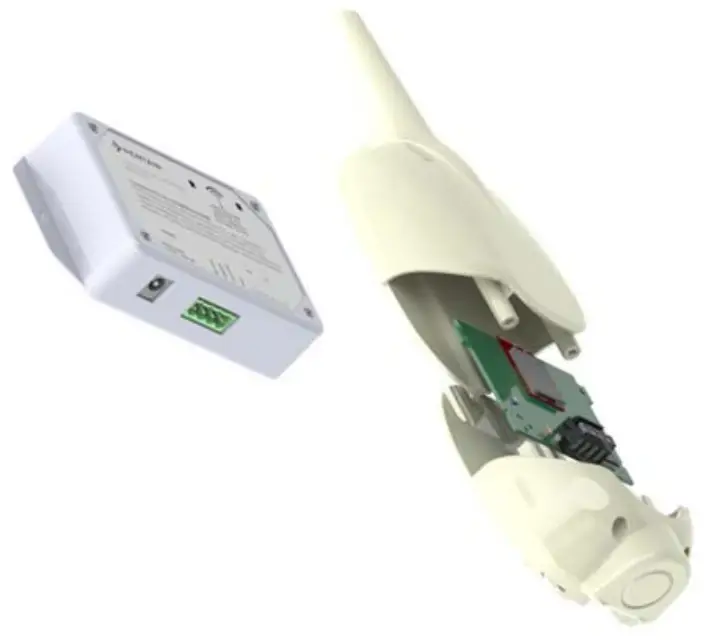
- One ScreenLogic Interface indoor wireless transceiver with AC power adapter and one foot connection cable with attached plugs.
- One ScreenLogic Interface outdoor wireless transceiver with 10 ft. cable, provided in kit with enclosure and mounting hardware.
- ScreenLogic Interface Wireless Connection Installation Guide (this manual)

ScreenLogic Interface Wireless Connection Kit Contents
Summary installation steps
The ScreenLogic® Interface connection diagram on page 2 shows the transceiver locations and connections. To install the ScreenLogic Interface Wireless Connection kit:
- Mount the outdoor transceiver antenna near the IntelliTouch® or EasyTouch® Control System Load Center and connect the transceiver to the COM port connector located in the IntelliTouch® or EasyTouch® Control System Load Center.
- Use the supplied 12 inch cable to connect the ScreenLogic Interface indoor wireless transceiver to the ScreenLogic Interface Protocol adapter. Plug the transceiver AC power adapter into an AC wall-outlet and into the transceiver unit to power up the unit.
ScreenLogic Interface (Indoor Wireless Transceiver)
ScreenLogic® Interface Connection Diagram
Cable distance limits:
– Ethernet cable distance limit = 300 feet
– Four-wire cable distance limit = 1500 feet Note: (*) Optional wiring for existing Indoor Control Panel. Tap into the Indoor Control Panel connector or pig tail off the four-wire cable connected to the Personality board.
Step 1:
Mount the Outdoor Wireless Transceiver and Connect to the IntelliTouch® or EasyTouch® Control System Load Center
The following describes how to mount the transceiver to the IntelliTouch® or EasyTouch® Control System Load Center and connect the four-wire cable to the COM port connector located in the IntelliTouch or EasyTouch Control System Load Center:
Mount the Transceiver Module
The Transceiver is a two-way radio device with an attached antenna that communicates to and from the IntelliTouch or EasyTouch Control System. Mount the transceiver at a convenient location (on a flat vertical surface) near the load center at a minimum of 5 feet above ground level to optimize the transmit and receive operating range.
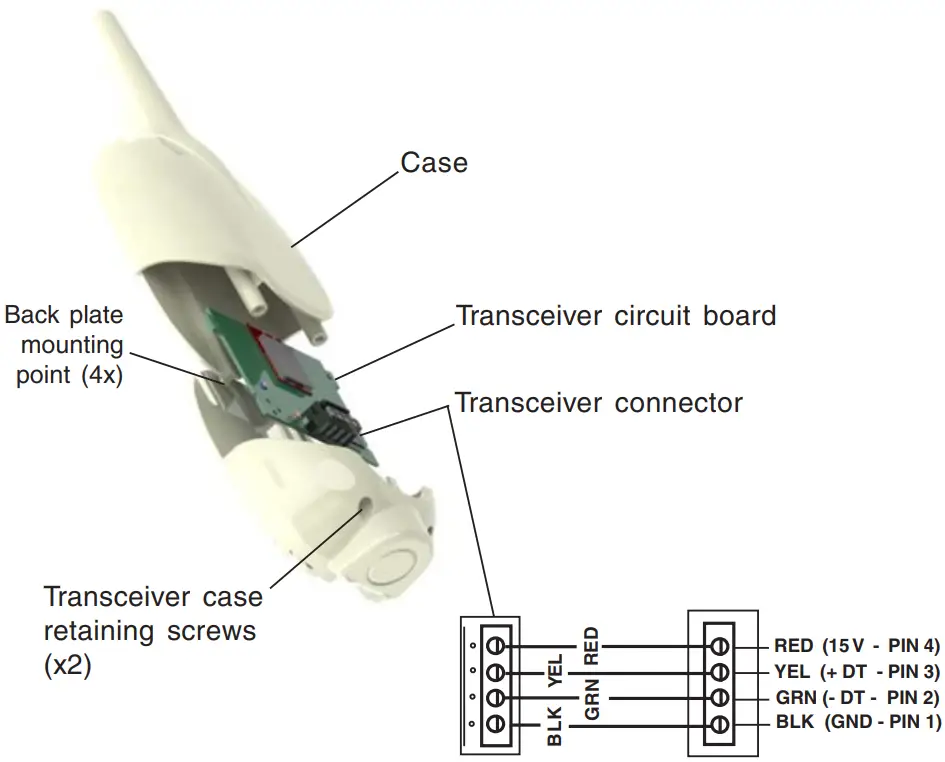
- Remove the two retaining screws located on the underside of the transceiver case. Slide the case off the back plate.
- Position the back plate against the mounting surface so that the transceiver is oriented in an upright position with the antenna pointing upwards. Use a pencil to mark the four mounting points. Drill four 3/16 in. diameter holes into the mounting surface and insert the four plastic anchors provided in the kit.
Note: To avoid signal interference, mount the transceiver a minimum of 10 feet away from the load center, any metal surface/structure, or air blower located in the immediate area of the equipment pad. - Position the back plate over the mounting points and secure it with the four mounting screws provided in the kit.
- Carefully position the transceiver circuit board into the mounted back plate. Route the connection wire down through the lower exit hole (left side) at the bottom of the back plate. Carefully pull the wire out the lower hole and position the circuit board in the back plate.
- Position the transceiver circuit board to the left side of the back plate, and slide the case over the circuit board and antenna into the back plate. Secure the circuit board in the case using the two retaining screws.
- Proceed to “Connect the Transceiver connection cable to the COM Port on Control Systems Circuit Board” on the next page.
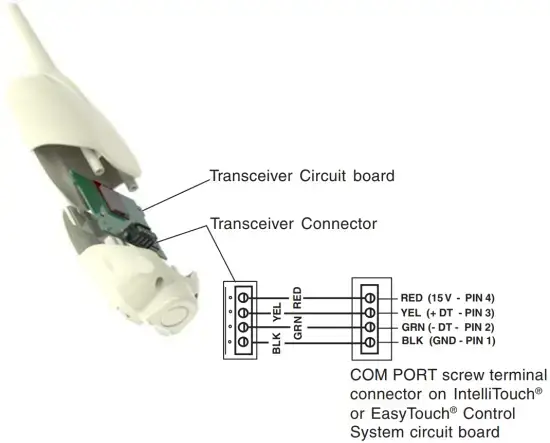
Transceiver Module Wiring
Connect the Transceiver connection cable to the COM Port on Control System Circuit Board
 WARNING Switch OFF the main system power to the Load Center before making any connections.
- Unlatch the enclosure door spring latche(s), and open the door.
- Remove the two retaining screws securing the high voltage cover-panel, and remove it from the enclosure.
- Loosen the two access screws securing the control panel.
IntelliTouch® or EasyTouch® Load Center - Lower down the hinged control panel to access the circuit board.
- Route the four conductor transceiver connection cable into the lower plastic grommet, up through the low voltage raceway to the circuit board.
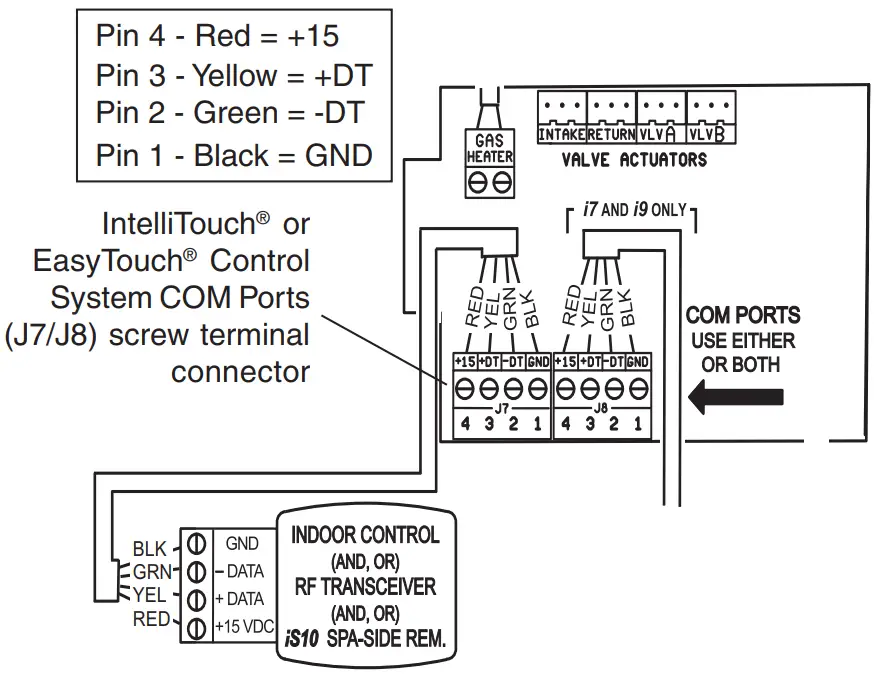
- Insert the four wires into the screw terminals of the COM PORT plug located on the circuit board as shown on page 6. Using a small flat-blade screwdriver, secure the wires with the screws.
Note: Multiple wires may be inserted into a single screw terminal but increases the chances of a poor or intermittent connection.
Note: Install the ScreenLogic® Interface outdoor wireless transceiver within 10 feet from Load Center
- After the connection has been completed, close the control panel into its original position and secure it with the two access screws.
- Install the front panel and secure it with the two retaining screws.
- Close the Load Center front door. Fasten the spring latche(s).
- Switch the power on to the IntelliTouch® or EasyTouch® Control System Load Center.
- Proceed to the “Connect the ScreenLogic Interface Indoor Wireless Transceiver to the ScreenLogic Interface Protocol Adapter” on page 8.
Step 2:
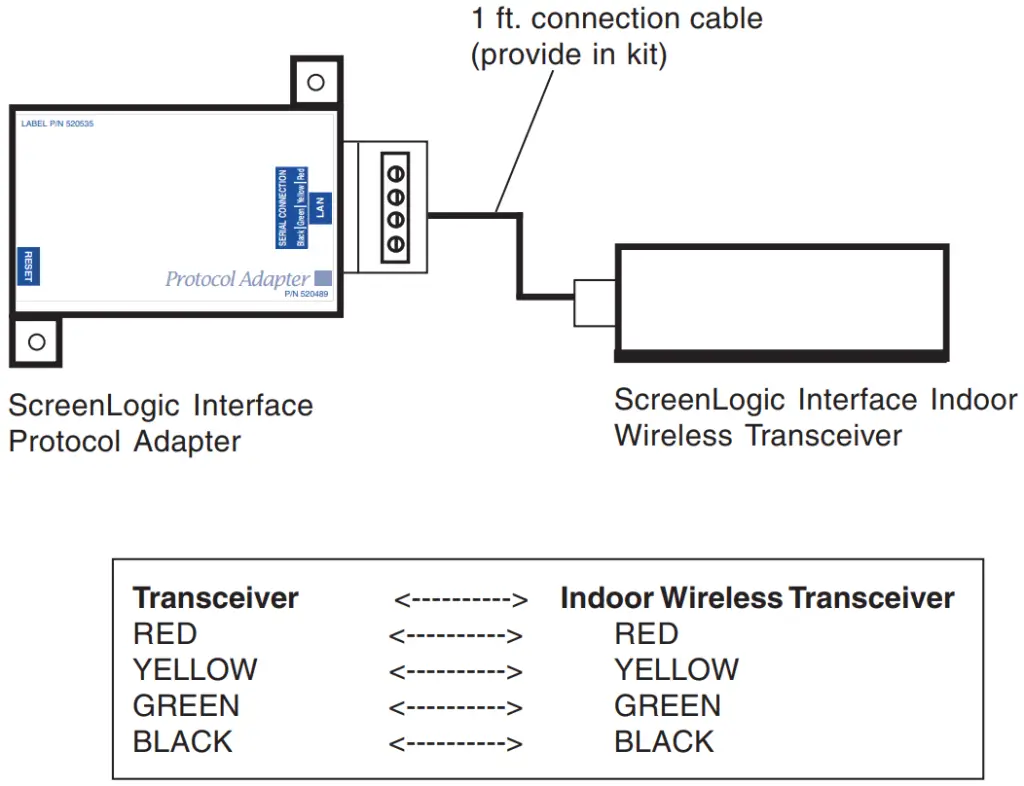
Connect the ScreenLogic® Interface Indoor Wireless Transceiver to the ScreenLogic Interface Protocol Adapter
To connect the ScreenLogic Interface indoor wireless transceiver to the ScreenLogic Interface Protocol adapter:
- Using the provided connection cable, connect one end of the cable to the ScreenLogic Interface Protocol adapter and the other end to the ScreenLogic Interface indoor wireless transceiver. The cable plugs are keyed for easy connection.
- Plug the ScreenLogic Interface Wireless Connection transceiver AC adapter wall-plug into an AC grounded electrical outlet.

Wiring Configuration

1620 HAWKINS AVE., SANFORD, NC 27330 · (919) 566-8000 10951 WEST LOS ANGELES AVE., MOORPARK, CA 93021 · (805) 553-5000
All Pentair trademarks and logos are owned by Pentair, Inc. Pentair Aquatic SystemsTM, ScreenLogic®, EasyTouch® and IntelliTouch® are trademarks and/or registered trademarks of Pentair Water Pool and Spa, Inc. and/or its affiliated companies in the United States and/ or other countries. iPhone® is a registered trademark of Apple Corporation. Unless expressly noted, names and brands of third parties that may be used in this document are not used to indicate an affiliation or endorsement between the owners of these names and brands and Pentair Water Pool and Spa, Inc. Those names and brands may be the trademarks or registered trademarks of those third parties. Because we are continuously improving our products and services, Pentair reserves the right to change specifications without prior notice. Pentair is an equal opportunity employer.
© 2014 Pentair Aquatic Systems. All rights reserved.
This document is subject to change without notice.
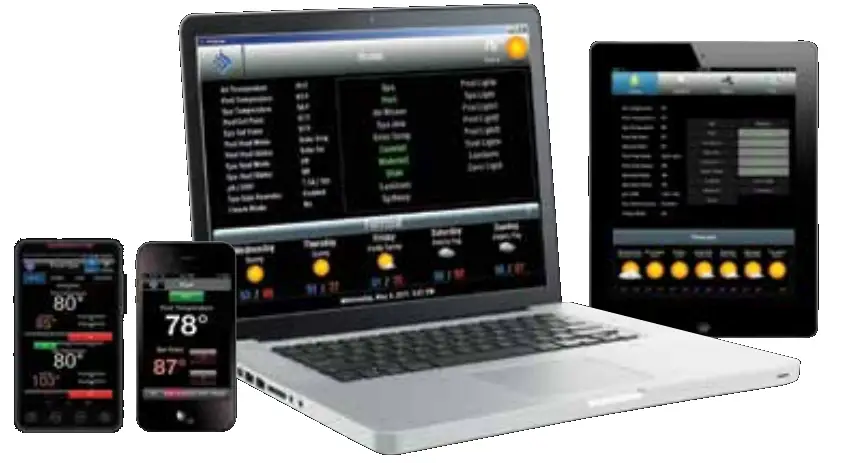
CONTROL INTELLITOUCH® AND EASYTOUCH® CONTROL SYSTEMS FROM YOUR MOBILE DIGITAL DEVICE
Now you can use your iPad®, iPhone® or iPod touch® mobile digital device or Android® device, to control all key functions of your pool or spa, from across the deck or around the globe. New software that communicates with the ScreenLogic interface of your new or existing IntelliTouch or EasyTouch control system is now available as a free download from the App Store® or Google PlayTM. Once it’s installed, you can control everything from pool and spa temperatures to jets, lighting, water features and more–right from your iPhone or other mobile digital device.

No other pool or spa control device offers such convenience.
- Easily turn on your spa and set it to the perfect temperature on your way home from work.
- Control all circuits when you are away–including waterfalls, pool lights, fountains and more.
- Use the History page to monitor temperature, pool/spa, heater and lights from afar.
WE’VE BROUGHT ENERGY SAVINGS WITHIN EASY REACH
The Eco Select® Brand designates eco-friendly products that conserve energy, minimize water usage, reduce noise or otherwise contribute to a more environmentally responsible pool system. As the global leader in pool and spa equipment manufacturing, we stand at the forefront in providing greener choices for our customers. We hope you’ll join us in embracing more eco-friendly poolscapes by choosing Eco Select brand products like this one for your swimming pool.
SCREENLOGIC® INTERFACE FOR MOBILE DIGITAL DEVICES
HERE’S ALL YOU NEED TO DO.
The software for your Apple® mobile digital device or Android® platform is a free download from the Apple App Store® or Google PlayTM. It’s easy to get:
- Using your device, visit the App Store or Google Play.
- Search for “Pentair.”
- Choose to download and install the Pentair® ScreenLogic interface.
FINGERTIP CONVENIENCE, WORLDWIDE CONTROL–FROM YOUR FAVORITE MOBILE DIGITAL DEVICE
How can you manage your pool or spa with our ScreenLogic interface app? Just about any way you want–from just about anywhere.
Easy to navigate. To get started, just choose what you want to manage from a simple home screen.
Temperature control for pool and spa. Getting off work an hour from now? Crank up the temperature on the spa, kick on the pool pump and even choose the heater mode: Solar, Solar Preferred, or Heater. When you arrive, your place of relaxation will be waiting.
Like standing in front of the control panel. If you’ve set up a Waterfall, Jets, or Spillway on your IntelliTouch® or EasyTouch® control system, then those circuits–and any others you’ve similarly chosen–will show up on the Circuits screen of your ScreenLogic interface app. Which means you enjoy push-button control anytime from anywhere.
AVAILABLE FROM:
Know what your pool’s been doing. Your ScreenLogic interface app shows you a visual history of your pool and spa’s operation. See how your water temperatures have changed over time. Confirm the exact periods that the Lights, Heater, Solar, Spa, and Pool modes have been used. Know your wishes are being followed and your money is being saved–no guesswork necessary.
If your pool is equipped with an IntelliTouch or EasyTouch system and a PC or Mac® computer ScreenLogic interface to access them, you’re already good to go.
If you don’t yet enjoy the benefits of an IntelliTouch or EasyTouch system, now’s the ideal time to upgrade to electronic convenience and get mobile digital device remote control at the same time. If you’re an IntelliTouch or EasyTouch system owner, you can gain iPad®, iPhone® and iPod touch® mobile digital device or Android® device access through a PC and Mac computer ScreenLogic Interface and Wireless Connection Kit (Part # 522104). This kit lets you remotely manage your pool and spa through your PC or Mac computer as well as your mobile digital devices.

1620 HAWKINS AVE, SANFORD, NC 27330 800.831.7133 WWW.PENTAIRPOOL.COM
All Pentair trademarks and logos are owned by Pentair or one of its global affiliates. ScreenLogic®, IntelliTouch®, EasyTouch®, and Eco Select® are registered trademarks of Pentair Water Pool and Spa, Inc. and/or its affiliated companies in the United States and/or other countries. iPad®, iPhone®, iPod touch®, Mac®, Apple® and App Store® are registered trademarks of Apple, Inc. in the United States and/or other countries. Google PlayTM and Android® are trademarks and/or registered trademarks of Google, Inc. Because we are continuously improving our products and services, Pentair reserves the right to change specifications without prior notice. Pentair is an equal opportunity employer.
pumps · filters · heaters · heat pumps · automation · lighting · cleaners · sanitizers · water features · maintenance products
1/16 Part # P1-096 ©2016 Pentair Water Pool and Spa, Inc. All rights reserved.