Sections in this Manual
- Product Overview
- Product Features
- Package Components
- Product Structure
- Charging the Dash Cam
- Installing the Dash Cam
- Instructions for video operation
- Instructions for Photo operation
- Video/Photo playback & protecting files
- Dash Cam menu
- Movie mode menu settings
- General settings
- Still, capture menu settings
- Connecting to a PC
- Maintenance
- Product Specifications
- Warranty
- FAQS
Manufactured by SCA
Charging the Dash Cam
The Dash Cam can be charged in multiple ways:
- Using the provided car charger.
- Using a USB cable to connect to the Mini USB interface. When the Dash Cam is charging, a red indicator on the Dash Cam glows red. The Dash Cam takes about 2 hours to fully charge. When the Dash Cam hits full charge, the red indicator will turn off.

Installing the Dash Cam

- Ensure the windscreen is clean and free of debris. Attach a suction cup to the windscreen and lock it into position with the lever.
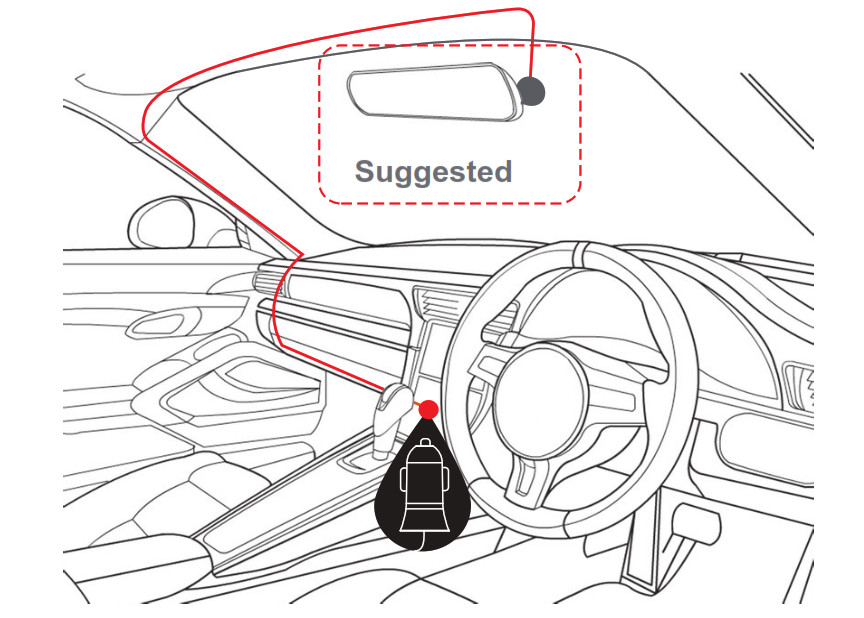
- Fix where the vision is not blocked (Place close to rear-view mirror is recommended). Don’t install the device on an airbag or within its working range.
- Insert a Micro SD card into the Dash Cam
- Insert the Mini USB end of the power cord into the Mini USB interface/ charging point of the Dash Cam. Connect the USB charging end of the cable into the USB socket adapter, place the adapter into the 12V power socket of the vehicle.
- Adjust the mounting bracket and rotate the camera direction to get the best view. Ensure of the bonnet of the vehicle is visible from the bottom of the screen for alignment.
- Turn the vehicle's ignition to ON, and the Dash Cam will power ON and start recording automatically, you will hear an audible tone once powered.
- A blue LED will start flashing when the recording has started. When the blue LED is solid the Dash Cam is in standby mode.
- For the Dash Cam to work it must receive power from the charging adapter. Once power is removed or turned off the Dash, Cam will save the current file and turn it off.


