User Manual

AC 940
Action Camera
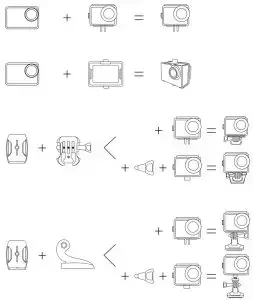
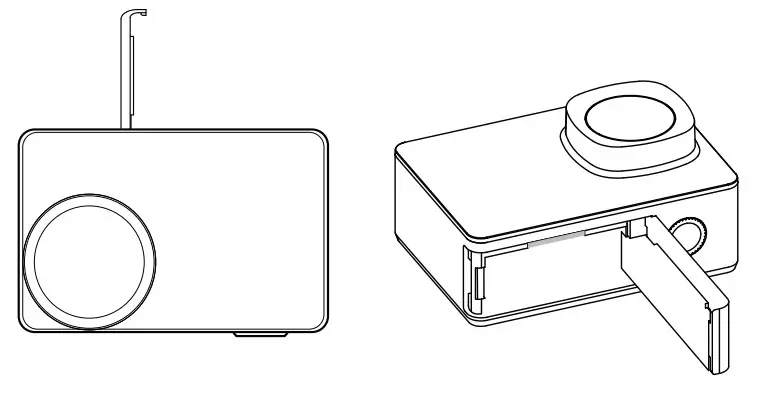
Mounting your camera
Attach your camera to helmets and equipment.
Dear Customer, Thank you for purchasing a product from Victure. Please read and follow this user manual carefully and keep it in a safe place for future reference.
Victure consistently attaches great importance to product quality and high customer satisfaction. We sincerely hope you can make a few suggestions during your use to help us improve our products. Your precious suggestions will help us shape our business to perfectly fit your standards. We’ll soon introduce a series of new products for our valued customers, please share this with your friends.
Just Let us know if you encounter any problems during your use. Our support team will provide you with our best solution without any delay. And all items purchased from Victure are covered by a 1-year warranty.
You can find our contact information below: Victure Action Camera Service E-mail: [email protected] Facebook: Victure Action Camera Club Youtube: Victure Action Camera
Look forward to bringing you more great products in the future. Hope everything goes well in your life.
Kind regards, Victure Support Team
Attention
- Avoid crushing and dropping.
- Keep the camera away from any strong magnetic interference objects like an electrical machine to avoid strong radio waves that might damage the product and affect the sound or image quality.
- Keep the camera away from water and liquids (unless equipped with a waterproof case). This may cause the camera to malfunction.
- Keep it away from children while on charging. It takes 3 hours to fully charge the battery. You are advised to remove the battery after you finish using the camera to extend battery life.
- We recommend you use a high-quality U3 TF Card (32-128 GB) for the best results. Please format the TF card on the camera before using it and restart the camera after formatting.
- Do not expose the camera directly to high temperatures over 55°C.
- Do not place heavy objects on the camera.
- Do not place your TF card near strong magnetic objects to avoid data error or loss.
- Do not use the camera when the battery is low.
- Do not use the camera while charging.
- Do not attempt to open the case of the camera or disassemble it in any way.
- Please remove the battery if you intend to use the camera as a dash camera.
- When you find the camera overheats, unwanted smoke, or unpleasant smell, unplug it immediately from the power outlet to prevent hazardous fire.
- Please store the device in a cool, dry, and dust-free location.
Installation Guide
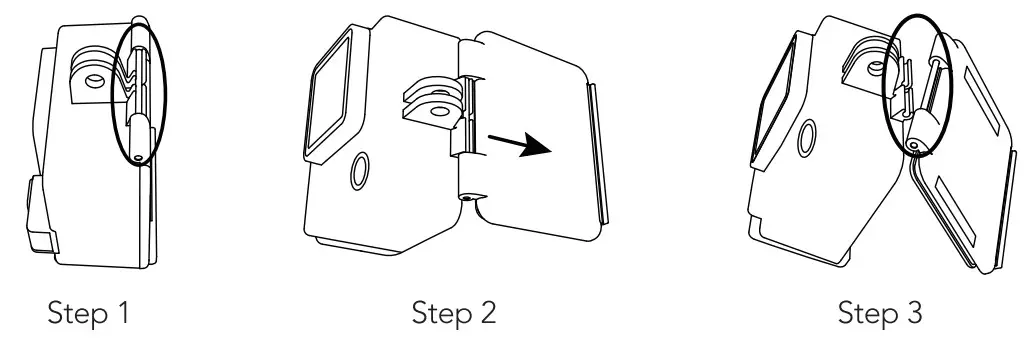
Dust-proof Cover Replacement
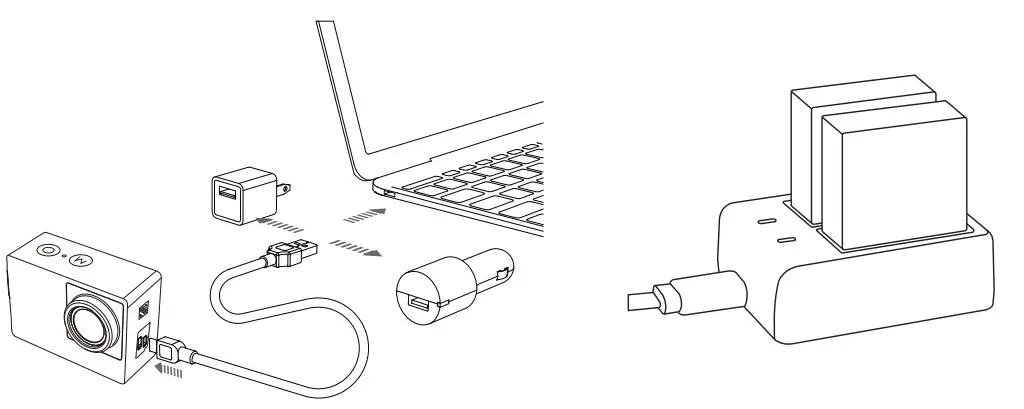
Battery Charging
The Battery charging steps are as below:
Note: The outlet battery charger is not included in this camera package.
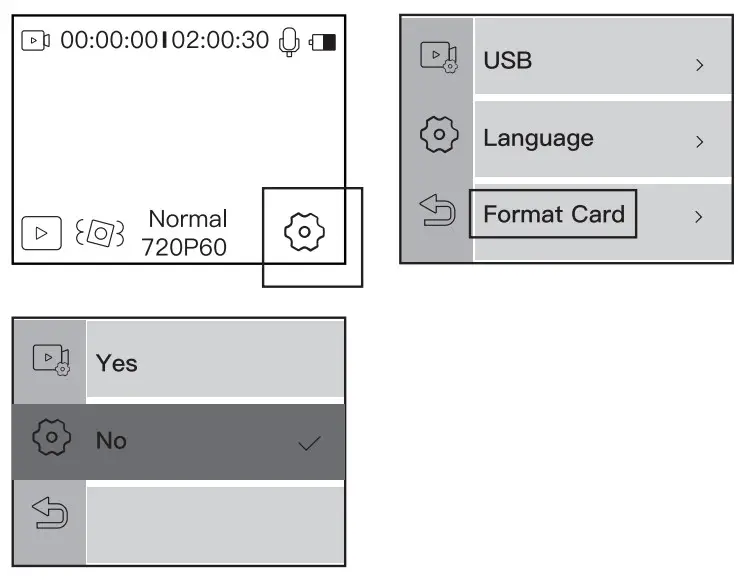
TF Card Installlation & Format
TF Card Installation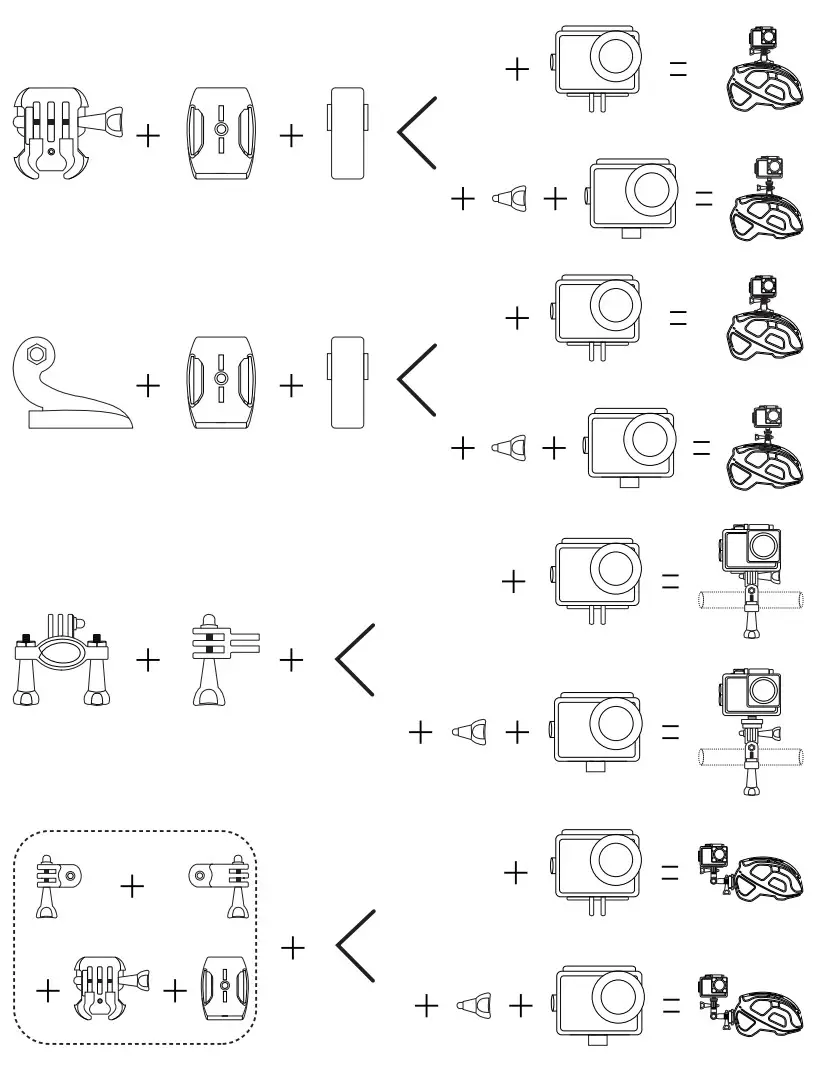
- The camera ONLY supports U3 TF Card with a capacity of 32-128G, otherwise, it may cause the camera unusable.
- After installing the TF card correctly, format it from the setting menu before the first use.
TF Card Formatting
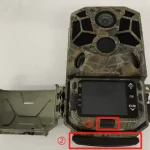
Introduction of host
Product Diagrams
| 1. Lens 2. Mode Button 3. OK / Shoot Button 4. WiFi / Power Button 5. Touch Screen 6. Charging Indicator (Red) |
7. WIFI Indicator (Blue) 8. USB / HDMI Port 9. Speaker 10. Tripod Mount 11. Battery Cover |
Indicator Light
| Working Indicator | 1. While recording a video, the LED continuously flashes. 2. When taking a photo, LED quickly flashes 3 times. 3. Power off, LED is off. |
| Charging Indicator | 1. While charging, LED is bright(Red). 2. Charge fully, LED is off. |
| Wi-Fi Indicator | 1. When the Wi-Fi opens, LED continuously flashes. 2. When WiFi is connected, the LED is bright(Blue). |
Button Instruction
| Power/WiFi Button | 1. Long press the Power key to open the camera. 2. short press to open/off the WIFI. 3. While in boot state, long press power key to shut down. |
| OK Button | 1. Shutter function while Video/Photo mode. 2. Long press into menu setting while video/photo interface, touch screen to select, or short press to confirm for the current option. 3. Video playback status, press to Pause/Play. |
| Mode Button | 1. Short press to switch setting option when in setting interface. 2. Short press to change mode from photo or video. |
Mode Operation Instructions
Video Mode
The camera will automatically display video mode when power on.
- Video Mode
- Recorded Video Time
- Available Record Time
- Microphone
- Battery Life
- Video Playback
- Resolution/fps
- Menu Setting
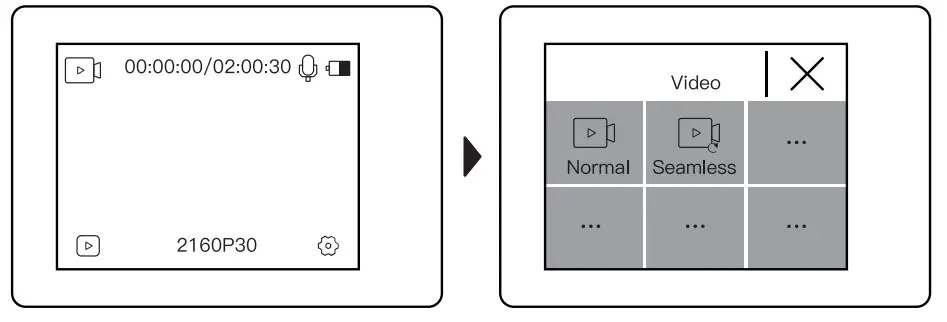
Press for video. 2160P30 or long-press OK button to choose different modes for video.
Press 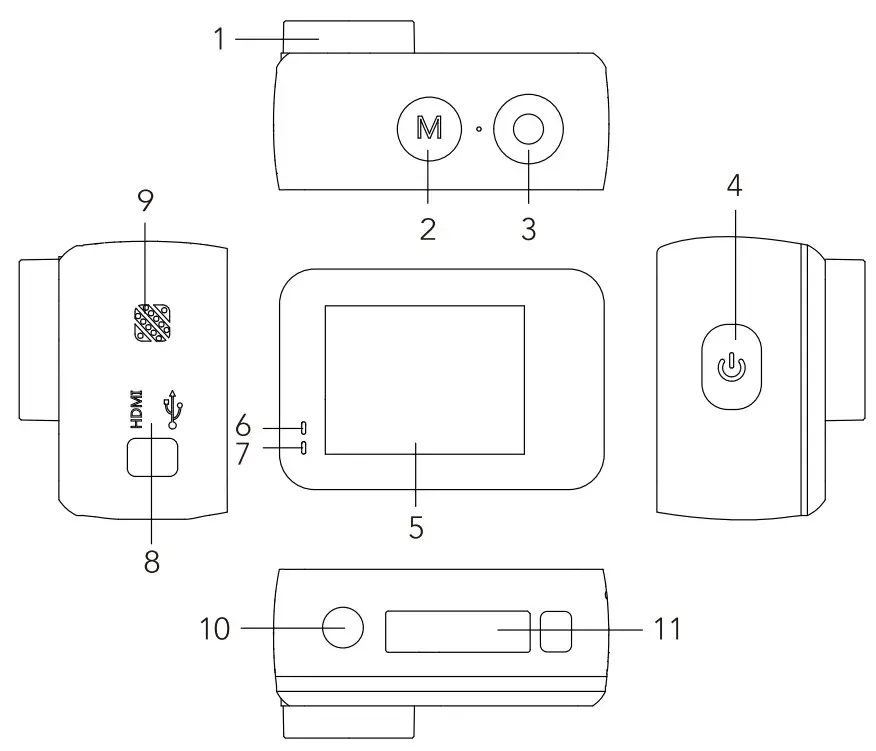 to enter video setting mode

Video Setting
- Video Resolution: 4K/60FPS, 4K/30FPS, 2.7K/30FPS, 1080P/120FPS, 1080P/60FPS, 1080P/30FPS, 720P/240FPS,720P/120FPS, 720P/60FPS
- Video Quality: High/Middle/Low
- EV: -2.0, -1.0, 0.0, +1.0, +2.0
- EIS: On/Off
- Loop Record: off, 1Min, 3Min, 5Min
- Time-lapse Interval: Off, 1 Sec, 3 Sec, 5 Sec, 10Sec, 30 Sec, 1 Min (The video recorded will be compressed to the time length you set, the result is an apparent time speed increase.)
- Time-lapse Duration: Unlimited, 5 Min, 10 Min, 15 Min, 20 Min, 30 Min, 60 Min (Used when the Time-Lapse is on)
- Slow Motion Movie: Off, On
- Fast Motion Movie: Off, 2X, 4X, 6X, 10X, 15X
- Wind Noise Reduction: Off,On
- Metering: Center/Multi/Spot
- Date Stamp: Off, Date, Date&Time
Photo Mode
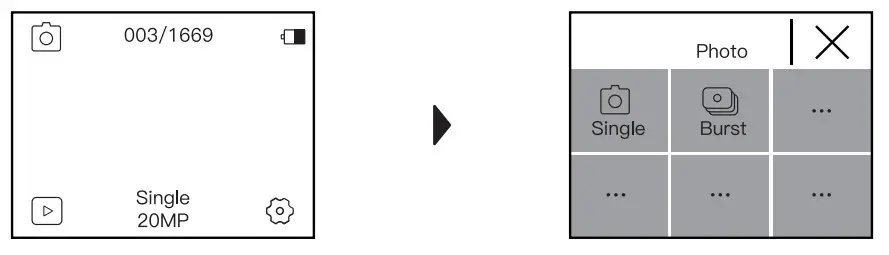
Open the camera and it will automatically display video mode. Then right slide or left slide to change it to photo mode.
- Photo Mode
- Photo quantity/Available Photo Shoot Quantity
- Battery Life
- Photo Playback/Photo Files
- Photo Resolution
- Photo Setting
Press 20MP single or long-press OK button to choose different modes for a photo.

Press 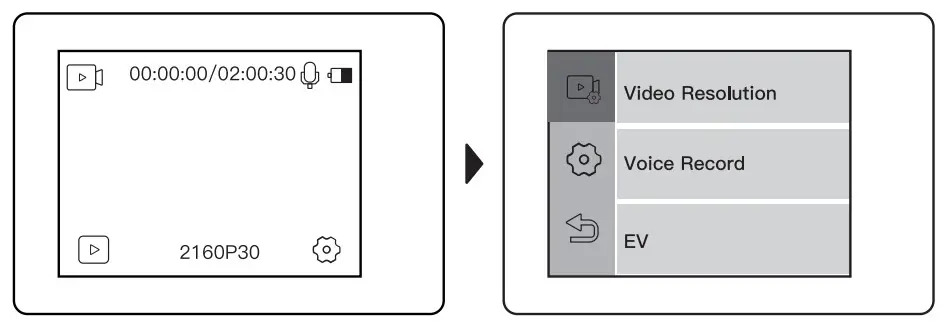 to enter photo setting mode
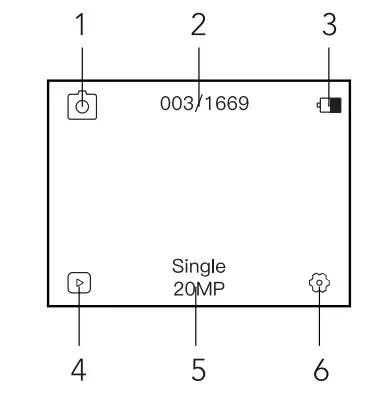
Photo Setting
- Photo Resolution: 20MP, 16MP, 14MP, 10MP, 8MP, 5MP
- ISO: Auto, 100, 200, 400, 800, 1600, 3200
- EV: -2.0, -1.0, 0.0, +1.0, +2.0
- Time-Lapse Interval: Off, 1 Sec, 3 Sec, 5 Sec, 10Sec, 30 Sec, 1 Min
- Time-Lapse Duration: Unlimited, 5 Min, 10 Min, 15 Min, 20 Min, 30 Min, 60 Min
- Photo Burst: Off, 3 shots, 7 shots, 15 shots, 30 shots
- Delay Timer: Off, Delay 2s, Delay 10s,
- Long Exposure: Off, 1 Second, 2 Second, 5 Second, 8 Second, 30 Second, 60 Second
- Metering: Centre, Multi, Spot
- Date Stamp: Off, Date, Date&Time
System Setting
- Power Frequency: 50Hz/60Hz
- Sounds: Shutter, Boot-up, Beep, Volume
- White Balance: Auto, Daylight, Shade, Tungsten Light, White Fluorescent, Underwater. (By adjusting this setting, the camera can correct the color of photos taken under different lighting conditions.)
- Effect: Normal, BW, Natural, Negative, Warm, Brightness Contrast
- Distortion Calibration: On/Off. (To adjust for the fisheye effect)
- Date & Time: Set Date and Time for the camera
- Screen Saver: Off, 1min, 3min, 5min. (After a set period of time, if there is no operation on the camera, the screen will automatically go black. At this point the camera does not turn off, you can press any button to light up the screen.)
- Auto Power Off: Off, 1Min, 3Min, 5Min.( After a set period of time, If there is no operation on the camera, the camera will automatically shut down.)
- Power On Auto Record: On/Off. (When you open the camera it will automatically start to record video.)
- USB: MSDC/PCCAM(UVCMJPG)
- Language: English
- Format Card: Format the memory card in the camera. Once this operation is implemented, all data will be deleted.
- Factory Reset: Reset all camera settings to default settings
- System Info: Firmware version
- Card Info: Card capacity and remaining memory.
WI F I/PC/TV Connection
Wi-Fi Connection
The Wi-Fi application allows you to control your camera remotely on a smart phone or a tablet. You can view the videos and pictures shot on your phone, as well as download them to your phone.
The connecting steps are as follows:
A: Download the iSmtar DV app on your smartphone or tablet in Google Play or Apple App Store.
B: Short press the “Power Button” on the front to turn on WIFI, short press again to Exit. The status light (RED)on the top of the camera remains flashing while the camera is waiting for a Wi-Fi connection and the light stays on when the Wi-Fi is connected
C: Find and connect the Wi-Fi in the Wi-Fi list on your phone with the Wi-Fi name and password displayed on the camera.

D. Open the iSmtar DV APP on your smartphone or tablet after the Wi-Fi is connected, you’ll find the camera is controlled by your phone.
Computer Connection
When you use the included micro-USB cable to connect to a computer, you can access the files stored in the camera’s micro SD card to copy or view them on a computer. This function can also achieve by a micro SD card reader.
TV Connection
With HDMI output, you can display the movies and images recorded by this camera on large screens of TV, projector, etc.
- Turn off the camera.
- Connect the camera and TV with a commercially available Micro HDMI cable (Not Included).
- Turn on the camera and turn on the HDMI setting on the device which you intended to input.
Tips:
- The HDMI input device should support 1080P.
- When outputting HDMI, the display of the camera turns back. The screen is displayed on the HDMI input device, but the operation is operated with the camera.
Specifications
| Model | AC940 |
| Lens | 170 HD wide-angle lens |
| LCD | 2.0″ LCD |
| APP | iSmart DV |
| Picture Format | JPEG |
| Video Format | MOV |
| Video Compression format | H.264 |
| Date Connection | Micro USB2.0, HDMI |
| Extended Memory | MAX to 128G, Micro SDHC |
| Power | 5V/1A |
| Micro speaker | Support |
| Speaker | built-in |
| Battery | 1350mAH |
| Charge Time | About 3-4hours |
| Operating System | Windows XP/7/8 SP3Nista and Mac 10.5 or above |
| Working Temperature | -10C —+55 C |
| Storage Temperature | -20 C — +70 C |
Note: The product specifications are formulated in accordance with the latest information at the time of writing this specification. If any changes are subject to prior notice, please follow the actual camera.
Warranty and Customer Support
All Victure products come with 12 months limited warranty from the date of purchase. Also, we are dedicated to providing the best possible customer service.
If you have any questions about our product or the warranty, please feel free to contact us and we will try our best to reply within 24 hours and solve your problem.
Customer Service E-mail: [email protected]
Youtube account: Victure Action Camera
Facebook: Victure Action Camera Club