Victure HC500 Trail Camera User Manual

Warranty
Dear customer,
Thanks for your great support of Victure camera. This product has a 12-MONTH warranty from the date of the purchase.
★ As our valued customer, you could now send us your Order Screenshot via the following email: [email protected] to extend the warranty to 36 MONTHS for free!
If there is any Question or Suggestion about this product, please feel free to contact us via the above email or WhatsApp: +86 13827808023. Our friendly customer service professionals are always standing by to help and we would make every effort to offer you a satisfying answer!
Best Regards,
Victure Trail Camera Team
STEP ONE: WHAT SHOULD I PREPARE BEFORE USING?
> Preparation before Using
- The SD card, the batteries and the external power supply are not included in the package, you need to prepare these things beforehand.
- Tips and Recommendation:
(1) For optimal performance, we recommend using a full set of eight rechargeable batteries of high-quality to maintain maximum battery life. The recommended brands of batteries are Energizer® or Duracell® branded batteries.
(2) External power supply output: 6V/2A; DC-IN plug size: 3.5 mm*1.35 mm/1.3 mm.
(3) Our cameras can support class 6 or faster SD card ranging from 4GB to 128GB. The recommended brands of SD cards are SanDisk® or Kingston® branded card. Please do not use the SD card which is adopted by the TF(micro SD) card. This might cause the file lost issue.
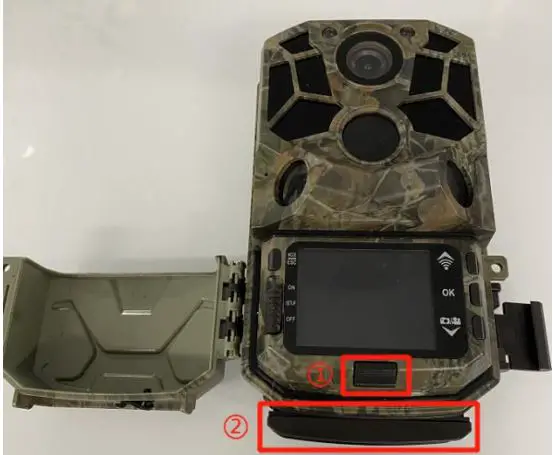
> Install the Batteries
- Press the button at the bottom of the display screen, the battery compartment will pop out, and then pull it out firmly.
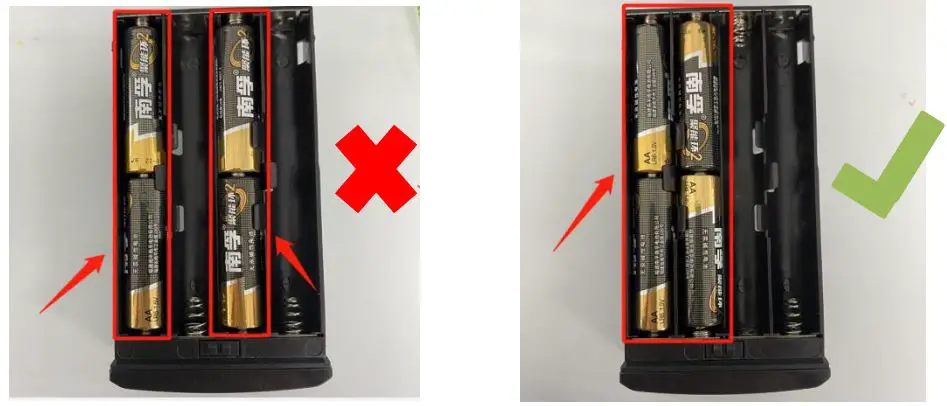
- When the camera uses only four batteries, please install the batteries in the correct position. As shown below.
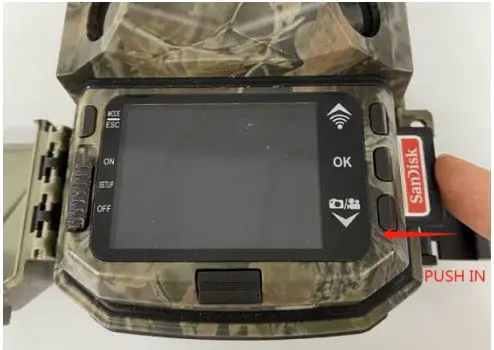
> Insert the SD Card
- Turning off the read-write protection of the SD card, which located in the left of the card, so that the camera can recognize the card.

- Please format the memory card as `FAT32′ on the computer and format it again on the camera before use.
- Insert a high-quality SD card when the camera is OFF.
> Tear off the Protective Films
Before you start using the product, please tear off the protective films at the position of the camera’s lens and sensor.
STEP TWO: HOW DO I SET IT?
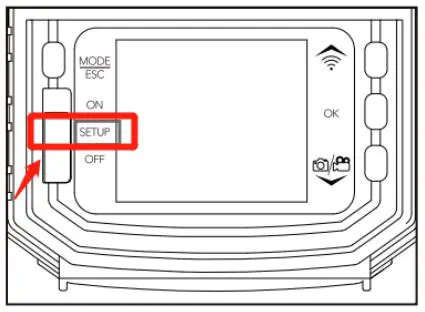
- Slide the Switch Button to the SETUP position. The camera enters test mode. The screen will light up.
- Short press
 Button once You can view the pictures and videos taken by the camera.
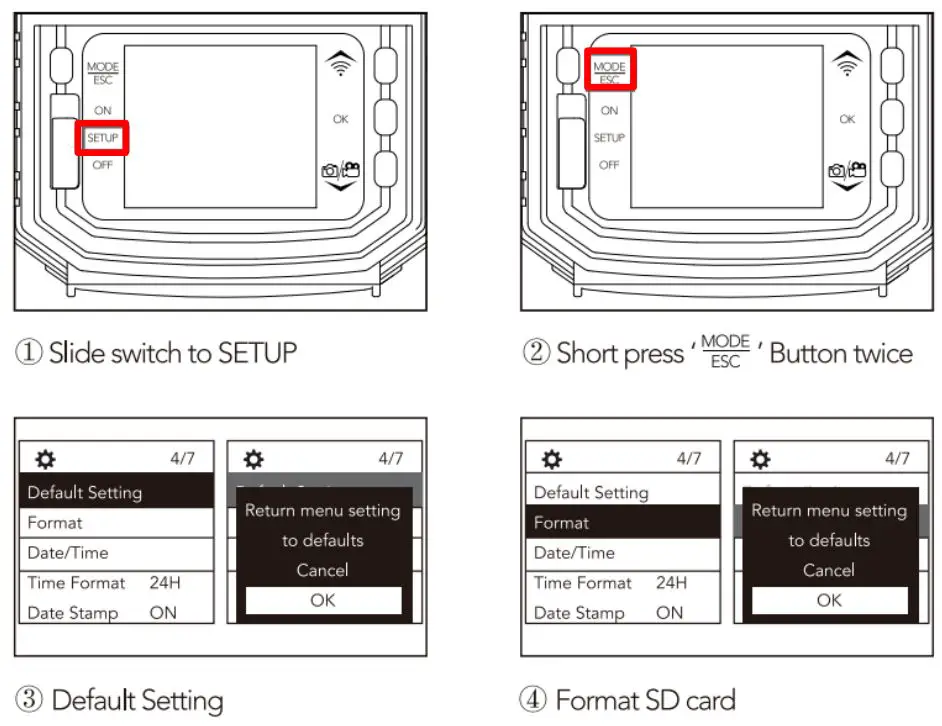
 - Short press Button twice and enter the setting interface. Here, you could press the UP and DOWN arrow to change the option, then press the OK button to confirm selection or press the button to return to the last interface. (Under the TEST mode, you could also press the OK button to take photos or videos manually.)
>How To Reset the Camera and Format the SD Card?
> Menu Setting List:
Mode: The camera will only take photos under Photo mode, only take videos under Video mode, and the photo first and then the video under the Photo + Video mode. Please set the function by you need. The camera default setting is Photo.
Image Size: The maximum value is 30MP and the default value is 5MP. Higher resolution provides clearer images, but creates larger files that takes up more of the SD card capacity.
Picture No: The maximum value is 10 Photos and the default value is 1 Photo. Choose 1 photo, and the camera will take one photo once; Choose 2 photos in series will get two photos once, choose 3 photos in series will get 3 photos once. Please set the function by you need.
Caution:
Due to the limitation of the camera’s read and write functions, if you need to make continuous shooting, you could try to reduce the resolution of the photo before setting it.
Resolution: The maximum value is 1296P and default value is 1080P. Higher resolutions produces better quality videos, but creates larger files that takes up more of the SD card capacity.
Video Length: The maximum value is 3 Min and the default value is 10 Sec. You can choose according to your own purpose. To conserve battery power, the video length should no longer than 10s at night.
Caution:
- In the night automatic (ON) mode, the system will automatically record according to the set recording length. When the battery is low, the recording will be stopped early.
- In order to prolong the battery life, please set a shorter recording time.
- When the battery power is low, the camera recording time may be lower than the set value. Please be in time Replacement battery.
Record Audio: The default setting is `on’. Please choose whether to enable this function according to your needs.
PIR Interval: The default choice of the interval is 30 Sec. If choose the 30s interval, the PIR sensor will detect the motion twice in one minute. If you want the PIR sensor to detect motion more frequently, you can choose the shorter interval.
Caution:
This function has a great influence on the batteries’ life. The shorter the interval, the high frequency to capture target, but more power consumption; The longer the interval, the lower frequency to capture the target and less power consumption.
PIR Sensitivity:
The default setting is Medium. Please modify this as needed. E.g. increase sensitivity to capture very small movements or lower the sensitivity if you are just looking for bigger animal movements.
Time Lapse:
Our trail camera has the ability to function as a time lapse camera. This is useful if you want to view the entire activity in a given area such as a large field or you want to observe cold blooded animals(e.g. snakes) or outdoor plants etc. The default setting is OFF, please set the function by you need.
Q: What’s the difference between the Interval and the Time Lapse?
A: Interval – In this mode, the PIR sensor still works. For example, if you choose the 30s interval, the PIR sensor will detect the motion twice in one minute. If the PIR sensor detects an object at this time, the camera will record, but if the PIR sensor doesn’t detect, the camera will not record.
Time Lapse – In this mode, the PIR sensor will no longer working because it will be triggered by the built-in timer, and the camera would take photos in the setting interval time. For example, if you set the time lapse to 30s, the camera will record twice in one minute whether or not there is an object passing by.
IR LED: Used to set the brightness of the IR LED light, which can be switched between auto, economy and off mode. The default setting is Auto. Please modify this as needed.
Low Bat Night Shot: When the battery is low, you can choose not to turn on the infrared light to continue taking pictures or stop night shooting. The default setting is No IR Led. (When the battery power is lower than 30%, it will stop or reduce the night shooting, please update the battery in time)
Monitoring Period: The default option is OFF. Select ON and set the timer, the camera can work for a predetermined period of time and standby for other periods of time.
For example,
I would like to record the activity of my birds at daylight (from 6:00am to 6:00pm), then I can set the timer from 6:00 to 18:00. Do not forget to press the OK button to save your settings.
Language: The default setting is English. You can choose the language by you need.
Default Setting: This selection returns your camera back to the factory default selections for each setting. If you are new to trail camera, you can choose yes when you do not know how to operate the camera or when the camera do not work well for you.
Format: This function can help you format your SD card. Select YES, the SD card will be formatted, the files in the card will be deleted.
Date Stamp: You can choose to turn on or off the date tag in this setting. If you choose the off, the photos or videos of will not have a date stamp.
Beep Sound: When this is on, You can hear the click of the camera button and the on/off prompt.
Camera Name: You can modify the camera name you want in this setting, and the camera name will be printed on the photo. It is convenient for users to identify different cameras by the camera name when multiple cameras are used at the same time.
Password Setting: You can set the camera power-on password through this function; if you forget the password, you can use this password to unlock: OPEN.
Bluetooth: When you need to turn on the camera Wifi via Bluetooth, please turn on this first. The default option is ON.
WIFI SSID: Through this setting to modify the camera’s WiFi hotspot name.
WIFI Password: The WiFi connection password of the camera can be set in this item, the initial password is “12345678” by default.
Auto WIFI Off: You can modify the time of WiFi automatic shutdown in this setting. When you successfully connect the camera wifi and do not operate for a period of time, the camera will automatically disconnect the wifi to save power. The default option is 1 Minute.
Auto Power Off: The default value is 3 Min. Under the TEST mode, when you do not operate the camera for a certain period of time, the camera will automatically shut down to save power. When you want to start the camera again, you need to switch the camera to OFF and then to SETUP.
Backlight: The default value is 1 Min. Under the TEST mode, If you don’t do anything for 1, 2 or 5 minutes the camera will turn off the light on that screen to save power. But the camera can be switched on again by pressing any button.
Version: You can check the camera’s software version information in this setting.
Mcu FW Update: Developers use, users can ignore it.
> The following parameter settings allow you to take more pictures and videos (for reference only)
- Mode: Photo + Video
- Photo NO: 1 photo
- Resolution: 1296P
- Record Audio: on
- PIR Sensitivity: High
- IR LED: Auto
- Side PIR Setup: ON
- Image size: 20MP
- Shutter speed: 1/30
- Video length: 10sec
- PIR Interval: 5sec
- Time lapse: off
- Monitoring Period: off
STEP THREEE: HOW SHOULD I MOUNT IT?
> Mounting the Camera
There are two ways to mount the Victure trail camera: using the provided adjustable web belt, or the tripod socket.
- Using the Adjustable Web Belt
Push one end of the belt through the brackets on the back of the camera. Thread the end of the strap through the buckle. Fasten on the belt securely around the tree trunk by pulling the end of the strap firmly so there is no slack left.
- Using the Tripod Socket
The camera is equipped with a socket at the bottom and to enable mounting on a tripod we provided.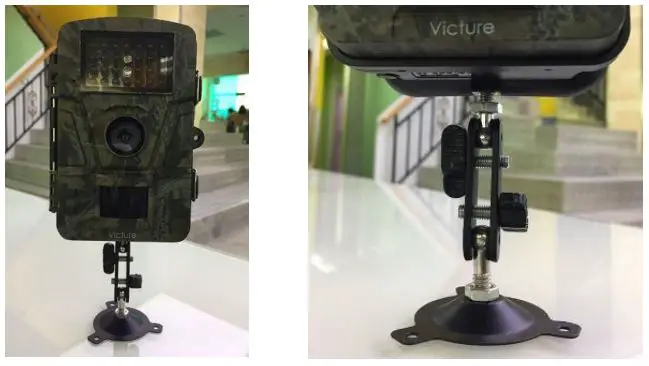
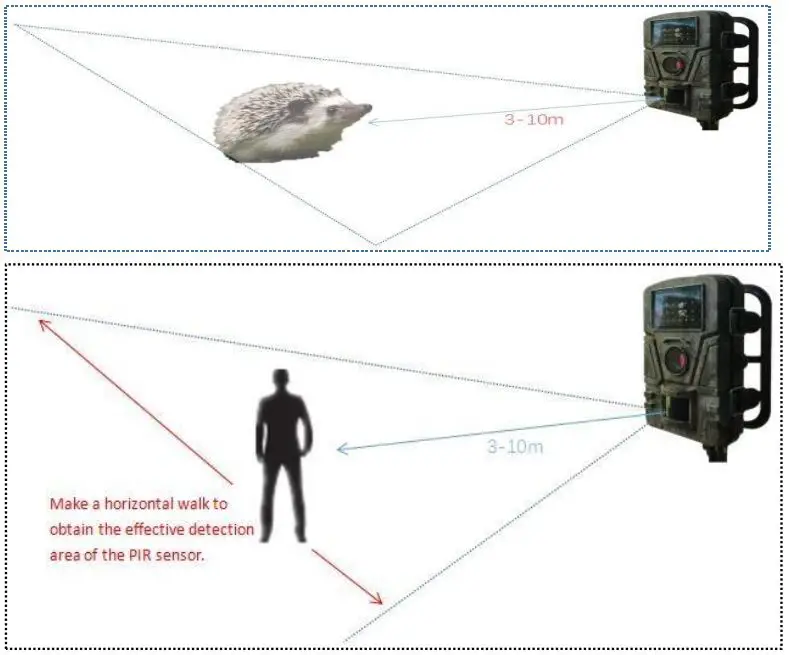
> How to make the camera more accurately capture animals?
The shooting range of this product is 120° fan-shaped area right in front of the camera. The best imaging distance is 3-10 meters in front of the camera. In order to achieve the desired detection of shooting, please place the camera following below instructions:
- Please attach the product to a suitable place, the installation height should be higher to the height of the detected animal. Please make sure that the lens is level or slightly tilted downward angle and make sure that there are no reflective objects within the shooting range, such as smooth rocks.
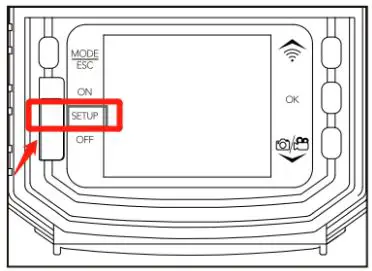
- Slide the switch button to SETUP position.
- Determine the shooting range (please off the `Auto Power Off’) Make a horizontal walk (not a vertical walk) in front of the PIR sensor window of the product. When the indicator light flashes once, it indicates that the PIR has sensed successfully. At this moment, the area you are in is the valid detection area. Keep doing this test repeatedly, you can obtain the effective detection area of the PIR sensor. When you doing walking test far away from the PIR sensor window, please speed up the pace.
STEP FOUR: SWITCHING ON THE CAMERA
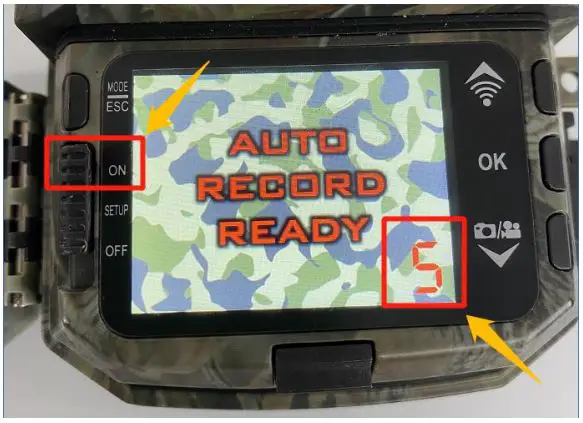
After placing the camera properly, please make sure that the power switch is in the ON position (Do not leave it in the SETUP position).
Once you switch the power switch to the ON position, the motion indicator light will blink for 5 seconds. This means the camera will enter the working state after 5 seconds, please close and lock the front cover of the camera and then walk away.
After it stops blinking, the PIR sensor is active, and the camera will be in working condition. Please note, the PIR sensor is strongly sensitive to ambient temperature. The greater the temperature difference between the environment and your subject, the farther the possible sensing distance.
STEP FIVE: HOW CAN I REVIEW THE PHOTOS AND VIDEOS?
> Review the Files Directly on the Camera
Slide the switch button to SETUP position, press Button to enter the Replay interface. You can view the pictures and videos taken by the camera. In Replay mode, you could:
- Press the
 button: page forward;
 - Press the
 button: page backward;
 - Long press the
 button: delete the current file.
If you are reviewing the videos, you could also:
- Press button: play/pause the video;
- Press button: stop playing the video.
> Review the Files on the Computer
- The way to review the images on your SD card is to review the images on your computer with card reader. The pictures can be viewed on both PC and the Mac computers. Here are the steps:
(1) Insert the SD card into your computer via a card reader..
(2) After the SD card is inserted into your computer, navigate to START/COMPUTER.
(3) Look for the SD card icon. Double click on the SD card icon. A folder named DCIM will appear.
(4) Double click the DCIM folder. A new folder will appear. Your images are in this folder. - You can also connect the camera to your computer via the USB cable included. In this case, please turn off your camera and take out all of the batteries. The screen will display `MSDC’ promptly which means the computer has been connected successfully. Then you could follow the instruction above to locate your picture files.
> Review the Files on you phone or iPad via connect camera’s Wifi
When it’s inconvenient for you to take off the camera, you can use the phone to connect to the WIFI signal sent by the trail camera(with ‘Hunting Camera Pro’ APP). It can help you use your phone to view the photos/videos in the camera directly on your phone(support downloading), also can adjust the settings of the camera. Here’s operational video for your reference: https://www.youtube.com/watch?v=O_u3Liuf8TA
ATTACHMENT: OUR SOCIAL CHANNELS
> YouTube
- Search `Victure TC’ on YouTube, enter into the brand page and then click the `PLAYLISTS’.
- Go through the link on the browser: http://rrd.me/ejNYF

Search: @enjoywildlifecamera