Sections in this Manual
- PRODUCT DESCRIPTION
- FIRST TIME USE SALT, RINSE AID AND DETERGENT
- FILLING THE SALT RESERVOIR
- SETTING THE WATER HARDNESS
- FILLING THE RINSE AID DISPENSER
- ADJUSTING THE DOSAGE OF RINSE AID
- FILLING THE DETERGENT DISPENSER
- PROGRAMS TABLE
- PROGRAMS DESCRIPTION
- OPTIONS AND FUNCTIONS
- DRAIN OUT
- LOADING THE RACKS
- LOWER RACK
- DAILY USE
- MODIFYING A RUNNING PROGRAM
- ADDING EXTRA CROCKERY
- ACCIDENTAL INTERRUPTIONS
- ADVICE AND TIPS
- UNSUITABLE CROCKERY
- DAMAGE TO GLASS AND CROCKERY
- TIPS ON ENERGY SAVING
- HYGIENE
- CARE AND MAINTENANCE
- WATER SOFTENING SYSTEM
- TROUBLESHOOTING
- FAQs
LOADING THE RACKS
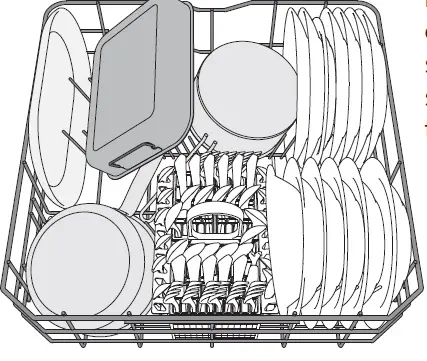
UPPER RACK
Load delicate and light dishes: glasses, cups, saucers, low salad bowls.
(loading example for the upper rack)
ADJUSTING THE HEIGHT OF THE UPPER RACK
The height of the upper rack can be adjusted: high position to place bulky crockery in the lower basket and low position to make the most of the tip-up supports by creating more space upwards and avoid collision with the items loaded into lower rack.
The upper rack is equipped with a Upper Rack height adjuster (see figure), without pressing the levers, lift it up by simply holding the rack sides, as soon as the rack is stable in its upper position.
To restore to the lower position, press the levers A at the sides of the rack and move the basket downwards.
We strongly recommend that you do not adjust the height of the rack when it is loaded.
NEVER raise or lower the basket on one side only.
FOLDABLE FLAPS WITH ADJUSTABLE POSITION
- The side foldable flaps can be fold or unfold to optimize the arrangement of crockery inside the rack.
- Wine glasses can be placed safely in the foldable flaps by inserting the stem of each glass into the corresponding slots.
Depending on the model
- to unfold the flaps there is needed to slide it up and rotate or release it from the snaps and pull it down.
- to fold the flaps there is needed to rotate it and slide flaps down or pull it up and attach flaps to the snaps.
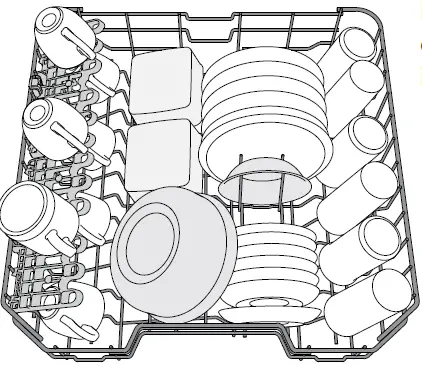
LOWER RACK
For pots, lids, plates, salad bowls, cutlery etc. Large plates and lids should ideally be placed at the sides to avoid interferences with the spray arm. (loading example for the lower rack)
CUTLERY BASKET
It is fitted with top grids for improved cutlery arrangement. It must only be positioned at the front of the lower rack.
Knives and other utensils with sharp edges must be placed in the cutlery basket with the points facing downwards or they must be positioned horizontally in the tip-up compartments on the upper rack.
DAILY USE
- CHECK WATER CONNECTION
Check that the dishwasher is connected to the water supply and that the tap is open. - SWITCH ON THE DISHWASHER
Press the ON/OFF button. - LOAD THE RACKS
(see LOADING THE RACKS). - FILLING THE DETERGENT DISPENSER
- CHOOSE THE PROGRAM AND CUSTOMISE THE CYCLE
Select the most appropriate program in accordance with the type of crockery and its soiling level (see PROGRAMS DESCRIPTION) by pressing the P button. Select the desired options (see OPTIONS AND FUNCTIONS). - START
Start the wash cycle by pressing the START/PAUSE button. When the program starts you hear a beep. - END OF WASH CYCLE
The end of the wash cycle is indicated by beeps and the display shows End. Open the door and switch off the appliance by pressing the ON/OFF button.
Wait for a few minutes before removing the crockery – to avoid burns. Unload the racks, beginning with the lower one.
The machine will switch off automatically during certain extended periods of inactivity, in order to minimise electricity consumption. If the crockery is only lightly soiled or if it has been rinsed with water before being placed in the dishwasher, reduce the amount of detergent used accordingly.
MODIFYING A RUNNING PROGRAM
If a wrong program was selected, it is possible to change it, provided that it has only just begun: press and hold the ON/OFF button, the machine will switch off. Switch the machine back on using the ON/OFF button and select the new wash cycle and any desired options; start the cycle by pressing the START/PAUSE button.
ADDING EXTRA CROCKERY
Without switching off the machine, open the door (be ware of HOT steam!) and place the crockery inside the dishwasher. Close the door and press the START/Pause button the cycle will begin from the point at which it was interrupted.
ACCIDENTAL INTERRUPTIONS
If the door is opened during the wash cycle, or if there is a power cut, the cycle stops. Once the door has been closed or the electricity supply is restored, to start again the cycle from where it was interrupted, press the START/Pause button.
To disable the DEMO MODE the following actions must be carried out in sequence, without breaks. Switch the machine ON and then switch it OFF again. Press the DELAY button until the buzzer is heard. Switch the machine on again. The “dOF” indicator flashes and then turns OFF.