M86N DC34
Title
Ownpets Remote Controlled Dog Training Collar, Rechargeable and Waterproof, All Size Dogs (10Lbs – 100Lbs) 600 yards Range
5 Bullet Points
8 LEVEL VIBRATION AND SHOCK – And Beep & Light. Motion sensor Adjust table collar band for small and large dogs
THE ULTIMATE DOG TRAINING COLLAR – Immensely Popular, The system can be used for 1 or 2 receiver collars. All-Weather Resistant E-Collar used by Expert Trainers & First Time Pet Owners. Can be used to help correct Barking, Walking, Leash Training, Sitting, Aggression, and other Behavioral Obedience.
LONG-LASTING BATTERY LIFE – Rapid Charging Lithium Ion Battery Provides a long-lasting Battery Life. Auto Power Protect Mode Helps Conserve Battery Life When Not In Use.
LIMITED LIFETIME WARRANTY – If You Ever Have any Issue with Your Training Collar. Please contact us.
COMPLIMENTARY EXPERT DOG TRAINING – If You Need dog training help Our Expert dog trainer offers one-on-one email advice to all customers
Description
CAUTION! Please read and follow the instructions in manual. Proper fitting of the collar is important. A collar worn for too long or made too tight on the pet’s neck may cause skin damage. These collars can cause pressure necrosis if used incorrectly and are often misidentified as burns.
- Avoid leaving the collar on the dog for more than 12 hours per day.
- If it’s possible, re-position the collar on the pet’s neck every 1 to 2 hours.
- Check the fit of the collar to prevent excessive pressure; follow the instructions in this manual.
- Never connect a lead to the electronic collar; it will cause excessive pressure on the contacts.
- When using a separate collar for a lead, don’t put pressure on the electronic collar.
- Wash the dog’s neck area and the contacts of the collar weekly with a damp cloth.
- Examine the contact area daily for signs of a rash or a sore.
- If a rash or sore is found, discontinue use of the collar until the skin has healed.
- If the condition persists beyond 48 hours, see your veterinarian.
These steps will help keep your pet safe and comfortable. Millions of pets are comfortable while they wear stainless steel contacts. Some pets are sensitive to contact pressure. You may find after some time that your pet is very tolerant of the collar. If so, you may relax some of these precautions.
It Is important to continue daily checks of the contact area. If redness or sores are found, discontinue use until the skin has fully healed.
Immensely Popular, Fully Waterproof E-Collar used by Expert Trainers and First Time Pet Owners. Can be used to help correct Barking, Walking, Leash Training, Sitting, Aggression, and other Behavioral Obedience Rapid Charging Lithium Ion Battery Provides a long-lasting Battery Life. Auto Power Protect Mode Helps Conserve Battery Life When Not In Use.
Package :
1×Remote Transmitter
1×Receiver Collar
1×Collar Strap
1×USB Cable
1×Charger
1×User Manual
1×Test Light
![]() Digital Music Player -B03
Digital Music Player -B03
Getting Started
Quick Guide
- Turn the switch button to “ON” to power on the device and then choose your language.
- Each time you tap the button+/-/
 /
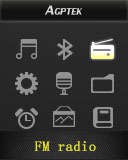
/ , it will bring you to its 9 different functions, including Music, Video, Recording, FM Radio, Folder view, EBook, Pictures, Setting, and Tools. Tap the central button to access to its function.
 - When it’s on music playing interface, tap the button
 to back to previous level, and continually tapping to back to main interface.
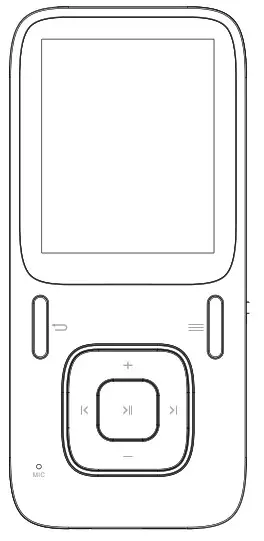
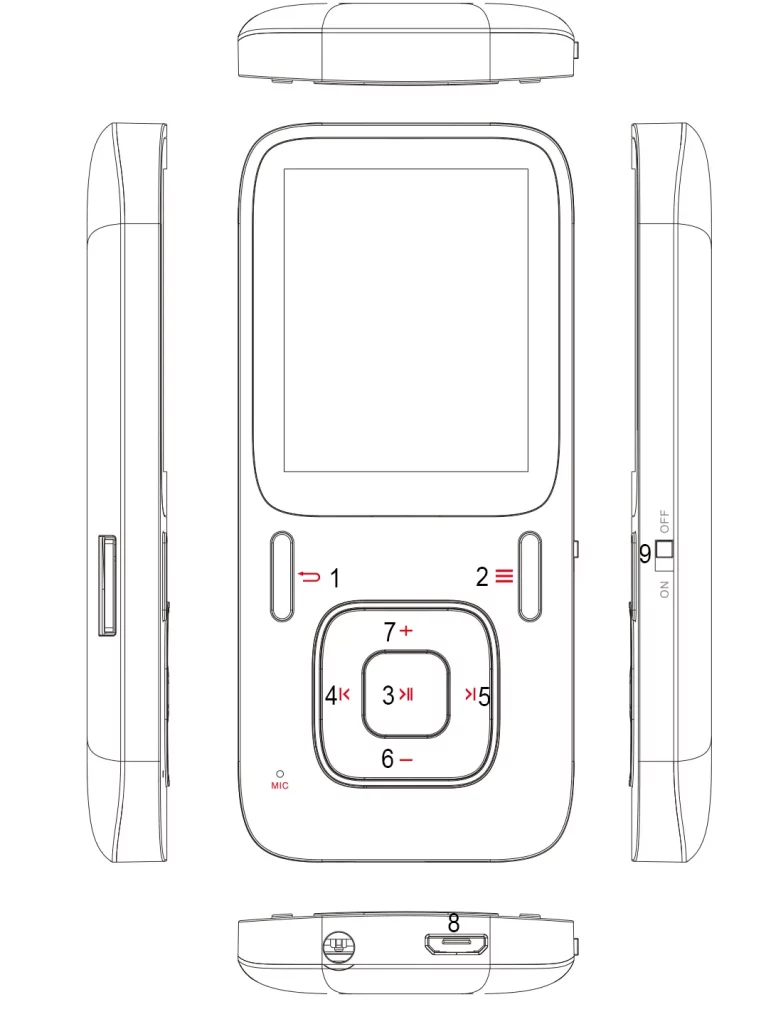
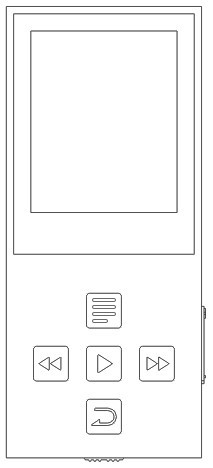
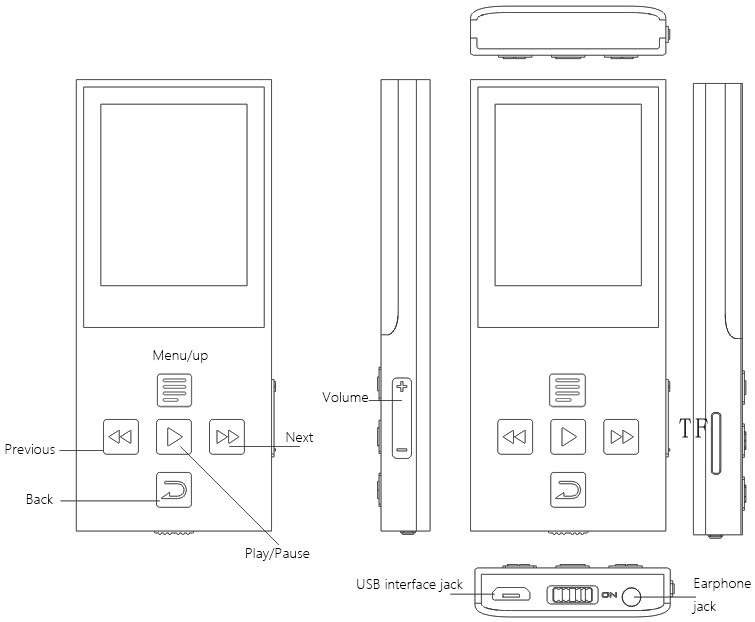
Buttons and Controls
- Return to previous menu.
 When on music/FM playing screen, tap to access to the submenu; Hold it to lock the player, and again to unlock it.
 Enter key/ play/pause/ hold for 3 seconds to switch off/ on.
 Tap for previous track/hold to rewind.
- Tap for next track/ hold to fast forward.
 Decrease the volume.
 Increase the volume.
 Micro USB port.
 Switch to power it “ON”/”OFF”.
Note: when it’s on main playing interface, tap the button +/- to choose different functions.
Charging the Battery
- Plug one end of the micro USB cable into the USB port of a computer or into the mains plug, plug the other end into the device.
- Please kindly note that the device can’t be charged while the switch button is “OFF”.
Power On/Off
- Turn the switch button to “ON”, the player will power up.
- When the switch button is turned to “ON”, it will be turned on/off by pressing the center button for three seconds.
- You can set sleep time under “Setting” according to your need, and then it will switch off as you set.
- When there is no operation on this player, it will switch off by itself.
Note: If you cannot power on the player, please check if you turn the switch on (the switch button is on right side of the player).
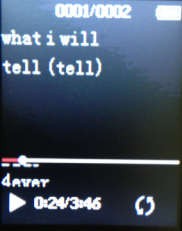
Listen Your Music
Tap the icon “Music” on main screen with central button, a related list will appear as “All songs”, “Artists”, “Albums” etc. While on main menu, tap the button ![]() to back to music playing interface.(Make sure music is playing on backstage)
to back to music playing interface.(Make sure music is playing on backstage)
- Rewind/Forward: Hold the button / for fast reward/ Rewind. Tap it to the next/previous song.
- Play/Pause: tap the central button to play/pause the track.
When it is on main audio playing interface, tap the button ![]() to access to the submenu. Then a related list will show, including “Play mode”, “Bookmark”, “Sound settings” etc.
to access to the submenu. Then a related list will show, including “Play mode”, “Bookmark”, “Sound settings” etc.
- Play mode
- Shuffle /Repeat Tap as Play mode> Shuffle /Repeat, and then choose according to your need.
- Repeat mode Replay settings
– Choose “Replay settings” > “Replay Mode” to access to its function, and the icon for A-B indication will appear on playing screen.
– Starting time for replay is confirmed while tapping the icon (B is flashing).
– Tap the icon again and then it will start replaying (adjust the replay paragraph according to your need).
– Tap the iconagain to back to normal playing. Replay times
-Choose “Replay settings” > “Replay Times” from 1 to 10 Replay Interval
– Choose “Replay settings” >”Replay Interval” from 1 to 10 seconds
- Sound settings
– Equalizer: Choose and set accrding to your need, including “Rock” “Funk”, “Hip hop” etc.
You can also customer the effct (such as the bass) according to your need.
-Variable speed playing
Choose different play speed according to your need. - Bookmark (choose “Bookmarks” with the option “Add bookmark”)
- It is marked by the stopping time as “hh:mm:ss”. So you can set the stopping time before you add it for continues playing next time conveniently.
- Maximum number of bookmarks supported by each audio file is10. You can also cover the previous bookmark with new bookmark, and then the old one will be replaced by the new.
- You can find the bookmarks you saved with the option “Go to bookmark” under item “Bookmarks”, and you can delete them with the option “Delete bookmark”.
Transfer Files to Your Player
Connect your player with the computer to start transferring files.
- Power on your computer and connect it with the device via micro USB cable. And then choose with the option “Charge & Transfer”.
- The device will show as a removable disk (AGPTEK-B03) as soon as your computer recognize it. Then you can drag or copy files onto your player.
Note: when you choose “Charge & Transfer” while the switch button is off, it won’t be charged but you can still transfer your files (The “Charge & Player” can be used normally).
FM Radio
Tap the icon “FM Radio” on main screen with central button, a related list will appear as “Presets”, “Manual tune” etc. Choose according to your need.
- Manual tune and Auto tune You can adjust the radio through “Manual tune” or “Auto tune”. When it’s on main radio playing interface, tap the left/right arrow button to rewind and forward search one by one, hold for searching automatically, then press the central button to stop on the channel you like.
- Recording and Presets
-When it’s on main playing interface, tap the button with to access to the submenu, choose with the option “Start FM radio recording” to start recording, and you can find it in “Recordings library”. -when it’s on main playing interface, tap the button with to access to the submenu, choose with the option “Save to preset”. Note: Please plug the earphones into the player when you want to use the FM radio.
Folder View
Tap the icon “Folder View” on main interface, and then a related list will show as “Local folder” and “Card folder” with SD card (SD card is not included in the package) in. When there is no SD card, you will only see folders and files in local folder, choose according to your need.
Settings
Tap the icon “Settings” on main interface to access to its function, and then a related list will show, including “Sleep Timer”, “Display Settings”, and “Ear Protect” etc. Choose and adjust according to your need. For example:
- Date and time Choose the format for your date and time, and then set it. Tap the button with icon to adjust different items, tap the left and right arrow button to adjust its value.
Recording
Tap the icon “Recording” on main interface to access to its function, then a related list will appear showing the following: “Start voice recording”, “Recording library”, “Record format”, and “Record settings”.
- Select option “Start voice recording” and tap the center button on it, the player will indicate `please wait’ and the recording starts.
- Push the center button to pause the recording.
- Push the back button and the player will show “Save recording?” select “yes” to save it. Choose the item “Recording library” and you will find the recordings you saved.
Tools
Tap the icon “Tools” with central button on main interface to access to its function then a related list will appear showing the following: “Calendar”, “Stopwatch”, and “Alarm”. For example, you can tap the button ![]() to choose among the year/month/date, and tap the left/right button to choose its different value. Alarm Choose it and you can adjust its 5 different items, including “Alarm ON/OFF”, “Alarm time”, “Alarm cycle”, “Alarm music” and “Alarm volume”. Adjust according to your need.
to choose among the year/month/date, and tap the left/right button to choose its different value. Alarm Choose it and you can adjust its 5 different items, including “Alarm ON/OFF”, “Alarm time”, “Alarm cycle”, “Alarm music” and “Alarm volume”. Adjust according to your need.
Pictures
Tap the icon “Pictures” with central button on main interface, tap the button with icon ![]() to access to its submenu. Adjust according to your need.
to access to its submenu. Adjust according to your need.
EBook
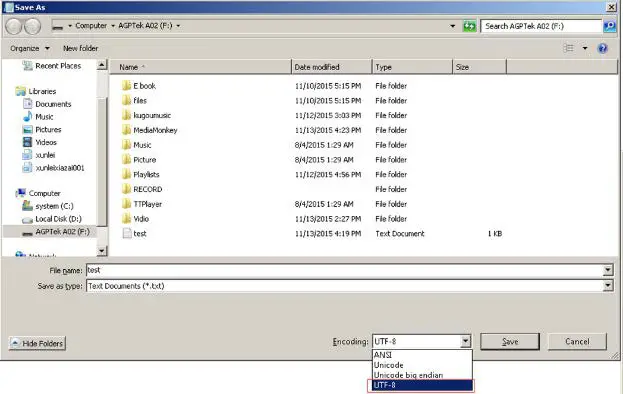
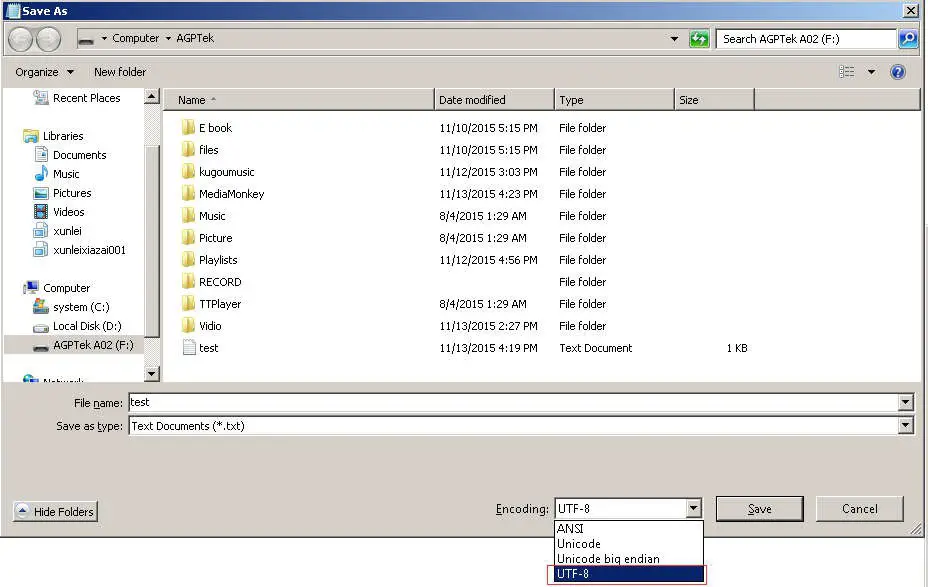
Tap the icon “EBook” with central button on main interface, when it’s on text playing interface, tap the central button to switch between the Manual play and Auto play, tap the button with icon to access to its submenu. Adjust according to your need. Note: max number of bookmarks supported by each file is 16. Please note: if you can’t read your txt document through E book, connect your player to the computer, and then choose the file for the item “save as”, select the code as “UTF-8” and save. Copy the txt file to E-Book folder and it will back to normal condition for your reading.
 Video
Video
Tap the icon “Video” with central button on main interface, and then the video list will show, choose what you want and start playing.
- Tap the left/right arrow button to back to previous/next file, hold them to rewind/forward.
- Tap +/- button to adjust the volume.
- Tap the central button to play / pause the track.
- Create the playlist by yourself
Note: The product only supports 160*128 video, you may convert video files to this format by APP “amvtransform”. (Download it at http://images.agptek.us/Download/VideoTools.zip).
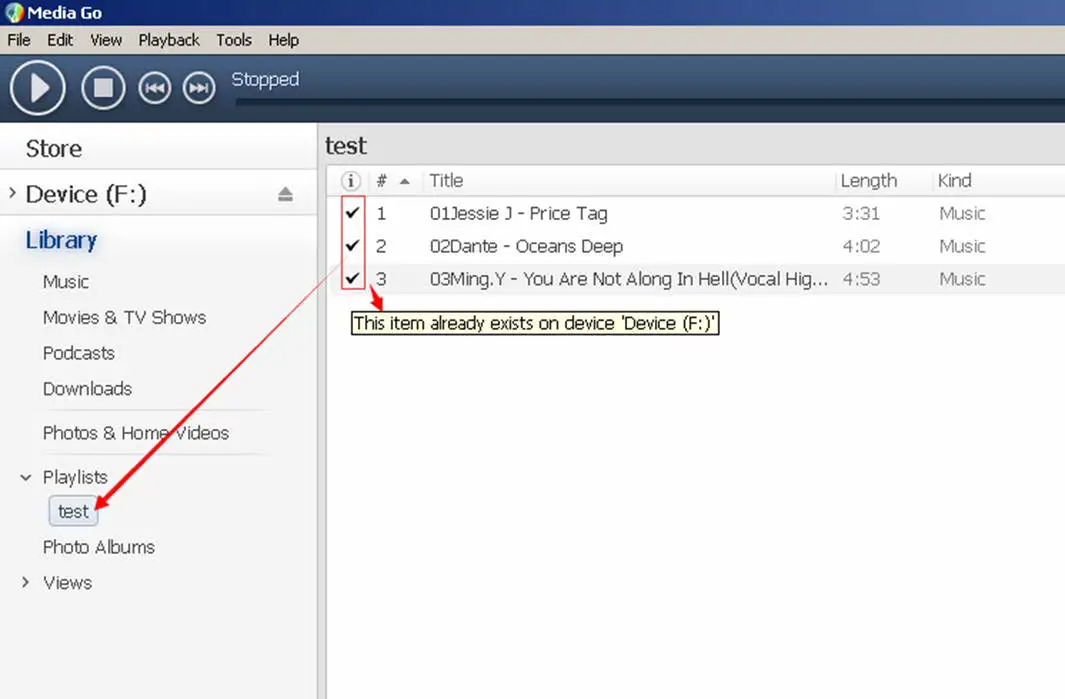
How to create your own playlist
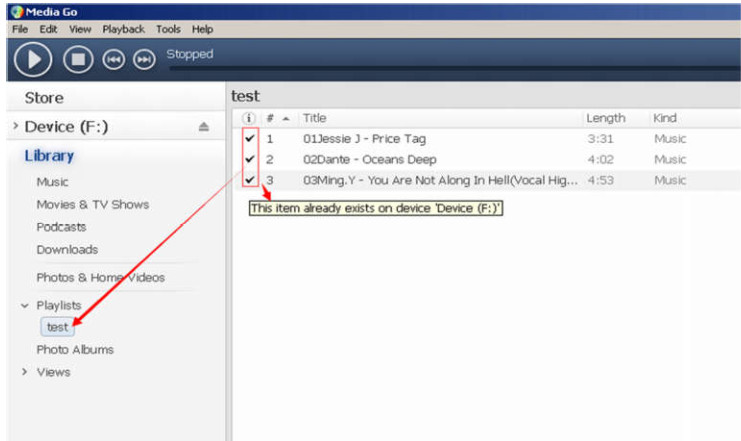
You can add your songs to the 3 preset playlists, and to create your own playlist, we recommend the free program called Media Go (http://mediago.sony.com/chs/download) Just create your playlists in Mediago and then right-click its name and select ‘Synch to X 🙁 Which is your mp3 player’s disk) ‘. (You can download it at http://mediago.sony.com/chs/download) After sending your playlist and music to the player, you may find it in “Music”, and then select playlists.
 How to make you music or audio books sort by number
- Play from “Music” on main interface, the order is sorted by alphabet (or exactly called ASCII).
- Play from “Folder viewer” on main interface, the order is sorted by the order you copy them. Before you copying them into the player, arrange the files to a right sequence in computer (by name, like the picture below. Not by #).
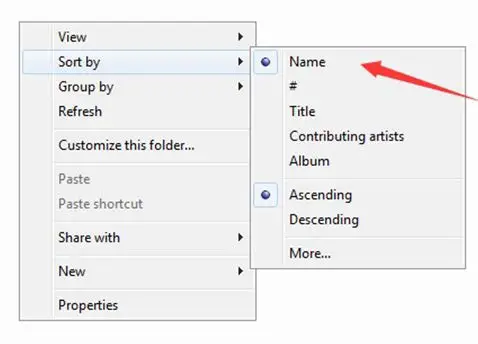
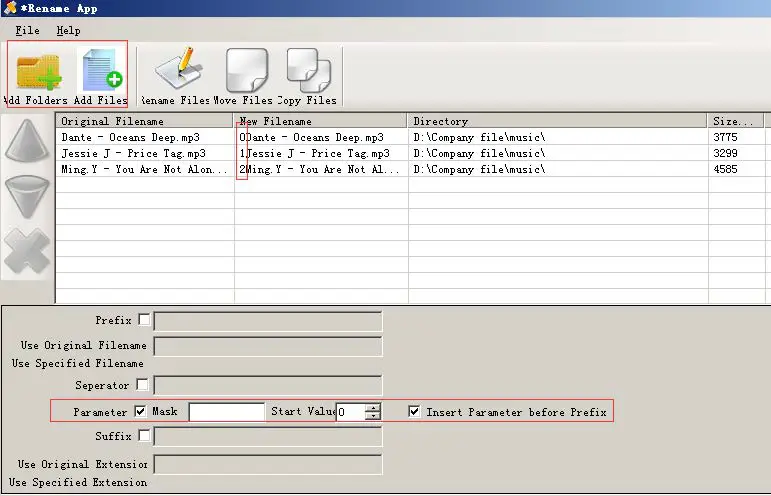
- If your music is not sort by the right number, use the app application”Renamer” to sort your music by number. Download it at http://renamer.en.softonic.com/, and then choose the item “Add folders” or “Add files” to add your music into list. For more details, please kindly check the link)
Specifications
| MP3 | MP1 | Bit rate:32kbps—448kbps |
| Sampling rate:8KHz—48KHz | ||
| MP2 | Bit rate:8kbps—384kbps | |
| Sampling rate:8KHz—48KHz | ||
| MP3 | Bit rate:8kbps—320kbps | |
| Sampling rate:8KHz—48KHz | ||
| WMA | Bit rate:5kbps—384kbps | |
| sampling rate:8KHz—48KHz | ||
| OGG | Bit rate:Q0–Q10(20kbps—499kbps) | |
| sampling rate:8KHz—48KHz | ||
| APE | Bit rate: FastNormal Compression(800kbps1000kbps) | |
| sampling rate:8KHz—48KHz | ||
| FLAC | Bit rate:L0–L8(1000kbps-1200kbps) | |
| sampling rate:8KHz—48KHz | ||
| WAV | IMA-ADPCM | Bit rate:32kbps—384kbps |
| sampling rate:8KHz—48KHz | ||
| MS-ADPCM | Bit rate:32kbps—384kbps | |
| sampling rate:8KHz—48KHz | ||
| PCM | Bit rate:128kbps—1536kbps | |
| sampling rate:8KHz—48KHz | ||
| AAC-LC | Bit rate:(8kbps—320kbps) | |
| Sampling rate:8KHz—48KHz | ||
Smart Dog In-ground Pet Fencing System W-227
This hidden W-227 fencing system is among the most reliable, cost-efficient pet containment systems available today. A buried wire transmits a harmless radio signal. When your dog approaches the boundary, the signal causes the dog’s collar receiver to deliver a warning beep first. If your dog continues closer to the boundary, the system will issue a mild shock. If your dog continues further, the system will issue stronger shocks until your dog returns to within the boundary you have set up. Your dog will naturally seek to avoid correction and is content staying within established boundaries.

FEATURES:
- PULSED PROPORTIONAL STIMULUS – The closer your pet gets to the boundary, the more intense the shock.
- PROGRESSIVE TONE STIMULUS – A warning tone will be issued first, then a shock stimulus if your dog continues to move closer to the boundary.
- POWER BOOST SWITCH – Allows the width of the warning area to be adjusted
- SPEED DETECT ANTI-RUN THROUGH – The faster your dog is moving, the quicker the higher level of intensity is issued
- AUDIBLE WIRE BREAK ALARM – The system’s control center has an audible alarm to alert you if it senses a break in the wire or if the boundary system is not functioning correctly
- VISUAL WIRE BREAK ALARM – The system’s control center will light also up if it senses a break in the wire
- QUICK DISCONNECT TERMINALS – quick and secure connection or disconnection of the wire to the control center
- LOW BATTERY INDICATOR – When the light on the collar is green, it is working properly. Red it means time to replace the battery.
- The updated version, New waterproof function, most reliable.
How to setup:
1) Wall-mounted transmitter: The transmitter is the central controller to a whole electronic system. Make sure the wire is set to a loop.
2) The receiver collar: Receiver (collar) will make a warning beep firstly and then continuous stimulation if your dog attempts to approach the wire boundary.
3) How to install the system
a. Design your containment area and calculate the amount of wire needed.
b. Install the wall transmitter.
c. Lay out the perimeter wire.
d. Connect the perimeter wire to the wall transmitter.
e. Verify transmitter is functioning without a problem.
f. Set up the receiver and then, test the containment system and adjust the field width.
g. Install the boundary wire and training flags.
h. Fit collars to your dogs and train your dogs
i. Then you can enjoy with the trained dog
PACKAGE INCLUDING:
1X Indoor Wall-mounted transmitter
1X Power plug
2X Adjustable receiver collars
2X 9 volt battery for collar
1X Boundary wire of 300 meters
4X Extra metal contact points
20X Training flags
2X Test bulb
2X Screws
1X User’s manual in English
M81N DC32
Title
Ownpets Remote Controlled Dog Training Collar, Rechargeable and Waterproof, All Size Dogs (10Lbs – 100Lbs),300 yards Range
5 Bullet Points
100 LEVELS OF VIBRATION -100 levels of static. The Controller will go into STANDBY mode if there is no operation after 20 seconds and turn off after 2 minutes. The Receiver Collar will TURN OFF if is unused for 4 minutes.
THE ULTIMATE DOG TRAINING COLLAR – Immensely Popular, The system can be used for 1 or 2 receiver‘s collars. All-Weather Resistant E-Collar used by Expert Trainers & First Time Pet Owners. Can be used to help correct Barking, Walking, Leash Training, Sitting, Aggression, and other Behavioral Obedience.
LONG-LASTING BATTERY LIFE – Rapid Charging Lithium Ion Battery Provides a long-lasting Battery Life. Auto Power Protect Mode Helps Conserve Battery Life When Not In Use.
LIMITED LIFETIME WARRANTY – If You Ever Have any Issue with Your Training Collar. Please contact us.
COMPLIMENTARY EXPERT DOG TRAINING – If You Need dog training help Our Expert dog trainer offers one-on-one email advice to all customers
Description
CAUTION! Please read and follow the instructions in the manual. Proper fitting of the collar is important. A collar worn for too long or made too tight on the pet’s neck may cause skin damage. These collars can cause pressure necrosis if used incorrectly and is often misidentified as burns.
- Avoid leaving the collar on the dog for more than 12 hours per day.
- If it’s possible, re-position the collar on the pet’s neck every 1 to 2 hours.
- Check the fit of the collar to prevent excessive pressure; follow the instructions in this manual.
- Never connect a lead to the electronic collar; it will cause excessive pressure on the contacts.
- When using a separate collar for a lead, don’t put pressure on the electronic collar.
- Wash the dog’s neck area and the contacts of the collar weekly with a damp cloth.
- Examine the contact area daily for signs of a rash or a sore.
- If a rash or sore is found, discontinue use of the collar until the skin has healed.
- If the condition persists beyond 48 hours, see your veterinarian.
These steps will help keep your pet safe and comfortable. Millions of pets are comfortable while they wear stainless steel contacts. Some pets are sensitive to contact pressure. You may find after some time that your pet is very tolerant of the collar. If so, you may relax some of these precautions.
It Is important to continue daily checks of the contact area. If redness or sores are found, discontinue use until the skin has fully healed.
Immensely Popular, Fully Waterproof E-Collar used by Expert Trainers and First Time Pet Owners. Can be used to help correct Barking, Walking, Leash Training, Sitting, Aggression, and other Behavioral Obedience Rapid Charging Lithium Ion Battery Provides a long lasting Battery Life. Auto Power Protect Mode Helps Conserve Battery Life When Not In Use.
Package :
1×Remote Transmitter
1×Receiver Collar
1×Collar Strap
1×USB Cable
1×Charger
1×User Manual
1×Test Light
]]>AGPTek Longevity Music Player
A18 User Manual
Please contact us via [email protected], when anything comes to your mind, we urge to turn this little thing into the best music player in the world and in your hand.
Quick Guide
Plug earphones into the jack on the bottom right of your device then slide the power switch to the right to turn the player on.
Each time you tap the button it will bring you to one of its nine different functions, including Music, Bluetooth, FM Radio, Set, Recordings, Folder view, Tools, Pictures,
and EBook.
 Note: the player will switch to sleep (standby) mode if inactive for a few seconds. And you can hold the central button for about 3 seconds to wake up the player.
When it’s on music/FM radio/recording playing interface, tap the button to back  to the last grade; in another interface, tap the icon to scroll down.
Power On and Off
Turn the slider switch (Main Power) at the bottom of the player to to right.
- Standby mode. While the slider switches in ON position, pressing the central button for about 3 seconds to turn off your player. Please kindly note, the device is not really powered off but fallen into standby mode, and the battery will be consumed still. To turn off your player totally, please turn the slider switch(Main Power) at the bottom of the player to to the left.
- If you have been fallen into standby mode with the slider switch in ON position, you can wake up the unit by pressing the center button for three seconds.
Note: If you cannot switch the player on, please make sure the slider switch is in ON position (right side).
Charging the Battery
- Plug one end of the provided micro USB cable into the USB port of a computer, plug the other end into the micro USB port on your device. It will start charging automatically.
- You can also charge the device via chargers. Please kindly note that the chargers should meet standards: input: AC110-240V 50/60Hz Max: 100mA; output: DC5.0-5.5V 500mA-800mA.
Transfer Files to Your Player
- Connect your device to the computer with the enclosed micro USB cable the mp3 player will show up as a removable disk as soon as the computer recognize it and then just drag files into the mp3 player. If your computer cannot recognize the player, the enclosed Micro USB lead may have a problem please use another Micro USB lead to connect it to your PC.
- When your device is shown as a removable disk, you can put the files saved on your computer to your player. When the slider is “off” the unit will power up when connected to a USB port, and then go dead when disconnected. Slide the switch of the opposite position it will power up OK.
Play Your Music
Selecting the Music icon on the main screen with a central button, and then a related list will show as “All songs”, “Artist”, “Albums”, and “Genres” etc. Choose and adjust according to your need.
 Main
Main
- Return to the main screen
When the player is on the music playing screen, there are two ways for you to return:
• Press the menu button, a related list will show with the item “Back to Home”, choose it and then you will return to the main screen
• Press the back button to return to the last grade, then tap the button continually to return to the main screen.
 - Rewind/Forward
– Hold buttonto fast rewind, tap to the previous song
– Hold the button to fast forward, tap to the next song
– Tap the central button to play or pause. - Volume Adjustment
Press and hold the button +/- to adjust the volume. - Resume Playback
• Resume/Now playing option
- When you have back to the main screen and start another application, the next time you enter “Music”, you will find the item “Resume” or “Now playing”, choose them and then tart playing from where you left off.
• Resume with power on/off
Press the back button to exist from the main playing screen and hold the central button for three seconds to turn the player into sleep mode, the next time you wake up the player it will start playing from where you left off last time. - Submenu
• Shuffle and Repeat
When you are on the music playing interface, tap the menu button to access to its submenu, and then choose the item “Shuffle” or “Repeat” according to your need.
Note: if you play the song through “Music”, it will only shuffle/repeat the songs in the folder in which your music is included. If you play the song through “Folder”, it will shuffle songs by folder and repeat as you set.
- Add Bookmarks
When access to the submenu, choose “Bookmarks” with the option “Add bookmark” from the list that appears.
1) Bookmarks are marked by the stopping time as “hh:mm: ss”.
2) Maximum number of bookmarks supported by each audio file is 10. Addition bookmarks will override the ones set previously.
3) To find saved bookmarks, select “go to bookmark”, found under item “Bookmarks”.
Select “Delete bookmark” to delete it. - Language learning
- Choose “Repeat mode” to access to its function, and the icon for A-B indication will appear on the playing screen.
- Starting time for the replay is confirmed while tapping the button (B is flashing).
- Tap the button again and then it will start replaying (adjust the replay paragraph according to your need)
- Tap the button again to back to normal playing.
•The player will fall into sleep mode as you set in “Sleep timer”
•Choose “Rock”, “Funk”, “Classical” etc. in “Equalizer”, and you can also custom the effect according to your need.
•The player will start playing indifferent speed according to your settings in “Speed”.
•Add the music file to the playlist in “Add to playlist”.
Play by Bluetooth
Please kindly note turn your BT device on pairing mode before connecting.
Select the “Bluetooth” icon on main screen with central button to enter its function. Make sure that the BT device is on pairing mode. (Please kindly note that for some Bluetooth speakers and lots of Bluetooth headphones, only when the LED flash red and blue at the same time, it is under pairing mode)
- The screen will display as “please wait” > “Searching” > “Bluetooth Connected”. Then play the music files as you want.
Note: the playlist is not supported under BT mode. - Please kindly note you can’t rewind or forward under BT mode, and there is a BT icon on top left corner of the screen.
- If your BT device can’t be connected with the player, please kindly check under the “Bluetooth device list”, find and choose your BT device, and then start connecting.
- If the Bluetooth feature does not work on your player please contact us for help:
FM Radio
Select the “FM radio” icon on the main screen with a central button to enter its function.
- Manual tune and Autotune
When choosing “Manual tune”,tap the buttonand for rewind and forward search one by one, and hold the button for searching automatically, then press the central button to stop.
When choosing “Autotune”, it will start searching automatically, and the searched stations will be saved under “Stations”. - Set via submenu
While on the radio playing screen, press the menu button to access to its submenu. Then a related list will show as “Bluetooth link”, “Save to preset”, “Tuner region” etc. Adjust according to your need.
Please kindly that you need to turn your BT device on pairing mode if you choose “Bluetooth link”. Choose “Search” and find your BT name, then tap and connect it with your player. When it’s connected, you can enjoy listening radio via the BT device. - Start FM recording
Choose the item “Start FM recording”, and then tap the back button to with the option “Yes” to save it.
Tap the item “FM recording” to play the saved recordings you saved.
Recordings
Select the “Recordings” icon on the main screen with a central button to enter its function.
The following functions are displayed: “Start Voice Recording”, “Recordings library”,
“Recording Format” and “Record Settings”.
– Select a format from MP3 and WAV
– Select the bitrate according to your need under “Record Settings”
– Select “Track AVR mode” under “Record Settings” and then it will start recording automatically once it’s waked up by the sound
– Scroll to “Start Voice Recording” to start your recording
– To pause or stop recording, press the central button
– To save, press the back button and then select an answer, yes to save
– To play, go to “Recordings Library” and play as music
Folder View
Select the “Folder View” icon on the main screen with a central button to enter its function.
Tap the button / to choose different folders, and play according to your need.
Tools
Select the “Tools” icon on the main screen with a central button to enter its function. Then a related list will show as follows “Video”, “Calendar”, “Stopwatch” and “Alarm”.
- Video
– Tap the central key for Playing/Pause
– Hold buttonto fast rewind, tap to the previous video
– Hold the button to fast forward, tap to the next video
– Back to the menu: while in the video playing screen, tap the back button and then tap the buttoncontinually to back to the main menu
– Tap the menu button to enter into its submenu, and then a related list will show as
“Brightness” and “Repeat” etc. Adjust according to your need.
Note: The product only supports 160*128 videos, you may convert video files to this format by the tools included in the device.
![]()
- To use the “am transform” included in the device Install the program on your computer first, and then press the icon
 to choose the file you want to convert on your computer, and choose the icon
 to put the converted video in the file on your A02 player. Choose the icon
 to start convert, the bottom will show the progress of converting for the
 icon, it will be ok until it showed 100%.
 - Calendar
Tap the central button to enter its function. And then tap the button to choose among year/month/day, tap the menu/ back button to choose different values. - Stopwatch
Tap the central button to enter its function. There are 5 preset options for you. Tap the central button to enter it.
– Tap the button/ to start different items
– Tap the buttonto back to the last grade
Alarm
Tap the central button to enter its function. And set the alarm time/cycle/music and volume according to your need.
Pictures
Select the “Pictures” icon on the main screen with a central button to enter its function. Tap the button to change different picture items.
When it’s on the picture playing interface, tap the menu button to access its function, and then adjust according to your need.
E-Book
Please note: Only the “txt” format is supported for eBooks.
Select the “E-Book” icon on the main screen with a central button to enter its function.
Tap the button and to turn the page up/down.
Tap the button to access to its submenu.
Please note: if you can’t read your text document through Ebook, connect your player to the computer, and then choose the file for the item “save as”, select the code as “UTF- 8” and save. Copy the text file to the E-Book folder and it will back to normal condition for your reading.
Please note: if you can’t read your txt document through Ebook, connect your player to the computer, and then choose the file for the item “save as”, select the code as “UTF- ” and save. Copy the txt file to the E-Book folder and it will back to normal condition for your reading.
Support and Troubleshooting
1. How to use the playlist
- To use the preset playlist.
Press the button and then choose the option “Add to playlist” for the song you want to operate. There are 3 items prepared for you, including “Playlist on the go [1]”, “Playlist on the go [2]” and “Playlist on the go [3]”, you can add the song to any one of these three as you like. - To create the playlist by yourself
Editing Playlist by media player could be painful, no matter by iPod or others. There is a free program called Media Go. It’s the easiest program to use for transferring playlists to AGPTek. Just create your playlists in Media Go and then right-click its name and select ‘Add playlist to X 🙁 Which is your MP3 player’s disk) ‘. (You can download it at http://mediago.sony.com/enu/)
After sending your playlist and music to the player, you may find it in “Music”.
2. If the device is frozen, turn it off and then restart
3. If the device doesn’t turn on
- Turn the slider power switch to off (left).
- Connect the player to your computer.
If the player still can’t be used after charging, please contact our customer service.
4. Serious Noise
- Dirt will cause noise. Inspect the headset and clean if necessary.
- A damaged music file may cause serious noise. Try another song to test.
5. No sound was heard from the headset
- Please check whether the voice volume is setting up at 0.
- Please check if there is any problem with the headset connecting.
Specifications
| Weight | 39.5g |
| Material | Plastic |
| Capacity | 8 GB (supports up to 64GB) |
| E book | TXT |
| Video format | WMA (160*128) |
| Picture format | BMP/JPG |
| Music format | MP3、WMA、APE、FLAC、OGG |
| Recording format | WAV, MP3 |
| Dimension | 92mm×40mm×11mm |
| Battery | 700 mah lithium-ion rechargeable battery |
AGPTEK LW11 Smartwatch
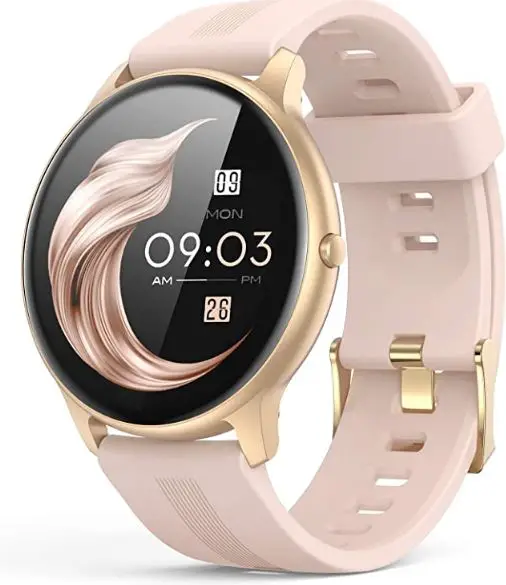
AGPTEK LW11 Smartwatch
Thanks for choosing this product. Please read this [user manual] carefully before use and keep it for future reference. Any problem about this product, please contact us at [email protected].
PRODUCT OVERVIEW
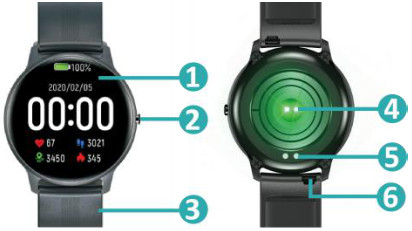
| 1. Touch Screen | 4. Optical Sensor |
| 2. Power Button | 5. Charging Point |
| 3. TPU Straps | 6. Strap Slot |
Note: Long press the power button to turn on/off the watch.
INSTALL WATCH
- One side of the spring bar should be inserted into the hole of your watch at first.
- Simply slide the pin with your finger.
- Point to the other side of the spring bar at the other hole of your watch.
- Release the pin and attach the strap.
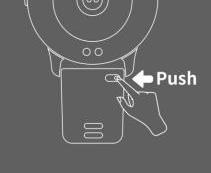
CHARGING WATCH
Attach the supplied magnetic charger to the charging contact on the back of the watch, and insert the other end of the charger into the USB wall charger or USB interface of a computer.
Note:
- Install your watch first, and fully charge your watch before use.
- To ensure smooth charging, please put the watch face down during charging. Charging time: about 2 hrs.
DOWNLOAD APP

- Scan the left QR code.
- Find [Settings] > [QR Code] in Watch. Then, tap it & scan the QR Code with the phone.
- Download “FitCloudPro” from “Apple store” or “Google play store” (Android App store).
http://fitcloud.hetangsmart.com/qrcode/
Note: Mobile phone must support Android 5.0 or above, iOS 9.0 or above, and Bluetooth 4.0+.
BINDING
⦁ FIRST CONNECTION
- For first use, open App “FitCloudPro”, register and log in.
- Follow the instruction of App to start binding the watch. Click [Search Now], and the smartphone will start searching for devices for about 10s that can be connected.
- After a successful search, select and click “LW11-xxx” to complete the connection. There are two situations:
1) iOS: A pairing request will appear, just click “Pair” to connect.
2) Android: No pairing request, directly connect.
⦁ SECOND CONNECTION
Open App, go to [Device] > [+ Add Peripheral Now] > [Search Now]. Follow the above [FIRST CONNECTION] steps 3 to complete the connection.
BASIC OPERATION
 On the main interface, swipe left to enter daily activity analyses; Swipe right to enter the main menu; Swipe up to enter the message list; Swipe down to enter the shortcut interface.
MAIN MENU
⦁ SPORT DATA
Record your steps, walking distance & burned calories on that day. They also can be viewed after syncing to the App.

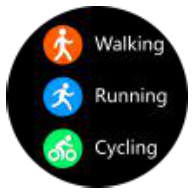
⦁ SPORTS
Swipe up/down to cycle through 8 different sports (Running/Hiking/Swimming, etc.), and select one of your favorite sport and tap it to start. Find the sports data on the [Sports Record].
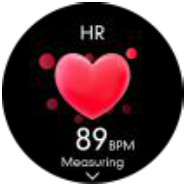
⦁ HEART RATE
On the heart rate interface, it will enter into real-time monitoring. Swipe up to get the analysis chart of your heart rate. And it can also be viewed in App after syncing.
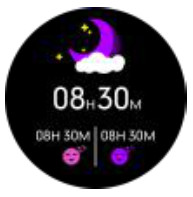
⦁ SLEEP
Record your sleep from 21:00 pm to 12:00 am. Sync and update the data to “Sleep” in App by manually pulling down the “Home” page of App.
 ⦁ BP&BO
On the blood pressure (BP) or blood oxygen (BO) interface, it will automatically detect your blood pressure or blood oxygen until the vibration is felt, which indicates completing the measurement.
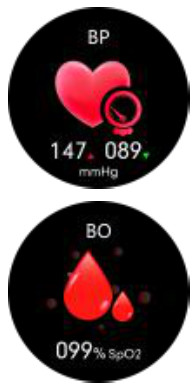 Note: Only reference, cannot be used as a basis for medical-related aspects.
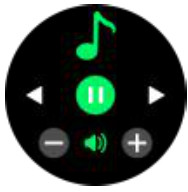
⦁ MUSIC
After connecting the watch and App, tap Music in the main menu to access its functionality. Tap pause, play, forwards, or backward icons to control the songs on your phone. Swipe right on the screen to exit.
Note: The music interface will not switch during operation, but the watch will vibrate to remind you after you have operated.
⦁ WEATHER
Display the current weather. Only the watch connects successfully to the App, the weather information will be shown or updated on the watch. Note: The App should be allowed to access into GPS & Internet of your phone

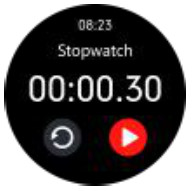
⦁ STOPWATCH
On the main menu, Tap it to access its function, and a new interface displays. Tap![]() to start, and tap
to start, and tap![]() to stop or tap
to stop or tap![]() to resume. Exit the stopwatch by swiping right on the screen.
to resume. Exit the stopwatch by swiping right on the screen.
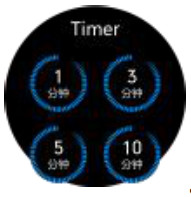
⦁ TIMER
With 8 timers + a customized timer. 8 Timers are 1M, 3M, 5M, 10M, 20M, 30M, 1H, 2H. Tap one of the timers you want to start. Then, follow the peration of the stopwatch to use the timer.
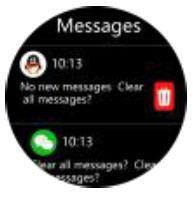
⦁ MESSAGE
Find a message on the main menu or swipe up the main interface to quickly access to Message. All notifications of your phone will be automatically synchronized to the watch after a successful connection between watch and App (Ensure enabling all message reminding in App). Swipe up or down to switch messages. Tap the message you want to check to view the whole content of the message.
⦁ FIND PHONE
Tap Find Phone in the main menu or find its icon by swiping down the main interface to start searching for your phone. When searching successfully, your phone will vibrate or give a ringtone (According to your settings).

⦁ SETTINGS
Tap Settings in the main menu or find its icon by swiping down the main interface, to access its functionality. A relative list will show Display, Vibration Intensity, Language, QR Code, System.
– Display. Set Dial Switch, Brightness, Screen Time, Turn Wrist Wake.
1. Dial Switch.
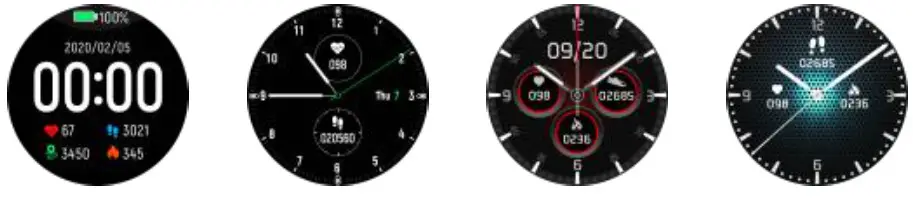
- Watch 4 Built-in Dials. Tap Dial Switch in the main menu or long press the screen on the main interface to enter. Swipe left/right to switch and tap one of your favorite dials to confirm.
- App: Find [Device] > [Watchface] > [Watchface Store], and click the first one dial to start editing. Then, select your favorite picture as the background of the main interface and customize it according to your preference. Your set watch face can be found in [My Watchface] quickly.
- Brightness. Tap Brightness in the main menu or find its icon by swiping down the main interface to access its functionality. Tap + to increase the the brightness of display; Tap – to decrease it.
- Screen Time. Automatically turn off the screen display when reaching the set time (5-9s). Swipe up or down to switch the time, and tap ✔ to confirm your settings.
- Turn Wrist Wake. Set the time(2-6s) of the screen display when you lift your wrist. Swipe up or down to switch the time, and tap ✔ to confirm your settings. Besides, App can set its beginning time and end time.
– Vibration Intensity. Set the intensity of vibration reminder (0-3), and tap ✔ to confirm your settings.
– Language. After a successful connection, the watch will automatically recognize and sync the language of App. If want to make your watch language differ from App, just find Setting > Language in the watch, to set the language of watching alone.
– QR Code. Tap it and scan the QR Code with your phone to download “FitCloudPro”.
– System. Includes: About, Shutdown, Reset.
Display
- About. Display the basic information: Bluetooth Name, Mac Address, Software Version, UI Version.
- Shutdown. Turn off the watch.
- Reset. Reset your watch.
ATTENTIONS
- DON’T use over 5V/2A power adapter to charge it.
- This device is an electronic product, not for medical reference, so the detected data (Especially for blood pressure and blood oxygen) is for reference only.
- Blood pressure monitoring method: Quiet rest for over 5 minutes before monitoring. Do not eat, smoke, take medicine, and drink coffee for 2 hours before monitoring.
- Monitoring process: Take a comfortable, restful sitting position and keep your mind easeful. Forbidden to speak. Place the watch is at the same height as your heart (as shown on the left).

- With IP68 waterproof, sweatproof, and rainproof, it can be used directly in daily washing, shower (cold water), and other daily environments.
- Do not use in the bath, sauna, hot spring, or other environments with corrosive liquid and hot steam, which will lead to product failure.
- Don’t operate the watch underwater.
- Do not wear the watch to deep dive.
FAQ
⦁ Why the measurement of blood pressure is inaccurate?
Affected by the external environment and the skin color of the individual, so it is only used to monitor changes in blood pressure, which can not really monitor the blood pressure of patients with hypertension.
⦁ Why can’t I receive the notification?
- Android: When you turn on the QQ/ Wechat reminder for the first time, the App will get the corresponding permissions automatically.
- iOS: (Call, SMS, SNS) When the reminders in the App are turned on, your phone will automatically pop up the accessing request, you just need to select OK.
SPECIFICATIONS
| Waterproof level | IP68 |
| Sensor | 3 Axis G-sensor |
| Sync method | Bluetooth |
| Resolution | 240*240 |
| Display | 1.28” TFT Full Touch Color Screen |
| Working time | About 8-10 days |
| Working Temperature | -10℃~50℃ |
| Compatible Systems | IOS 9.0 or above; Android 5.0 or above |
FAQ’S
How to connect with my phone?
You can search “FitCloudPro” in the app store. Install it on your phone. Then, follow the instruction to connect.
How to reset the watch?
Long press the power button for 3 seconds to reset the watch.
How to change the language?
Long press the power button for 3 seconds, then choose [Language] and select your language.
How to sync data?
Open FitCloudPro app on your phone. Choose [Sync] in [Main Menu]. Then, connect your watch and phone with Bluetooth. Wait for a while, then sync data will be completed.
How to use heart rate monitor?
You need to install an App named “Heart Rate Monitor” on your phone firstly. Then you can use this function by wearing the heart rate monitor band and watch together. Note that this function is only available when you are doing exercise or sports activities. It will not work if you are just sitting still or walking slowly. If you want to use this function, please check whether your heart rate monitor band is connected with your watch properly before using it. If it is not connected, please check whether both of them are charged enough and restart them again after charging them fully. If they are still not connected, please contact our customer service center for help ([email protected]).
What should I do if my smart watch doesn’t work when I charge it?
Please make sure that the smart watch is charged enough before using it for first time, and fully charge it before next use. If it still doesn’t work properly after charging fully, please contact our customer service center ([email protected]) for help as soon as possible so that we can offer you a good solution as soon as possible.
How do I connect my LW11 smartwatch?
BINDING
For first use, open App “FitCloudPro”, register and log in.
Follow the instruction of App to start binding the watch. Click [Search Now], and the smartphone will start searching for devices for about 10s that can be connected.
After a successful search, select and click “LW11-xxx” to complete the connection.
How do I connect my Agptek smart watch to my phone?
Scan the QR code(Shown on the left). Find [Settings] > [QR Code] in Watch. Then, tap it & scan the QR Code with phone. Download “OnWear” from “Apple store” or “Google play store” (Android App store)
How do I turn on Bluetooth on my Agptek smartwatch?
Connect the bracelet to the app on your phone
Power on Charge or long-press the touch key for 3 seconds, and the bracelet will be powered on and a pairing code will be displayed on the screen to identify the bracelet.
How do I setup my smart Watch?
First, you’ll need to download the Android Wear app(Opens in a new window) on your smartphone and turn on your smartwatch. If your watch doesn’t have a physical button, like the LG G Watch, place it in the charging cradle while power is connected. You’ll also want Bluetooth enabled on your smartphone.
Why is my smartwatch not working?
Your smartwatch may not work due to a lack of battery life, physical damage to the watch or charger, or unclean charging ports. These are the three most common reasons your smartwatch won’t work. It is essential to identify the root cause of the problem.
Can I use a smartwatch without a SIM card?
Most smart watches will still function without a SIM card if the operations don’t require connectivity such as tracking or monitoring activities, telling time, or other similar actions.
AGPTEK LW11 Smartwatch
www://agptek.com/index.php/product/
AGPTEK A19 MUSIC PLAYER
Important Notice
Thank you for purchasing AGPTEK Music Player. Please read the manual carefully before using the product. Specifications are subject to change without prior notice.
Charge the Player
- Charge by computer USB port.
- Use 5V/500mA charger (Charger not included).
Connect to the PC & Download audio files
- Open the Windows Explorer or “This PC”.
- Using the USB cable, connect the player to a USB port on your PC.
- Open the new “AGP-A19” folder under “This PC”.
- Copy files to the “AGP-A19” in which you want them to play.
- In the left sidebar, right-click the “AGP-A19 ” folder and select “Eject” from the menu.
- Wait until the computer confirms a safe ejection before you unplug the USB cable.
- Note: Please do not disconnect the USB plug during file transferring. It may cause malfunction of the player and the files.
Product Overview
Buttons and Controls
- Power On/Off
- TF Card Slot
- Vol +
- Vol –
- Reset Hole
- Return
- Submenu
- Scroll Up
- Scroll Down
- Previous/Fast Rewind
- Next/Fast Forward
- Play/Pause/Enter
- Lanyard Hold
- Speaker
- Earphone Jack
- Micro USB Port
Basic Operation
- Power On/Off. Hold button ➀ to turn on/off the player.
- Screen lock. Hold down the button to lock screen and all the buttons will be unavailable. Repeat the above steps to unlock.
- Screen display. Press ➀ to activate screen.
- Browse item. On home menu or list menu, press button to browse item, press button to enter.
- Back. When on any interface, press to go back; hold down to bback to home menu directly.
- Volume +/-. On the non-list menu, press ➂/➃ to adjust volume.
Main Functions
Home Menu
The home menu is the starting point of each application. There are 8 functions on the home menu: Music/FM Radio/Folder/Bluetooth/Recorder/Video/E-book/Tools/Settings.
Music
Find “Music” on home menu with button to access to its function. A related list will show:
- All songs.
- Resume/Now Playing.
- Artists/Albums/Genres.
- Playlists. There are 3 default playlists on the player: Playlist [1]/[2]/[3].
- Update Playlist. Update music files.
- Local Folder/Card Folder. View music file in the local folder or card folder. Note: These functions only available when memory card inserted.
Play the music.
While it’s on music playing interface, hold down the button to fast forward, and press it to skip to next track. Hold down the button to fast rewind, and press it to play the previous track. Press button to play/pause.
Back to Home/Play Mode/Sound Settings/Bookmarks/Add to Playlist/Remove from Playlist/ Delete. While it’s on music playing interface, tap button to access to the submenu.
- Back to Home. Choose to go to home menu.
- Play Mode.
- Play music from. Choose to play from All Songs/This Artist/Album/Genre.
- Repeat. Choose repeat mode: Repeat Off, Repeat 1, Repeat All.
- Shuffle. Choose to turn on/off shuffle mode.
- Repeat Settings. Repeat Mode. Enter. Press the button to enter. Set. Press button to confirm the starting time A when A is flashing. Then press button to set the ending time B when B is flashing. The passage from time A to B will be repeated automatically.
- The icon for A-B indication will appear on the screen. Press button again to back to normal playback.
- Replay Times. Set the replay times from 1 to 10.
- Replay Interval. Set the replay gap from 1 to 10 (seconds)
- Sound Settings. Choose to set Equalizer, Variable Speed Playback and Volume Limit.
- Bookmarks. Choose to add bookmark for the song that is playing now, or go to/delete the bookmark you added.
- Add to Playlist/Remove from Playlist. Choose to add to or remove from the 3 existing playlist.
- Delete. Choose to delete the song that is playing now.
FM Radio
Find “FM Radio” on Home menu with the button to access to its function. A related list will show:
- Presets. All the saved stations will be listed here.
- Manual tune/Auto tune. When choose “Auto tune”, the searched stations will be saved in “Presets” automatically.
- FM Recordings. View the radio recording files. You will need to choose from local folder or card folder if the memory card is inserted. The radio recordings will also be saved in Recordings> Recordings library.
- Start FM Recording/Save/Clear Station/Auto Tune/Tuner Region/FM Recordings. While it’s on radio playing interface, press button to switch among preset stations, press the button / to find tune stations. Press utton to access to its submenu which includes:
- Start FM Recording. Press button to pause/continue, press and select “Yes” to save the recording file.
- Save/Clear station/Auto tune.
- Tuner Region. Choose from Common/European/Japan Band as needed.
- FM Recordings
Folder
Find “Folder” on Home menu with the button to access to its function. All of the files in the player will be listed. If the Micro SD card is inserted, you can choose to go to Local folder or Card folder.
Bluetooth
Find “Bluetooth” on Home menu with the button to access to its function. A related list will show, including Bluetooth On/Off, Search for Devices, Device List, BT Upgrade. Select the device you want to connect/disconnect, and then press to connect/disconnect. After successfully connected, this player is ready to play music or FM radio via Bluetooth headphones, Bluetooth speaker, etc.
Note:
- When listen to radio by Bluetooth, wired headphones are needed as radio antenna.
- Recording, Variable Speed Playback, Video, Pictures, Pedometer functions are not available when Bluetooth opened.
- BT Upgrade function is only available for manufacturer, not for user.
Recorder
Find “Recorder” on home menu with button to access to its function. A related list will show:
- Start Voice Recording. Press button to start voice recording, press again to pause. Press the button and choose “Yes” to save the recording file.
- Recordings Library. Find the saved recordings in Recordings>Recordings library. You will need to choose from local folder or card folder if the memory card is inserted. While it’s on recording playing interface, press button and choose “Delete” to delete.
- Storage. Choose to store your recordings in internal or external memory. Confirm your selection with button . (Only available when TF card inserted)
- Rec Format. Choose the record format between MP3/WAV .
- Rec Settings. Set the recording bit rate as you need.
Videos
- Press button to access to its function. You will need to choose from local folder or card folder if the memory card is inserted 6.
- Press button to watch videos, press the button / to go to previous/next video or hold to fast backward/forward.
- When it’s on video playing interface, press button to access to its submenu, including: Brightness, Repeat, Delete Video, Update Playlist. Set according to your preference.
Tools
Find “Tools” on Home menu with the button to access to its function. A related list will show:
Photos.
Press to view pictures, press the / to go to previous/next picture. When it’s on picture viewing interface, press button to access to its submenu, including: Brightness, Backlight Timer, Slideshow Settings, Delete Photos, Update Playlist. Set according to your preference.
Calendar.
Press the button to switch among year|month|day, press the button / to choose specific year|month|day.
Stopwatch
Press to enter, press again to start the timer, then press again to stop r press to resume. Press to start a new one. The maximum Stopwatch list is 4.
Clock.
Press button to enter, a related list will show: Alarm On/off, Alarm Time, Alarm Cycle (Once/Daily/Work day), Alarm Music, Alarm Volume. Set according to your preference.
Pedometer.
Find “Pedometer” on Tools with the button to access to its function, a related list will show.
Start.
- Press to start counting your daily steps. Press it again to stop counting steps and then press the button to exit it. 2) Press button and choose “Yes” to save the record in “History”. If the history record is full, it will automatically cover the previous one.
- Personal Info. Set your height, weight, and step length with button 7 to confirm.
- History. All your saved step record will be listed here, and you can save up to 7 records.
- Clear history. You can choose to clear the history record you want or clear all the history record.
E-book
While it’s on text playing interface, press button / to turn the pages. Press the button to play automatically, press again to stop. Submenu. While it ’s on text playing interface, press button M to enter its submenu and set your preference, including Autoplay Settings (2s-30s), Font Size, Page Color, Delete E-book, Select Bookmark, Delete Bookmark, Add Bookmark, Select Page, Local Folder and Card Folder (Only available when TF card inserted).
Settings
Find “Settings” on Home menu with the button to access to its function. A related list will show, including:
- Language/Language. Choose display language.
- Display Settings. Set Brightness, Backlight timer and Screensaver.
- Button Light. Set the button light to be always on, on and off.
- Speaker. Turn On/Off the Speaker.
- Shutdown Settings
- Power Off. When there is no operation on the device, the device will shut off automatically when reaches the set time.
- Sleep Timer. The device will shut down automatically when reaches the set time.
- Date and Time. Choose “Time” to set time format and date. To set time, press / to switch among hour | minute; Press button / to adjust the value of hour | minute. Set date under “Date Settings > Set Date” and adjust the date like “Time Settings”.
- Information. Check the information and disk space about your player.
- Format device/Factory settings. Format the device or restore to factory default settings. Note: Before formatting the device, please backup the file so as not to lose any files.
Help and Troubleshooting
How to reset the language?
There are two ways to reset the language as shown below.
- Find (Settings) in the home menu and confirm it by pressing button Select the first (upper) option and press button to confirm. Scroll down and select the language you want to set.
- Find (Settings) in the home menu, enter and scroll down to the last menu. Press button to enter and choose the first (upper) option which means “Yes” with button to confirm and restore to factory settings. And then the player will power on automatically and then you can choose language again.
Can’t turn on the player; the screen of player goes blank/black; the player is crashed or has a firmware bug.
- Power off the player and try again.
- Update the firmware. Please contact our customer service or check our website at https://www.agptek.com/blog to download the firmware.
Can’t download files from computer.
- Please confirm whether it’s connected properly;
- Please check whether the storage space of the internal memory is full;
- Please check whether the USB cable is damaged.
Can’t recognize the player when connected to the computer via USB cable.
- Reconnect it.
- Restart the computer and reconnect it.
- Connect your player to another USB port.
- Charge the player for about 10 minutes first.
Specifications
| Specifications | |||
| Screen | 2.4”TFT | ||
| Housing | Zinc alloy | ||
| Unit Size | 106*48*9mm | ||
| Net Weight | 100g | ||
| Interface Type | USB 2.0 | ||
| Internal Memory | 16GB/32GB | ||
| SD Card Expansion | Up to 128GB | ||
| Format | Music | MP3/WMA/APE/FLAC/WAV/DRM/A CELP | |
| Bluetooth | MP3/WMA/WAVE/FLAC/APE/M4A
/AAC |
||
| Lyric | LRC | ||
| Video | AMV/AVI | ||
| Recording | MP3/WAV | ||
| E-book | TXT | ||
| Playtime | Music | Wired | 48 hours |
| Bluetooth | 6.5 hours | ||
| Video | Wired | 10 hours | |
| Radio | 14 hours | ||
| Recording | 50 hours | ||
| Battery | 560mAh lithium polymer battery | ||
| Charging time | 2.5 hours (5V/500mA) | ||
![]()
The game controller is designed for tablet PC. It’s compatible with all of the android tablets with standard interface (that can connect with USB flash disk). Firstly, connect the receiver with the USB cable of the tablet. And then, install the games (the simulative games) on the tablet. In this way, you can play the games, such as Super Mario, Contra, Warriors of Fate, Cadillacs and Dinosaurs, KOF, Street fighter and so on. It’s compatible with most of the Android systems. You can also download the VirtuaNES from the link.
Things you need confirm before using the game controller:
A: The 2.4G receiver is connected.
B: Be sure that the battery is fully charged and powered on.
- Game installation
If you can’t find the games, you may refer to the following direction. Click the icon on the interface of the catalogue of the games= Game settings.
- The view of the catalogue
Generally, games are in ROMS folder.
You can also download the games that work fine with the simulator. Search and then play the games.
Settings:
The place where the Rom folder is saved:
If Roms folder is in the tablet, please choose ROM; or if it’s in the SD card, please choose SD card. (You may refer to the different direction of the different software.)
Key mapping:
The key is set. If you want to change a button, there’ll be a prompt like “push a button”. And then, push the corresponding button. Lastly, choose “save”. In this way, you can change the button. If you want more details, you can refer to schematic of “The Definition of the Button”.
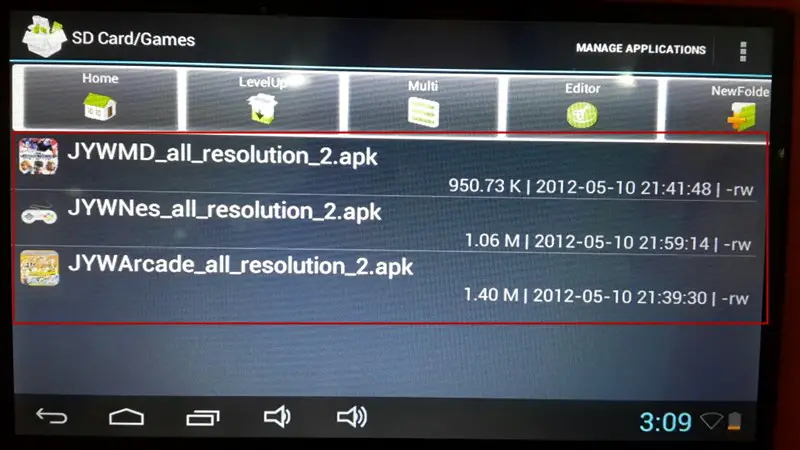
Step 1: Choose “Explorer”.
Step 2: Choose “SD card”.

Step 3: Choose “Games” folder.
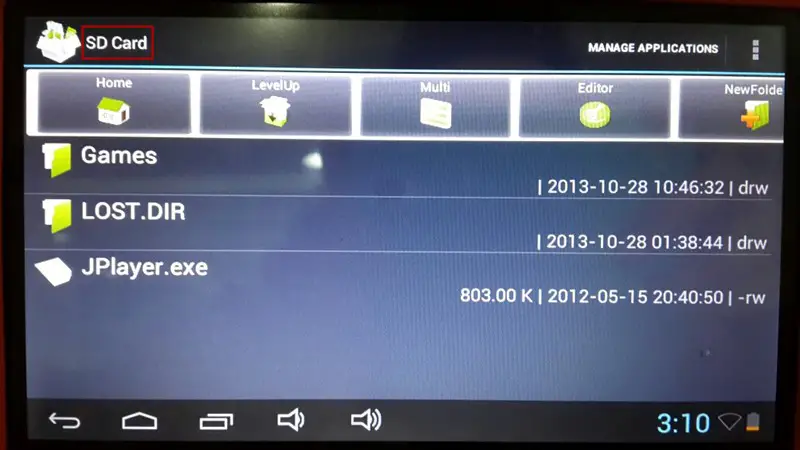
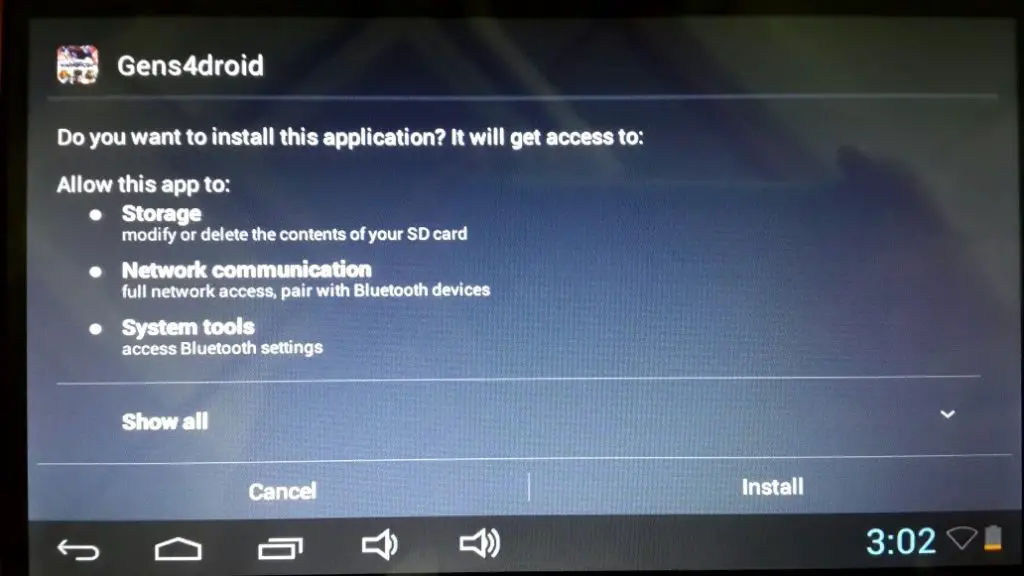
Step 4: Install the following software one by one.
The installation page would be like the following picture:
To find out how to use W2 or if you have a problem, please refer to Quick Guide. The color of W2 sold in other countries/areas may differ from the color shown in this manual.
Before Use
- Thank you for purchasing the W2 Digital Audio Player produced by AGPTEK. Before using the player, please read the manual carefully. If you have any question or any idea about this product, please email [email protected]. We look forward to hearing from you!
- We strongly suggest you to back up the data in case there is accident happening on the Digital Audio Player. We are afraid that we could not bear responsibilities for data loss due to mistaken operation or hardware damage.
- Generally wear at 1-2 finger width from wrist join. It is not recommended to wear tightly and does not shake. Otherwise, it will affect the blood circulation and Bluetooth connection. Once the Bluetooth connection is affected, the effect of music playback via Bluetooth will be affected accordingly.
- With the functions of sweat proof, it can be used in daily exercise. Do not use in bath, sauna, hot spring or other hot environments with hot water and steam, which will lead to product failure. Owing to the action of water pressure, do not wear it while swimming or diving.
Note
- It is recommended to clean the player regularly with a soft, lint-free cloth.
- Always place the player out of reach of children and it is not allowed to use alone by kids.
- Do not use the player in a humid environment. This player may not work properly or shorten its service life because of moisture.
Charge the Player
- THIS PLAYER DOES NOT SUPPORT QUICK CHARGE.
- Please charge this player before use. It takes two hours to fully charge.
Buttons and Control

- Lanyard hole.
- Mic.
- Power button: Hold for 3s to turn on/off the player; When it is on, press to turn on/off the screen.
- Volume+.
- Volume-.
- Earphone jack.
- Micro USB port.
- Home: Activating the screen, tap it to enter into the Home menu.
- Return: Swipe right on this screen.
Music
- Playing music via Bluetooth Make sure your device’s Bluetooth is in pairing before turning on player’s Bluetooth. Find Bluetooth in Home menu and tap its icon to access to Bluetooth of player, and then this player will automatically search for devices for about 10s that can be connected. After a successful search, select the device that you would like to connect.
Note: If you want to make the Bluetooth of this player being on, please make sure that Bluetooth on/off memory is on. Every time you boot up this player, its Bluetooth will turn on automatically and connect your device automatically that had been connected before.(Ensure your device’s Bluetooth is on.)
Features:
The related list will show, including: All Songs, Artists, Albums, Playlists, Update playlist. Tap any one of these choices you wan to access to its function.
- “Now playing/Last played”. Take you back to the song or audio file you are playing now or played last time.
- “Update Playlist”. Update music file.
- “Rewind/Forward”. While it’s on music playing interface, hold the button to fast forward, click to next music file; hold the button to fast rewind, click to the previous song files. Click button to play/pause.
Submenu
While it’s on music playing interface, click 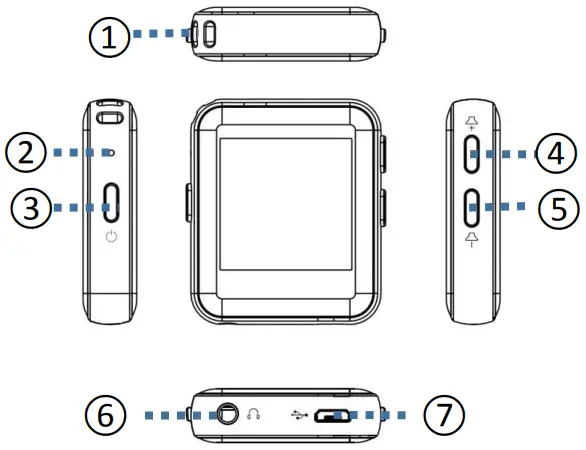 button to access to the submenu. The related list will show:
- “Home”. Go back to home menu.
- “Play mode”. Choose play mode:
 Shuffle,
  Repeat playlist,
  Repeat one, Play by playlist, View playing, Playlists auto switch.
Note: “View playing”. The player would only play the first 10 seconds of a track and then skip next one if you select this option.
“Playlists auto switch”. After playing a song of a folder, the song of the next folder is automatically played. - “Equalizer”. Set Equalizer.(Off, Rock, Funk, Hip hop, Jazz, Classical, Techno)
- “lyrics display”. Choose turn on or off the lyrics, off by default. 5. Resume. Take you back to the song or audio file you are played last time or playing now.
- “Bookmarks”. Choose to add, delete or go to bookmark.
- “Repeat settings”. Choose A-B repeat settings and set replay times and interval.
- “Delete”. Choose to delete the song that is playing now.
- “Add to playlist”/”Remove from playlist”. Choose to add to or remove from the 3 playlists.
FM Radio
Two ways to play radio
- Playing radio via Bluetooth
Make sure your device’s Bluetooth is in pairing before turning on player’s Bluetooth. Find Bluetooth in Home menu, and tap its icon to access to Bluetooth of player, and then this player will automatically search for devices for about 10s that can be connected. After a successful search, select the device that you would like to connect.
Note: If you want to make the Bluetooth of this player being on, please make sure that Bluetooth on/off memory is on. Every time you boot up this player, its Bluetooth will turn on automatically and connect your device automatically that had been connected before. (Ensure your device’s Bluetooth is on.) - Playing radio via wired earphones. Find “FM Radio” in Home menu and tap the icon of FM radio to access to its function. You can listen to radio via wired earphones.
Features:
Find “FM radio” on main menu and tap the icon of FM radio to enter to its function.
While it’s on radio playing interface,  click to access to its submenu which includes: Home, Start FM radio recording, Presets, Save to preset, Clear preset, Auto tune, Tuner Region and FM Recording.
- 1. Auto tune/save to/Clear preset
- “Auto tune”. Search stations automatically. You can see the searched stations in “Presets”. While is on radio playing interface, click / to switch among preset stations.
- “Save to preset”. Save the station that you are listening to to “Presets” list.
- “Clear preset”. Click “Clear preset” to enter the Presets, choose the station you want to clear, and choose “yes” to clear the preset station.
- FM recording. Choose “Start FM radio recording”. Click the interface of recording to pause/continue. Swipe right on the screen and select “yes” to save the recording file.
Clock Screen saver
Find “Settings” in the Home menu via clicking  / . Tap the icon of Settings, Select and enter into “Display settings”. Click “Screen saver” where a related list will be displayed: None/Digital clock/Turntable clock. Select any one of two choices(Digital clock/Turntable clock), the screen will display the corresponding interface(as the following pictures shown). Note: “Backlight timer” can help you select the interval (10S/30S/60S/Always on) of Screen saver.
- Turntable clock

- Digital clock

Settings
Find “Settings” on main menu with tapping its icon to enter to its function. A related list will show, including: Language, Date and time, Display settings, Volume limit, Information, Format device, Factory settings Shutdown settings.
- Date and time.
Choose “Date settings” to set date format and date. When you want to set date, you can tap YY|MM|DD to switch among year| month| day, and click button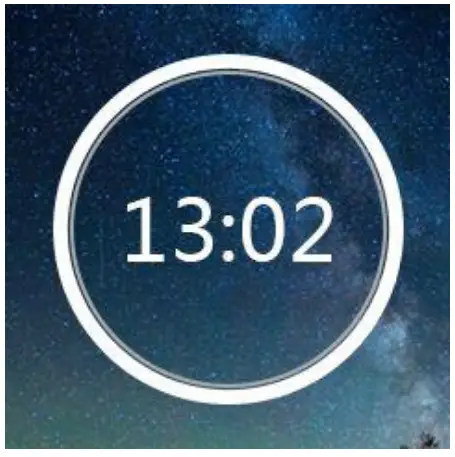 / to adjust the value of year| month| day. Set time under “Time setting” and adjust the time in the same way.
 - Display settings. Set Brightness, Backlight timer and Screen saver.
- Shutdown settings.
- Power off mode:
When there is no operation on the device, the device will shut off automatically when reaches the set time(1-5min); - Sleep timer:
The device will shut down automatically when reaches the set time(5-90min).
- Power off mode:
- Information. Check player information and disk space about your player;
- Format device/Factory settings. Format the device or restore to factory settings.
Note: Before formatting the device, please backup the file so as not to lose any files.
Specifications:
Size & Weight 42*38*11mm (3.62*1.57*0.35in)/38g
Wristband TPU; Suitable for wrist: 15-20cm
Screen 1.54inch TFT screen(zinc alloy)
Internal memory 16GB
Bluetooth YES
Play mode Repeat one/Repeat all/Shuffle/ Normal/Last played/A-B Repeat
EQ Rock, Funk, Hiphop, Jazz, Classical, Techno, etc Languages English/German/Russian/French/Polish/ Japanese/Chinese/Italian/Spanish etc.
Supporte Music MP3/WMA/OGG/APE/FLAC/WAV/
AGPTEK Official

AGPTEK Forum

 @agptek.fans
 @AGPTEK_fans
 agptek.fans
Visit agptek.com to know more about us. Contact us: [email protected]
]]>User Manual
Fast Charge
Wireless Charging Pad
Model: DW01
Preface
Thank you for purchasing our company’s product. For optimum operation, please read this manual carefully before use. If you have any problem with this device, please feel free to contact [email protected]
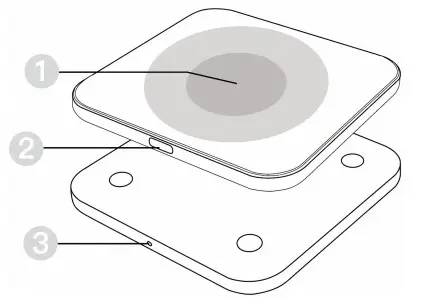
Product Details
- Wireless Charging Area
- Type-C Port
- LED Indicator

Specifications
Input: DC 5V-2A, DC 9V-1.67A,
DC12V-1.5A
Output: 15W Max.
Size: 80*80*6mm
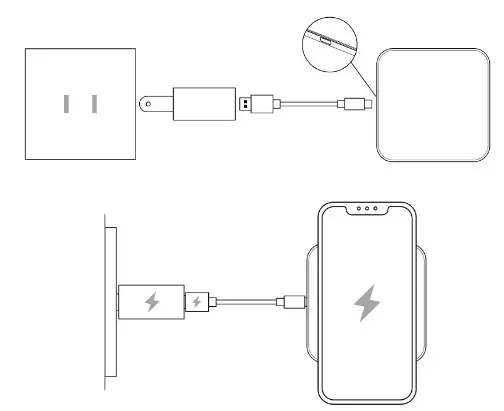
How It Works
- Connection Instruction
a. Connecting power source.
b. Put the device in a wireless charging area.
c. The LED indicator is in blue color
indicating the device is charging. - Power Indicator Instruction
| LED Indicator | Status |
| Flashing Bluegreen for once | Connected to power |
| Solid blue | On Charging |
| Solid green | Full Charge |
Notice
- For the fast and safe charge, please use a Quick Charge 2.0 or 3.0 Wall Charger.
- Wireless charger VS Wired charger: All devices supporting wireless charging function, can use the wireless charger to charge. No need to plug and unplug the phone frequently with a corresponding charging cable. Put down and start charging!
- Charging time (Wireless) VS Charging time (Wired): The power of the wireless charger is 15W max (iPhone supports max. 7.5W power, and most Android phones support 10W power), but the power of the wired charger is at least 10W. Thus, the wireless charger will take longer to charge than the wired charger.
- It is a normal phenomenon that the wireless charging pad will be fever during charging. Please kindly note that take off the device after a full charge to protect your device and the wireless charging pad.
- If there is a charge interruption the situation during charging, please check if the phone is shifting or the charging cable is loose.
- When charging, make sure that there is no metal foreign objects on the back of the phone and place your phone centrally.

Product And Safety Info
- Do not store or use it in high temperature, humidity or dirty areas.
- Do not store or use it in strong magnetic fields.
- Keep out of the reach of children.
- Do not expose it to water or heavy dust.
Keep it dry and clean. - Non-professionals are not allowed to disassemble and repair it without authorization.
Manufacturer:
Shenzhen Lontems Technology Co., Ltd.
Address:
4th Floor, 2nd West District, Shangxue Science, and Technology City, Xinxue Community, Bantian Street, Longgang District, Shenzhen City