This manual contains instructions for operating your new anko cold brew coffee maker 377101 as well as important safety information to keep you and your home safe from electrical hazards.
Manufactured by Anko
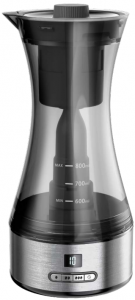
![]()
Cold Brew Coffee Maker


PLEASE READ AND SAVE THESE
IMPORTANT SAFEGUARDS
PLEASE READ AND SAVE THIS INSTRUCTION
When using the Cold Brew Coffee Maker, the following basic safety precautions should always be followed:
- READ ALL INSTRUCTIONS.
- Remove all wrappings and packaging from the appliance before use.
- Wash and dry the appliance thoroughly before use.
- All parts must be properly assembled before use.
- To protect yourself against the risk of an electrical shock, never immerse the cord, plug, or main unit into water or any other liquid.
- Operate appliance on a stable and dry surface only.
- Do not operate the appliance with a damaged cord or plug. If the appliance malfunctions or is damaged, return the appliance to the supplier for examination, repair, or electrical and/or mechanical adjustment.
- Do not use any attachments that are not recommended by the appliance manufacturer, as this may result in fire, electric shock or personal injury.
- This appliance is intended for indoor and household purposes only. Do not use outdoors.
- This appliance is not intended for use by persons (including children) with reduced physical, sensory or mental capabilities, or lack of experience and knowledge unless they have been given supervision or instructions concerning the use of the products by a person responsible for their safety.
- To protect against the risk of electrical shock, do not put the unit base, cord, or plug in water or other liquid.
- Except for the Base, all the elements in the jar can be cleaned by water and dishwasher safe.
- Children should be supervised to ensure that they do not play with the appliance.
- Always be sure to unplug the appliance from the outlet prior to assembly, disassembly, cleaning, and storage.
- This product is for household use only, not intended for commercial use.
- Always unplug the appliance from mains power if left unattended.
- Check and make sure the voltages and currents of the appliance are compatible with your power supply.
- Misuse may cause injury.
- Do not pour hot liquid into the coffee machine.
IMPORTANT! USE ONLY COLD TAP WATER OR WATER AT ROOM TEMPERATURE. NEVER USE HOT OR WARM WATER.
20. This appliance is intended to be used in households and similar applications such as:
- staff kitchen areas in shops, offices and other working environments;
- farmhouses;
- by clients in hotels, motels and other residential type environments;
- bed and breakfast type environments.
21. Switch off the appliance and disconnect from mains power before changing accessories.
22. If the supply cord is damaged, it must be replaced by a qualified electrical person in order to avoid a hazard, or the product must be disposed of.
23. For cleaning and maintenance, please refer to the “Care and Cleaning” section below.
SAVE THESE INSTRUCTIONS FOR HOUSEHOLD USE ONLY
PARTS AND FEATURES


Control Panel features:


Coffee strength buttons:

USING YOUR COLD BREW COFFEE MAKER
Note: The following instructions must be followed before connecting to mains power.
- Remove all plastic wrappings packing material.
- Wash and dry the coffee jar thoroughly before use.
IMPORTANT! FOR ELECTRICAL SAFETY, DO NOT WET OR WASH THE BASE IN WATER OR OTHER LIQUID.
3. Turn the Coffee Jar Lid counterclockwise and remove it.
4. Take out the coffee basket.
5. Turn the Ground Coffee Basket Lid counterclockwise. Add the ground coffee into Coffee Basket (Maximum weight: 80gram)


6. Lightly shake the coffee basket to make the ground coffee even in the coffee basket, then turn the coffee basket lid clockwise and lock it into place.
7. Install the removable fountain into the spindle in the coffee jar and press all the way down to the bottom of the coffee jar to lock it into place.
8. Fill the coffee jar with cold water or water at room temperature. The recommended coffee powder to water at the ratio of 1:10.
Note: The maximum capacity for the jar is 800ml VS coffee powder 80g. Do not overfill the jar past the MAX line, always fill between MIN and MAX line.
9. Replace the coffee basket with the coffee jar.
10. Cover the Coffee Jar with the Jar Lid and turn the lid clockwise to lock it into place.
11. Attach the coffee jar to the Base of the main unit.
12. Connect the power cord plug into a mains power outlet socket.
13. Press the start/stop power button “
Note: Due to inadequate mixing of water and ground coffee, the coffee machine will shake slightly at the beginning when brewing. This is normal. When water and ground coffee is fully mixed, this should subside.
14. Once the countdown has ended, you will hear 5 beeps, signaling that the brewed coffee is ready.
IMPORTANT!
1. Do not remove the Jar or Lid while the machine is still working.
2. Do not let the appliance run for more than 16 minutes at a time.
The maximum operating time when brewing 800ml of coffee is 16 minutes. Please allow the machine to cool down for a minimum of 1 hour before you are using it again.
Brew Tips and Storage
- Never use boiling or hot water.
- When pouring coffee or water, be careful not to overfill.
- The machine can be stopped while working if you want, just press the start/stop power button.
- BREW STRENGTH (Coffee grind size: medium-coarse or coarse)
| Strength | Time (minutes) |
| Light | 6 |
| Medium | 11 |
| Bold | 16 |
- The brewed coffee can be stored in another separate bottle or container in the refrigerator up to 2 weeks. Milk is not recommended to be added into the cold coffee for longer storage. Add the milk at the time when ready to drink.
Recipes
Sparkling cold brew
INGREDIENTS
- 1 cup cold brew
- 3oz sparkling mineral water
- Crushed ice
INSTRUCTIONS
Pour the cold brew over ice in a tall glass. Fill the remainder of the glass with mineral water. Stir and serve.
VANILLA MOCHA
INGREDIENTS
- 1 mug of cold coffee
- 1/2 teaspoon of vanilla extract
- 1/2 teaspoon of cocoa powder
- Sugar or sugar substitute to taste
- Milk to taste (add it until it’s the color you like)
- A glass of ice cubes
INSTRUCTIONS
Add the vanilla into the mug of cold coffee, cocoa, sugar, and milk. Use a stick mixer or whisk to mix. For some added foam on top, pour a little extra milk into a small bowl, use the stick mixer or whisk to whip up some more pretty topping.
Pour your coffee into a glass filled with ice cubes to make iced coffee. You can drink it hot, too, if you’d like. Then pour the extra frothed milk on top. You can add some cocoa powder over the top if you want to make it fancy.
Healthy Starbucks Mocha Frappuccino
INGREDIENTS
- 2 cups of strong cold brew coffee
- 1/4 cup half and a half or almond milk
- 2 tablespoons cocoa powder
- 1 tablespoon vanilla extract
- 14 drops chocolate stevia or sweetener of choice (i.e. honey, maple syrup, etc.)
- 1 pinch sea salt
- Ice
- Whipped cream and dark chocolate shavings optional garnish
INSTRUCTIONS
Combine coffee, half and half, cocoa powder, vanilla, stevia and salt in a blender. Puree until smooth for about 30-60 seconds.
Add a scoop or two of ice and puree for additional 45-60 seconds on high.
Pour into a glass and garnish with whipped cream and dark chocolate shavings.
Care and Cleaning
CAUTION:
- Before cleaning, make sure the machine is disconnected from mains power.
- Never immerse the Base of the main unit in water or any other liquids. Wipe with a damp cloth and dry thoroughly.
CLEANING:
- Remove the Jar lid from the coffee jar by turning it counterclockwise.
- Remove the Coffee Basket Lid along with the Coffee Basket from the coffee Jar and discard any leftover ground coffee.
- Remove the removable fountain and pour out any remaining water in the Coffee Jar.
- You can rinse the Jar and all the jar attachments with clean water several times or put it in the dishwasher for thorough cleaning.
- Dry all parts thoroughly after cleaning.
Technical Specification
Voltage: 220-240V~ 50Hz
Wattage: 30W
12 Month Warranty
Thank you for your purchase from Kmart.
Kmart Australia Ltd warrants your new product to be free from defects in materials and workmanship for the period stated above, from the date of purchase, provided that the product is used in accordance with accompanying recommendations or instructions where provided. This warranty is in addition to your rights under the Australian Consumer Law.
Kmart will provide you with your choice of a refund, repair or exchange (where possible) for this product if it becomes defective within the warranty period. Kmart will bear the reasonable expense of claiming the warranty. This warranty will no longer apply where the defect is a result of alteration, accident, misuse, abuse or neglect.
Please retain your receipt as proof of purchase and contact our Customer Service Centre on 1800 124 125 (Australia) or 0800 945 995 (New Zealand) or alternatively, via Customer Help at Kmart.com.au for any difficulties with your product. Warranty claims and claims for expenses incurred in returning this product can be addressed to our Customer Service Centre at 690 Springvale Rd, Mulgrave Vic 3170.
Our goods come with guarantees that cannot be excluded under the Australian Consumer Law. You are entitled to a replacement or refund for a major failure and compensation for any other reasonably foreseeable loss or damage. You are also entitled to have the goods repaired or replaced if the goods fail to be of acceptable quality and the failure does not amount to a major failure.
For New Zealand customers, this warranty is in addition to statutory rights observed under New Zealand legislation.
Download PDF Manual
You can download the original PDF version that this HTML manual has been created using by clicking the button below:
Download PDF Manual