APP Connection Guide
Setting the APP
Step1:
Scan the QR Code or search Smart Life or ” Tuya Smart” on App store or Google Play to download and install the APP for iOS / Android. The mobile phone system version needs to be Android 5.0 and iOS 9.0 or above.
Step 2:
Run the “Smart Life “or “Tuya Smart “app on your phone, then tap “sign up” to create an account with Email address (if you already had one, please log in), and verify your account with a verification code that has sent to your email.
Step 3:
Log in to your account and follow the App instructions to create a “Family” and later follow the below instructions to add devices to your “Family”.
Bluetooth Configuration
Step 1:
Before connecting, please make sure your smartphone is connecting with your home Wi-Fi(2.4GHz) successfully and enable the Bluetooth feature.
Step 2:
To Connect in Bluetooth mode, the strip lights need to be set to blink rapidly. (You can learn the detailed instruction on How to set the light a rapidly flashing section).
Step 3:
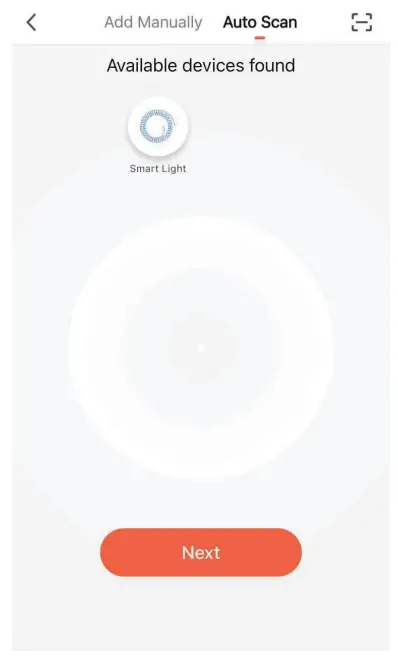
Open the APP and click “+” to add a device, then tap “Auto Scan”
Step 4:
Follow the in-app instructions to connect the strip lights to your Wi-Fi network, Please note the device only works at 2.4GHz Wi-Fi.
Step 5:
Once Connected, the APP will prompt the connection. Then Click “Completed”.
Step 6:
Now you can control the lights through the APP

Quick Mode Configuration(EZ mode)
- Before connecting, please make sure your smartphone is connecting with your home Wi-Fi (2.4GHz) successfully.
- To connect in EZ mode, the strip lights need to be set to blink rapidly. (You can learn the detailed instruction on How to set the light in a rapidly flashing section).
- Open APP and click “+” to add device.
- Follow the in-APP instructions to connect the strip lights to your Wi-Fi network, Please note the device only works at 2.4GHz Wi-Fi.
- 0nce connected, the APP will prompt the connection. Then click “Completed”.
- Now you can control the lights through the APP.
AP (Access Point) Mode Configuration
- Before connecting, please make sure your smartphone is connecting with your home Wi-Fi (2.4GHz) successfully.
- To connect in AP mode, the strip lights needs to be set to blinks Slowly. (You can learn the detailed instruction on the” How to set light as slowly flashing”section)

- Click the ICON “+” at the top right corner of the APP.
- Select device type and click AP mode to add a device.
- Go to the Wi-Fi setting in your smartphone and select the”Smart Life-XXX” for your Wi-Fi.
- Once connected successfully, the APP will prompt the connection, and click “Completed”
How to set the light as rapidly flashing
Method 1
Step 1 Power on device Step 2 Turn off(>5s)-on(<5s)-off(>5s)-on(<5s)-off(>5s)-on Step 3 Confirm LED light is now rapidly flashing
Method 2 (If your control box has a button)
Step 1 Power on the device Step 2 Hold the power button for 5S Step 3 Confirm the LED light is now rapidly flashing
Method 3
Step 1 Power on the device Step 2 Press the ON or ON/OFF button on the remote for 5 seconds Step 3 Confirm the LED light now rapidly flashing.
How to set light as slowly flashing
Method 1
Step 1 Power on device Step 2 Turn off(>5s)-on(<5s)-off(>5s)-on(<5s)-off(>5s)-on Step 3 Confirm LED light is now rapidly flashing Step 4 Operate again: Turn off(>5s)-on(<5s)-off(>5s)-on(<5s) -off(>5s)-on until light is slowly flashing.
Method 2 (If your control box has a button)
Step 1 Power on the device.
Step 2 Hold the power button for 5 seconds
Step 3 Confirm the LED light now rapidly flashing.
Step 4 Operate again: Hold the power button for 5 seconds until the light is slowly flashing.
Method 3
Step 1 Power on the device.
Step 2 Press the ON or ON/OFF button on the remote for 5 seconds
Step 3 Confirm LED light now rapidly flashing.
Step 4 Operate again: Press the ON or ON/OFF button on the remote for 5 seconds until the light is slowly flashing.
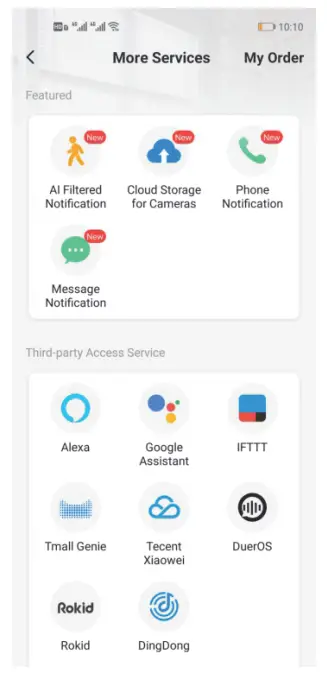
How to connect lights to AmazonAlexa / Google Assistant
You can learn the detailed instruction on “Me->More Services” page of the APP. Tap the corresponding service to learn moreand how to set up.
This device complies with part 15 of the FCC Rules. Operation is subject to the following two conditions: (1) This device may not cause harmful interference, and (2) this device must accept any interference received, including interference that may cause undesired operation.
Any Changes or modifications not expressly approved by the party responsible for compliance could void the user’s authority to operate the equipment.
Note: This equipment has been tested and found to comply with the limits for a Class B digital device, pursuant to part 15 of the FCC Rules. These limits are designed to provide reasonable protection against harmful interference in a residential installation. This equipment generates uses and can radiate radio frequency energy and, if not installed and used in accordance with the instructions, may cause harmful interference to radio communications. However, there is no guarantee that interference will not occur in a particular installation. If this equipment does cause harmful interference to radio or television reception, which can be determined by turning the equipment off and on, the user is encouraged to try to correct the interference by one or more of the following measures:
- Reorient or relocate the receiving antenna.
- Increase the separation between the equipment and receiver.
- Connect the equipment into an outlet on a circuit different from that to which the receiver is connected.
- Consult the dealer or an experienced radio/TV technician for help.
This equipment complies with FCC radiation exposure limits set forth for an uncontrolled environment. This equipment should be installed and operated with a minimum distance 20cm between the radiator & your body.