Sections in this Manual
- IMPORTANT SAFETY INSTRUCTIONS
- SAVE THESE INSTRUCTIONS
- Assembly
- What’s in the Box?
- Product View
- Operations
- Adjusting the Suction Control
- Above-Floor Cleaning
- Vacuum Motor Protection
- Remove/Empty Dirt Tank
- Clean/Replace Pre-Motor Filters
- Clean/Replace Post-Motor Filter
- Clean Inner Cyclone Separator
- Maintain Pet TurboEraser® Tool
- Troubleshooting
- Warranty
- Service

Assembly

- Slide end of wand into top of base. It will “click” when inserted correctly.
- Attach Stretch Hose by lining the tabs on the cuff with the notches on the back of the vacuum. Twist clockwise to lock hose into place.
- Remove Dirt Tank. Press the Dirt Tank Release Button and pull away from vacuum.
- Attach end of hose to vacuum by sliding square cuff into the bracket below the Power Switch.
- Place the Dirt Tank on the vacuum by securing the bottom in place first, then pushing back until you hear a “click”.
- Press the Dirt Tank Release Button and pull away from vacuum.
- Twist tank cover to the unlock position then pull up on Handle.
- Remove the Pre-Motor Filter and replace with the Febreze Filter.
Thanks for buying a BISSELL® vacuum!
We love to clean and we’re excited to share one of our innovative products with you. We want your vacuum to work like new for the years to come, so this guide has tips on how to use, maintain and, if there’s a problem, troubleshoot.
Your vacuum needs a little assembly before getting to work, so flip to the “Assembly” section and let’s get started!
What’s in the Box?
NOTE: Standard accessories may vary by model. To identify what should be included with your purchase, please refer to the “Carton Contents” list located on the carton top flap.
Product View
*NOTE: Pet TurboEraser® Tool does not store on unit.
THIS APPLIANCE HAS A POLARIZED PLUG
To reduce the risk of electric shock, this appliance has a polarized plug (one blade is wider than the other). This plug will fit in a polarized outlet only one way. If the plug does not fit fully in the outlet, reverse the plug. If it still does not fit, contact a qualified electrician to install a proper outlet. Do not change the plug in any way.
Operations
WARNING: Do not plug in your vacuum until you are familiar with all instructions and operating procedures.

Turn vacuum ON by pressing Power Switch ON (I – ON and O – OFF). Press Brush Roll ON/OFF Switch to run the PowerBrush for carpet cleaning (Brush Roll is on when light on switch is illuminated). See page 13 to maintain the Brush Roll.
Step gently on base and pull back on Handle to recline.
- NOTE: The Brush Roll will automatically shut off when vacuum is locked in upright position. Recline to reactivate.
- NOTE: In the unlikely event that hair wrapped around your Brush Roll, run vacuum back and forth on clean carpet several times to help release any wrapped hair.
- NOTE: Turn OFF the Brush Roll when vacuuming hard or delicate surfaces that may be caught by the rotating brush. This could include hard wood, tiled floors, small area rugs, or frieze carpets that have long delicate fibers or threads.
Adjusting the Suction Control
Locate the Suction Control setting on the vacuum Handle. Adjust Suction Control for plush carpet or low carpet for easy multi-surface cleaning.
Above-Floor Cleaning
- Clean hard to reach spaces with the Quick Release Extension Wand. Push the release button to remove and attach desired tool.
- If desired, the Stretch Hose can be removed from the Extension Wand. To do so, twist hose from the back of the wand to remove.
- Attach desired tool. Use the Pet TurboEraser® Tool for best results on stairs. Or use the 2-in-1 Pet Brush with soft, white bristles for sensitive/gentle surfaces and rubber nubs to pick up embedded pet hair.
- When finished, replace the wand back on the vacuum by sliding into place until you hear “click”.
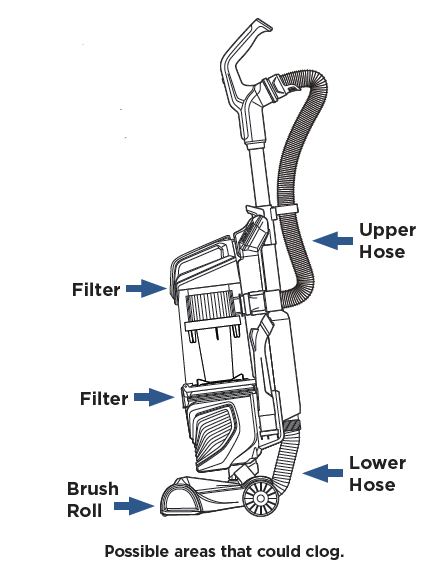
Vacuum Motor Protection
An internal thermal protector has been designed into your vacuum to protect it from overheating. When the thermal protector activates, the main vacuum motor will stop operating. The front lights will remain on, even though the motor turns OFF. If this happens, proceed as follows.

- Turn vacuum OFF and unplug from electrical outlet.
- Check for the source of overheating problem (full Dirt Tank, dirty filters, or a clog) and fix by following the maintenance instructions.
- When the motor cools for approximately 30 minutes, the thermal protector automatically resets and cleaning may continue. If the vacuum will not turn ON or the thermal protector continues to activate, your vacuum may need servicing. Contact BISSELL Consumer Care.
NOTE: The thermal protector controls the main vacuum motor only, not the brush motor. If the thermal protector activates, brush and lights will continue to operate normally; however, there will be no suction.