Sections in this Manual
- IMPORTANT SAFETY INSTRUCTIONS
- SAVE THESE INSTRUCTIONS
- Assembly
- What’s in the Box?
- Product View
- Operations
- Adjusting the Suction Control
- Above-Floor Cleaning
- Vacuum Motor Protection
- Remove/Empty Dirt Tank
- Clean/Replace Pre-Motor Filters
- Clean/Replace Post-Motor Filter
- Clean Inner Cyclone Separator
- Maintain Pet TurboEraser® Tool
- Troubleshooting
- Warranty
- Service
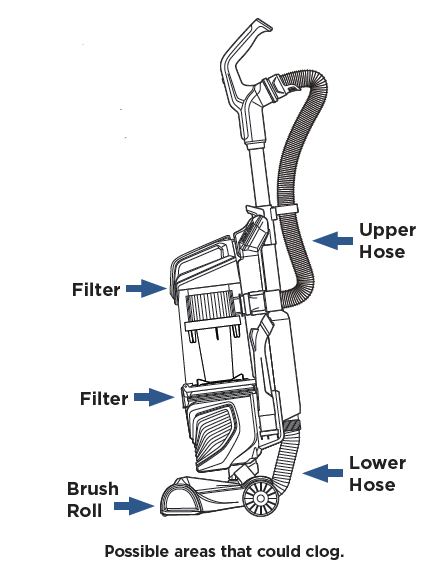

Remove/Empty Dirt Tank
WARNING: To reduce the risk of electrical shock, turn Power Switch OFF and disconnect polarized plug from electrical outlet before performing maintenance or troubleshooting checks.
- The Dirt Tank is full. Time to empty!
- Press the Tank Release Button and grab the Handle to pull the Dirt Tank away from vacuum.
- Hold the Dirt Tank over a trash bin and press the Empty Button. Once emptied, snap bottom back into place.
- Return the Dirt Tank to the vacuum, securing the bottom in place first and then pushing back until you hear a “click”.
WARNING: Do not operate vacuum with damp or wet filters. Allow components to dry before reassembling the Dirt Tank.
WARNING: Before using your vacuum, make sure that the Dirt Tank is in locked position and that all filters, both pre- and post-filters, are in place. DO NOT operate your vacuum without these filters.
Clean/Replace Pre-Motor Filters
WARNING: To reduce the risk of electrical shock, turn Power Switch OFF and disconnect polarized plug from electrical outlet before performing maintenance or troubleshooting checks.
WARNING: Do not operate vacuum with damp or wet filters. Allow components to dry before reassembling the Dirt Tank.

- Press the Dirt Tank Release Button and pull away from vacuum.
- Twist tank cover to the unlock position then pull up on Handle.
- Remove Pre-Motor Filter from top of Dirt Tank lid by pulling out.
- Both Pre-Motor Felt and Foam Filters are washable. Clean with mild detergent, rinse and squeeze all excess water. Allow filters to dry completely before reinserting. Return Pre-Motor Filters to the top of the Dirt Tank, placing the thick Foam Filter in last.
NOTE: Replace filters every 3 to 6 months. Visit BISSELL.com for filter replacements.
NOTE: Washing may decrease the Febreze odor eliminating scent.
Clean/Replace Post-Motor Filter
WARNING: To reduce the risk of electrical shock, turn Power Switch OFF and disconnect polarized plug from electrical outlet before performing maintenance or troubleshooting checks.
WARNING: Do not operate vacuum with damp or wet filters. Allow components to dry before reassembling the Dirt Tank.

- Press the Dirt Tank Release Button and pull Dirt Tank away from vacuum.
- Pull tab up to access Post-Motor Filter.
- Twist filter counter-clockwise to unlock and remove from vacuum.
- When reassembling, be sure to lock the filter back into place. The pleated filter may NOT be washed. If dust/debris accumulates, gently tap the filter on the inside of a trash container.
NOTE: Replace filters every 3 to 6 months. Visit BISSELL.com for filter replacements.
Clean Inner Cyclone Separator
- Hold the Dirt Tank over a trash container. Press the bottom release button to empty.
- Twist Cyclone counter-clockwise and pull down to remove from tank.
- Tap separator against inside of trash container and rinse under warm water, if necessary. Be sure to let it dry completely before placing back in Dirt Tank.
Maintain Pet TurboEraser® Tool
- Twist gray collar counter-clockwise, until slot appears, and then separate faceplate.
- Remove Brush Roll, Belt, and Paddle Wheel. Inspect for damages and replace if necessary.
- To reassemble, align two clips on each end of Paddle Wheel with Belt on and pop back into place. Place Brush Roll with Belt back in. Faceplate will not close properly if all parts are not aligned correctly.
- To put faceplate back on, align the tabs in the top of the cover and place it down to “click†into place.
Replace Brush and Belt Unplug and turn vacuum over. Unscrew 10 Phillips-head screws to remove bottom cover.
- Unplug and turn vacuum over. Unscrew 10 Phillips-head screws to remove bottom cover.
- Pull Brush Roll straight out and slide Belt off motor gear. Replace Brush Roll and/or Belt.
- Inspect Brush Roll by placing it on its end and spinning. The Brush Roll should spin freely, multiple times by one flick. If it doesn’t, replace Brush Roll. Inspect Belt, replace if it appears damaged.
- FOLLOW:
- Place Belt back on Brush Roll.
- Pinch Belt around Brush Roll & hook back around the motor gear.
- Rotate Brush Roll into place and line up end caps.
- Re-attach bottom cover with 10 screws.
NOTE: If an object becomes lodged in foot and brush shuts OFF, turn vacuum OFF and unplug from electrical outlet. Remove obstruction and brush will automatically reset when vacuum is plugged and turned back ON.