
Onn 6-Device Universal Remote
Model: 100008755
Need help?
We’re here for you every day
7 a.m. – 9 p.m. CST.
Give us a call at 1-888-516-2630
We’d love to hear from you. Scan with your Walmart app and let us know what you think
GETTING STARTED
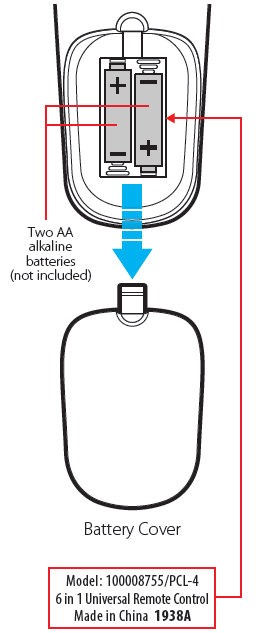
Thank you for choosing the ONN Universal Remote Control. This remote control can operate a wide range of electronic devices, works across most brands and models, and comes pre-programmed to operate many Samsung TVs (see the Programming Your Remote sections if your device is not compatible). Your remote can control up to 6 devices and is remarkably easy to set up. To get started, please install two AA alkaline batteries (not included) as shown below.
BATTERIES
Installing the Batteries
- Remove the battery cover.
- Insert the batteries as shown.
- Snap the battery cover back into place.
Battery Precautions
- Do not mix old and new batteries.
- Do not mix alkaline, standard (carbon-zinc) or rechargeable (nickel-cadmium) batteries.
- Always remove old, weak or wornout batteries promptly and recycle or dispose of them in accordance with local and national regulations.
Low Battery Indicator
If while using the remote, the button’s red indicator light flashes 3 times, this indicates the batteries need to be replaced. Please replace the batteries as soon as possible when this indication occurs.
Code Saver
When changing the batteries of your remote, please do so quickly. You have up to 20 minutes to change the batteries in your remote without losing the programmed codes.
Battery Saver
To conserve battery power, the remote will automatically turn off if any button is pressed for more than 60 seconds (except during programming). This feature is helpful in the event that the remote is stuck in a location 10where the buttons remain depressed, such as between sofa cushions.
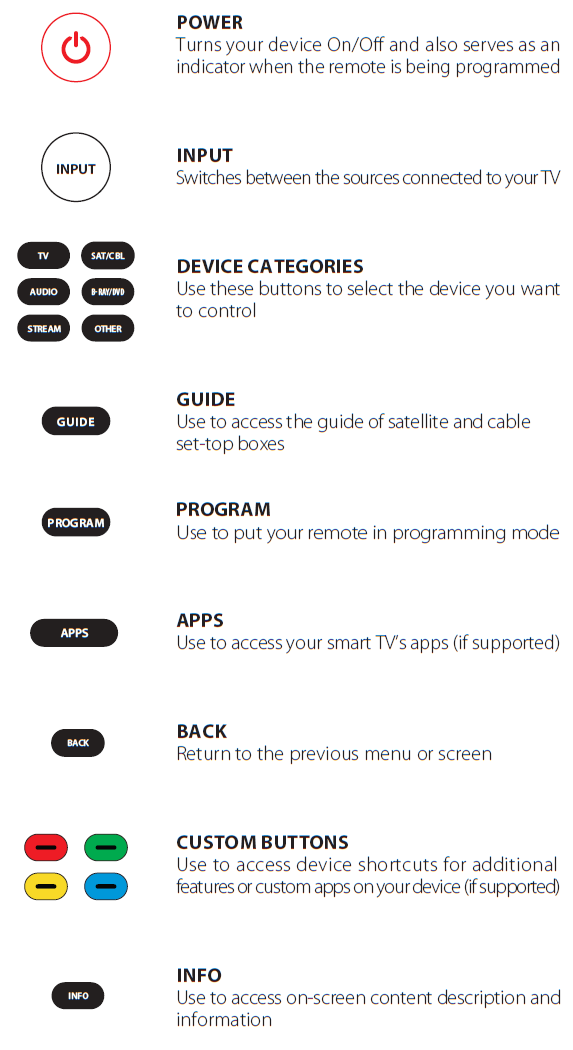
BUTTONS
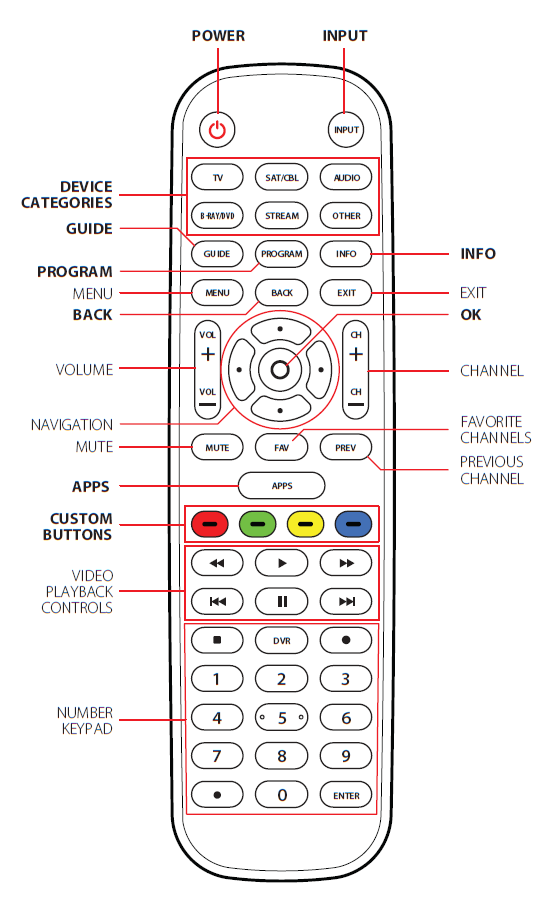
NOTE: Some of the buttons on the remote may not support all of the functions of the original device remote.
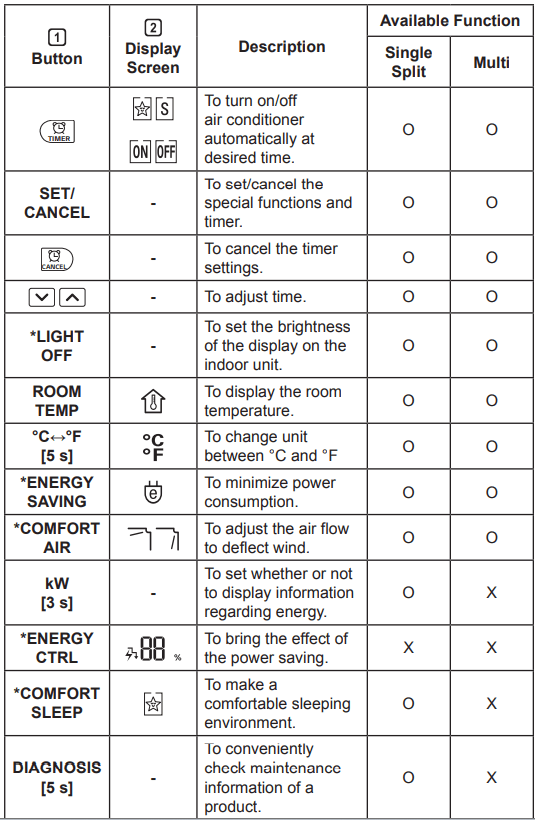
You can operate the air conditioner more conveniently with the remote control.
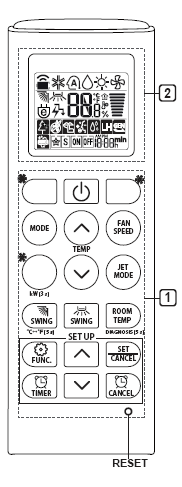
Remote Control Symbols & Meanings
These are the symbols that you will find on the remote control along with their meanings:

Then the list continues with timer controls such as:
and finally the third part of the list of remote symbols:
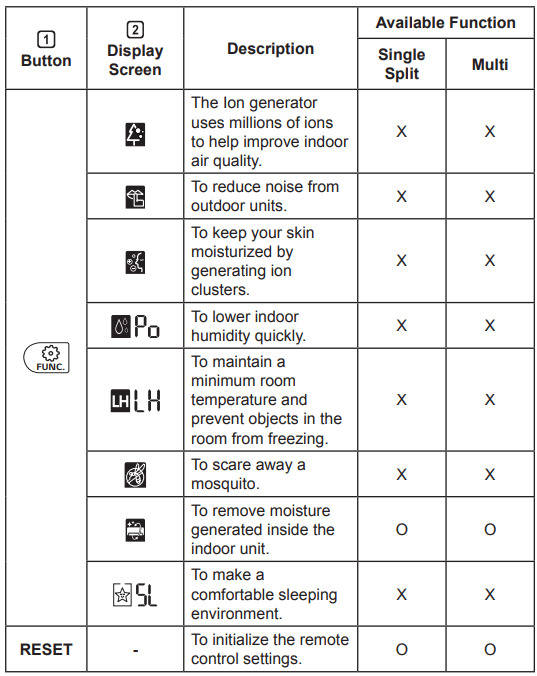
NOTE: Some functions may not be supported, depending on the model buttons may be changed according to the type of model. Press the SET/CANCEL button to operate the selected FUNC.
Restarting the Air Conditioner Automatically
When the air conditioner (such as the COV34636805) is turned on again after a power failure, this function restores the previous settings.
Disabling Auto Restart
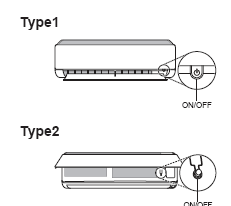
- Open the front cover (Type2) or horizontal vane (Type1).
- Press the ON/OFF button and hold it for 6 seconds, then the unit will beep twice and the lamp will blink twice 4 times.
To re-enable the function, press the ON/OFF button and hold it for 6 seconds. The unit will beep twice and the lamp will blink 4 times.
NOTE: The feature may be changed according to the type of model.•
If you press and hold the ON/OFF button for 3 – 5 seconds, instead of 6 seconds, the unit will switch to the test operation.
In the test operation, the unit blows out strong cooling air for 18 minutes and then returns to factory default settings.
Using the Mode Function
This function allows you to select the desired function.
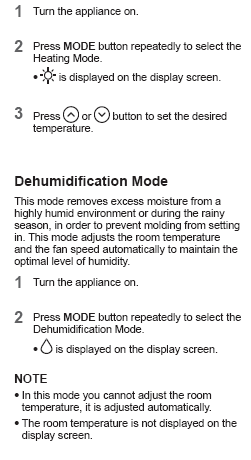
Cooling Only Mode
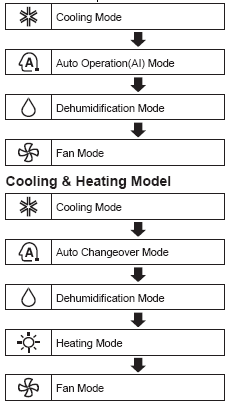
Mode: Cooling Mode
- Turn the appliance on.
- Press MODE button repeatedly to select the Cooling Mode. Dots are displayed on the display screen.
- Press the button to set the desired temperature.
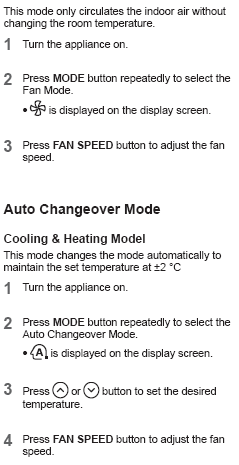
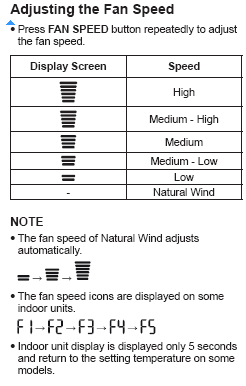
Using the Fan Speed Function
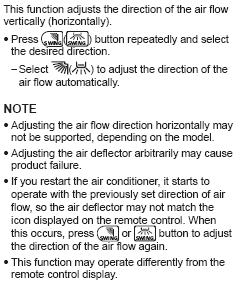
Using the Air Flow Direction Function
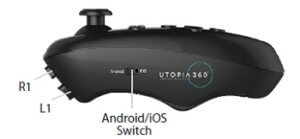
The ZERO GamePad supports many devices and platforms thanks to the multiple modes it can switch between. PC, Smartphone, iPad, Notebook, Android, iOS, Mac
OSX, Windows are supported. Making the ZERO GamePad ideal for all popular systems and devices.
To relive the happy memories of the past.
FAST START UP
Learn how to connect the Zero GamePage to Macs as well as PCs, Android and iOS in the table below.
It can function as a traditional gamepad or mimic your keyboard as seen in the columns below.
| GamePad | Bluetooth Keyboard | iCade | Emu-Touch Screen | |
|---|---|---|---|---|
| START ON (Hold down key for 2 seconds) |
START | START+B | START+A | START+X |
| Blue LED | 1 times per second | 2 times per second | 3 times per second | 4 times per second |
| Support system | Windows, Android | Windows, Mac OS, Android, iOS | Android, iOS | Android |
| Memo | PC can use Bluetooth Adapter. | Exclusive support FOUR players | Input method should be English. | Need ROOT |
| Selfie Mode | Bluetooth Keyboard(2P) | PC Joystick | |
|---|---|---|---|
| START ON (Hold down key for 2 seconds) |
SELECT | START+B+R | START+R1 |
| Blue LED | 1 times per second | 2 times per second | 1 times per second |
| Support system | Android, iOS | Windows, Mac OS, Android, iOS | Windows PC |
| Memo | D-pad buttons for iOS, four face buttons (A, B, X, Y) for Android. | Multiplayer supported, Dual keyboard code system | The Bluetooth conneection is the difference between PC mode and 360 mode, the buttons value also not the same |
Modes
- For Android devices, use GamePad.
- For iOS devices, use Mode Bluetooth Keyboard or iCade.
- For games that only support touchscreen controls, use Emu-Touch Screen.
To turn off the controller
- Hold down the button for 2 seconds.
Selfie Mode Instructions
Android/iOS
- Press on the SELECT button on the gamepad for 2 seconds;
- Turn on Bluetooth on your other device, find ‘8Bitdo ZERO GamePad’, choose it to connect;
- D-pad buttons for iOS, four face buttons (A, B, X, Y) for Android.
Visit www.myretrak.com/vr for a list of recommended apps.
Key Description
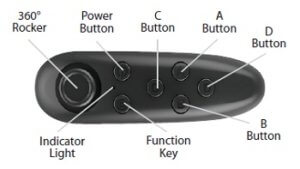
- AAA batteries (not included).
- Hold down the power button for 3 seconds to turn on the controller, repeat this to turn it off.
- For the first time, it should start blinking. This means it is from your device. The LED will stop blinking once paired.
Note: To connect the remote to a new device, the old device should be out of range or the Bluetooth should be turned off on the device. Restart the remote and the remote will go into pairing mode after 5 seconds.
]]>
WARNING: Never leave product charging unattended for extended periods of time. Always disconnect Zipp Nano™ from the charger immediately after the Zipp Nano™ is fully charged. Please refer to the enclosed safety instructions.
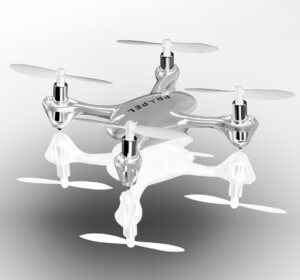
PACKAGE CONTAINS:

Colors and styles may slightly vary.
FEATURES
- Built-in 6 axis gyroscopic chip keeps the Zipp Nano™ extremely stable in all conditions.
- New T (training ) mode helps beginner pilots learn how to fly.
- Unique switch blade technology allows for 3ch and 4ch flight modes.
- 3 different speed settings for slow to high-speed flying.
- LED directional lights make the Zipp Nano™ easy to follow.
- 2.4G radio allows for a 200-foot operational range.
- The Zipp Nano™ is engineered for incredible maneuverability including 360˚ aerial stunts!
REMOTE CONTROL BATTERY INSTALLATION
- Unscrew the battery cover from the back of the remote control.
- Install 2 “AAA” alkaline batteries into the battery pack as shown in the diagram.
- Replace the battery cover and secure it.
CHARGING THE ZIPP NANO™
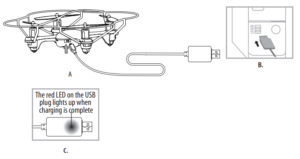
- Make sure the Zipp Nano’s power switch is in the “OFF” position and plug the USB charging cord into the charging socket of the Zipp Nano™(see diagram A ). Battery Cover Caution: The USB plug fits the charging socket only in one way. Do not force it.
- Connect the Zipp Nano™ charging cord to your computer’s USB port (see diagram B). Caution: Only use this charging cord with a computer USB port! Do not attempt Battery Compartment (2 “AAA” batteries) to use other USB charging devices.
- The red LED on the USB plug lights up when charging is complete (See diagram C). Note: If the red LED lights up, either the charging is complete or the USB plug is not properly connected.
- The charging time will vary depending on the percentage of battery already charged. The average charging time is approximately 30-45 minutes. The Zipp Nano™ operates for approximately 5-7 minutes per charge.
Low battery indication: the Zipp Nano™ ‘s LED lights will begin to flash to notify you that the battery is running low. The lights will continue to flash for 45 seconds before the Zipp Nano™ automatically lands.
Thank you for purchasing the 2.4 G Indoor /Outdoor Zipp Nano™. Please read this instruction booklet as it contains valuable information on how to properly fly and care for your Zipp Nano™.
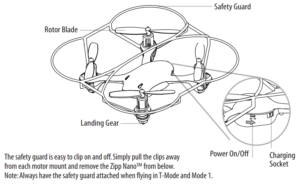
ZIPP NANO™ DIAGRAM
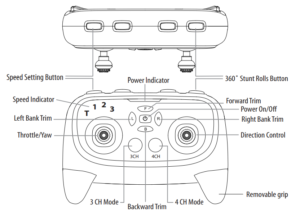
REMOTE DIAGRAM
REMOVABLE CONTROLLER GRIPS
Easily slides off and on. (see remote diagram)
WARNING
DO NOT FLY YOUR ZIPP NANO™ IN FOUL WEATHER!

PREPARING FOR FLIGHT
- Verify that there are 2 “AAA” batteries inside the remote control unit and the Zipp Nano™ has been fully charged.
- Make sure to be in a large space with an open radius of at least 50 feet.
- Make sure the empty space has no obstacles or water obstacles. Set your Zipp Nano™ on a clean flat surface before take-off.
DO NOT ATTEMPT TO FLY YOUR ZIPP NANO™ IF THERE IS RAIN, SNOW, HEAVY WINDS, THUNDER OR LIGHTNING OUTDOORS. IT COULD DAMAGE YOUR PRODUCT AND POSSIBLY EVEN CAUSE BODILY HARM.
SYNCING YOUR ZIPP NANO™
Important! When syncing your Zipp Nano™ copter with the controller always make sure that the copter is on a flat level surface. This ensures that the 6 Axis gyro is properly programmed to mimic your trim settings.
Your Zipp Nano™ utilizes an automatic 2.4G channel selection system that allows up to 8 people to fly side by side in the same wireless range.
For One Person Play:
1. Before starting, make sure that the power on both your controller and Zipp Nano™ is in the OFF position. Make sure that there are no other 2.4G devices in the area as well.
2. Turn ON the Zipp Nano™ and set it down on a flat surface. The white and red LED indicators of the Zipp Nano™ should flash.
3. ON the remote, pull the throttle all the way down, then turn ON your remote and You will hear 2 short beeps, the white and red LED lights start flashing faster, Push the throttle all the way up and pull it down, your Zipp Nano™ and remote should have successfully synced. Should this not happen, repeat all steps again.
For Multi-Person Play:
4. Before starting, make sure that the power on all Zipp Nanos and Controllers is in the OFF position. Make sure that there are no other 2.4G devices in the area as well.
5. Each person will have to sync their Zipp Nano™ individually at a different time to avoid interference. Follow steps 1 to 3 above making sure to keep away from other people while also making sure that no one else is syncing at the same time
6. After syncing a players Zipp Nano™, it should be left ON until all players have synced their Zipp Nano™.
7. Should there be a mistake/interference, all players must turn off their controllers and Zipp Nano™ and start the process all over again.
FLYING TIPS
- It is recommended that you operate the Zipp Nano™ in a wide space. The ideal space should have a 200-foot radius.
- Parental guidance or adult supervision is suggested at all times.
- If you are flying the Zipp Nano™ with others, make sure all spectators are behind you.
- For best performance, it is recommended that you operate the Zipp Nano™ in zero wind conditions.
Wind can greatly affect the performance of the Zipp Nano™.
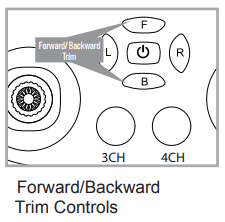
UNDERSTANDING TRIM ADJUSTMENTS
Forward/Backward Trim
- If your Zipp Nano™ is moving forwards or backward automatically, you may need to adjust the FORWARD/BACKWARD TRIM buttons.
- If your Zipp Nano™ flies forward, push and release the B TRIM button repeatedly until the moving stops and proper flight is maintained.
- If your Zipp Nano™ flies backward, push and release the F TRIM button in the same manner until the problem is resolved.
- From time to time you may have to adjust the FORWARD/BACKWARD TRIM to ensure the Zipp Nano™ will hover in mid-air and respond accurately to your commands.
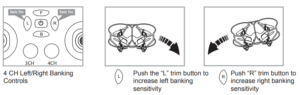
Banking Left/Right Trim
- If your Zipp Nano™ is not steadily hovering and is banking to the left or right automatically, you may need to adjust the BANKING TRIM buttons.
- If your Zipp Nano™ banks to the left, push and release the R TRIM button repeatedly until the banking stops and proper flight is maintained.
- If your Zipp Nano™ banks to the right, push and release the L TRIM button in the same manner until the problem is resolved.
- From time to time you may have to adjust the BANKING TRIM to ensure the Zipp Nano™ will steadily hover in mid-air and respond accurately to your commands.
NOTE: The use of the Trim buttons is accompanied by a Beep tone. A single long Beep indicates the product is center trimmed. Continuous long Beeps indicate the product is trimmed to the maximum on a particular side.
RECOGNIZING THE FRONT AND BACK OF THE ZIPP NANO™
Even though the Zipp Nano™ has four rotors there is still a front or “forward” facing direction and “back” or backward-facing direction. The forward Front and forward-facing direction of the Zipp Nano™ is the side with two holes. The rear and back of the Zipp Nano™ is where the battery charging socket and the power ON/OFF is. The Zipp Nano™ when in flight will also help you keep aware of the orientation with lighted LED lights in the arms of the Zipp Nano™. NOTE: The front of the copter displays WHITE LED lights and the back of the copter displays RED LED lights.
SPEED SETTING BUTTON
The Zipp Nano™ has 4-speed settings; T(Training), 1 (SLOW) , 2 (MEDIUM) and 3(HIGH). The default setting when you first turn on your Zipp Nano™ is the 1 (SLOW) speed mode. To increase the speed simply press the speed setting button (see remote diagram on page 3) You will hear a beep and the speed indicator will display the current speed setting with the Number. Number 1 indicates slow speed, 2 indicates medium speed and 3 indicates high speed.
T (Training)MODE
Simply press and hold the Speed Setting Button you will hear a long beep and the speed indicator will change to “T”, Now you are in the T mode. T mode allows you to learn how to operate your Zipp Nano™ at a very slow speed. To exit T mode just press the speed setting button again.
Auto Shut Off
In T-Mode and Mode 1 (with safety cage fitted), The Zipp Nano™’s motors will automatically shut off when it comes into contact with the ground, walls or any other objects. This is a safety feature for beginner pilots and is disabled in modes 2 and 3.
3/4 CHANNEL SELECT
Zipp Nano™ allows you to control your Quadrocopter in 3 channel mode (beginner) or 4 channel mode (advanced flying). The Zipp Nano™ default setting is 4 Channel mode. To change to 3 Channel mode: PRESS the 3CH button (see remote diagram on pg 3), you will hear 3 short beeps indicating the Zipp Nano™ now is set to 3CH mode. To change back to 4 Channel mode: PRESS the 4CH button (see remote diagram on pg 3), you will hear 4 short beeps indicating the Zipp Nano™ is now set to 4CH mode
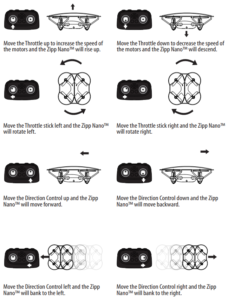
4 CHANNEL FLIGHT CONTROL
Below is a list of basic flight functions for your long-range remote control Zipp Nano™. While learning to fly your Zipp Nano™ it is best to start with a large space until you get used to the basic controls. As you master flying your Zipp Nano™ you can move to more advanced maneuvering techniques. Practice makes perfect! When you have these basic steps down you can move to the next level.
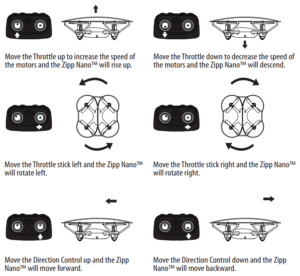
3 CHANNEL FLIGHT CONTROL
Below is a list of basic flight functions for your long-range remote control Zipp Nano™. While learning to fly your Zipp Nano™ it is best to start with a large space until you get used to the basic controls. As you master flying your Zipp Nano™ you can move to more advanced maneuvering techniques. Practice makes perfect! When you have these basic steps down you can move to the next level.
CALIBRATING THE ZIPP NANO™
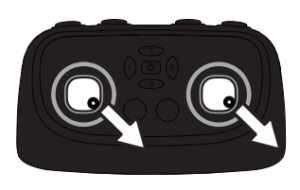
If the Zipp Nano™ becomes unstable during the course of flying, you may need to re-stabilize the internal gyros. To do this place the Zipp Nano™ on a level surface, pull both of the control levers on the remote down and to the right (approximately 45º) at the same time. The LEDs on the Zipp Nano™ will flash quickly and then remain solid, this indicates your drone has been stabilized (see diagram below).
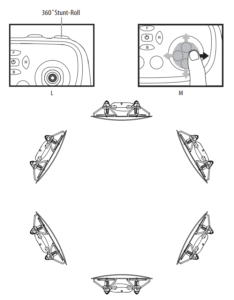
HOW TO DO 360º STUNT ROLLS
1. In order to make your Zipp Nano™ do 360º rolls you must fully charge your battery. Note: The Zipp Nano™ will not do 360º stunt rolls in T-Mode, Mode1 and under low battery indication (The LED lights on the drone will be flashing).
2. Once you are ready to attempt a 360º roll, simply depress and let go of the “STUNT” button on the top right hand side of your controller (see Remote Diagram on page 3), you will hear a sound. This means you are now in “STUNT MODE”
3. Now quickly move your right control stick in any of 4 directions; up, down, left or right and your Zipp Nano™ copter will instantly roll in the associated direction. See diagram below. 360˚Stunt-Roll
ZIPP NANO™ WARNING:
The Zipp Nano™ is designed for INDOOR and OUTDOOR use. The Zipp Nano™ blades revolve at high speeds and can cause damage to the user, spectators, and animals. Stand away from the Zipp Nano™ to reduce the risk of getting into the flight path. Warn spectators that you will be flying your Zipp Nano™ so that they are aware of its position. Before a flight, inspect the rotor blades to make certain that the blades are securely fastened to the Zipp Nano™.
WARNING!
- Choking/Cutting Hazard. Small Parts/Sharp Rotor Blades.
- Keep hands, hair and lose clothing away from the propeller when the power switch is turned to the ON position.
- Turn off the transmitter and Zipp Nano™ power switches when not in use.
- The included charger is built specifically for the Zipp Nano™ Li-Poly battery. Do not use it to charge any other battery.
- New alkaline batteries are recommended for maximum performance.
- Parental supervision is recommended when flying Zipp Nano™.
BATTERY WARNINGS
RECHARGEABLE BATTERY:
This Zipp Nano™ uses a Li-Poly rechargeable battery. If the battery no longer stays charged, dispose of the battery properly according to local disposal requirements.
CONTROLLER BATTERIES:
Remote control requires 2 “AAA” batteries (not included). Please read the important battery safety warning below.
- Do not mix alkaline, standard (carbon-zinc) and rechargeable batteries (Nickel Metal Hydride).
- Do not mix old and new batteries.
- Non-rechargeable batteries are not to be recharged.
- Rechargeable batteries are to be removed from the item before being charged (if removable).
- Rechargeable batteries are only to be charged under adult supervision.
- Exhausted batteries should be removed immediately and must be recycled or disposed of properly according to state or local government ordinances and regulations.
- The supply terminals are not to be short-circuited.
- Only batteries of the same or equivalent type as recommended are to be used.
- Batteries are to be inserted with the correct polarity (see inside booklet for diagram).
- Do not dispose of batteries in a fire – batteries may leak or explode.
CARE AND MAINTENANCE
- Always remove the batteries from the wireless infrared remote control when it is not being used for an extended period of time.
- To clean, gently wipe the remote control and Zipp Nano™ with a clean damp cloth.
- Keep the toy away from direct heat or sunlight.
- Do not submerge the toy into the water. This can damage the unit beyond repair.
- Parental guidance is recommended when installing or replacing the batteries.
REPLACING THE PROPELLER BLADE
Your Zipp Nano™ propeller system is a precision instrument that may need repair or replacement from time to time for optimal flight function. Crashlanding from high-speed aerial flights may cause damage to your Zipp Nano™ propellers.
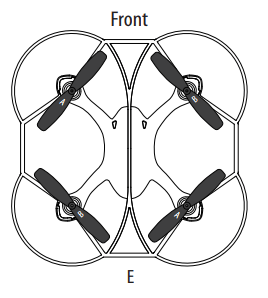
1. The Zipp Nano™ has four blades, two A & B blades on the front, and two B & A blades on the back (see diagram E).
2. Pick up a blade from the included spare parts and match Front the marking to the diagram E.
3. Replacing the correct blade to the broken blade.
FCC Part 15 Notice
CAUTION: Changes or modifications not expressly approved by the party responsible for compliance could void the user’s authority to operate the equipment.
NOTE: This equipment has been tested and found to comply with the limits for a Class B digital device, pursuant to Part 15 of the FCC Rules. These limits are designed to provide reasonable protection against harmful interference in a residential installation. This equipment generates, uses and can radiate radio frequency energy and, if not installed and used in accordance with the instructions, may cause harmful interference to radio communications. However, there is no guarantee that interference will not occur in a particular installation. If this equipment does cause harmful interference to radio or television reception, which can be determined by turning the equipment off and on, the user is encouraged to try to correct the interference by one or more of the following measures:
- Reorient or relocate the receiving antenna.
- Increase the separation between the equipment and receiver.
- Connect the equipment into an outlet on a circuit different from that to which the receiver is connected.
- Consult the dealer or experienced radio/TV technician for help.
This device complies with Part 15 of the FCC Rules. The operation is subject to the following two conditions :
- This device may not cause harmful interference, and
- this device must accept any interference received, including interference that may cause undesired operation.
INDUSTRY CANADA NOTICE: CANADA ONLY.
This device complies with Industry Canada licence-exempt RSS standard(s). The operation is subject to the following two conditions: (1) this device may not cause interference, and (2) this device must accept any interference, including interference that may cause undesired operation of the device.
Le présent appareil est conforme aux CNR d’Industrie Canada applicables aux appareils radio exempts de licence. L’exploitation est autorisée aux deux conditions suivantes : (1) l’appareil ne doit pas produire de brouillage, et (2) l’utilisateur de l’appareil doit accepter dout brouillage radioélectrique subi, même si le brouillage est susceptible d’en compromettre le fonctionnement.
Conforms to safety requirements of ASTM, CPSIA and FCC.
8619 Wall street, Suite 400, Austin, TX 78754
©2016 Rooftop Brands™ All rights reserved
Tel: 1-866-458-5151 • www.propelrc.com
Made in China
Rackmount Unmanaged Redundant Industrial Switch
Overview
The EKI-2428G is an unmanaged switch with 24 Gigabit ports and 4 Gigabit SFP ports that can provide users with abundant ports to connect many devices. It is designed for rack-mount installation and is suitable for edge to core networks.
Packing List
Before installation, please make sure that you have received the following:
- 1 x EKI-2428G-4FA Rackmount Unmanaged Switch
- 1 x Startup manual
If anything is missing or damaged, contact your distributor or sales representative immediately
User Manual
For more detailed information, please refer to the full manual which can be found on Advantech’s website.
Notes
For more information on this and other Advantech products, please visit our websites at: http://www.advantech.com/products
For technical support and service: http://www.advantech.com/support/
This startup manual is for EKI-2428G-4FA
Part No:
1st Edition
Dec 2017
Specifications
General
- Compatibility: IEEE 802.3, 802.3u, 802.3x, 802.3ab, 802.3z
- LAN: 10/100/1000 Base-TX
- SFP: Up to 110 km (depends onSFP)
- Ethernet RJ-45 Distance: Up to 100m
- Connectors: 24 x 10/100/1000Base-T/TX RJ-45 4 x SFP(mini-GBIC) port
- PowerRequirements: 100~240V single AC power input
- Power Consumption: 18W
- Dimensions (W x H x D): 442 x 44 x 211.1 mm
- Enclosure: Metal shell with solid mounting kits
- Operating Temperature: 0 ~ 55°C (32 ~ 131°F)
- Storage Temperature: -20 ~ 70°C (-4 ~158°F)
- Operating Humidity: 10 ~ 95%(non-condensing)
- Storage Humidity: 10 ~95% (non-condensing)
- EMC: CE FCC Class A
- Warranty: 5years
Overview

Warning: This is a Class A product. In a domestic environment, this product may cause radio interference in which case the user may be required to take adequate measures.
Safety Instructions
- Read these safety instructions carefully.
- Keep this user manual for later reference.
- Disconnect this equipment from any AC outlet before cleaning. Use a damp cloth. Do not use liquid or spray detergents for cleaning.
- For plug-in equipment, the power outlet socket must be located near the equipment and must be easily accessible.
- Keep this equipment away from humidity.
- Put this equipment on a reliable surface during installation. Dropping it or letting it fall may cause damage.
- The openings on the enclosure are for air convection. Protect the equipment from overheating. DO NOT COVER THE OPENINGS.
- Make sure the voltage of the power source is correct before connecting the equipment to the power outlet.
- Position the power cord so that people cannot step on it. Do not place anything over the power cord.
- All caution and warning on the equipment should be noted.
- If the equipment is not used for a long time, disconnect it from the power source to avoid damage by transient overvoltage.
- Never pour any liquid into an opening. This may cause fire or electrical shock.
- Never open the equipment. For safety reasons, the equipment should be opened only by qualified service personnel.
- If one of the following situations arises, get the equipment checked by service personnel:
- The power cord or plug is damaged.
- Liquid has penetrated into the equipment.
- The equipment has been exposed to moisture.
- The equipment does not work well, or you cannot get it to work according to the user manual.
- The equipment has been dropped and damaged.
- The equipment has obvious signs of breakage.
- Do NOT LEAVE THIS EQUIPMENT IN AN ENVIRONMENT WHERE THE STORAGE TEMPERATURE MAY GO BELOW -20°C (-4°F) OR ABOVE 70°C (158°F) THIS COULD DAMAGE THE EQUIPMENT. THE EQUIPMENT SHOULD BE IN A CONTROLLED ENVIRONMENT.
Rack Mounting
- Position one bracket to align with the holes on one side of the switch and secure it with the bracket screws. Then attach the remaining bracket to the other side of the Switch.
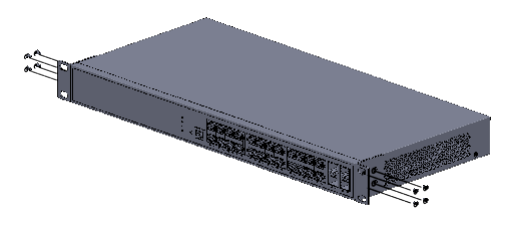
- After attaching the mounting brackets, position the EKI-2428G-4FA Unmanaged Switch in the rack by lining up the holes in the brackets with the appropriate holes on the rack. Secure the Switch to the rack with a screwdriver with the rack-mounting screws.

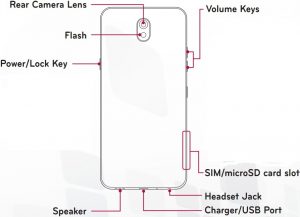
- While the screen is off
- Press the Volume Up Key twice to launch Capture+.
- Press the Volume Down Key twice to launch the Camera.
- On the Home screen: Control ringer volume.
- During a call: Control your earpiece volume.
- When playing audio/video: Control volume continuously.
- Turn your device on/off by pressing and holding this key.
- Press once to turn the screen on/off
For more information, please visit www.lg.com to view the user guide.
 Do not attempt to remove the back cover.
This device has a non-removable battery. DO NOT attempt to remove or instruct someone else to remove the battery to reset the device.
To Perform a Soft Reset:
To perform a soft reset of your device, simply press & hold the Volume Down and Power keys until the device restarts.
Getting to know your phone
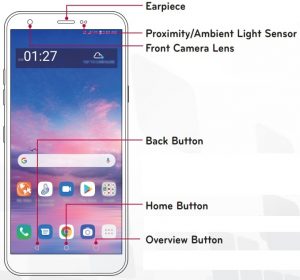
- Returns to the previous screen. Also closes pop-up items, such as menus, dialog boxes and the on-screen keyboard.
- Return to the Home screen from any screen.
- Displays recently used applications.

When receiving and making calls, the proximity sensor automatically turns the backlight off and locks the touch screen by sensing when the phone is near your ear. This extends battery life and prevents you from unintentionally activating the touch screen during calls.
WARNING: Placing a heavy object on the phone or sitting on it can damage the display and touch screen functions. Do not cover the proximity sensor with screen protectors or any other type of protective film. This could cause the sensor to malfunction.
Google Account Setup
The first time you open a Google application on your phone, you will be required to sign in with your existing Google account. If you do not have a Google account, you will be prompted to create one.
Creating your Google account
- Tap
 >
> > Accounts.
 - Tap Add Account > Google > Create account.
- Enter your first and last name, then tap Next.
- Enter your birthday and gender, then tap Next.
- Enter a username and tap Next. Your device will communicate with Google servers and check for username availability.
- Enter your password and tap Next.
- Follow the instructions and enter the required and optional information about the account. Wait while the server creates your account.
Signing in to your Google account
- Tap > > Accounts.
- Tap Add Account > Google.
- Enter your email address and tap Next.
- Enter your password and tap Next.
• If your email and applications list to be synchronized are visible when accessing this screen, you do not have to enter your password again. - After signing in, you can use Gmail and take advantage of Google services on your device. After signing in, your device will sync with your Google services, such as Gmail, Contacts, and Google Calendar. You can also use Maps, download applications from Play Store, back up your settings to Google servers, and take advantage of other Google services on your device.
Anti-Theft Guide
You can set up your device to prevent other people from using it if it’s been reset to factory settings without your permission. For example, if your device is lost, stolen, or wiped, only someone with your Google account or screen lock information can use the device. All you need to make sure your device is protected is:
-
- Set a screen lock: If your device is lost or stolen but you have a screen lock set, the device can’t be erased using the Settings menu unless your screen is unlocked.
- Add your Google account on your device: If your device is wiped but you have your Google account on it, the device can’t finish the setup process until your Google account information is entered again. After your device is protected, you’ll need to either unlock your screen or enter your Google account password if you need to do a factory reset. This ensures that you or someone you trust is doing the reset.
Do not forget your Google account and password that you had added to your device prior to performing a factory reset. If you can’t provide the account information during the setup process, you won’t be able to use the device at all after performing the factory reset.
Open Source Software Notice
To obtain the source code under GPL, LGPL, MPL, and other open-source licenses, that is contained in this product, please visit http://opensource.lge.com. In addition to the source code, all referred license terms, warranty disclaimers and copyright notices are available for download. LG Electronics will also provide open source code to you on CD-ROM for a charge covering the cost of performing such distribution (such as the cost of media, shipping, and handling) upon email request to [email protected]. This offer is valid for a period of three years after our last shipment of this product. This offer is valid to anyone in receipt of this information.
Regulatory and Safety
To view regulatory marks and related information on your phone, go to
Settings > System > Regulatory & safety.
Trademarks
- Bluetooth® is a registered trademark of Bluetooth SIG, Inc. worldwide.
- Google is a trademark of Google Inc.
Limited Warranty – USA
ARBITRATION NOTICE: THIS LIMITED WARRANTY CONTAINS AN ARBITRATION PROVISION THAT REQUIRES YOU AND LG (as defined hereinafter in the Definitions) TO RESOLVE DISPUTES BY BINDING ARBITRATION INSTEAD OF IN COURT, UNLESS YOU CHOOSE TO OPT OUT. IN ARBITRATION, CLASS ACTIONS AND JURY TRIALS ARE NOT PERMITTED. PLEASE SEE THE SECTION TITLED “PROCEDURE FOR RESOLVING DISPUTES” BELOW.
Should your LG Mobile Phone (“Product”) fail due to a defect in materials or workmanship under normal and proper use, during the warranty period set forth below, LG will, at its option, repair or replace the Product. This limited warranty is valid only to the original retail purchaser of the Product and applies only when purchased and used within the United States including U.S. Territories.
| Warranty Period | Scope of Warranty |
| Twelve (12) months from date of original retail purchase (or absent valid proof of purchase, fifteen (15) months from manufacture date) | Parts and Labor (internal/functional parts only) |
- Replacement products and parts are warranted for the remaining portion of the original warranty period or ninety (90) days, whichever is greater.
- Replacement products and parts may be new, reconditioned, refurbished, or otherwise, factory remanufactured.
- Replaced products and parts will become the property of LG. [See 15 USC §2311.]
EXCEPT TO THE EXTENT PROHIBITED BY APPLICABLE LAW, ANY IMPLIED WARRANTY OF MERCHANT ABILITY OR FITNESS FOR A PARTICULAR PURPOSE ON THE PRODUCT IS LIMITED IN DURATION TO THE DURATION OF THE ABOVE LIMITED WARRANTY. UNDER NO CIRCUMSTANCES SHALL LG OR ITS U.S. DISTRIBUTORS/DEALERS BE LIABLE FOR ANY INDIRECT, INCIDENTAL, CONSEQUENTIAL, SPECIAL, OR PUNITIVE DAMAGES, INCLUDING, WITHOUT LIMITATION, LOST GOODWILL, LOST REVENUES OR PROFITS, WORK STOPPAGE, IMPAIRMENT OF OTHER GOODS, COST OF REMOVAL AND REINSTALLATION OF THE PRODUCT, LOSS OF USE, OR ANY OTHER DAMAGES WHETHER BASED IN CONTRACT, TORT, OR OTHERWISE. LG’S TOTAL LIABILITY, IF ANY, SHALL NOT EXCEED THE PURCHASE PRICE PAID BY YOU FOR THE PRODUCT. Some states do not allow the exclusion or limitation of incidental or consequential damages or limitations on how long an implied warranty lasts, so the above exclusions or limitations may not apply to you. This limited warranty gives you specific legal rights and you may also have other rights that vary from state to state.
HOW SERVICE IS HANDLED:
The original sales receipt specifying the Product and date of purchase is required to obtain warranty service. LG will not re-install or back up any data, applications, or software that you have added to your Product. It is therefore recommended that you back up any such data or information prior to sending the Product to LG to avoid permanent loss of such information You shall bear the cost of shipping the Product to LG Customer Service. LG shall bear the cost of shipping the Product back to you after completion of service under this limited warranty.
THIS LIMITED WARRANTY DOES NOT COVER:
- Damage or defects of the Product resulting from use of the Product in other than its normal and customary manner.
- Damage or defects of the Product resulting from abnormal use, abnormal conditions, improper storage, exposure to moisture or dampness, unauthorized modifications/connection/repair, misuse, neglect, abuse, accident, alteration, improper installation, or other acts which are not the fault of LG, including damage or defects of the Product caused by shipping, blown fuses, spills of food or liquid.
- Damage or defects of the Product caused by transportation and/or handling, including scratches, dents, chips, and/or other damage to the finish of your Product including the external housing and cosmetic parts, unless such damage results from defects in materials or workmanship and is reported within one (1) week of delivery (Call: 1-800-793-8896).
- Damage or defects to antennas unless caused directly by defects in material or workmanship.
- Damage or defects of the Product resulting from operating the Product contrary to the instructions outlined in the Product owner’s manual.
- That LG Customer Service was not notified by you of the alleged defect or malfunction of the Product during the applicable limited warranty period.
- Products with original serial numbers that have been removed, altered, or cannot be readily determined.
- Damage or defects of the Product or missing items to any Product sold “As Is”, “With All Faults” or a similar disclaimer.
- Damage or defect of the Product caused by the use of accessories, parts, consumable cleaning products, or service not provided or approved by LG.
- All plastic surfaces and all other externally exposed parts are scratched or damaged.
- Products operated outside published maximum ratings.
- Replacement of any consumable parts (such as fuses).
The cost of repair or replacement under the above-excluded circumstances
shall be borne by you.
TO OBTAIN WARRANTY SERVICE AND ADDITIONAL INFORMATION:
Call 1-800-793-8896 and select the appropriate option from the menu. Or visit our website at TO OBTAIN WARRANTY SERVICE AND ADDITIONAL INFORMATION: Call 1-800-793-8896 and select the appropriate option from the menu. Or visit our website at http://www.lg.com. Or by mail: LG Electronics Customer Service P.O. Box 240007 Huntsville, AL 35813 ATTN: CIC – Mobile Handsets
DO NOT RETURN YOUR PRODUCT TO THE ABOVE ADDRESS. Please call or write for procedures for obtaining warranty service. Or by mail: LG Electronics Customer Service P.O. Box 240007 Huntsville, AL 35813 ATTN: CIC – Mobile Handsets
DO NOT RETURN YOUR PRODUCT TO THE ABOVE ADDRESS. Please call or write for procedures for obtaining warranty service.
PROCEDURE FOR RESOLVING DISPUTES:
ALL DISPUTES BETWEEN YOU AND LG ARISING OUT OF OR RELATING IN ANY WAY TO THIS LIMITED WARRANTY OR THE PRODUCT SHALL BE RESOLVED EXCLUSIVELY THROUGH BINDING ARBITRATION, AND NOT IN A COURT OF GENERAL JURISDICTION. BINDING ARBITRATION MEANS THAT YOU AND LG ARE EACH WAIVING THE RIGHT TO A JURY TRIAL AND TO BRING OR PARTICIPATE IN A CLASS ACTION.
Definitions. For the purposes of this section, references to “LG” mean LG Electronics Mobile Comm U.S.A., Inc., its parents, subsidiaries and affiliates, and each of their officers, directors, employees, agents, beneficiaries, predecessors in interest, successors, assigns and suppliers; references to dispute” or “claim” shall include any dispute, claim or controversy of any kind whatsoever (whether based in contract, tort, statute, regulation, ordinance, fraud, misrepresentation or any other legal or equitable theory) arising out of or relating in any way to the sale, condition or performance of the product or this Limited Warranty.
Notice of Dispute. In the event you intend to commence an arbitration proceeding, you must first notify LG in writing at least 30 days in advance of initiating the arbitration by sending a letter to LG at LG Electronics U.S.A., Inc. Attn: Legal Department- Arbitration 1000 Sylvan Avenue Englewood Cliffs, NJ 07632. You and LG agree to engage in good faith discussions in an attempt to amicably resolve your claim. The notice must provide your name, address, and telephone number; identify the product that is the subject of the claim; and describe the nature of the claim and the relief being sought. If you and LG are unable to resolve the dispute within 30 days, either party may proceed to file a claim for arbitration.
Agreement to Binding Arbitration and Class Action Waiver. Upon failure to resolve the dispute during the 30 day period after sending written notice to LG, you and LG agree to resolve any claims between us only by binding arbitration on an individual basis, unless you opt out as provided below. Any dispute between you and LG shall not be combined or consolidated with a dispute involving any other person’s or entity’s product or claim. More specifically, without limitation of the foregoing, any dispute between you and LG shall not under any circumstances proceed as part of a class or representative action. Instead of arbitration, either party may bring an individual action in small claims court, but that small claims court action may not be brought on a class or representative basis.
Arbitration Rules and Procedures. To begin arbitration of a claim, either you or LG must make a written demand for arbitration. The arbitration will be administered by the American Arbitration Association (“AAA”) and will be conducted before a single arbitrator under the AAA’s Consumer Arbitration Rules that are in effect at the time the arbitration is initiated (referred to as the “AAA Rules”) and under the procedures set forth in this section. The AAA Rules are available online at www.adr.org/consumer. Send a copy of your written demand for arbitration, as well as a copy of this provision, to the AAA in the manner described in the AAA Rules. You must also send a copy of your written demand to LG at LG Electronics, U.S.A., Inc. Attn: Legal Department Arbitration 1000 Sylvan Avenue Engle wood Cliffs, NJ 07632. If there is a conflict between the AAA Rules and the rules set forth in this section, the rules set forth in this section will govern. This arbitration provision is governed by the Federal Arbitration Act. Judgment may be entered on the arbitrators award in any court of competent jurisdiction. All issues are for the arbitrator to decide, except that issues relating to the scope and enforceability of the arbitration provision and to the arbitrability of the dispute are for the court to decide. The arbitrator is bound by the terms of this provision.
Governing Law. The law of the state of your residence shall govern this Limited Warranty and any disputes between us except to the extent that such law is preempted by or inconsistent with applicable federal law.
Fees/Costs. You do not need to pay any fee to begin an arbitration. Upon receipt of your written demand for arbitration, LG will promptly pay all arbitration filing fees to the AAA unless you seek more than $25,000 in damages, in which case the payment of these fees will be governed by the AAA Rules. Except as otherwise provided for herein, LG will pay all AAA filing, administration and arbitrator fees for any arbitration initiated in accordance with the AAA Rules and this arbitration provision. If you prevail in the arbitration, LG will pay your attorneys’ fees and expenses as long as they are reasonable, by considering factors including, but not limited to, the purchase amount and claim amount. Notwithstanding the foregoing, if applicable law allows for an award of reasonable attorneys’ fees and expenses, an arbitrator can award them to the same extent that a court would. If the arbitrator finds either the substance of your claim or the relief sought in the demand is frivolous or brought for an improper purpose (as measured by the standards set forth in Federal Rule of Civil Procedure 11(b)), then the payment of all arbitration fees will be governed by the AAA Rules. In such a situation, you agree to reimburse LG for all monies previously disbursed by it that are otherwise your obligation to pay under the AAA Rules. Except as otherwise provided for, LG waives any rights it may have to seek attorneys’ fees and expenses from you if LG prevails in the arbitration.
Hearings and Location. If your claim is for $25,000 or less, you may choose to
have the arbitration conducted solely on the basis of (1) documents submitted to the arbitrator, (2) through a telephonic hearing, or (3) by an in-person hearing as established by the AAA Rules. If your claim exceeds $25,000, the right to a hearing will be determined by the AAA Rules. Any in-person arbitration hearings will be held at a location within the federal judicial district in which you reside unless we both agree to another location or we agree to a telephonic arbitration.
Opt-Out. You may opt-out of this dispute resolution procedure. If you opt-out, neither you nor LG can require the other to participate in an arbitration proceeding. To opt-out, you must send notice to LG no later than 30 calendar
days from the date of the first consumer purchaser’s purchase of the product by either: (i) sending an e-mail to LG with the subject line: “Arbitration Opt-Out” or (ii) calling 1-800-980-2973. You must include in the opt-out e-mail or provide by telephone: (a) your name and address; (b) the date on which the product was purchased; (c) the product model name or model number; and (d) the IMEI or MEID or Serial Number, as applicable(the IMEI or MEID or Serial Number can be found (i) on the product box; (ii) on a label on the back of the product beneath the battery, if the battery is removable; or (iii) from the settings menu via the following path: Settings > System > About phone > Status). You may only opt-out of the dispute resolution procedure in the manner described above (that is, by e-mail or telephone); no other form of notice will be effective to opt-out of this dispute resolution procedure. Opting out of this dispute resolution procedure will not affect the coverage of the Limited Warranty in any way, and you will continue to enjoy the full benefits of the Limited Warranty. If you keep this product and do not opt-out, then you accept all terms and conditions of the arbitration provision described above.
Product Diagrammatic Sketch
Wearing Diagrammatic Sketch
Wearing Steps

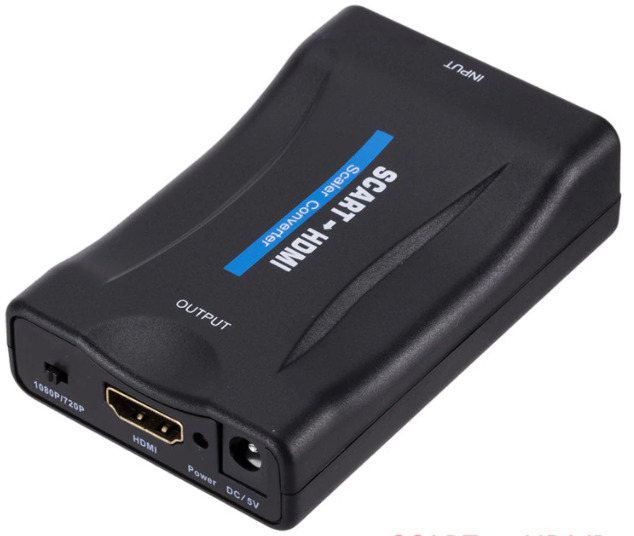
nedis HDMI Converter Scart
Parts

Quick start guide
HDMI™ Converter
For more information see the extended manual online: ned.is/vcon3460bk
Intended use
The VCON3460BK is an HDMI to SCART converter.
The product is intended for indoor use only. The product is not intended for professional use. Any modification of the product may have consequences for safety, warranty and proper functioning.
Specifications
| Product | HDMI™ Converter |
| Article number | VCON3460BK |
| Dimensions (w x h x d) | 57.5 x 25 x 88.5 mm |
| Weight | 60 g |
| Power Adapter Input | 100 – 240 VAC ; 50 / 60 Hz |
| Power Adapter Output | 5 VDC ; 1 A |
| Max working current | 600 mA |
| HDMI input / output resolution | Up to 1.3 / 60 fps |
| Support HDMI video color format | 24 bit / deep color 30 bit
/ 36 bit |
| HDMI max bandwidth | 300 MHz |
| HDMI max baud rate | 10.2 Gbps |
| Input / Output TMDS signal | 0.5 ~ 5 V p-p (TTL) |
| Input / Output DDC signal | 5 V p-p (TTL) |
| RCA analog output ( KHZ @ dB ) | 1 V RMS |
| Signal-to-noise-ratio @ dB (CC1R / ARM) | ≥ 90 dB |
| Distortion | ≤ 0.1 % |
| Frequency response | 20 Hz ~ 20000 Hz |
| Max HDMI input cable length | ≤ 7 m AWG26 HDMI standard cable |
| Max SCART output cable length | ≤ 8 m AWG26 SCART standard cable |
| Operating temperature | -10 °C – 55 °C |
| Storage temperature | -20 °C – 60 °C |
| Operating humidity | 10 – 90% RH (no
condensation) |
| Storage humidity | 5 – 95% RH (no condensation) |
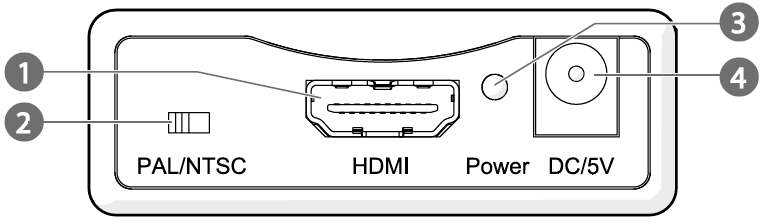
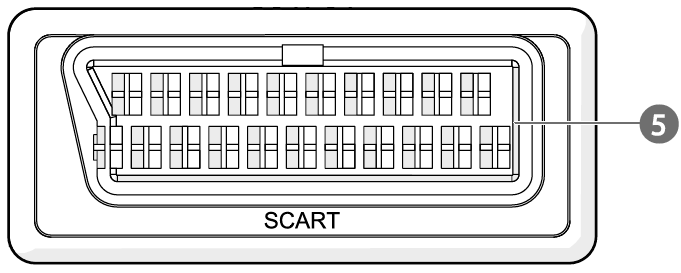
Main parts
- HDMI input
- PAL / NTSC switch
- Power indicator LED
- Power supply port
- SCART output
- Power cable
Safety instructions
WARNING
- Only use the product as described in this manual.
- Do not use a damaged product.
- Do not expose the product to direct sunlight, naked flames or heat.
- Do not expose the product to water or moisture.
- Place the product on a stable and flat surface.
- Do not drop the product and avoid bumping.
- Do not open the product.
- Keep the product out of reach from children.
- Do not unplug the product by pulling on the cable. Always grasp the plug and pull.
- Only handle the product with dry hands. Handling with wet hands might cause an electric shock.
- Unplug the product if you do not plan on using the product for an extended period of time.
Installing the product
- Plug an HDMI cable (not included) from your source device into A1.
- Plug a SCART cable (not included) from A5 into your display.
- Plug A6 into A4.
- Insert the other end of A6 into a power outlet. 44A3 lights up.
Using the product
- Use the PAL / NTSC switch A2 to switch the frequency between 50 Hz and 60 Hz.
![]()
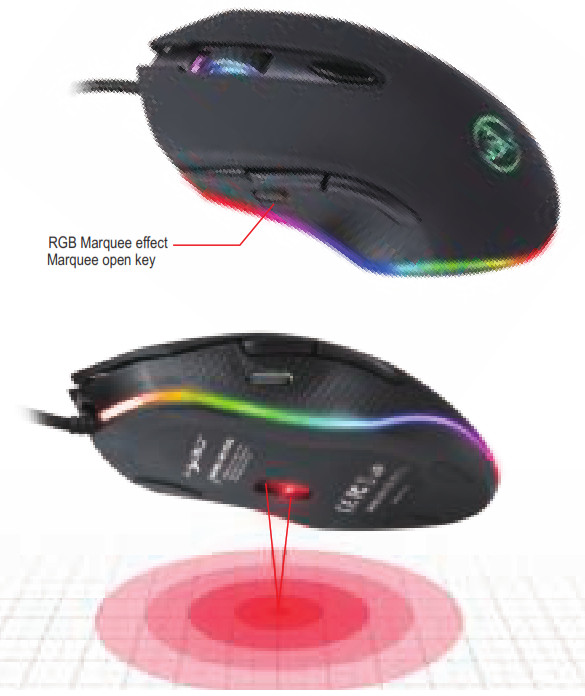
S500 MACRO DEFINITION PROGRAMMABLE RGB MARQUEE GAME MOUSE
SPECIFICATIONS
- Product model: S500 Mechanical Macros Define the game mouse
- 100% new mouse game
- High-end brand mechanical macro definition gaming mouse
- Human body engineering design
- 6 programmable keys
- Light mode: RGB marquee effect, the bottom of the mouse with a light switch button.
- 12-level adjustable DPI, Max.4800 DPI
- Voltage rating / electric current: DC 5V / 100mA
- USB plug and play
- Switch life: 20million cycle
- Cable length: 150cm
- Item Weight:149g
- Item Size : 125*68*38MM(L * W * H)
- Package Weight:225g
- Package Size:159*121*47MM
- Support Windows 2000 / XP / win7 / win8 /win10 Vista 32bit IOS or latest.
- Packing list:
1 x gaming mouse
1 x User manual
1 x CD(Macro definition software)
The high-speed precision optical engine positioning wireless mouse uses a photoelectric sensor using more advanced laser technology, the mouse is sliding and fast to meet the daily office and game entertainment use.
]]>