Sections in this Manual
- Included in the box
- Tools you will need
- Tools you may need
-
Removing your old thermostat
- Turn power OFF
- Check that your system is off.
- Remove the old thermostat’s faceplate.
- Make sure there are no 120/240V wires.
- Take a picture of how your wiring looks right now.
- Record which R-wire(s) you have and write down the color of the wire(s).
- Record the remaining wires and write down the color of the wires.
- Disconnect the wires and remove the old wall plate.
- Installing your RTH5160 thermostat
- Bundle and insert wires through the UWP.
- Insert the wall anchors.
- Set R-switch position and insert R-wire(s).
- Connect remaining wires.
- Confirm wiring matches snapshot.
- Mount the UWP and close the door.
- Install batteries.
- Attach your thermostat.
- Turn your power ON.
- System Setup
- Wiring—conventional systems
- Wiring—heat pump
- Battery Replacement
- Alerts Screen
- Alerts Codes
- Troubleshooting
- 1-year limited warranty
- FAQs
Wiring—conventional systems
Alternate wiring (conventional systems)
If labels do not match terminals, connect wires as shown below (see notes, below).
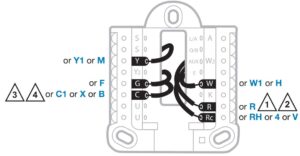
NOTES:
- If you must connect both R and Rc wires, set the R Slider Tab to the down position (2 wires).
- If your old thermostat had both R and RH wires, set the R Slider Tab to the down position (2 wires). Then connect the R wire to the Rc terminal, and the RH wire to the R terminal.
- If your old thermostat had only 1 C or C1 wire, connect it to the C terminal. If your old thermostat had 2 C or C1 wires, wrap each separately with electrical tape and do not connect them.
- C does not power the thermostat display or operations; batteries are always required.
Wiring—heat pump
Connect wires: heat pump
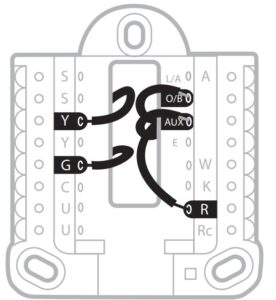
- Match each labeled wire with same letter on new thermostat.
- Insert the wires into the matching terminal.
NOTE: If you have difficulty inserting wires, you may have to press down the terminal push button next to the corresponding terminal.
Labels don’t match?
If labels do not match letters on thermostat, see “Alternate wiring (conventional systems)“ above.
Alternate wiring (for heat pumps only)
- Keep R Slider Tab in the up position (1 wire).
- If your old thermostat had both V and VR wires, stop now and contact a qualified contractor for help.
- If your old thermostat had separate O and B wires, attach the B wire to the C terminal. If another wire is attached to the C terminal, stop now and contact a qualified contractor for help.
- If your old thermostat had Y1, W1 and W2 wires, stop now and contact a qualified contractor for help.
- C does not power the thermostat display or operations; batteries are always
required. - This model doesn’t support the heat pump fault alert (L/A terminal). If this
is desired, please contact a contractor for replacement model.
