Sections in this Manual
- Package Includes:
- Optional Cover Plate installation
- Power options
- Setting Slider Tabs
- Wiring terminal designations
- Thermostat mounting
- System operation settings
- Fan operation settings
- Installer setup (ISU)
- Advanced setup options (ISU)
- Installer system test
- System test / System status
- Electrical Ratings
- Customer assistance
Setting Slider Tabs
Set R Slider Tab.
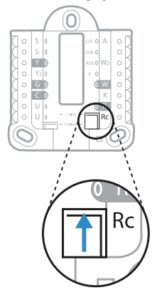
- Use built-in jumper (R Slider Tab) to differentiate between one or two transformer systems.
- If there is only one R wire, and it is connected to the R, Rc, or RH terminal, set the slider to the up position (1 wire).
- If there is one wire connected to the R terminal and one wire connected to the Rc terminal, set the slider to the down position (2 wires).
NOTE: Slider Tabs for U terminals should be left in place for T6 Pro models.
Wiring terminal designations
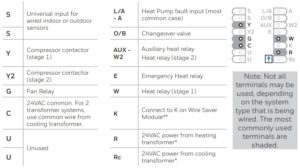
Wiring conventional systems: forced air and Hydronics
1H/1C System (1 transformer)
R Power [1]
Rc [R+Rc joined by Slider Tab] [2]
Y Compressor contactor
C 24VAC common [3]
W Heat relay
G Fan relay
1H/1C System (2 transformers)
Power (heating transformer) [1]
Rc Power (cooling transformer) [1]
Y Compressor contactor
C 24VAC common [3, 4]
W Heat relay
G Fan relay
Heat-only System
R Power [1]
Rc [R+Rc joined by Slider Tab] [2]
C 24VAC common [3]
W Heat relay
Heat-only System with Fan
R Power [1]
Rc [R+Rc joined by Slider Tab] [2]
C 24VAC common [3]
W Heat relay
G Fan relay
Heat-only System (Series 20) [5]
R Series 20 valve terminal “R” [1]
Rc [R+Rc joined by Slider Tab] [2]
Y Series 20 valve terminal “W”
C 24VAC common [3]
W Series 20 valve terminal “B”
Cool-only System
R Power [1]
Rc [R+Rc joined by Slider Tab] [2]
Y Compressor contactor
C 24VAC common [3]
G Fan relay
Heat-only System (power open zone valve) [5]
R Power [1]
Rc [R+Rc joined by Slider Tab] [2]
W Valve
C 24VAC common [3]
2H/2C System (1 transformer) [6]
R Power [1]
Rc [R+Rc joined by Slider Tab] [2]
Y Compressor contactor (stage 1)
C 24VAC common [3]
W Heat relay (stage 1)
G Fan relay
W2 Heat relay (stage 2)
Y2 Compressor contactor (stage 2)
NOTES
Wire specifications: Use 18- to 22-gauge thermostat wire. A shielded cable is not required.
- Power supply. Provide disconnect means and overload protection as required.
- Move R-Slider Tab on UWP to the R setting. For more information, see “Setting Slider Tabs” on page 3
- Optional 24VAC common connection.
- Common connection must come from cooling transformer.
- In ISU set Heat system type to Radiant Heat. Set number of cool stages to 0.
- In Installer Setup, set system type to 2Heat/2Cool Conventional.
Wiring heat pump systems
Shaded areas below apply only to TH6320U/TH6220U or as otherwise noted.
1H/1C Heat Pump System
R Power [1]
Rc [R+Rc joined by Slider Tab] [2]
Y Compressor contactor
C 24VAC common [3]
O/B Changeover valve [7]
G Fan relay
2H/1C Heat Pump System [8]
R Power [1]
Rc [R+Rc joined by Slider Tab] [2]
Y Compressor contactor
C 24VAC common [3]
O/B Changeover valve [7]
G Fan relay Aux Auxiliary heat
E Emergency heat relay
L Heat pump fault input
