The Onn Soundbar has been designed to provide you with an unrivalled sound experience. This manual will guide you through the setup process, and also give you access to all of the features that come packaged with this device. When troubleshooting problems with your device this is a great place to start.
Sections in this Manual
- What’s in the Box?
- Get to Know Your 36” 5.1 SOUNDBAR
- Remote Control Overview
- Using the HDMI IN or HDMI ARC connection
- Using the AUX or Optical Connection
- Bluetooth Connection and 5.1 System Connection
- Using The Bluetooth Connection
- Connection to the Power Outlet
- Product Wall Mounting the first step
- Product Wall Mounting the second step
- Product Wall Mounting the Third Step
- Battery Replacement for the Remote Control the First Step
- Battery Replacement for the Remote Control the Second Step
- Battery Replacement for the Remote Control the Third Step
- Remote Control Operation Range
- Specification
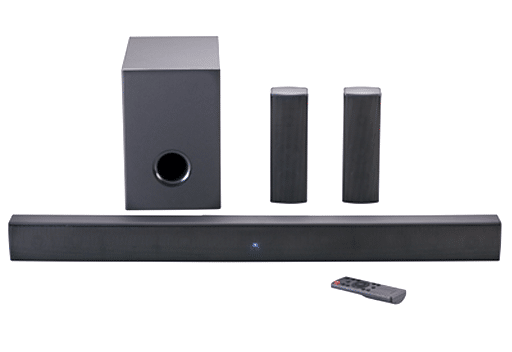
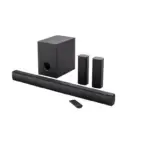
36″ 5.1 Soundbar
What’s in the Box?
Check to make sure you have everything below.

- Main unit
- Subwoofer
- Satellite Speaker x 2
- RCA to RCA Cable x 2
- Remote Control
- Power Cord x 2
- AUX Cable x 1
- HDMI Cable x 1
- Optical Cable x 1
- QSG x 1
- User manual x 1
Get to Know Your 36” 5.1 SOUNDBAR

- LED Indicator
• Red when the unit is in STANDBY mode.
• Lights up yellow in AUX mode.
• Lights up green in OPTICAL mode.
• Lights up blue in BLUETOOTH mode.
• Lights white in HDMI(ARC)mode.
• Lights up orange in HDMI IN mode - Remote Control Sensor
- HDMI IN Port
- HDMI ARC Port
- OPTICAL Port
- AUX IN Port
- AC IN Port
- Button Switches the unit between ON and STANDBY modes
- SOURCE Button - Selects the input source
- VOL- Button - Decreases the volume
- VOL+ Button - lncreases the volume

Remote Control Overview


Using the HDMI IN or HDMI ARC connection
Use an HDMI cable (included) to connect the TV’s HDMI OUT Port to the soundbar’s HDMI IN Port.

HDMI cable (included) length is 1.7m
Please note the soundbar has HDMI CEC function
Use a HDMI to HDMI cable (included) to connect the TV’s HDMI (ARC) port to the soundbar’s HDMI(ARC) port.
HDMI cable (included) length is 1.7m
Using the AUX or Optical Connection
Use a 3.5mm to RCA stereo audio cable (not included) to connect the TV’s audio output Port to the soundbar’s AUX IN port.
Use a 3.5mm to 3.5mm stereo audio cable (included) to connect the TV’s headphone Port to the soundbar’s AUX IN port.

Use an optical cable (included) to connect the TV’s OPTICAL OUT Port to the soundbar’s OPTICAL Port.