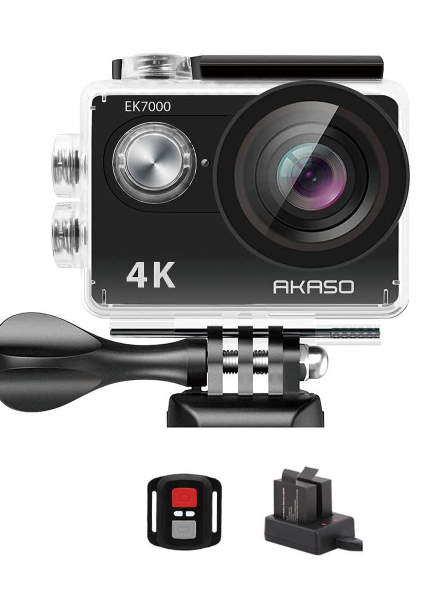
AKASO EK7000 4K30FPS Action Camera Ultra HD Underwater Camera
Specifications
- DIMENSIONS: 0.9 x 2 x 1.5 inches
- WEIGHT: 12 ounces
- WATERPROOF: 98 FT
- VIDEO QUALITY: 4K
- BRAND: Akaso
Akaso EK7000 comes with professional video recording, instant sharing, waterproof and wide-angle features. It features HD 4K video recording and allows you to capture 4K 30FPS/2.7K 30 FPS/1080P 60 FPS videos. It also comes with a splash-proof remote which lets you capture from a distance and switch between video and photo mode. Another important feature of the camera is that it is Wi-Fi enabled. This allows you to connect to the App on your smartphone and preview and offload pictures and videos to your smartphone.
The Akaso Ek7000 is waterproof with a safe depth of 98FT allowing divers and swimmers to capture pictures and videos deep underwater. Conventional cameras have an angle of 120 degrees or 90 degrees, however, the EK7000 has an angle of 170 degrees which is wider and allows you to capture a wider angle view. Apart from these features, it also offers various shooting modes like looking recording, burst photo, and time-lapse.
What’s in the Box?
- 1x AKASO EK7000 Action Camera
- 1x 2.4G Remote Control
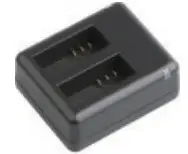
- 2x 1050mAh Battery
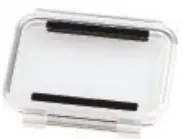
- 1x Waterproof Case
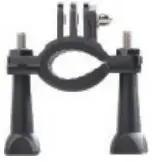
- 1x Bicycle Stand
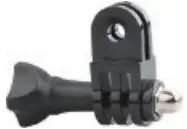
- 7x Mount
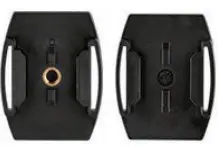
- 2x Clip
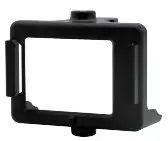
- 1x Helmet Mounts
- 1x Bandages
- 5x Tethers
- 1 x Protective Backdoor
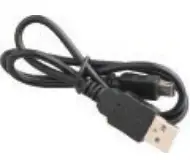
- 1x USB Cable
- 1x AC Charger
- 1x Lens Cloth
- 1x Quick Reference Guide
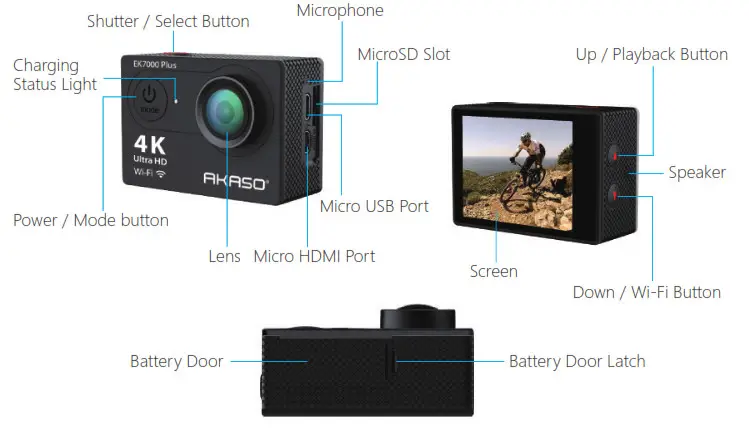
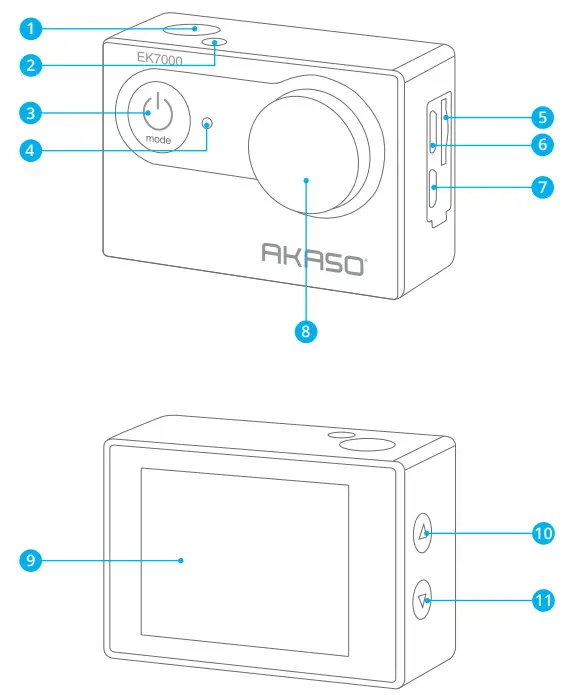
YOUR EK7000
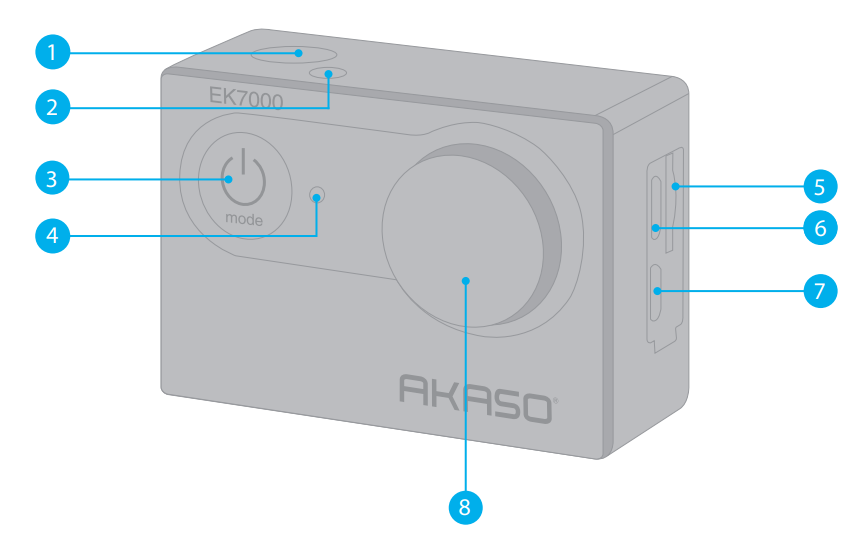
- Shutter / Select Button
- Working / Wi-Fi Indicator
- Power / Mode / Exit Button
- Charging Indicator
- MicroSD Slot
- Micro USB Port
- Micro HDMI Port
- Lens
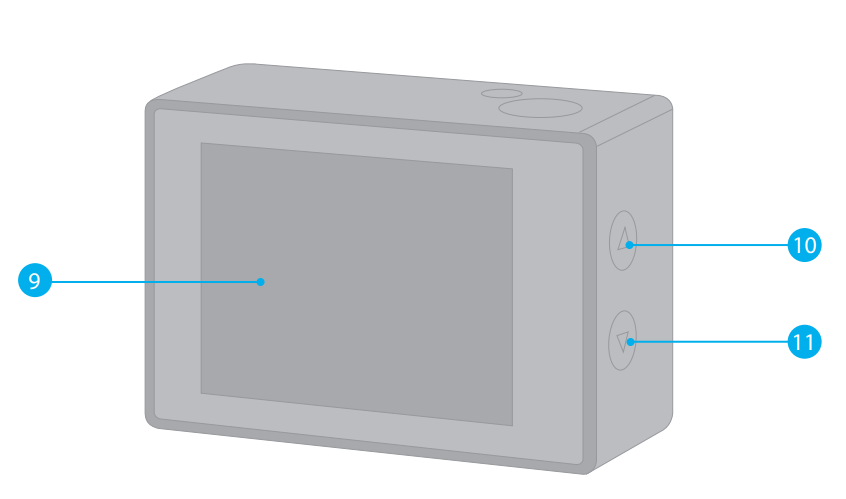
- Screen
- Up Button
- Down / Wi-Fi Button
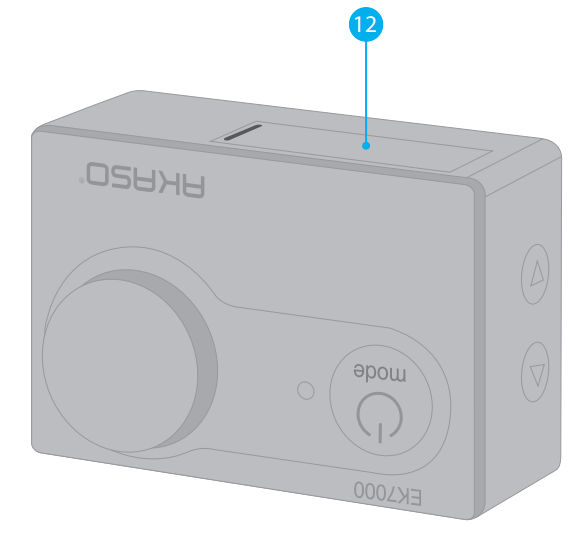
- Battery Door
Note: The camera does not record sound when it is in the waterproof case.
GETTING STARTED
Welcome to your new EK7000. To capture video and photos, you need a microSD card (sold separately).
MICR SD CARDS
Use brand name memory cards that meet these requirements:
- MicroSD, microSDHC, or micr SDXC
- Class 10 or UHS-I rating
- Capacity up to 32GB (FAT32)
Note:
- Please format the microSD card first in this camera before using. To keep your microSD card in good condition, reformat it on a regular basis. Reformatting erases all of your content, so be sure to offload your photos and videos first.
- FAT32 format microSD card stops recording when the storage of each file is over 4GB and starts to record again on a new file.
POWERING ON AND OFF
- To Power On:
Press and hold the Mode button for three seconds. The camera beeps while the camera status lights light. When information appears on the LCD display or the camera status screen, your camera is on. - To Power Off:
Press and hold the Mode button for three seconds. The camera beeps while the camera status lights are off.
SWITCHING MODE
- To Switch Mode:
Press the Mode button to switch the mode. - To Exit Mode:
Press the Mode button to exit mode.
TURNING ON / OFF Wi-Fi
- To turn on Wi-Fi
Turn on the camera, and press the Down button to turn on Wi-Fi. - To turn off Wi-Fi
Press the Down button to turn off Wi-Fi.
OVERVIEW OF MODES
There are 5 modes: Video, Photo, Burst Photo, Time Lapse, and Setting.
Video Mode
Video Mode is the default mode when you turn on the camera. In Video Mode, press the Shutter button, and the camera starts recording the video. Press the Shutter button to stop recording the video.
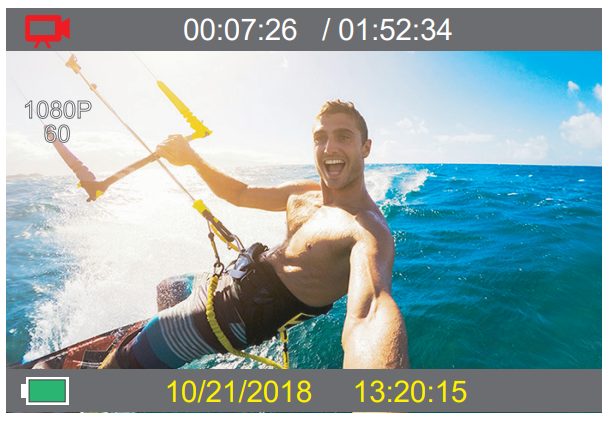
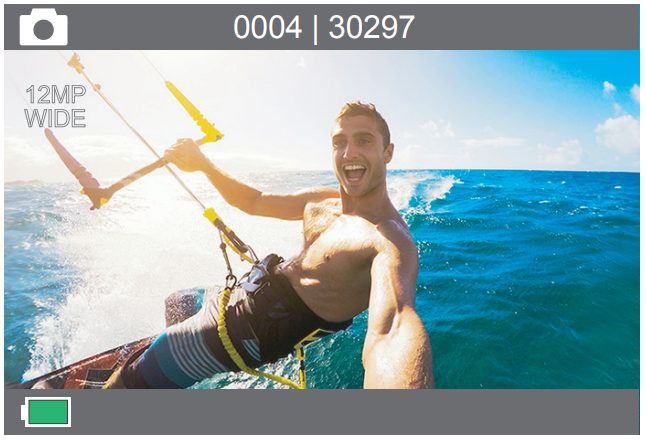
Photo Mode
Press the Mode button once to switch to Photo Mode after you turn on the camera. In Photo Mode, press the Shutter button, and the camera takes a photo.
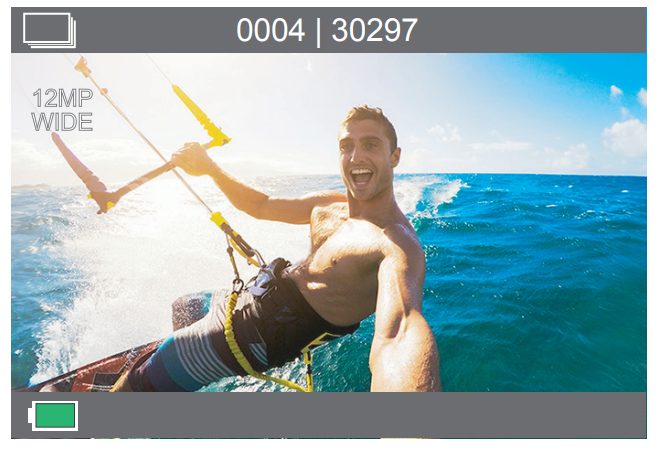
Burst Photo Mode
Press the Mode button several times to switch to Burst Photo Mode. In Burst Photo Mode, press the Shutter button, and the camera takes 3 photos per second.
Time Lapse Photo Mode
Press the Mode button several times to switch to Time Lapse Photo Mode. In Time Lapse Photo Mode, press the Shutter button, and the camera takes a series of photos at 3s / 5s / 10s intervals.

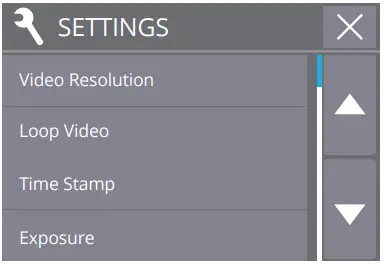
Settings
Press Mode Button several times to switch to settings mode. Press the UP or Down button to cycle through options and press the Shutter Button to select the desired option.

CUSTOMIZING YOUR EK7000
Settings
- Video Resolution: 1080P 60FPS, 1080P 30FPS, 4K 25FPS, 2.7K 30FPS, 1080P 60FPS,
720P 120FPS, 720P 60FPS
Default setting is 1080P 60FPS. - Looping Record: Off / On
The default setting is off.
Loop recording allows your camera to overwrite old files with new files. Once the memory card becomes full, the camera will delete the first video file to make room for the latest file. - Time Stamp: Off, Date, Date & Time
The default setting is Date & Time.
If you turn on Time Stamp, this camera adds a timestamp to the videos or photos you take. If you select Off, this camera will not add a time stamp to the videos or photos you take - Exposure: -2.0, -1.7, -1.3, -1.0, -0.7, -0.3, 0.0, +0.3, +0.7, +1.0, +1.3, +1.7, +2.0
The default setting is 0.0.
By default, your camera uses the entire image to determine the appropriate exposure level. However, Exposure lets you select an area that you want the camera to prioritize when determining exposure. This setting is particularly useful in shots where an important region might otherwise be over-or underexposed.
When you change this setting, the LCD display immediately shows you the effect on your image. If you change modes, the camera returns to using the entire scene to determine the correct level of exposure. - Photo Resolution: 12MP, 8MP, 5MP, 4MP
Default setting is 12MP. - Burst Photo: 3 Photos
Burst captures up to 3 photos in 1 second, so it is perfect for capturing fast-moving activities. - Time Lapse: 2s, 3s, 5s, 10s, 20s, 30s, 60s
Default setting is 3s.
Time Lapse Photo captures a series of photos at specified intervals. Use this mode to capture photos of any activity, then choose the best ones later. - Continuous Lapse: OFF / ON
Default setting is Off.
Turn on Continuous Lapse, this camera takes continuous lapse photo. - Power Frequency: 50Hz, 60Hz, Auto
The default setting is 50Hz. - Language: English, 繁體中文, Italiano, Español, Português, Deutsch, Dutch, Français, Čeština, Polski, Türk, Pyccкий, Romaña, 日本語, Thai,
The default setting is English. - Date & Time: YY / MM / DD HH: MM
Note: If you replace the battery, the date and time will reset. - Sounds Indicator
Shutter: On / Off
Start-up: On / Off
Beep: On / Off
The default setting is on.
Sets the volume of your EK7000’s alerts.
Volume: 0, 1, 2, 3
Default setting is 3.
This option lets you adjust the volume. Press Shutter button to adjust the volume. - Upside Down: Yes / No
Default setting is No.
This setting determines the orientation of your video or photos to help you prevent upside down footage. - Screen Saver: OFF, 1min, 3min, 5min
Default setting is 1min.
Turns off the LCD display after a period of inactivity to save battery life. To turn on the LCD display again, press any button on the camera. - Power Save: OFF, 1 min, 3 min, 5 min
Default setting is 3 min.
Powers off your EK7000 after a period of inactivity to save battery life. - Format: No / Yes
To keep your microSD card in good condition, reformat it on a regular basis. Reformatting erases all of your content, so be sure to offload your photos and videos first.
To reformat your card, press the mode button several times to enter Camera Setting, then press down button several times to enter Format and select Yes. - Reset: No / Yes
This option resets all settings to their default values. - Version|You can check the model and updated time of your EK7000.
CONNECTING TO THE ISMART DV APP
The iSmart DV app lets you control your camera remotely using a smartphone or tablet. Features include full camera control, live preview, playback and sharing of content.
- Download the iSmart DV app to your mobile device from the Apple App Store or Google Play.
- Turn on the camera, then press the Down button to turn on Wi-Fi.
- Turn on the Wi-Fi of your mobile device, and connect to the Wi-Fi SSID ‘iCam-AKASO’.
- Enter the password: 1234567890.
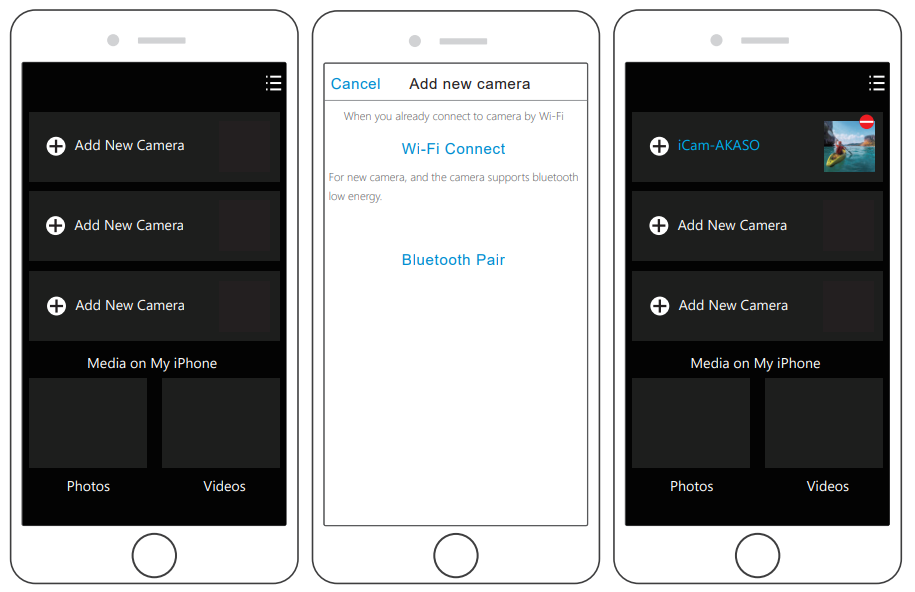
- Open the app iSmart DV.
- Tap ‘Add new camera’.
- Tap ‘Wi-Fi Connect’
Note: Press the Down button if you want to turn off Wi-Fi.
PLAYING BACK YOUR CONTENT
You can playback your content on the camera’s LCD display, your computer, TV, or smartphone/tablet. You can also playback content by inserting the microSD card directly into a device, such as a computer or compatible TV. With this method, playback resolution depends on the resolution of the device and its ability to playback that resolution.
VIEWING VIDEOS AND PHOTOS ON YOUR EK7000
- Turn on the camera to enter Video or Photo mode.
- Press the Up button in video or photo mode to enter playback mode. If you press the Up button in playback mode, the camera will exit playback mode.
- Press the Down button, then the Shutter button to open the video or photo in full-screen view.
- Press the Up or Down button to playback photos. Press the Up or Down button, then the Shutter button to playback videos.
- To exit the video or photo files, press the Mode button.
Note: If your micro-SD card contains a lot of content, it might take a minute for it to load.
DELETING VIDEOS AND PHOTOS ON YOUR EK7000
- Turn on the camera to enter Video or Photo mode.
- Press the Up button in video or photo mode to enter playback mode. If you press the Up button in playback mode, the camera will exit playback mode.
- Press the Down button, then the Shutter button to open the video or photo in full-screen view.
- Press the Up or Down button to locate the file you want to delete.
- Press and hold the Shutter button for 3 seconds. The screen shows ‘Delete this file? Yes No’
- Press the Up button, then the Shutter button, the selected file will be deleted.
OFFLOADING YOUR CONTENT
OFFLOADING YOUR CONTENT TO A COMPUTER
To playback your video and photos on a computer, you must first transfer these files to a computer. Transferring also frees up space on your microSD card for new content. To offload files to a computer using a card reader (sold separately) and your computer’s file explorer, connect the card reader to the computer, then insert the microSD card. You can then transfer files to your computer or delete selected files on your card. Note that you must use a card reader to offload photos or audio files.
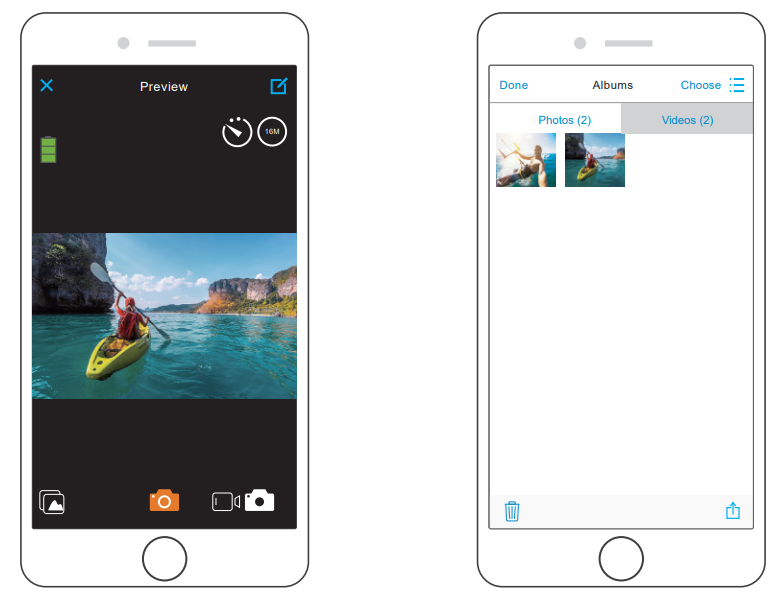
OFFLOADING YOUR CONTENT TO A SMARTPHONE OR TABLET
- Connect to the iSmart DV app.
- Open the iSmart DV app.
- Tap ‘iCam-AKASO’ at the top of the screen.
- Tap the file icon at the left corner of the bottom screen.
- Tap ‘Choose’
- Tap the files you want to save.
- Tap at the right corner of the bottom screen. The screen shows ‘Confirm Download’.
- Tap ‘Confirm Download’.
- Tap ‘Save Images’.
Note:
- If you cannot offload videos or photos to your iPhone or iPad, please enter Setting -> Privacy -> Photos, find “iSmart DV” and select “Read and Write”.
- You cannot download 4Kor 2.7K video to iPhone and iPad via the Wi-Fi app. Please offload 4Kor 2.7K videos via card reader.
REFORMATTING YOUR MICROSD CARD
To keep your microSD card in good condition, reformat it on a regular basis. Reformatting erases all of your content, so be sure to offload your photos and videos first.
- Turn on the camera.
- Press the Mode button four times, then the Shutter button to enter Camera Setting.
- Press the UP or Down button to locate the ‘Format’ option.
- Press the Shutter button, the screen shows ‘No/Yes.’
- Press the Down button then the Shutter button. The screen shows ‘Waiting’ then ‘Completed’. Then you format your microSD card successfully.
MAINTENANCE YOUR CAMERA
Follow these guidelines to get the best performance from your camera:
- For best audio performance, shake the camera or blow on the mic to remove debris from the microphone holes.
- To clean the lens, wipe it with a soft, lint-free cloth. Do not insert foreign objects around the lens.
- Don’t touch the lens with your fingers.
- Keep the camera away from drops and bumps, which may cause damage to the parts inside.
- Keep the camera away from high temperatures and strong sunshine to avoid being damaged.
MAXIMIZING BATTERY LIFE
A message appears on the touch display if the battery drops below 10%. If the battery reaches 0% while recording, the camera saves the file and powers off.
To maximize battery life, follow these guidelines when possible:
- Turn off Wireless Connections
- Capture video at lower frame rates and resolutions
- Use Screen Saver setting.
BATTERY STORAGE AND HANDLING
The camera contains sensitive components, including the battery. Avoid exposing your camera to very cold or very hot temperatures. Low or high-temperature conditions may temporarily shorten the battery life or cause the camera to temporarily stop working properly. Avoid dramatic changes in temperature or humidity when using the camera, as condensation may form on or within the camera. Do not dry the camera or battery with an external heat source such as a microwave oven or hairdryer. Damage to the camera or battery caused by contact with the liquid inside the camera is not covered under the warranty. Do not store your battery with metal objects, such as coins, keys or necklaces. If the battery terminals come in contact with metal objects, this may cause a fire. Do not make any unauthorized alterations to the camera. Doing so may compromise the safety, regulatory compliance, and performance, and may void the warranty.
WARNING: Do not drop, disassemble, open, crush, bend, deform, puncture, shred, microwave, incinerate or paint the camera or battery. Do not insert foreign objects into the battery opening on the camera. Do not use the camera or the battery if it has been damaged – for example, if cracked, punctured or harmed by water. Disassembling or puncturing the battery can cause an explosion or fire.
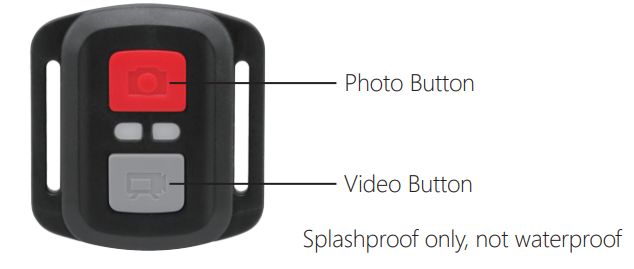
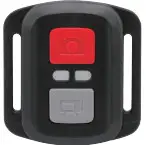
REMOTE
VIDEO
To record Video, verify the camera in Video mode.
To start recording:
Press the Grey Video Button. The camera will emit one beep and the camera light will flash while recording.
To stop recording:
Press the Grey Video Button again. The camera will emit one beep and the camera light will stop flashing while recording.
PHOTO
To capture a photo, verify the camera in Photo mode.
To take a photo:
Press the Red Photo Button. The camera will emit a camera shutter sound.
CR2032 BATTERY REPLACEMENT FOR EK7000 REMOTE
- Use a 1.8mm Phillips tip screwdriver to remove the 4 screws on the back cover of the remote, allowing you to open it.
- Remove another 4 screws on the PCB board.
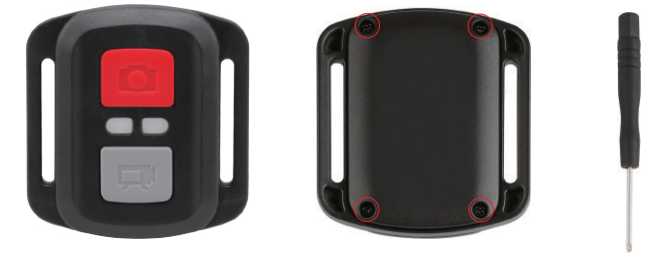
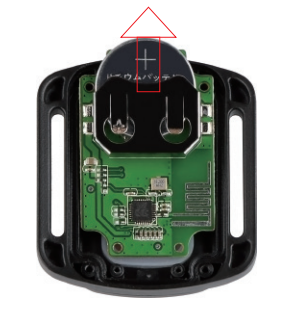
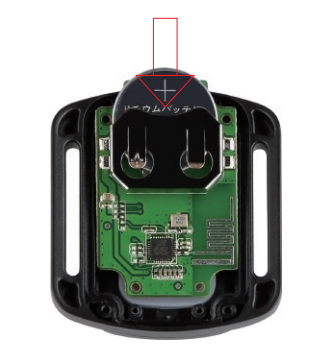
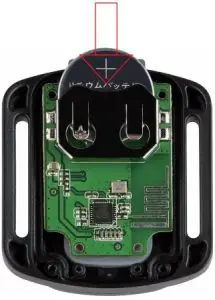
- Lift the PCB board and slide out the battery, as shown in the picture.
Note: Do NOT rotate the PCB board to avoid reversing the camera and video button functions.
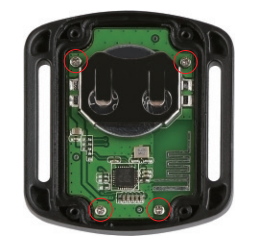
- Install the new battery, keeping the “+” pole facing up.
- Install all 4 screws back onto the PCB board.
- Install all 4 screws back into the cover.
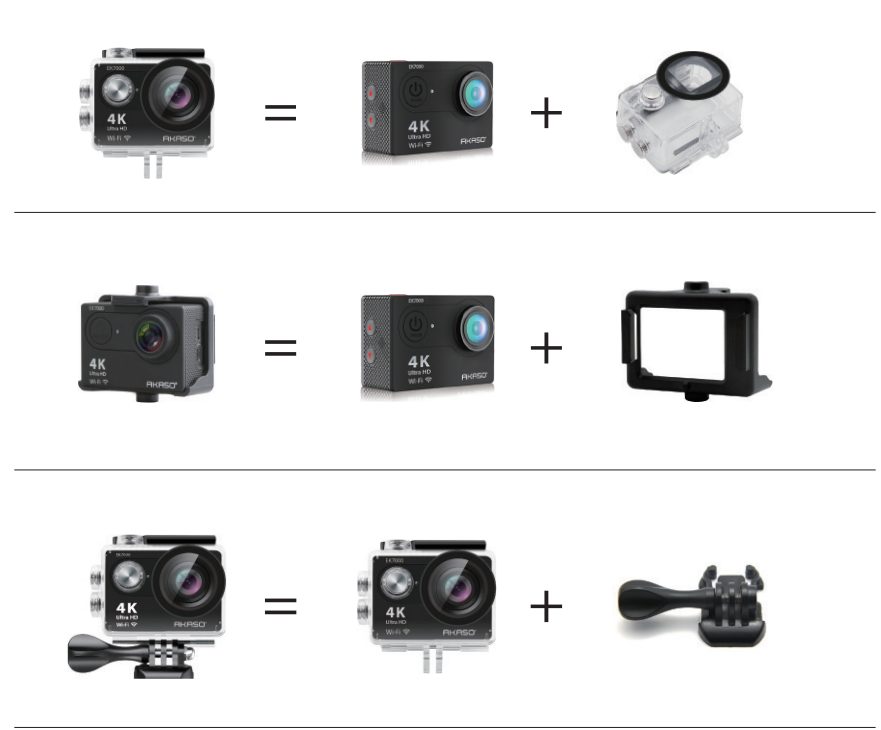
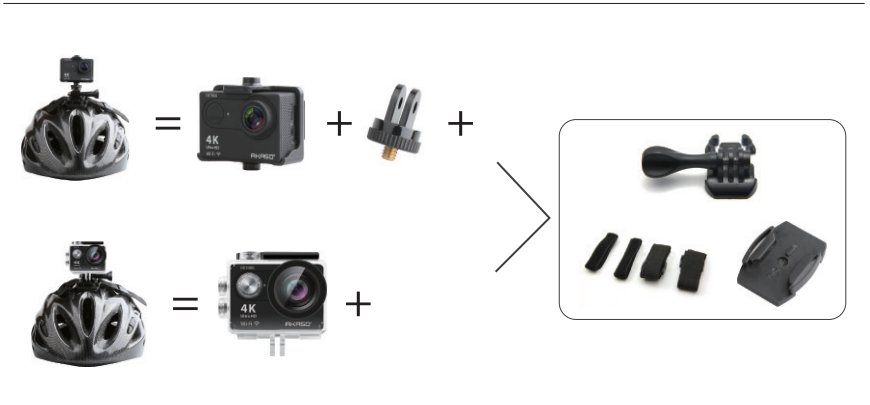
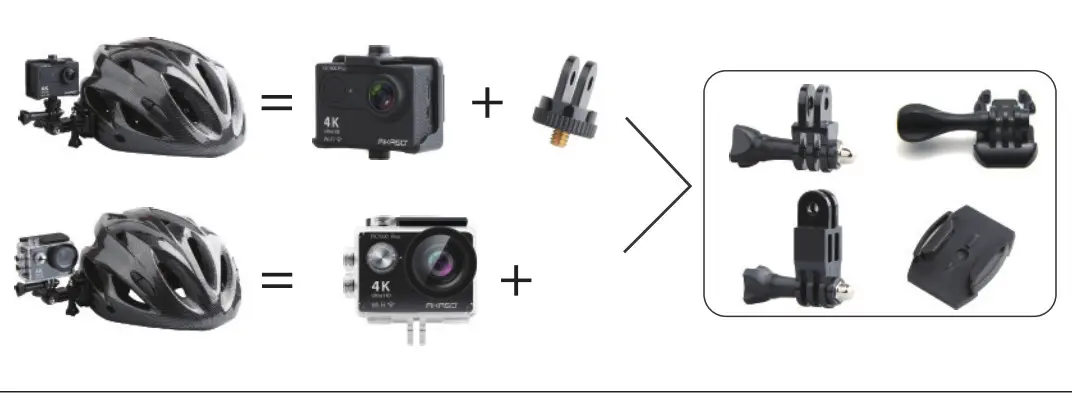
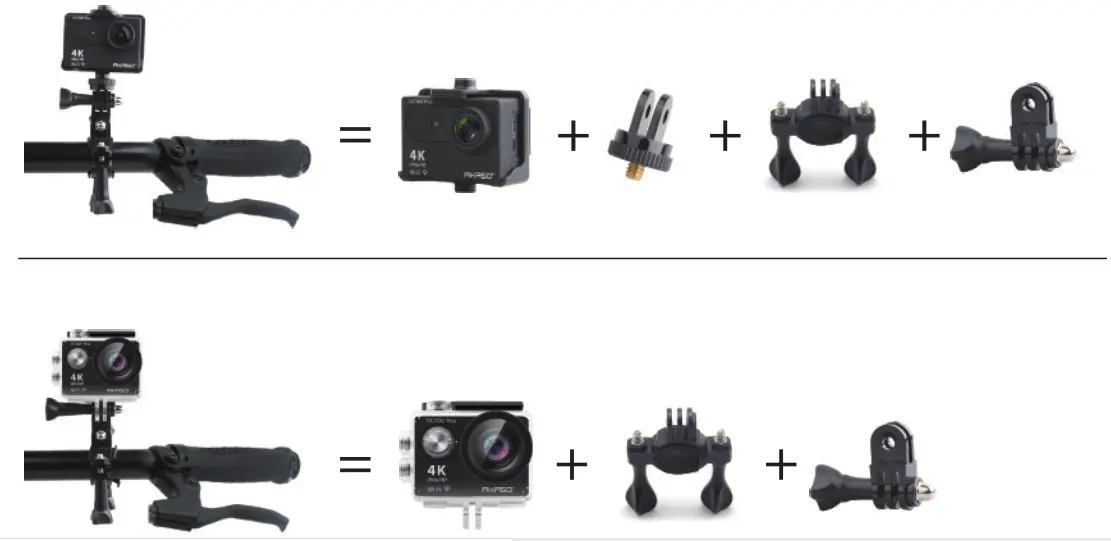
MOUNTING YOUR CAMERA
Attach your camera to helmets, gear, and equipment.

FREQUENTLY ASKED QUESTIONS
- Does this work with go pro mounts?
Yes, it fits some of the GoPro mounts. Link to SD card it takes?
Yes, it can handle a 256gb Micro SDXC card. - Does it come with a bicycle mount?
Yes, it comes with a bicycle mount. - Akaso ek7000 4k action camera can this camera be connected to the external power supply via USB?
Yes, it can be connected to the external power supply - I am a drummer. Can this camera handle loud volumes without distorting the sound?
- Yes, it can handle loud volumes, however, the mic quality isn’t really high.
- Is there a head mount strap that you can buy?
It comes with a head mount strap. - Does the EK 7000 have zoom capability?
No, it doesn’t have zoom capability. - What kind of SD card works? Does any micro-SD work?
Yes, any kind of micro-SD card works. - Does this camera have a setting for auto-deleting oldest footage when SD card storage is full?
- No, it doesn’t have such a setting.
- Does this camera have audio?
- Yes, it has a built-in microphone but doesn’t have its self-play audio.
AKASO V50 Elite Action Camera User Manual

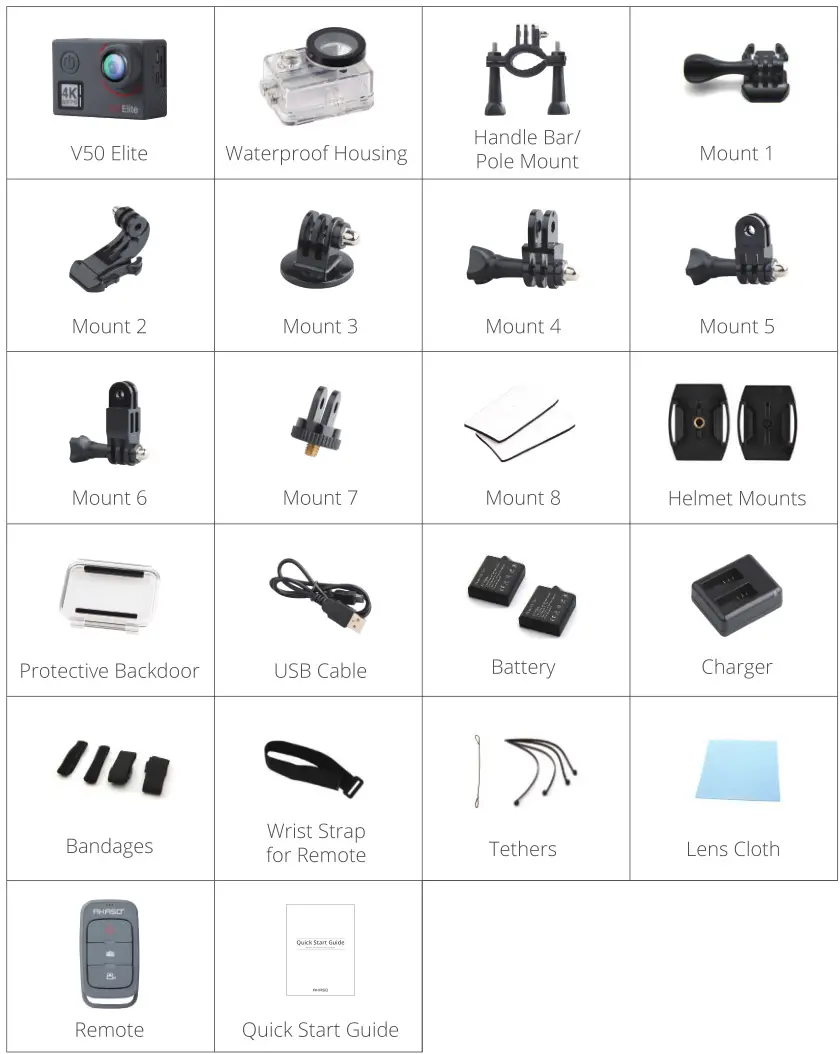
WHAT’S IN THE BOX
YOUR V50 ELITE
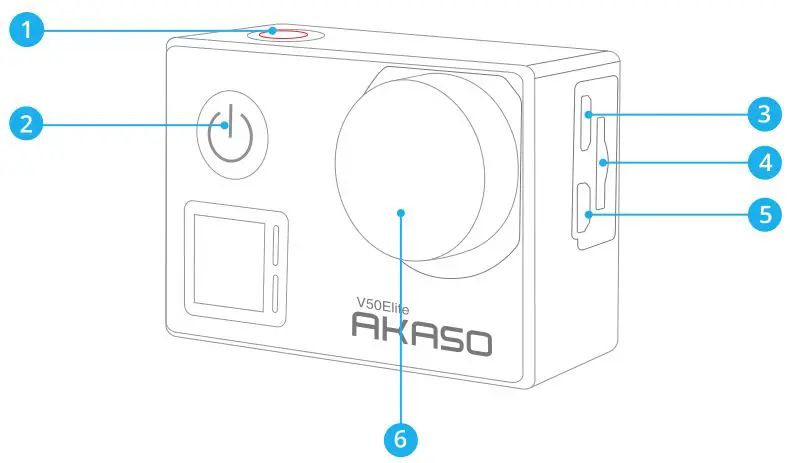

- Shutter/Wifi/Select Button
- Power/Mode/Exit Button
- Micro USB Port
- microSD Slot
- Micro HDMI Port
- Lens
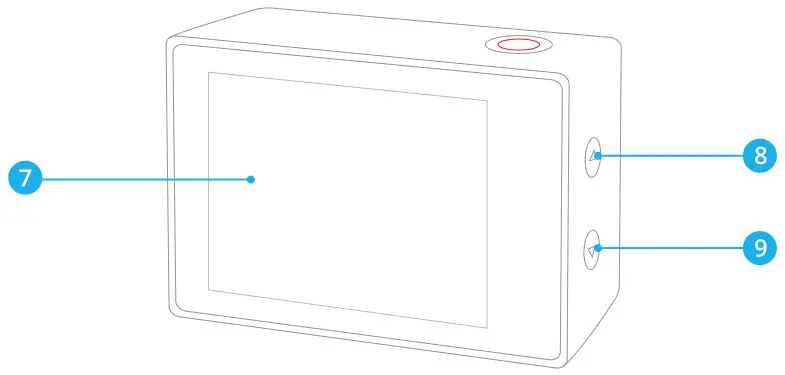
- Touch Screen
- Up Button
- Down Button
- Tripod Hole
- Battery Door
Note: The camera does not record sound when it is in the waterproof case.
GETTING STARTED
Welcome to your AKASO V50 Elite. To capture videos and photos, you need a microSD card (sold separately).
MICROSD CARDS
Use brand name memory cards that meet these requirements:
- microSD, microSDHC, or microSDXC
- UHS-3 rating only
- Capacity up to 64GB
Note:
- Please format the microSD card first in this camera before using. To keep your microSD card in good condition, reformat it on a regular basis. Reformatting erases all of your content, so be sure to offload your photos and videos first.
- FAT32 and exFAT format microSD card stops recording when the storage of each file is over 4GB and starts to record again on a new file.
POWERING ON + OFF
To Power On
Press and hold the Mode button for three seconds. The camera beeps while the camera status light is on. When information appears on the LCD display or the camera status screen, your camera is on.
To Power Off:
Press and hold the Mode button for three seconds. The camera beeps while the camera status light is off.
SWITCHING MODE
To Switch Mode: Press the Mode button after you turn on the camera, you can switch the mode.
To Exit Mode: Press the Mode button to exit mode.
TURNING ON/OFF Wifi
To turn on Wifi
Turn on camera, in Video or Photo Mode press and hold Wifi button for three seconds to turn on Wifi.
To turn off Wifi
Press and hold Wifi button for three seconds to turn off Wifi.
TURNING ON/OFF BT
To turn on BT
Turn on camera, in Video or Photo Mode press and hold Down button for three seconds to turn on BT.
To turn off BT
Press Mode button to turn off BT.
OVERVIEW OF MODES
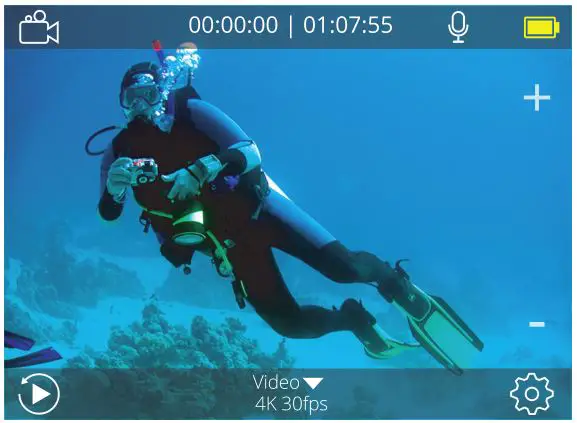
There are 6 modes: Video, Time Lapse Video, Slow Motion, Photo, Time Lapse Photo and Setting.
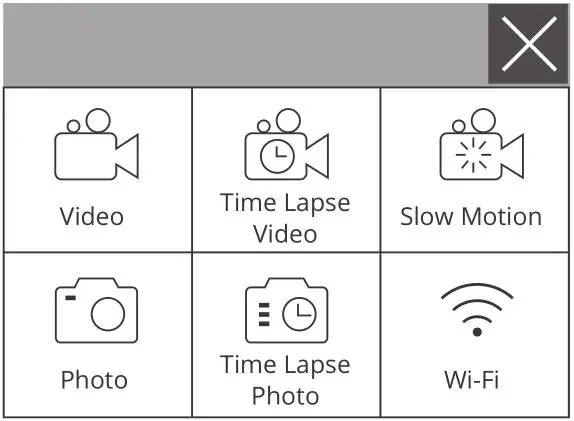
Video Mode
Video Mode is the default mode when you turn on the camera. In Video Mode, press Shutter button, the camera starts recording video. Press Shutter button to stop recording video.
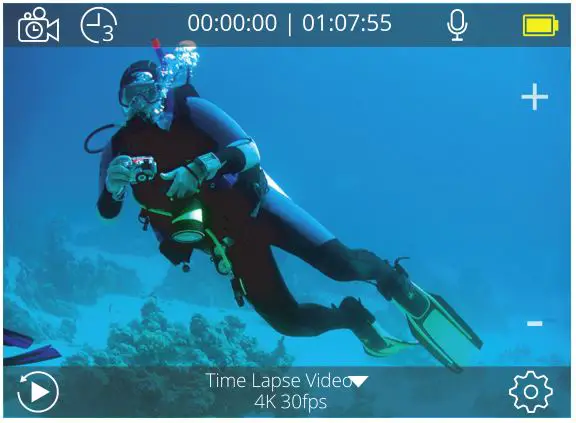
Time Lapse Video Mode
In Time Lapse Video Mode, press Shutter button, the camera takes video at 1 Sec/ 3 Sec/5 Sec/10 Sec/30 Sec/1 Min intervals.
Slow Motion Mode
In Slow Motion Mode, Press Shutter button, the camera takes slow motion video.
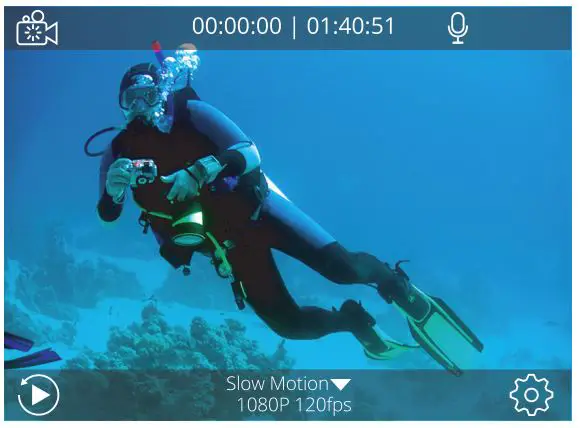
Photo Mode
Press Mode button once to switch to Photo Mode after you turn on camera. In Photo Mode, press Shutter button, the camera takes a photo.

Time Lapse Photo Mode
In Time Lapse Photo Mode, press Shutter button, the camera takes a serial of photos at 3 Sec/5 Sec/10 Sec/30 Sec/1 Min intervals.

Setting Mode
Press and hold Up button for 3 seconds to enter Setting Mode.
CUSTOMIZING YOUR V50 ELITE
Video Setting
1. Video Resolution: 4K 60FPS, 4K 30FPS, 2.7K 60FPS, 2.7K 30FPS, 1080P 120FPS, 1080P 60FPS, 1080P 30FPS, 720P 240FPS, 720P 120FPS, 720P 60FPS Default setting is 4K 30FPS.
Note: When capturing video at high resolutions or high frame rates in warm ambient temperatures, the camera may become warm and use more power.
2. Video Encoder: H.264/H.265
Default setting is H.264.
A video codec is an electronic circuit or software that compresses or decompresses digital video. It converts uncompressed video to a compressed format or vice versa. According to multiple studies, HEVC, High Efficiency Video Coding (H.265) should deliver up to 50% better compression than H.264 in video on demand (VOD) applications, which means better quality at half the bit rate. In live encoding, which obviously has to be performed in real time, the initial expectations are a 35% bandwidth reduction at similar quality levels. Alternatively, HEVC can also enable larger resolution movies, whether 2K or 4K. In addition, encoding existing SD and HD content with HEVC rather than H.264 will add to cost savings and/or the ability to stream higher quality video to lower bit rate connections.
3. Image Stabilization: On/Off
Default setting is Off.
This setting adjusts the footage to offset for motion during capture. The result is smoother footage, especially in activities with relatively small but fast motion including cycling, motorcycling, and handheld uses.
Note: Image Stabilization is disabled when you select 4K 60FPS, 2.7K 60FPS, 1080P 120FPS or all 720P video resolution.
4. Loop Recording: Unlimited/2 Min/3 Min/5 Min
Default setting is Unlimited.
Using Loop Recording, you can continuously record video, but save only the moments that you want. For example, if you select a 5-minute interval, only the previous 5 minutes are saved when you press the Shutter button to stop recording. If you record for 5 minutes and do not press the Shutter button to stop recording and save, the camera records a new 5-minute interval by recording over your previous 5 minutes of footage. When the microSD card is full, the new files will cover the old one if loop recording is on.
Note: Loop Recording is disabled when Image Stabilization is on.
5. Time Lapse Interval: Off/1 Sec/3 Sec/5 Sec/10 Sec/30 Sec/1 Min
Default setting is Off.
Time Lapse Video creates video from frames captured at specific intervals. This option lets you capture a time lapse event and immediately view or share it as a video. Time Lapse Video is captured without audio. Select 3 seconds means recording 3 seconds to get one frame per second.
For example: If you select 4K 30FPS and 3 seconds, you need to record 90 seconds, then you can get 1 second video for 4K 30FPS. Note: Time Lapse Video is disabled when Image Stabilization is on.
6. Time Lapse Duration: Unlimited/5 Min/10 Min/15 Min/20 Min/30 Min/60 Min
Default setting is Unlimited.
Note: If you want to set Time Lapse Duration, please turn on Time Lapse Interval first.
7. Slow Motion Movie: On/Off
Default setting is Off.
Slow motion is an effect in film-making whereby time appears to be slowed down.
Note: Please select 1080P 120FPS, 720P 240FPS or 720P 120FPS when you want to record slow motion movie.
8. Fast Motion Movie: Off/2x/4x/6x/10x/15x
Default setting is Off.
Action that appears to move faster than normal on the screen, accomplished by filming the action at less than normal speed in the camera and then projecting it at normal speed.
9. Wind Noise Reduction: On / Off
Default setting is Off.
Turn on Wind Noise Reduction, it can lower the noise to an acceptable level.
10. Angle: Wide/Medium/Narrow
Default setting is Wide.
The angle refers to how much of the scene can be captured through the camera lens. Wide angle captures the largest amount of the scene, while Narrow angle captures the least.
Note: Medium and Narrow is disabled when Image Stabilization is on.
11. Sound Record: On/Off
Default setting is On.
Turn off Sound Record, the camera does not record audio when you record video.
12. Auto Low Light: On/Off
Default setting is Off.
Auto Low Light mode will automatically adjust settings according to lighting conditions to achieve the best low light performance. Even if you move back and forth between bright and dark environments, you do not need to manually adjust the camera settings.
Note: Auto Low Light is disabled when you select 4K 60FPS, 4K 30FPS, 2.7K 60FPS or 2.7K 30FPS video resolution.
13. Drive Mode: On/Off
Default setting is Off.
If you turn on Drive Mode and connect camera with car cigarette lighter, the camera will turn on automatically if you start your car and will turn off if you stop your car.
14. Video Scene Mode: Manual, Water, Riding, Winter, Diving, Night
Default setting is Manual.
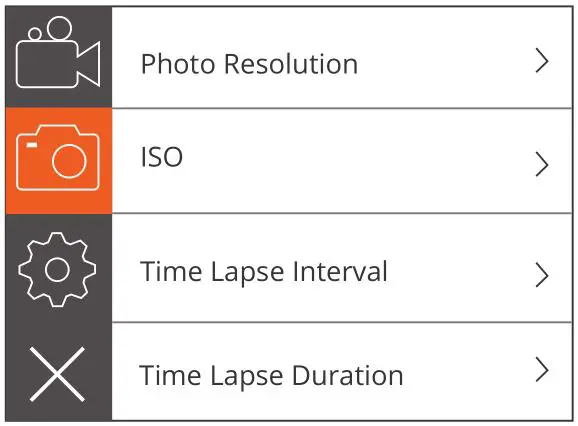
Photo Setting
1. Photo Resolution: 20MP/16MP/12MP/10MP/8MP/5MP
Default setting is 20M.
2. ISO: Auto / 100 / 200 / 400 / 800 / 1600 / 3200
Default setting is Auto.
ISO determines the camera’s sensitivity to light, and creates a trade-off between brightness and resulting image noise. Image noise refers to the degree of graininess in the image.
3. Time Lapse Interval: Unlimited/3 Sec/5 Sec/10 Sec/30 Sec/1 Min
Default setting is Unlimited.
Time Lapse Photo captures a series of photos at specified intervals. Use this mode to capture photos of any activity, then choose the best ones later.
Note: Time Lapse Photo is disabled when Burst Photo is on.
4. Time Lapse Duration: Unlimited/5 Min/10 Min/15 Min/20 Min/30 Min/60 Min
Default setting is Unlimited.
Note: If you want to set Time Lapse Duration, please turn on Time Lapse Interval first.
5. Night Lapse: On/Off
Default setting is Off.
Captures a series of photos at specific intervals and exposure times. Use Night Lapse in low light environments, such as when capturing the night sky over a period of time.
6. Burst Photo: Off, 3 shots/1s, 7 shots/2s, 15 shots/4s, 30 shots/8s
Default setting is Off.
Burst captures up to 30 photos in 8 seconds, so it is perfect for capturing fastmoving activities.
7. Delay Timer: Off/Delay 3s/Delay 5s/Delay 10s/Delay 20s
Default setting is Off.
A delay timer gives a delay between pressing the shutter release and the shutter’s firing. It is most commonly used to let photographers to take a photo of themselves (often with family).
8. Long Exposure: Off/1 Sec/2 Sec/5 Sec/8 Sec/30 Sec/1 Min
Default setting is Off.
Long exposures are easiest to accomplish in low-light conditions, but can be done in brighter light using neutral density filters or specially designed cameras.
Note: Long Exposure is disabled when Burst Photo is on.
9. RAW: On/Off
Default setting is Off.
10. Photo Scene Mode: Manual, Indoor, Outdoor, Portrait, Landscape, Night
Default setting is Manual.
Camera Setting
1. Sounds
Shutter: On/Off
Boot-up: On/Off
Beep: On/Off
Volume: 0/1/2/3 Default setting is 2.
Default setting is on.
You can turn on or off the shutter, boot-up, beep sounds.
2. BT: On/Off (Remote)
Default setting is Off.
You can also hold and press Down button for three seconds to turn on BT. Press Mode button to turn off BT.
3. Distortion Calibration: On/Off
Default setting is Off.
Turn on Distortion Calibration, it can correct the image distortion.
Note: Distortion Calibration is disabled when you select 4K 60FPS video resolution.
4. Special Effect: None, Black&White, Sepia, Vivid, Natural, Negative, Warm, Cold, Red, Green, Blue
Default setting is None.
5. Diving Mode: On/Off
Default setting is Off.
Turn on Diving Mode, it can compensate for the lack of red light in underwater scenes. Diving Mode is designed to be used in tropical and blue water, optimized for use between 10 and 80 feet.
6. Date Stamp: Off/Date/Date&Time
Default setting is Off. If you select Date&Time, this camera adds date and time to the video or photos you take.
Note: Date Stamp is disabled when Image Stabilization is on.
7. Date & Time
Default setting is MM/DD/YY HH/MM/SS
8. Screen Saver: Off/30 Sec/1 Min/2 Min
Default setting is 1 Min.
Turns off the LCD display after a period of inactivity to save battery life. To turn on the LCD display again, press any button on the camera.
9. Auto Power Off: Off/1 Min./2 Min.
Default setting is 2 Min.
Powers off your V50 Elite after a period of inactivity to save battery life.
10. Power-on Auto Record: On/Off
Default setting is Off.
If you turn on Power-on Auto Record, the camera records video automatically after you turn on V50 Elite.
11. Power Frequency: 50Hz/60Hz
Default setting is 50Hz.
12. White Balance: Auto/Daylight/Cloudy/Tungsten Light/White Fluorescent/
Default setting is Auto.
White Balance lets you adjust the color temperature of videos and photos to optimize for cool or warm lighting conditions. When you change this setting, the LCD display immediately shows you the effect on your image.
13. Exposure: -2.0/-1.0/+0.0/+1.0/+2.0
Default setting is +0.0.
By default, your camera uses the entire image to determine the appropriate exposure level. However, Exposure lets you select an area that you want the camera to prioritize when determining exposure. This setting is particularly useful in shots where an important region might otherwise be over-or underexposed. When you change this setting, the LCD display immediately shows you the effect on your image. If you change modes, the camera returns to using the entire scene to determine the correct level of exposure.
14. Reset Wifi Setting: Yes/No
Default setting is No.
This option can erase the Wifi data of V50 Elite.
15. Language: English, Português, , Deutsch, Italiano, Español, Français
Default setting is English.
16. Format Card: Yes/No
Default setting is No.
To keep your microSD card in good condition, reformat it on a regular basis. Reformatting erases all of your content, so be sure to offload your photos and videos first. To reformat your card, please enter Camera Setting, then press Up or Down button to scroll through the options to locate `Format Card’ option, press shutter button ¹Up button ¹Shutter button.
17. System
Default Setting: Yes/No
System Info: V50 Elite: YYYYMMDD-V2
Card Info: Capacity/Free Space
Default Setting option resets all settings to their default values.
System Info option let you check the model, version and updated time of your V50 Elite. Card Info option let you check the capacity and free space of your microSD card.
Some functions cannot be used at the same time. Please refer to the information below.

CONNECTING YOUR V50 ELITE WITH REMOTE
- Turn on camera.
- Press and hold the Down button for three seconds to turn on BT. The screen shows “BT ON” ¹ “Scanning”.
Note: You can also go to Camera Setting to turn on BT. - Press and hold the Power button for three seconds to turn on remote. The remote indicator flashes every second during connecting.
- The camera screen shows “Connected”. Remote indicator remains on after V50 Elite connects with remote successfully.
Note: Photo indicator flashes when you take a photo. Video indicator flashes two seconds during video recording.
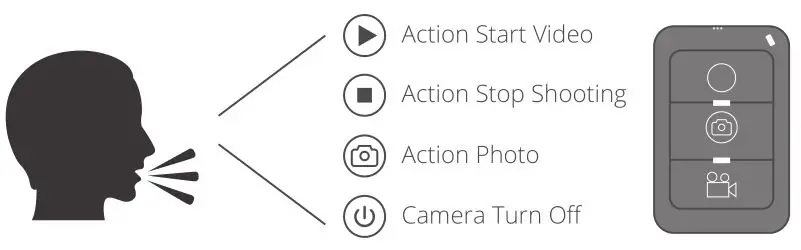
CONTROLLING YOUR V50 ELITE WITH YOUR VOICE
You can control your V50 Elite with your voice using a set of specific commands (see list below).
Note: Voice Control performance may be impacted by distance, wind, and noisy conditions. Keep the product clean and clear of debris.
USING VOICE CONTROL
Voice Control works best when you say a command to the remote mic directly.
1. Turn on camera and remote.
2. Connect camera with remote.
3. Say a command to the remote mic from list below.
Note: Voice Control also turns off when your camera powers off.
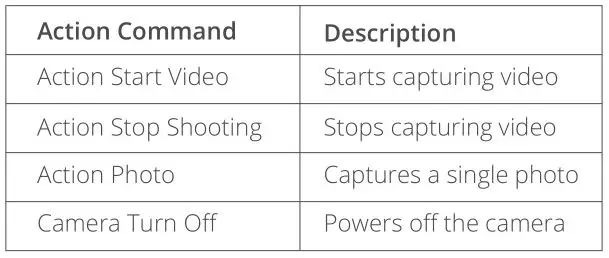
Pro Tip: If you are recording video, you must stop recording before issuing a new command.
CONNECTING TO THE AKASO DV APP
The AKASO DV app lets you control your camera remotely using a smartphone or tablet. Features include full camera control, live preview, playback, download, sharing of content and setting camera.
- Download AKASO DV app to your mobile device from the Apple App Store or Google Play.
- Turn on camera, in Video or Photo Mode press and hold Wifi button for three seconds to turn on Wifi.
- Turn on Wifi of your mobile device, connect to the Wifi SSID “AKASO_V50Elite”.
- Enter the password: 1234567890
- Open the AKASO DV app.
PLAYING BACK YOUR CONTENT
You can play back your content on the camera’s LCD display, your computer, TV, or smartphone/tablet.
You can also play back content by inserting the microSD card directly into a device, such as a computer or compatible TV. With this method, playback resolution depends on the resolution of the device and its ability to play back that resolution.
VIEWING VIDEOS AND PHOTOS ON YOUR V50 ELITE
- Turn on camera.
- Tap video file icon at the left corner of the screen to enter playback mode.
- Tap video file icon or photo file icon .
- Tap video or photo file to playback video and photo in full-screen view.
- To exit video or photo files, tap return icon .
Note: If your microSD card contains a lot of content, it might take a minute for it to load.

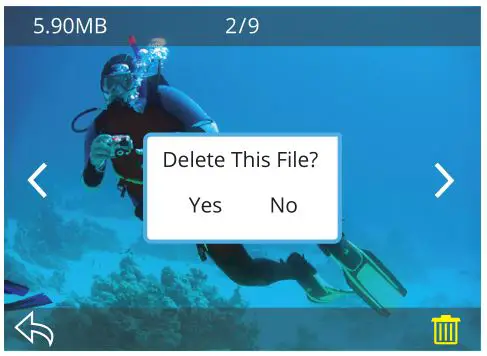
DELETING VIDEOS AND PHOTOS ON YOUR V50 ELITE
1. Enter playback mode.
2. Tap video file icon or photo file icon .
3. Tap the video or photo file you want to delete.
4. Tap . The screen shows “Delete This File? Yes/No”.
4. Tap “Yes”, the selected file will be deleted.
Note: You cannot delete video or photo files when they are in full-screen view.
OFFLOADING YOUR CONTENT
OFFLOADING YOUR CONTENT TO A COMPUTER
To play back your video and photos on a computer, you must first transfer these files to a computer. Transferring also frees up space on your microSD card for new content. To offload files to a computer using a card reader (sold separately) and your computer’s file explorer, connect the card reader to the computer, then insert the microSD card. You can then transfer files to your computer or delete selected files on your card. Note that you must use a card reader to offload photos or audio files.
OFFLOADING YOUR CONTENT TO SMARTPHONE OR TABLET
- Open the “AKASO DV” app.
- Tap “Folders” at the left corner of the bottom screen.
- Tap “Edit” at the right corner of the top screen.
- Tap the files you want to save.
- Tap “Save” at the right corner of the bottom screen. The screen shows “Confirm Download”.
- Tap “Confirm Download”.

ADJUSTING THE ZOOM LEVEL
The Zoom function lets you adjust how close or far away the subject appears in your video or photo. The default is no zoom. Zoom function is available in Video mode and Photo mode. V50 Elite can 8X zoom.
1. Turn on V50 Elite.
2. Press Up or Down button to adjust the zoom level.
Note: You cannot zoom when Image Stabilization is on.
REFORMATTING YOUR MICROSD CARD
To keep your microSD card in good condition, reformat it on a regular basis. Reformatting erases all of your content, so be sure to offload your photos and videos first.
1. Turn on camera and enter Camera Setting.
2. Scroll down to locate the “Format Card” option.
3. Tap “Yes”. The screen shows “Busy…Please wait”. Then you format your microSD card successfully.
MAINTENANCE YOUR CAMERA
Follow these guidelines to get the best performance from your camera:
- For best audio performance, shake the camera or blow on the mic to remove debris from the microphone holes.
- To clean the lens, wipe it with a soft, lint-free cloth. Do not insert foreign objects around the lens.
- Don’t touch the lens with fingers.
- Keep the camera away from drops and bumps, which may cause damage to the parts inside.
- Keep the camera away from high temperature and strong sunshine to avoid being damaged.
MAXIMIZING BATTERY LIFE
If the battery reaches 0% while recording, the camera saves the file and powers off. To maximize battery life, follow these guidelines when possible:
- Turn off Wireless Connections
- Capture video at lower frame rates and resolutions
- Use Screen Saver setting.
BATTERY STORAGE AND HANDLING
The camera contains sensitive components, including the battery. Avoid exposing your camera to very cold or very hot temperatures. Low or high temperature conditions may temporarily shorten the battery life or cause the camera to temporarily stop working properly. Avoid dramatic changes in temperature or humidity when using the camera, as condensation may form on or within the camera.
Do not dry the camera or battery with an external heat source such as a microwave oven or hair dryer. Damage to the camera or battery caused by contact with liquid inside the camera is not covered under the warranty.
Do not store your battery with metal objects, such as coins, keys or necklaces. If the battery terminals come in contact with metal objects, this may cause a fire.
Do not make any unauthorized alterations to the camera. Doing so may compromise safety, regulatory compliance, performance, and may void the warranty.
WARNING: Do not drop, disassemble, open, crush, bend, deform, puncture, shred, microwave, incinerate or paint the camera or battery. Do not insert foreign objects into the battery opening on the camera. Do not use the camera or the battery if it has been damaged – for example, if cracked, punctured or harmed by water. Disassembling or puncturing the battery can cause an explosion or fire.
REMOTE
Power Button
Press and hold Power Button for 3s to turn On/Off the remote.
Video Button
To record Video, verify the camera is in Video mode.
Photo Button
To capture a photo, verify the camera is in Photo mode.
CONNECTING YOUR V50 ELITE WITH REMOTE
- Turn on camera.
- Press and hold the Down button for three seconds to turn on BT. The screen shows “BT ON” ¹ “Scanning”.
Note: You can also go to Camera Setting to turn on BT. - Press and hold the Power button to turn on remote. The remote indicator flashes every second during connecting.
- The camera screen shows “Connected”. Remote indicator remains on after V50 Elite connects with remote successfully.
Note: Photo indicator flashes when you take a photo. Video indicator flashes two seconds during video recording.
MOUNTING YOUR CAMERA
Attach your camera to helmets, gear and equipment.
CONTACT US
For any inquiries with AKASO products, please feel free to contact us, we will respond within 24 hours.
E-mail: [email protected]
Tel: (888) 466-9222 (US) Mon-Fri (except holiday) 9am-5pm (EST)
Official website: www.akasotech.com
The microSD, microSDHC, microSDXC and SD marks and logos are trademarks of SD-3C, LLC.
]]>USER MANUAL
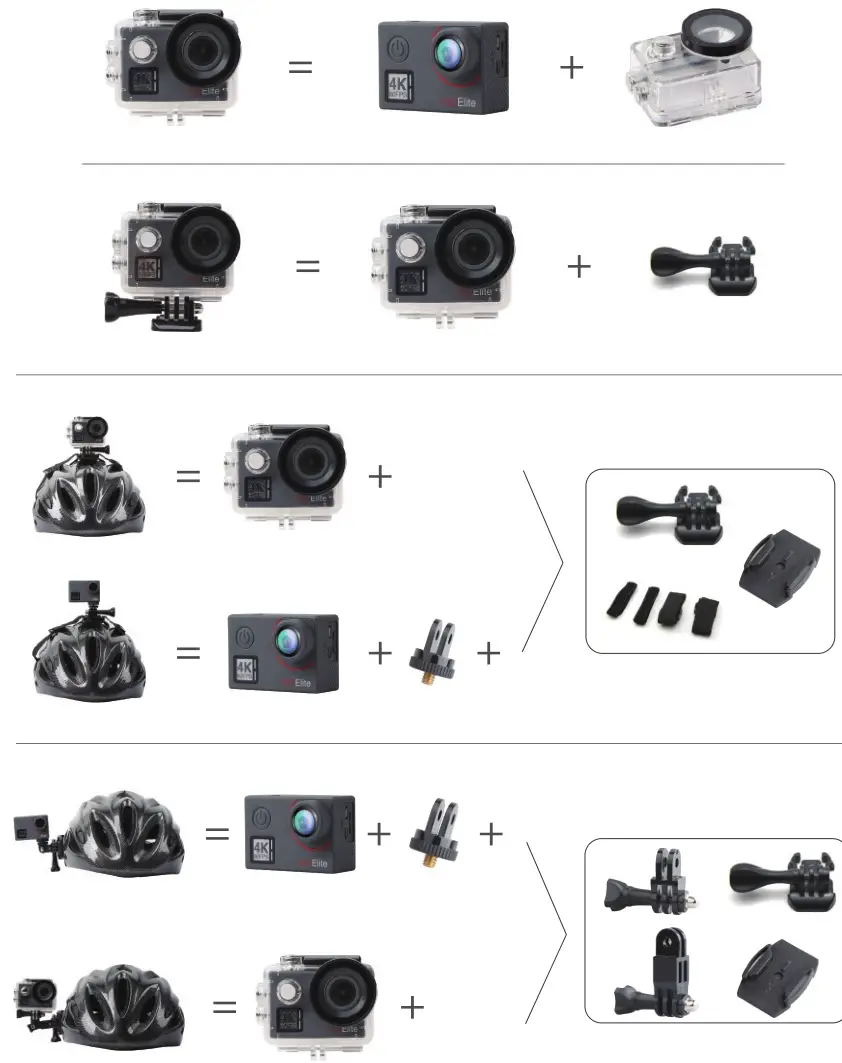
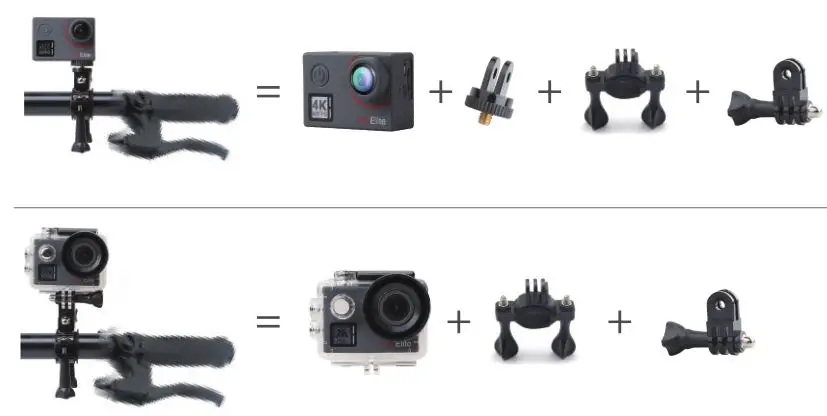
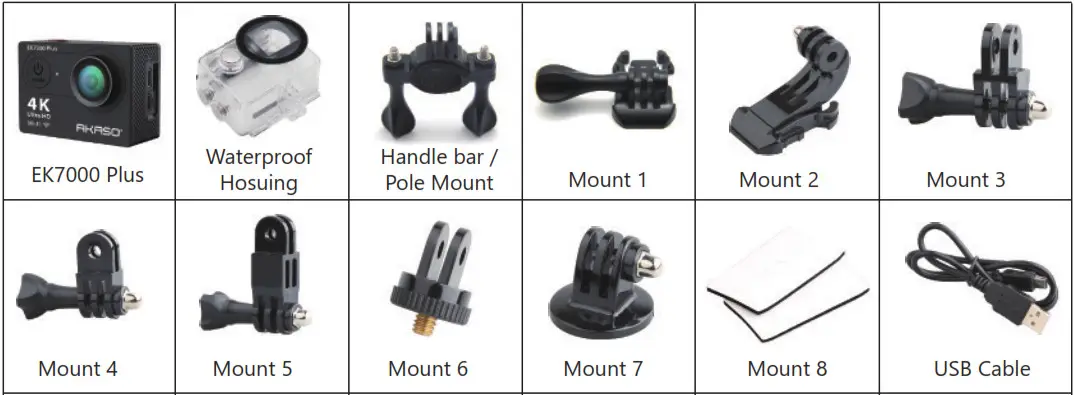
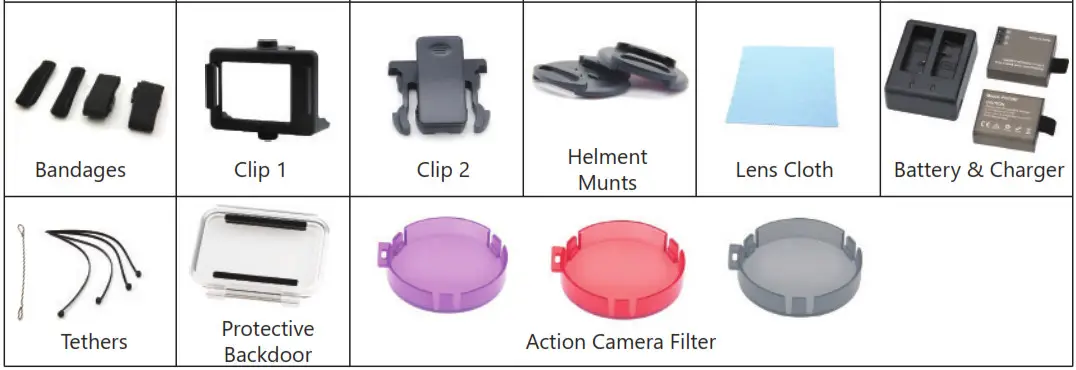
EK7000 Plus Action Camera
![]()
WHAT’S IN THE BOX
CAM ERA BUTTONS & FUNC TIONS
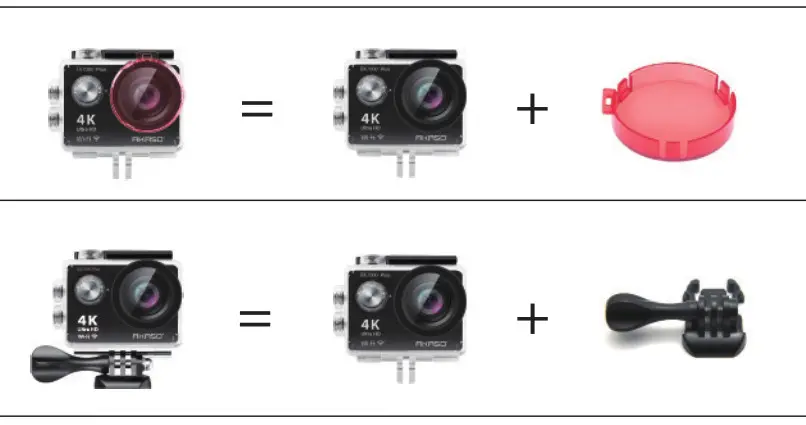
WATERPROOF CASE
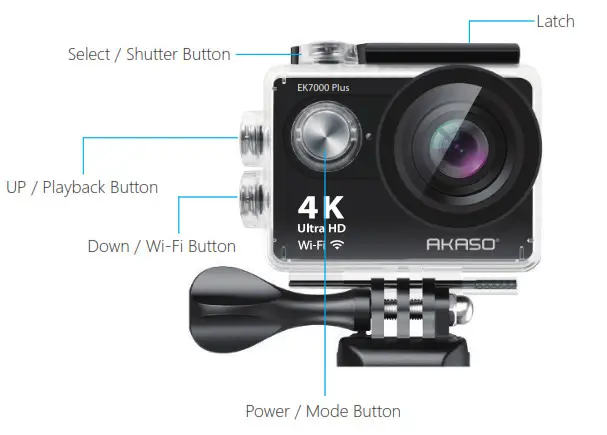
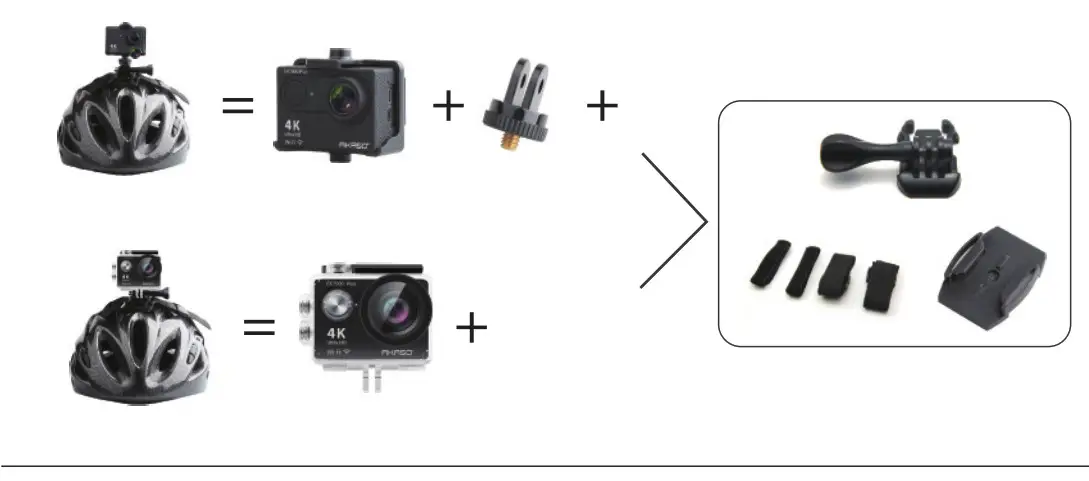
Attach your camera to helmets, gear and equipment.

INSTRUCTIONS
Welcome to use your AKASO Action Camera. To record or take pictures, Micro SD card (not included) is a must.
Micro SD card specifications: MicroSD / Micro SDHC / Micro SDXC Class 10 / UHS-I Up to 32GB (FAT32)
Format the SD card first on this camera before using. Regularly formating the SD Card will maintain the card in good working condition. Before formatting, be sure to back up all the files in your SD card.
Battery
Please make sure the battery is full of power when use it for the first time. Charge the battery: Connect the camera to a computer or USB power supply. When it’s charging, the light remains ON. When fully charged, the light will turn OFF.
Power ON / Power OFF
To power ON, Press the Power / Mode Button, To power OFF, press and hold the Power / Mode Button.
VIDEO MODE ·
- Video Mode is the default mode after camera power on.
Make sure the Video icon shows on the screen before recording. If not, press the Power / Mode Button repeatedly until it appears. - Press the Shutter / Select Button, the camera will start to record video. Meanwhile the status light will flash and one beep will be emitted by the camera.
- Press the Shutter / Select Button to end video recording.
- Loop recording: In Settings, turn on the loop recording. Then return to Video Mode, press OK Button to record, the video will automatically be saved as a file (depends on the chosen video resolution, usually about 10 mins) . The recording time on LCD screen starts at zero. When the memory is full, the first video would be covered, and so on.
- When recording starts, to switch modes is not available. To switch mode, please stop recording first.
- When the battery runs out, the camera will stop working. But the video will be saved automatically.
PHOTO MODE
Press Power / Mode Button repeatedly to switch to Photo Mode.
Shooting Photo: in Photo Mode, press Shutter / Select Button to shoot photos, The camera will emit camera shutter sound if it has been turned on in Settings.
BURST PHOTO MODE
Press Power / Mode Button repeatedly to switch to Burst Photo Mode. In Burst Photo Mode, it takes 1.5s to take 3 photos. The camera will emit camera shutter sound if it has been turned on in Settings.
Press the Shutter / Select Button, the camera will start to photos in burst series.
TIME LAPSE MODE
Press Power / Mode Button repeatedly to switch to Time Lapse Mode. Also, make sure that the Continuous Lapse has been set to ON in Settings.
In Time Lapse Mode, your AKASO Action Camera captures a series of photos at 2s / 3s / 5s / 10s / 20s / 30s / 60s intervals.
PLAYBACK MODE
- To review photos and videos on the camera, go to Playback Mode. Go to the Playback.
- Mode, first verify that the camera is in Photo Mode or Video Mode. Then press the UP /Playback Button to enter the Playback menu.
- Press Shutter / Select Button to select desired options.
- Press UP / Playback Button or Down / WiFi Button to cycle through the overview of photos or videos.
- Press Shutter / Select Button to playback the desired one.
- To delete photo or video, long press the Shutter / Select Button. The menu for deleting will show up.
- To return to the Playback menu, press the Power / Mode Button.
- To exit the Playback Mode, hold and press the Up / Playback Button for 2s.
SETTINGS
- Press Power / Mode Button repeatedly to switch to Settings.
- Press the Shutter / Select Button to enter the settings menu.
- Repeatedly press the Power / Mode Button to cycle through options and press the Shutter / Select Button to select desired one.
- Or press the Up / Down Button to cycle through options.
- To exit Settings, go to the last option and press Power / Mode Button again, then you will go to the exit option (x). Press Shutter / Select Button to exit.
Options:
Video Resolution: 1080P / 60fps, 1080P / 30fps, 4K / 25fps, 2.7K / 30fps, 720P / 120fps, 720P / 60fps
Looping Video: ON / OFF
Time Stamp: OFF / Date / Date & Time
Exposure: -2.0 / -1.7 / -1.3 / -1.0 / -0.7 /- 0.3 / 0 / 0.3 / 0.7 / 1.0 / 1.3 / 1.7 / 2.0
Photo Resolution: 16MP / 14MP / 12MP / 8MP / 5MP / 4MP
Burst Photo: ON 3Photos Time Lapse: 2s / 3s / 5s / 10s / 20s / 30s /60s
Continuous Lapse: OFF / ON
Dive Mode: OFF / ON
FOV: Super Wide / Wide / Normal / Narrow
Effect: None / B&W / Sepia / Negative / Warm / Cold / Red / Green / Blue
Power Frequency: 50Hz / 60Hz / Auto
Language: Deutsch / English / Espagnol / Français / Italien /
Date & Time: MM / DD / YY, DD / MM / YY, YY / MM / DD
Sounds Indicator
Shutter: Off / On
Start-up: Off / On
Beep: Off / On
Volume: 0 / 1 / 2 / 3
Upside Down: Yes / No
Screen Saver: Off / 1 min / 3 min / 5 min
Power Save: Off / 1 min / 3 min / 5 min
Format: Yes / No Reset: Yes / No
CAMERA APP
Before using the WiFi function, please install the App iSmart DV or AKASO DV in your mobile device first.
- Download the iSmart DV from Google Play or Apple Store.
- Power on the camera and switch to Photo Mode, then press Down / WiFi Button to turn ON. After the WIFI is set to on, the screen shows message ‘Waiting for WiFi connection’.
- Find the WiFi named ‘iCam…’ on the mobile devices. Connect it with the password: 1234567890
- Open the APP iSmart DV on mobile devices. To turn off WiFi, press and hold the Down / WiFi Button for 3s. If you have finished using the WiFi function, please turn off it. By doing it, the battery will last long.
CAMERA MAINTENANCE
- When the camera is in idle, please keep it in a dry shady place.
- Use protective cases to avoid scratches to the lens and LCD.
- If lens needs to be cleaned, firstly blow away the dust on the surface, then use cloth or paper suitable for optical devices to clean. Detergent could be used if ecessary.
- Please don’t use organic solvent to clean.
- Please do not touch the lens by fingers.
- Please do not put the camera in moist or dusty place. Electricity leakage may cause fire.
- Keep the camera away from drops and bumps. It may cause damage to the parts inside.
- Keep the camera away from long time high temperature and strong sunshine to avoid being damaged.
- Please note that the camera will get hot after using it for a long time. It is normal.
FAQ
Q: Video files couldn’t be played on computers?
A: The software doesn’t support H.264 code. Or the computer doesn’t support 4K display.
Q: Wi-Fi Network Can’t be Found in Phone / Tablet
A: 1. Turn off / on the phone/tablet’s Wi-Fi.
2. Power the camera ON.
3. In the camera’s Wi-Fi settings, turn on the WiFi.
4. Open up the Wireless Settings on your device and try to connect to the Wi-Fi network with the phone/tablet.
5. If the network is not present in the phone/tablet’s list, try another phone/table if possible.
6. If all the above steps don’t work, please contact the seller support with detailed description of the problem. They will be happy to answer any questions and help out moving forward.
Q: Camera Footage is Distorted or Has Poor Quality?
A: 1. Camera Housing May Have Condensation. Try to put the camera under sunshine for 1 hour or two.
2. Camera Lens May Be Faulty. Camera lens may have scratches or cracks causing videos and photos to appear distorted. Inspect the lens for cracks and scratches.
3. Camera Sensor May Be Faulty. If photos and videos are corrupted or distorted your camera’s sensor may be faulty.
Q: Camera Will Not Work With My Memory Card.
A: 1. Try to use the memory card in other devices. If it doesn’t work either, the memory card may be faulty. If it works on other device, check to make sure it is a minimum of a Class 10 SD card.
2. If the above steps prove that the memory card is functional, then the memory card slot might be faulty. Please contact seller support for resolution.
CONTACT US
For any inquiries, issues or comments concerning our products, please send an E-mail to the address below or call us. We will respond as soon as possible.
E-mail: [email protected]
Tel: (888) 466-9222 (US) Mon-Fri 9am-5pm (EST) Brand
web: www.akasotech.com
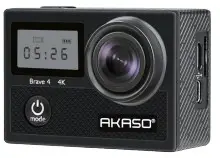
AKASO Brave 4 Action Camera User Manual

WHAT’S IN THE BOX
- Brave 4
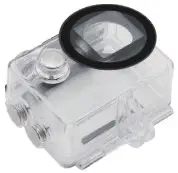
- Waterproof Housing
- Handle Bar/ Pole Mount
- Mount 1

- Mount 2

- Mount 3

- Mount 4

- Mount 5
- Mount 6

- Mount 7

- Clip 1
- Clip 2

- Helmet Mounts
- Protective Backdoor
- Charger
- Battery

- USB Cable
- Tethers

- Lens Cloth

- Bandages

- Remote
- External microphone

- Quick Start Guide

YOUR BRAVE 4


- Shutter/Wifi/Select Button
- Screen
- Power/Mode/Exit Button
- Micro USB Port
- MicroSD Card Slot
- Micro HDMI Port
- Lens
- Screen
- Up/Wifi Button
- Speaker
- Down
- Battery Cover
Note: The camera will not record sound when it is in the waterproof case.
GETTING STARTED
Welcome to your AKASO Brave 4. To capture videos and photos, you need a microSD card (not included).
microSD CARDS
Use brand name memory cards that meet these requirements:
- microSD, microSDHC, or microSDXC
- Class 10 or UHS-III rating
- Capacity up to 64GB (FAT32)
Note:
- Before using, please format the microSD card in the camera. To keep your microSD card in good condition, reformat it on a regular basis. Reformatting deletes all of your data, so be sure to transfer your photos and videos first.
- The FAT32 format microSD card will stop recording when the storage of each file exceeds 4GB and start to record again on a new file.
POWERING ON/OFF
To Power On:
Press and hold the Mode button for three seconds. The camera will beep and the status light will be on. When information appears on the display or the camera status screen, your camera is on.
To Power Off:
Press and hold the Mode button for three seconds. The camera will beep and the status light will be off.
SWITCHING MODE
To Switch Mode:
Turn on camera, press the Mode button to switch mode, or tap “Video” on the screen and click to select modes.
To Exit Mode:
Press the Mode button to exit mode.
TURNING ON/OFF Wifi
To turn on Wifi
Turn on camera, press and hold the Shutter button to turn on Wifi. You can also enter Camera Setting to turn on Wifi.
To turn off Wifi
Press Shutter button to turn off Wifi.
OVERVIEW OF MODES
There are 5 modes: Video, Photo, Burst Photo, Time Lapse Video, Timer Photo and Setting
Video Mode
Video Mode is the default mode when you turn on the camera. In Video Mode, press Shutter button, the camera starts recording video. Press Shutter button again to stop recording. Press Mode Button to take a still photo when recording video. Press Up or Down button to adjust the zoom level
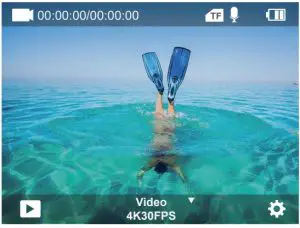
Photo Mode
Press Mode button once to switch to Photo Mode after you turn on camera. In Photo Mode, press Shutter button, the camera takes a photo. Press Up or Down button to adjust the zoom level.

Burst Photo Mode
Press the Mode button twice to enter Burst Photo Mode. In Burst Photo Mode, press the Shutter button, the camera will take 3/5/10 photos per second.
Time Lapse Video Mode
Press the Mode button several times to enter Time Lapse Video Mode. In Time Lapse Video Mode, press the Shutter button to take a serial of Videos at 0.5s/1s/2s/5s/10s/30s/60s intervals.
Timer Photo Mode
Press the Mode button several times to enter Timer Photo Mode. In Timer Photo Mode, press the Shutter button to take photos at 3s/5s/10s/20s/30s/60s timer.

Camera Setting Mode
Press the Down button to enter Setting Mode. You can change camera settings in this mode.
Note: Camera will not record sound when it is in the waterproof case.
VIDEO & PHOTO SETTING
- Video Resolution: 4K30FPS, 2.7K30FPS, 1080P120FPS, 1080P60FPS, 1080P30FPS, 720P240FPS, 720P120FPS,720P60FPS, 720P30FPS Default setting is 4K30FPS.
Note: When capturing video at high resolutions or high frame rates in warm ambient temperatures, the camera may get high temperature and consume more power - Image Stabilization: Off/On Default setting is Off. This setting adjusts the footage to offset for motion during capture. The result is smoother footage, especially in activities with relatively small but fast motion including cycling, motorcycling, and handheld uses.
- Angle: Super Wide, Wide, Middle, Narrow Default setting is Super Wide. The angle refers to how much of the scene (measured in degrees) can be captured through the camera lens. Super wide angle captures the largest amount of the scene, while narrow angle captures the least.
- Diving mode: Off/On Default setting is Off. Diving Mode can compensate for the lack of red light in underwater environments. Diving Mode is designed to be used in tropical and blue water, optimized for use between 10 and 80 feet.
- Video Length: Off/2 Min/3 Min/5 Min Default setting is 3 Off. Using Loop Recording, you can continuously record but only save the moments you want to keep. For example, if you select a 5-minute interval, only the previous 5 minutes are saved when you press the Shutter button to stop recording. If you record for 5 minutes and do not press the Shutter button to stop recording and save, the camera will record a new 5-minute interval by recording over your previous 5 minutes of footage. When the microSD card is full, the new files will cover the old one if loop recording is on. Time Lapse Photo captures a series of photos at specified intervals. Use this mode to capture photos of any activity, then choose the best one later. Default setting is 0.5Sec.
- Exposure: –3, -2, -1, 0, 1, 2, 3 Default setting is 0. By default, your camera uses the entire image to determine the appropriate exposure level. However, Exposure lets you select an area that you want the camera to prioritize when determining exposure. This setting is particularly useful in shots where an important region might otherwise be over- or underexposed. When you change this setting, the display immediately shows you the effect on your image. If you change modes, the camera returns to using the entire scene to determine the correct level of exposure.
- WDR: Off/On Default setting is Off. Wide Dynamic Range (WDR) retains a greater level of detail in the dark and bright areas of an image. The result is a photo that is properly exposed for both of these extremes. This setting is especially useful for scenes that are back list or that have large bright regions and a dark foreground. WDR is available in Video mode only.
- Metering: Average/Center/Spot Default setting is average. Choose the way your camera measures the light of the scene.
- Sharpness: High/Middle/Low Default setting is High. Sharpness controls the quality of details captured in your video footage or photos. When you change this setting, the touch display immediately shows you the effect on your image.
- Video Quality: High/Middle/Low Default setting is Middle
- ISO: Auto/100/200/400/800/1600/3200/6400 Default setting is Auto. ISO determines the camera’s sensitivity to light, and creates a trade-off between brightness and resulting image noise. Image noise refers to the degree of graininess in the image. In low light, higher ISO values result in brighter images, but with greater image noise. Lower values result in lower image noise, but darker images. When you change this setting, the display immediately shows you the effect on your image.
- Date Stamp: Off/On Default setting is On. Turn on Date Stamp, this camera will add a date stamp to your videos and photos.
- Motion Detection: Turn Off/Turn On Default setting is turn off. Motion detection is the process of detecting a change in the position of an object relative to its surroundings or a change in the surroundings relative to an object. Turn on Motion Detection and camera, the camera records video automatically when it detects a change in the position of an object relative to its surroundings.
- Photo Resolution: 20MP, 16MP, 13MP, 8MP Default setting is 20M.
- Anti-shake: Off/On Default setting is Off. This setting adjusts the footage to offset for motion during capture. The result is smoother footage, especially in activities with relatively small but fast motion including cycling, motorcycling, and handheld uses.
- Burst Photo: 3P/s, 5P/s, 10P/s Default setting is 3P/s. Burst captures up to 10 photos in 1 second, so it is perfect for capturing fast-moving activities.
- Time Lapse Interval: 0.5Sec/1Sec/2Sec/5Sec/10Sec/30Sec/60Sec Default setting is 0.5Sec. Time Lapse Video creates video from frames captured at specific intervals. This option lets you capture a time lapse event and immediately view or share it as a video. Time Lapse Video is captured without audio.
- Continuous Lapse: 3Sec/5Sec/10Sec/20Sec/30Sec/60Sec Default setting is 3Sec. This camera takes continuous lapse photo for 60 seconds at most.
- Self-Timer: Off/On Default setting is off. A Self Timer gives a delay between pressing the shutter release and the shutter’s firing. It is most commonly used to let photographers to take a photo of themselves (often with family).
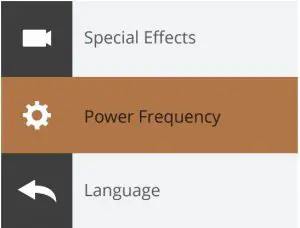
CAMERA SETTING
- Special Effects: Normal/Black and White/Negative/Retro/Red/Green/Blue Default setting is Normal.
- Power Frequency: Auto/50 Hz/60 Hz Default setting is Auto.
- Language: English/Français/Deutsch/Español/Italiano/日本語/한국어/简体中文 Default setting is English.
- Date & Time: MM/DD/YY The date and time are automatically updated when you connect your camera to the AKASO GO App. However, you can manually change these settings, if needed.
Note: If the battery is removed from the camera for an extended period of time, the date and time will be reset automatically. - Sounds: Shutter: Off/On Beep: Off/On Volume: 0/30/70/100 Boot: Off/On Default setting is on. You can turn on or off the shutter, boot, beep sounds. Sets the volume of your Brave 4’s alerts
- Drive Mode: Off/On Default setting is Off.
- Upside Down: Off/On Default setting is Off. This setting determines the orientation of your videos or photos to help you prevent upside down footage.
- Screen Saver: Unlimited/30S/1Min/2Min Default setting is 1 Minute. Turn off the display after a period of inactivity to save battery life. To turn on the display again, press any button on the camera.
- Auto Power Off: Unlimited/3 Min/5 Min/10 Min Default setting is 3 Min.Power off your Brave 4 after a period of inactivity to save battery life.
- Format : To keep your microSD card in good condition, reformat it on a regular basis. Reformatting erases all of your content, so be sure to offload your photos and videos first. To reformat your card, press the Down button to enter camera setting, then press mode button and press Up button several times to enter Format > SD Card > Storage Space Format/Cancel.
- Reset: Return menu setting to defaults Confirm/Cancel This option resets all settings to their default values.
- Device Info: Brave 4 Version: FX9307I-V1.0 4-20-2021 You can check the model, version and updated time of your Brave 4.
CONNECTING TO THE AKASO GO AP
The AKASO GO app lets you control your camera remotely using a smartphone or tablet. Features include full camera control, live preview, playback, download, sharing of content and setting camera.
- Download AKASO GO app to your mobile device from the Apple App Store or Google Play.
- Turn on the camera, then enter Camera Setting to turn on Wifi. You can also press and hold Shutter button to turn on Wifi.
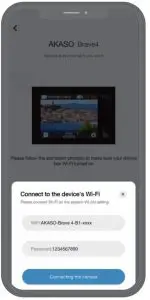
- Turn on Wifi of your mobile device, connect to the Wifi AKASO-Brave 4-B1-2073.
- Enter the password: 1234567890.
- Open the AKASO GO app
PLAYING BACK YOUR DATA
You can play back your content on the camera’s display, your computer, TV, or
smartphone/tablet.
You can also play back content by inserting the microSD card directly into a device, such as a computer or compatible TV. With this method, playback resolution depends on the resolution of the device and its ability to play back that resolution.
VIEWING VIDEOS AND PHOTOS ON YOUR BRAVE 4
- Turn on camera.
- Tap video playback icon
 at the left corner of the screen to enter playback mode.
 - Tap file icon
 .
. - Tap Forward or Backward icon to playback videos or photo files.
- Tap video playback icon to playback videos in full-screen view.
- To exit the videos or photo files, tap return icon
 .
.
Note: If your microSD card contains a lot of content, it might take a minute to load.
DELETING VIDEOS AND PHOTOS ON YOUR BRAVE 4
- Enter playback mode.
- Tap video playback icon or file icon .
- Tap Forward or Backward icon to locate the video or photo file you want to delete.
- Tap
 . The screen shows “Delete this file? Yes/No”.
 - Tap”Yes”, the selected file will be deleted.
TRANSFERRING YOUR DATA
TRANSFERRING YOUR DATA TO A COMPUTER
To play back your video and photos on a computer, you must first transfer these files to a computer. Transferring also frees up space on your microSD card for new content. To offload files to a computer using a card reader (not included) and your computer’ file explorer, connect the card reader to the computer, then insert the microSD card. You can then transfer files to your computer or delete selected files on your card.
Note that you must use a card reader to offload photos or audio files.
TRANSFERRING YOUR DATA TO SMARTPHONE OR TABLET
- Open the AKASO GO App. Connect the camera with the App.
- Tap Playback icon to see all the videos and photos.
- Tap the icon
 and select the photo or video you want to download and then tap the Download icon at the bottom right corner.

Note:
- If you cannot offload videos or photos to iPhone or iPad, please enter Setting → Privacy → Photos , find “AKASO GO” and select “Read and Write”.
- Iphone and iPad does not allow you to download 4K or 2.7K video via Wifi app.
- Please offload 4K or 2.7K videos via card reader.
MAINTAINING YOUR CAMERA
Follow these guidelines to get the best performance from your camera:
- For best audio performance, shake the camera or blow on the mic to remove debris from the microphone holes.
- To clean the lens, wipe it with a soft, lint-free cloth. Do not insert foreign objects around the lens.
- Don’t touch the lens with fingers.
- Keep the camera away from drops and bumps, which may cause damage to the parts inside.
- Keep the camera away from high temperature and strong sunshine to avoid being damaged.
MAXIMIZING BATTERY LIFE
If the battery reaches 0% while recording, the camera saves the file and powers off. To maximize battery life, follow these guidelines when possible:
- Turn off Wireless Connections
- Capture video at lower frame rates and resolutions
- Use Screen Saver setting.
ADJUSTING THE ZOOM LEVEL
The Zoom function lets you adjust how close or far away the subject appears in your photo. The default is no zoom. Zoom function is available in Video and Burst Phot and Timer Photo Mode. Brave 4 can 5X zoom.
- Turn on Brave 4.
- Enter Video or Burst Photo, Timer Photo Mode.
- Press and hold Up or Down button to adjust the zoom level.
REFORMATTING YOUR MICROSD CARD
To keep your microSD card in a good condition, reformat it on a regular basis. Reformatting erases all of your content, so be sure to offload your photos and videos first.
- Press and hold Mode button for 3 seconds to turn on Brave 4.
- Press Down button or tap the setting icon on the screen to enter Camera Setting.
- Press Mode button and then press Down button to find the ‘Format’ option.
- Press Shutter button, the screen shows ‘SD card Storage Space: xxG/xxG Format/Cancel.’
- Press Shutter button, The screen shows ‘Formatting…”Format successfully’. Then you format your microSD card successfully.
BATTERY STORAGE AND OPERATION
The camera contains sensitive components, including the battery. Avoid exposing your camera to very cold or very hot temperatures. Low or high temperature conditions may temporarily shorten the battery life or cause the camera to temporarily stop working properly. Avoid dramatic changes in temperature or humidity when using the camera, as condensation may form on or within the camera.
- Do not dry the camera or battery with an external heat source such as a microwave oven or hair dryer. Damage to the camera or battery which caused by liquid inside the body is excluded from the warranty.
- Do not store the battery with metal objects such as coins, keys or necklaces. If the battery terminals come close to metal objects, fire may be caused.
- Do not make any unauthorized alterations to the camera as this may compromise safety, regulatory compliance or performance, and may void the warranty.
WARNING: Do not drop, disassemble, open, crush, bend, deform, puncture, shred microwave, incinerate or paint the camera or battery. Do not insert foreign objects into the battery opening of the camera. Do not use the camera or the battery if it has been damaged – for example, if cracked, punctured or damaged by water. Disassembling or puncturing the battery can cause an explosion or fire.
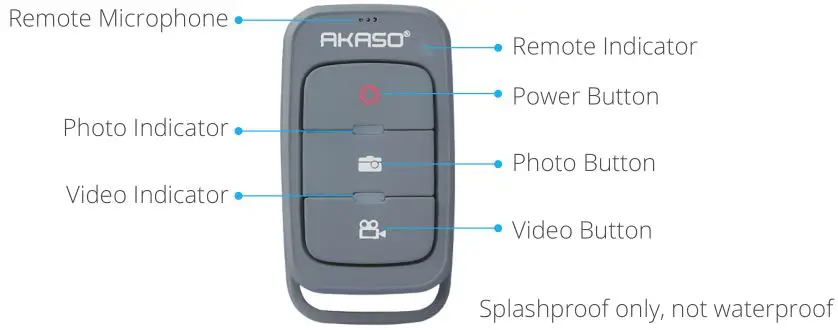
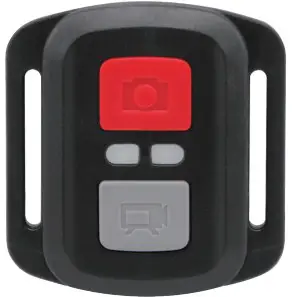
REMOTE

Splashproof only, not waterproof
VIDEO
To record video, put the camera in Video Mode.
To start recording:
Press the Grey Video Button. The camera will emit one beep and the camera light will flash while recording.
To stop recording:
Press the Grey Video Button again. The camera will emit one beep, the camera light will stop flashing and the camera will stop recording.
PHOTO
To capture a photo, put the camera is in Photo Mode.
To take a photo:
Press the Red Photo Button. The camera will emit a camera shutter sound.
CR2032 BATTERY REPLACEMENT FOR BRAVE 4 REMOTE
- Use a 1.8mm Phillips tip screwdriver to remove the 4 screws on the back cover of the remote, allowing you to open it.


- Remove the other four screws in the PCB board.
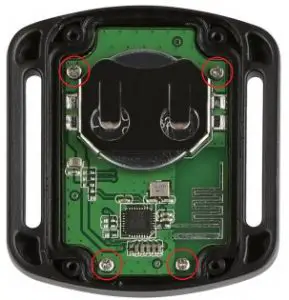
- Lift the PCB board and slide out the battery, as shown in the picture.
Note: Do NOT rotate the PCB board to avoid reversing the camera and video button functions.
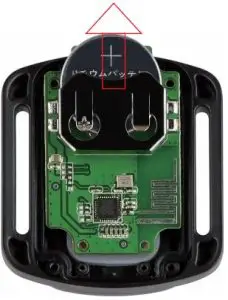
- Install the new battery, keeping the “+” pole facing up.
- Install all 4 screws back into the PCB board.
- Install all 4 screws back into the cover.
![]() USER MANUAL
USER MANUAL
AKASO EK7000 Action Camera
WHAT’S IN THE BOX

YOUR EK7000

| 1.Shutter/Select Button 2.Working/Wifi Indicator 3.Power/Mode/Exit Button 4.Charging Indicator 5.microSD Card Slot 6.Micro USB Port |
7.Micro HDMI Port 8.Lens 9.Screen 10.Up Button 11.Down/Wifi Button 12.Battery Door |
Note: The camera does not record sound when it is in the waterproof case.
GETTING STARTED
Welcome to your EK7000! To capture video and photos, you will need a microSD card (sold separately).
microSD Cards
Use brand name microSD cards that meet these requirements:
- microSD, microSDHC, or microSDXC
- UHS-III rating
- Capacity up to 64GB (FAT32)
Note:
- Please format the microSD card first in this camera before using it. To keep your microSD card in good condition, reformat it on a regular basis. Reformatting erases all of your content, so be sure to offload your photos and videos first.
- FAT32 format microSD cards stop recording when the storage of each file exceeds 4GB and start recording again on a new file.
Powering On and Off
To Power On:
Press and hold the Mode button for three seconds. The camera will beep as the camera status lights light up. When information appears on the LCD display, your camera is on. Press and hold the Mode button again to turn off the camera.
To Power Off:
Press and hold the Mode button for three seconds. The camera beeps while the camera status lights are off.
Switch Mode
Press the Mode button to switch modes.
Turning On and Off Wifi
Turn on the camera and press and hold the Down button to turn on Wifi. The Wifi name and password will appear on the screen. Press the Down button again to turn off Wifi.
OVERVIEW OF MODES
There are 5 modes: Video, Photo, Burst Photo, Time Lapse, and Setting.
Video Mode
Video Mode is the default mode when you turn on the camera.
In Video Mode, press the Shutter button to start recording the video. Press the Shutter button again to stop recording the video.
 Photo Mode
After turning on the camera, press the Mode button once to switch to Photo Mode.
In Photo Mode, press the Shutter button to take a photo.
 Burst Photo Mode
Press the Mode button twice to switch to Burst Photo Mode. In Burst Photo Mode, press the Shutter button to capture several photographs in quick succession. This is perfect for capturing fast-moving activities.
 Time Lapse Photo Mode
Press the Mode button three times to switch to Time Lapse Photo Mode. In Time Lapse Photo Mode, press the Shutter button to take a series of photos at specified intervals.

Settings
Press the Mode button several times to switch to Settings mode. Press the Up or Down button to scroll through options and press the Shutter Button to select and confirm. Press the Mode button to exit.
CUSTOMIZING YOUR EK7000
- Video Resolution: 4K30FPS/2.7K30FPS/1080P120FPS/1080P60FPS/1080P30FPS/ 720P120FPS/720P60FPS/720P30FPS Default setting is 4K30FPS.
- Encoding Type: H.264/H.265 Default setting is H.264.
- Looping Record: Off/2 min/3 min/5 min
The default setting is off.
Loop recording allows your camera to overwrite old files with new files. Once the MicroSD card is full, the camera will delete the first video file on the card to make room for the latest file. For example, if the setting for loop recording is “1 Minute”, then the camera will create video clips of 1 minute in length, and a 1-minute clip will be deleted when the camera needs more memory. - Time-lapse Video: Off/0.5s/1s/2s/5s/10s/30s/60s
The default setting is Off.
When you turn on Time-lapse video, the camera records video from frames captured at specific intervals. This allows the action to progress much faster than in reality.
Note: Time Lapse video is captured without audio. - Slow Motion: Off/1080P60FPS/1080P120FPS/720P120FPS
Default setting is Off.
In Slow Motion Video mode, when you press the Shutter button, the camera records slow-motion video. - Video Quality: High/Middle/Low
The default setting is High. - Record Sound: Off/On
The default setting is On. - Time Watermark: Off/On
The default setting is On.
When this setting is on, the camera adds a date stamp to the videos and photos you take. - Photo Resolution: 16M/13M/8M/5M/4M
The default setting is 16M. - Self-timer: 3s/5s/10s/20s
The default setting is 5s.
The self-timer provides a delay between pressing the shutter release and the picture being taken. - Timed Photo Length: Unlimited/5 min/10 min/15 min/20 min/30 min
The default setting is Unlimited. - Time Lapse Photo: Off/On
The default setting is Off.
Time Lapse Photo captures a series of photos at specified intervals. Use this mode to capture multiple photos of the activity so you can choose the best ones later. - Burst Photo: 3 Photos/5 Photos/10 Photos
The default setting is 3 Photos.
In burst mode, several photographs are captured in quick succession. - White Balance: Auto/Sunny/Cloudy/Incandescent/Fluorescence
The default setting is Auto.
White Balance lets you adjust the color temperature of videos and photos to optimize for cool or warm lighting conditions. - Exposure: -2/-1/0/1/2
The default setting is 0.
EV (Exposure Value) is just to measure any change of exposure. This setting is
particularly useful in shots where an important region might otherwise be over-or underexposed. - ISO: Auto/100/200/400/800/1600/3200/6400
The default setting is Auto.
ISO determines the camera’s sensitivity to light and creates a trade-off between brightness and resulting image noise. Image noise refers to the degree of graininess
in the image. In low light, higher ISO values result in brighter images, but with greater image noise. Lower values result in lower image noise, but darker images. - Sound Indicator: Shutter/Start-up/Beep/Volume
You can turn on or off these sound effects and adjust the volume of the camera in this setting. - Power Frequency: 50Hz/60Hz/Auto
The default setting is Auto. - Remote Control: Off/On
The default setting is On. - Upside Down: Off/On
The default setting is Off.
This setting determines the orientation of your video or photos to help you prevent upside-down footage. - Date Time: MM/DD/YY
Here you can set the camera’s date and time. - Screen Saver: Off/1 Min/3 Min/5 Min
The default setting is 1 Min.
The screen saver turns off the display after a period of inactivity to save battery life. To turn on the display again, press any button or tap the screen on the camera. - Power Save: Off/3 Min/5 Min/10 Min
The default setting is 3 Min.
Powers off your camera after a period of inactivity to save battery life. - Driving Mode: Off/On
The default setting is Off.
If you turn on Driving Mode and connect the camera to the car’s cigarette lighter, the camera will turn on automatically if you start your car and will turn off if you stop
your car. - Language: English/Pусский/Deutsch/Français/Italiano/Español/
繁体中文/日本 語/简体中文
The default setting is English. - Format: No/Yes
The default setting is No.
To keep your microSD card in good condition, reformat it on a regular basis. Reformatting erases all of your content, so make sure offload your photos and videos first. - Reset: No/Yes
The default setting is No.
This option resets all settings to their default values. - Version
You can check the model and software version of your camera.
CONNECTING TO THE APP
Please download and install the AKASO GO app from the App Store or Google Play first. The AKASO GO app lets you control your camera remotely using a smartphone or tablet. Features include camera control, live preview, playback, download, settings, and editing.
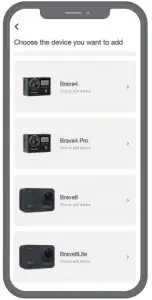
- Open the AKASO GO app, tap the “Device” icon at the bottom of the screen, then choose “Add device”.
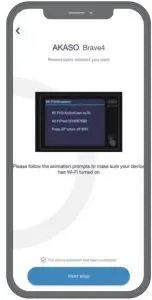
- Choose “EK7000”. Follow the instructions. Press and hold the Down button to turn on the Wifi. The Wifi name and password will be shown on the camera screen.
- Check the “The above operation has been confirmed” at the bottom of the screen and click “Live Preview”.
- Enter the correct Wifi name and password then click Connect.

PLAYING BACK YOUR CONTENT
You can playback your content on the camera itself, your computer, TV, smartphone, or tablet. You can also playback content by inserting the microSD card directly into a device, such as a computer or a compatible TV. With this method, playback resolution depends on the resolution of the device and its ability to playback that resolution.
Note: To playback your videos and photos on a computer, you must first transfer these files to a computer. Transferring also frees up space on your microSD card for new content.
VIEWING VIDEOS AND PHOTOS ON YOUR EK7000
- Turn on the camera to enter Video or Photo mode.
- Press the Up button in Video or Photo mode to enter playback mode. If you press the Up button in playback mode, the camera will exit playback mode.
- Press the Down button, then the Shutter button to open the video or photo in full-screen view.
- Press the Up or Down button to display photos. Press the Up or Down button followed by the Shutter button to playback videos.
- To exit the video or photo files, press the Mode button.
Note: If your microSD card contains a lot of content, it might take a minute for it to load.
DELETING VIDEOS AND PHOTOS ON YOUR EK7000
- Turn on the camera to enter Video or Photo mode.
- Press the Up button in Video or Photo mode to enter playback mode.
- Press the Down button, then the Shutter button to open the video or photo in full-screen view.
- Press the Up or Down button to locate the file you want to delete.
- Press and hold the Shutter button for 3 seconds. The screen will display “Delete this file? Yes/No”.
- Choose Yes, then press the Shutter button. The selected file will be deleted.
OFFLOADING YOUR CONTENT
Offloading Your Content to a Computer
To offload files to a computer, you need a card reader (sold separately). Connect it to the computer via a USB port and insert the microSD card. You can then transfer files to your computer or delete selected files using the file explorer.
Offloading Your Content to Smartphone
- Open the AKASO GO app. Connect the camera with the app.
- Tap the Album icon on the bottom of the screen to see all the videos and photos.
- Tap the Select icon at the upper right corner, then select the photo or video you want to download. Tap the Download icon to download.
Note: If you cannot offload videos or photos to your iPhone or iPad, please navigate to Settings → Privacy → Photos, find “AKASO GO” and select “Read and Write”.
MAINTENANCE FOR YOUR CAMERA
Please follow these guidelines to get the best performance from your camera:
- For best audio performance, shake the camera or blow on the mic to remove debris from the microphone holes.
- To clean the lens, wipe it with a soft, lint-free cloth. Do not insert foreign objects around the lens.
- Don’t touch the lens with your fingers.
- Avoid dropping or bumping the camera, as it may cause damage to the parts inside.
- Keep the camera away from high temperatures and strong sunshine to avoid damage.
MAXIMIZING BATTERY LIFE
If the battery reaches 0% while recording, the camera will save the file and power off.
To maximize battery life, follow these guidelines when possible:
- Turn off Wireless Connections.
- Capture video at lower frame rates and resolutions.
- Use the Screen Saver setting.
BATTERY STORAGE AND HANDLING
The camera contains sensitive components, including the battery. Avoid exposing your camera to very cold or hot temperatures. Low or high-temperature conditions may temporarily shorten battery life or cause the camera to temporarily stop working properly. Avoid dramatic changes in temperature or humidity when using the camera, as condensation may form on or within the camera.
- Do not dry the camera or battery with an external heat source such as a microwave oven or hairdryer. Damage to the camera or battery caused by contact with the liquid inside the camera is not covered under the warranty.
- Do not store your battery with metal objects, such as coins, keys, or necklaces. If the battery terminals come in contact with metal objects, it may cause a fire.
- Do not make any unauthorized alterations to the camera. Doing so may compromise the safety, regulatory compliance, performance, and may void the warranty.
WARNING: Do not drop, disassemble, open, crush, bend, deform, puncture, shred, microwave, incinerate or paint the camera or battery. Do not insert foreign objects into the battery opening on the camera. Do not use the camera or the battery if it has been damaged-for example if cracked, punctured, or damaged by water. Disassembling or puncturing the battery can cause an explosion or fire.
REMOTE
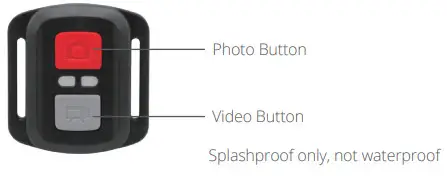
VIDEO
To record a video, verify the camera is in Video mode.
To start recording:
Press the Grey Video Button. The camera will emit one beep and the camera light will flash while recording.
To stop recording:
Press the Grey Video Button again. The camera will emit one beep and the camera light will stop flashing.
PHOTO
To capture a photo, verify the camera is in Photo mode.
To take a photo:
Press the Red Photo Button. The camera will emit a camera shutter sound.
CR2032 BATTERY REPLACEMENT FOR EK7000 REMOTE
- Use a 1.8mm Phillips tip screwdriver to remove the 4 screws on the back cover of the remote, allowing you to open it.
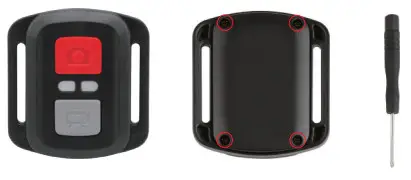
- Remove another 4 screws on the PCB board.

- Lift the PCB board and slide out the battery, as shown in the picture.
Note: Do NOT rotate the PCB board to avoid reversing the camera and video button functions.

- Install the new battery, keeping the “+” pole facing up.
- Install all 4 screws back onto the PCB board. 6. Install all 4 screws back into the cover.
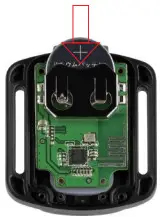 6. Install all 4 screws back into the cover.
MOUNTING YOUR CAMERA
Attach your camera to helmets, gear, and equipment.
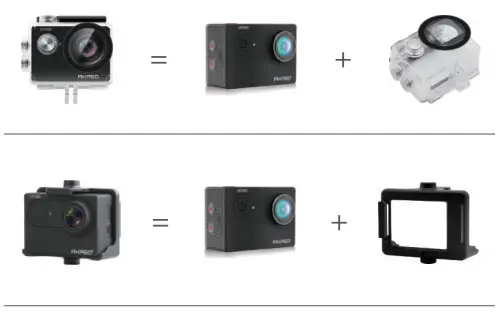

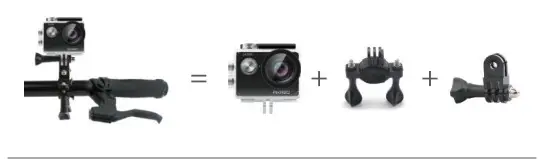
CONTACT US
For any inquiries with AKASO products, please feel free to contact us, we will respond within 24 hours.
Email: [email protected]
Tel: (888) 466-9222 (US) Mon-Fri (except holiday) 9am-5pm (EST)
Official website: www.akasotech.com
The microSD, microSDHC, microSDXC, and SD marks and logos are trademarks of
SD-3C, LLC.
AKASO EK7000 Action Camera

Was ist in der Box

YOUR EK7000
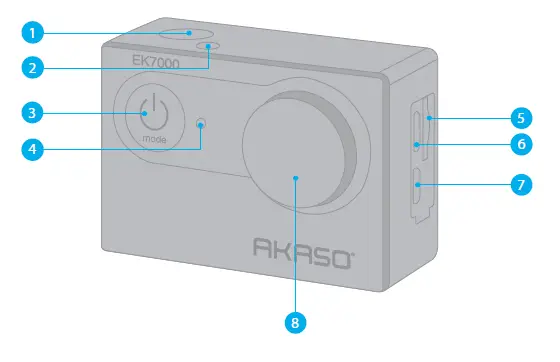

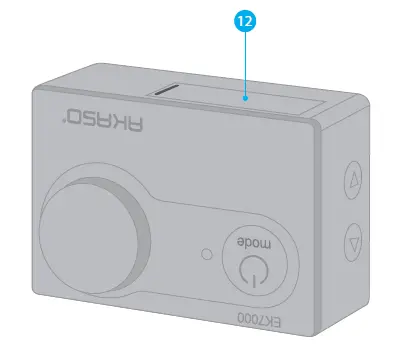
- Shutter / Select Button
- Working / Wi-Fi Indicator
- Power / Mode / Exit Button
- Charging Indicator
- MicroSD Slot
- Micro USB Port
- Micro HDMI Port
- Lens
- Screen
- Up Button
- Down / Wi-Fi Button
- Battery Door
Note: Camera does not record sound when it is in the waterproof case.
GETTING STARTED
Welcome to your new EK7000. To capture video and photos, you need a microSD card (sold separately).
MICR SD CARDS
Use brand name memory cards that meet these requirements:
- MicroSD, microSDHC, or micr SDXC
- Class 10 or UHS-I rating
- Capacity up to 32GB (FAT32)
Note:
- Please format the microSD card first in this camera before using. To keep your microSD
card in good condition, reformat it on a regular basis. Reformatting erases all of your
content, so be sure to offload your photos and videos first. - FAT32 format microSD card stops recording when the storage of each file is over 4GB
and starts to record again on a new file.
POWERING ON AND OFF
To Power On:
Press and hold the Mode button for three seconds. The camera beeps while the camera status lights light. When information appears on the LCD display or the camera status screen, your camera is on.
To Power Off:
Press and hold the Mode button for three seconds. The camera beeps while the camera status lights is off.
SWITCHING MODE
To Switch Mode:
Press the Mode button to switch the mode.
To Exit Mode:
Press the Mode button to exit mode.
TURNING ON / OFF Wi-Fi
To turn on Wi-Fi
Turn on camera, press Down button to turn on Wi-Fi.
To turn off Wi-Fi
Press Down button to turn off Wi-Fi.
OVERVIEW OF MODES
There are 5 modes: Video, Photo, Burst Photo, Time Lapse and Setting.
Video Mode
Video Mode is the default mode when you turn on the camera.
In Video Mode, press Shutter button, the camera starts recording video. Press Shutter button to stop recording video.

Photo Mode
Press Mode button once to switch to Photo Mode after you turn on camera.
In Photo Mode, press Shutter button, the camera takes a photo.
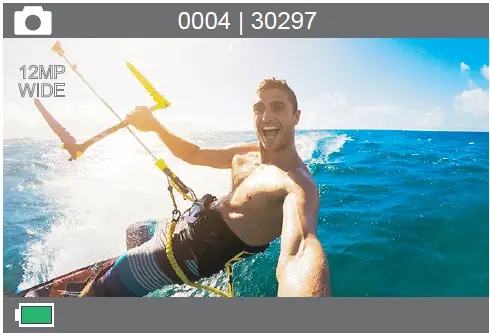
Burst Photo Mode
Press Mode button several times to switch to Burst Photo Mode. In Burst Photo Mode, press Shutter button, the camera takes 3 photos per second.
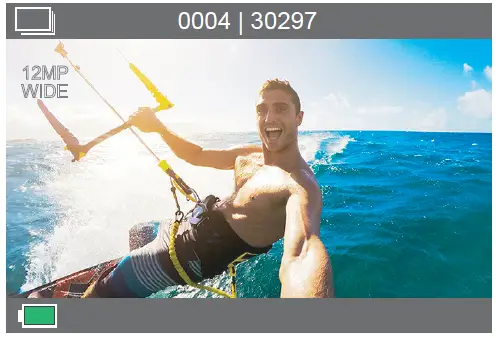
Time Lapse Photo Mode
Press Mode button several times to switch to Time Lapse Photo Mode. In Time Lapse Photo Mode, press Shutter button, the camera takes a serial of photos at 3s / 5s / 10s intervals.

Settings
Press Mode Button several times to switch to settings mode. Press UP or Down button to cycle through options and press Shutter Button to select desired option.
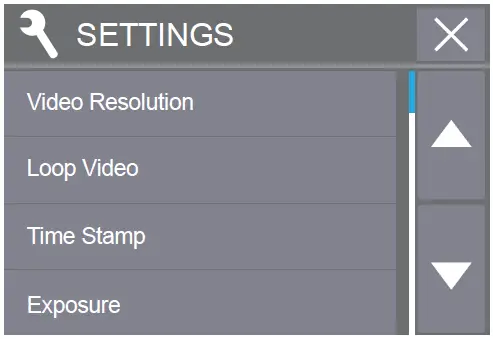
CUSTOMIZING YOUR EK7000
Settings
- Video Resolution: 1080P 60FPS, 1080P 30FPS, 4K 25FPS, 2.7K 30FPS, 1080P 60FPS, 720P 120FPS, 720P 60FPS
Default setting is 1080P 60FPS. - Looping Record: Off / On
Default setting is off.
Loop recording allows your camera to overwrite old files with new files. Once the memory
card becomes full, the camera will delete the first video file to make room for the latest file. - Time Stamp: Off, Date, Date & Time
Default setting is Date & Time.
If you turn on Time Stamp, this camera adds time stamp to the videos or photos you take.
If you select Off, this camera will not add time stamp to the videos or photos you take. - Exposure: -2.0, -1.7, -1.3, -1.0, -0.7, -0.3, 0.0, +0.3, +0.7, +1.0, +1.3, +1.7, +2.0
Default setting is 0.0.
By default, your camera uses the entire image to determine the appropriate exposure level.
However, Exposure lets you select an area that you want the camera to prioritize when
determining exposure. This setting is particularly useful in shots where an important region
might otherwise be over- or underexposed.
When you change this setting, the LCD display immediately shows you the effect on your
image. If you change modes, the camera returns to using the entire scene to determine
the correct level of exposure. - Photo Resolution: 12MP, 8MP, 5MP, 4MP
Default setting is 12MP. - Burst Photo: 3 Photos
Burst captures up to 3 photos in 1 second, so it is perfect for capturing fast-moving activities. - Time Lapse: 2s, 3s, 5s, 10s, 20s, 30s, 60s
Default setting is 3s. Time Lapse Photo captures a series of photos at specified intervals. Use this mode to capture photos of any activity, then choose the best ones later. - Continuous Lapse: OFF / ON
Default setting is Off.
Turn on Continuous Lapse, this camera takes continuous lapse photo. - Power Frequency: 50Hz, 60Hz, Auto
Default setting is 50Hz. - Language: English, 繁體中文, Italiano, Español, Português, Deutsch, Dutch, Français,
Čeština, Polski, Türk, Pyccкий, Romaña, 日本語, Thai,
Default setting is English. - Date & Time: YY / MM / DD HH: MM
Note: If you replace the battery, the date and time will reset. - Sounds Indicator
Shutter: On / Off Start-up: On / Off
Beep: On / Off Default setting is on.
Sets the volume of your EK7000’s alerts.
Volume: 0, 1, 2, 3
Default setting is 3.
This option lets you adjust the volume. Press Shutter button to adjust the volume. - Upside Down: Yes / No
Default setting is No.
This setting determines the orientation of your video or photos to help you prevent upside
down footage. - Screen Saver: OFF, 1min, 3min, 5min
Default setting is 1min.
Turns off the LCD display after a period of inactivity to save battery life. To turn on the
LCD display again, press any button on the camera. - Power Save: OFF, 1 min, 3 min, 5 min
Default setting is 3 min.
Powers off your EK7000 after a period of inactivity to save battery life. - Format: No / Yes
To keep your microSD card in good condition, reformat it on a regular basis. Reformatting
erases all of your content, so be sure to offload your photos and videos first.
To reformat your card, press the mode button several times to enter Camera Setting, then
press down button several times to enter Format and select Yes. - Reset: No / Yes
This option resets all settings to their default values. - Version
You can check the model and updated time of your EK7000.
CONNECTING TO THE ISMART DV APP
The iSmart DV app lets you control your camera remotely using a smartphone or tablet.
Features include full camera control, live preview, playback and sharing of content.
- Download iSmart DV app to your mobile device from the Apple App Store or Google Play.
- Turn on the camera, then press Down button to turn on Wi-Fi.
- Turn on Wi-Fi of your mobile device, connect to the Wi-Fi SSID ‘iCam-AKASO’.
- Enter the password: 1234567890.
- Open the app iSmart DV.
- Tap ‘Add new camera’.
- Tap ‘Wi-Fi Connect’
Note: Press Down button if you want to turn off Wi-Fi.
PLAYING BACK YOUR CONTENT
You can play back your content on the camera’s LCD display, your computer, TV, or smartphone / tablet.
You can also play back content by inserting the microSD card directly into a device, such as a computer or compatible TV. With this method, playback resolution depends on the resolution of the device and its ability to play back that resolution.
VIEWING VIDEOS AND PHOTOS ON YOUR EK7000
- Turn on camera to enter Video or Photo mode.
- Press Up button in video or photo mode to enter playback mode. If you press Up button in playback mode, the camera will exit playback mode.
- Press Down button, then Shutter button to open video or photo in full-screen view.
- Press Up or Down button to playback photos. Press Up or Down button, then Shutter button to playback videos.
- To exit the video or photo files, press Mode button.
Note: If your micro SD card contains a lot of content, it might take a minute for it to loa
DELETING VIDEOS AND PHOTOS ON YOUR EK7000
- Turn on camera to enter Video or Photo mode.
- Press Up button in video or photo mode to enter playback mode. If you press Up button
in playback mode, the camera will exit playback mode. - Press Down button, then Shutter button to open video or photo in full-screen view.
- Press Up or Down button to locate the file you want to delete.
- Press and hold the Shutter button for 3 seconds. The screen shows ‘Delete this file? Yes No’
- Press Up button, then Shutter button, the selected file will be deleted.
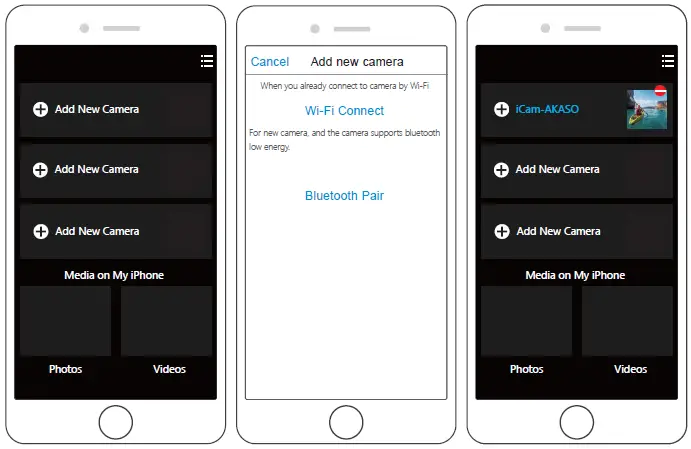

OFFLOADING YOUR CONTENT
OFFLOADING YOUR CONTENT TO A COMPUTER
To play back your video and photos on a computer, you must first transfer these files to a computer. Transferring also frees up space on your microSD card for new content.
To offload files to a computer using a card reader (sold separately) and your computer’s file explorer, connect the card reader to the computer, then insert the microSD card. You can then transfer files to your computer or delete selected files on your card. Note that you must use a card reader to offload photos or audio files.
OFFLOADING YOUR CONTENT TO SMARTPHONE OR TABLET
- Connect to the iSmart DV app.
- Open the iSmart DV app.
- Tap ‘iCam-AKASO’ at the top of the screen.
- Tap file icon at the left corner of the bottom screen.
- Tap ‘Choose’
- Tap the files you want to save.
- Tap at the right corner of the bottom screen. The screen shows ‘Confirm Download’.
- Tap ‘Confirm Download’.
- Tap ‘Save Images’.
Note:
- If you cannot offload videos or photos to iPhone or iPad, please enter Setting -> Privacy -> Photos , find “iSmart DV” and select “Read and Write”.
- You cannot download 4K or 2.7K video to iPhone and iPad via Wi-Fi app. Please offload 4K or 2.7K videos via card reader.
REFORMATTING YOUR MICROSD CARD
To keep your microSD card in good condition, reformat it on a regular basis. Reformatting erases all of your content, so be sure to offload your photos and videos first.
- Turn on camera.
- Press Mode button four times, then Shutter button to enter Camera Setting.
- Press UP or Down button to locate the ‘Format’ option.
- Press Shutter button, the screen shows ‘No/Yes.’
- Press Down button then Shutter button. The screen shows ‘Waiting’ then ‘Completed’. Then you format your microSD card successfully.
MAINTENANCE YOUR CAMERA
Follow these guidelines to get the best performance from your camera:
- For best audio performance, shake the camera or blow on the mic to remove debris from the microphone holes.
- To clean the lens, wipe it with a soft, lint-free cloth. Do not insert foreign objects around the lens.
- Don’t touch the lens with fingers.
- Keep the camera away from drops and bumps, which may cause damage to the parts
inside. - Keep the camera away from high temperature and strong sunshine to avoid being
damaged.
MAXIMIZING BATTERY LIFE
A message appears on the touch display if the battery drops below 10%. If the battery reaches 0% while recording, the camera saves the file and powers off.
To maximize battery life, follow these guidelines when possible:
- Turn off Wireless Connections
- Capture video at lower frame rates and resolutions
- Use Screen Saver setting.
BATTERY STORAGE AND HANDLING
The camera contains sensitive components, including the battery. Avoid exposing your camera to very cold or very hot temperatures. Low or high temperature conditions may temporarily shorten the battery life or cause the camera to temporarily stop working properly. Avoid dramatic changes in temperature or humidity when using the camera, as condensation may form on or within the camera.
Do not dry the camera or battery with an external heat source such as a microwave oven or hair dryer. Damage to the camera or battery caused by contact with liquid inside the camera is not covered under the warranty.
Do not store your battery with metal objects, such as coins, keys or necklaces. If the battery terminals come in contact with metal objects, this may cause a fire.
Do not make any unauthorized alterations to the camera. Doing so may compromise safety, regulatory compliance, performance, and may void the warranty.
WARNING: Do not drop, disassemble, open, crush, bend, deform, puncture, shred, microwave, incinerate or paint the camera or battery. Do not insert foreign objects into the battery opening on the camera. Do not use the camera or the battery if it has been damaged – for example, if cracked, punctured or harmed by water. Disassembling or puncturing the battery can cause an explosion or fire.
REMOTE

VIDEO
To record Video, verify the camera in Video mode.
To start recording:
Press the Grey Video Button. The camera will emit one beep and the camera light will flash while recording.
To stop recording:
Press the Grey Video Button again. The camera will emit one beep and the camera light will stop flashing while recording.
PHOTO
To capture a photo, verify the camera in Photo mode.
To take a photo:
Press the Red Photo Button. The camera will emit a camera shutter sound.
CR2032 BATTERY REPLACEMENT FOR EK7000 REMOTE
- Use a 1.8mm Phillips tip screwdriver to remove the 4 screws on the back cover of the
remote, allowing you to open it.
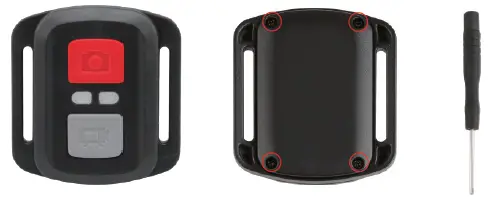
2. Remove another 4 screws on PCB board.
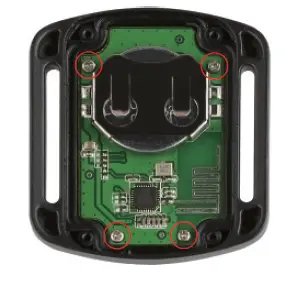
3. Lift the PCB board and slide out the battery, as shown in the picture.
Note: Do NOT rotate the PCB board to avoid reversing the camera and video button functions.
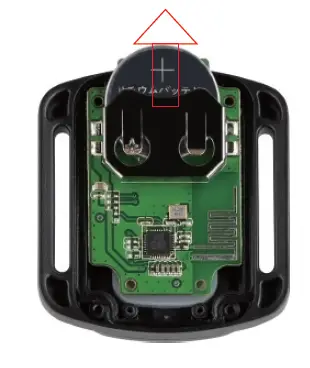
4. Install the new battery, keeping the “+” pole facing up.
5. Install all 4 screws back onto the PCB board.

6. Install all 4 screws back into the cover.
MOUNTING YOUR CAMERA
Attach your camera to helmets, gear and equipment.
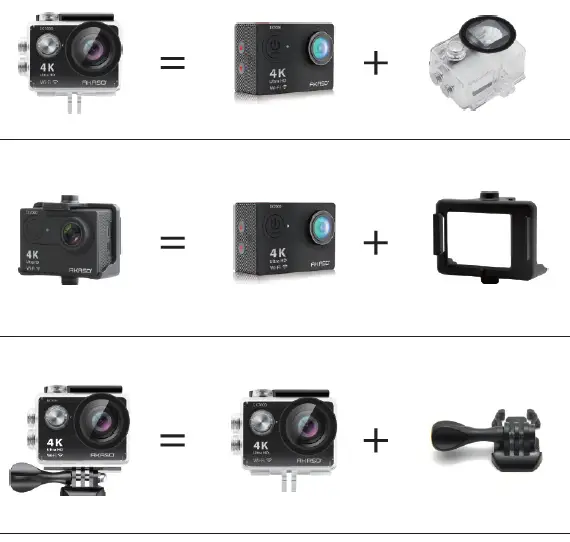

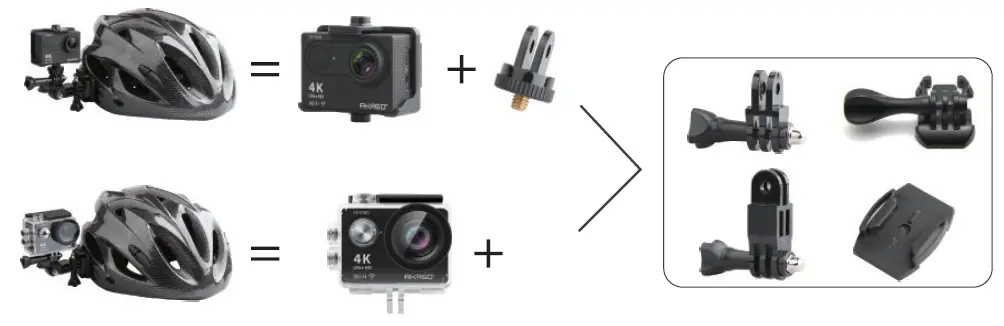
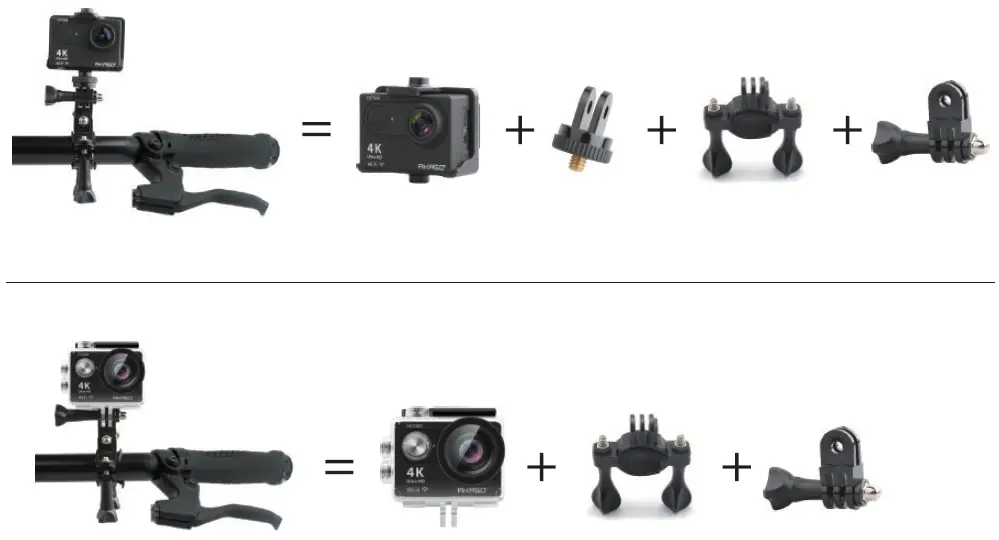
CONTACT US
For any inquires with AKASO products, please feel free to contact us, we will respond
within 24 hours.
E-mail: [email protected]
Tel: (888) 466-9222 (US) Mon-Fri (except holiday) 9am-5pm (EST)
Official website: www.akasotech.com
AKASO Smart Lock
Introduction
- Thank you for choosing the AKASO Smart Lock.
- The new Smart Lock uses the latest technology to make your life easier.
- The user manual enables you to operate the product safely
- Please read the user manual before using AKASO Smart Lock.
Product Profile
- Dimensions

- Unlocking Method
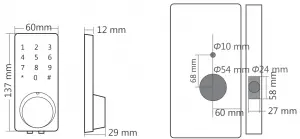
Installation Instructions for Users
- Installation Requirements
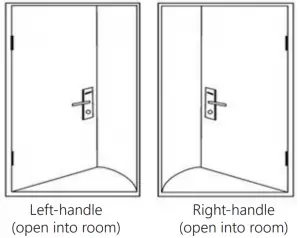
- Accessories Installation Drawing

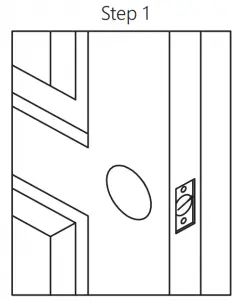


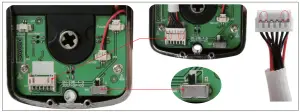
Note: If it is a left hand door, please turn the switch to L.
If it is a right hand door, please turn the switch to R.


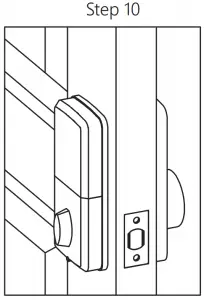
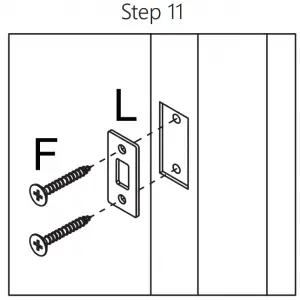
3. Installation Precautions
3.1. Doorjamb ≥ 110mm.
3.2. Door thickness: more than 32mm and less than 48mm.
3.3. Lock cylinder installation: push the cylinder out before installation.
3.4. Back panel installation: connect the data cable of the Front panel to the socket of the Back panel and insert the redundant part of the data cable into the door hole of the lock. If it is a left hand door, please turn the switch on the back panel to L and if it is a right hand door, please turn it to R. After installation, please twist the Back panel knob to check whether the cylinder can be twisted (otherwise re-install after the knob is rotated 90 degree). (Image)
APP Operation Guide
- APP Installation and Registration
1.1 Download the “ttlock” APP from Google play store or Apple store.
1.2 Install and register an account with your phone number or email.
Note: The APP only supports Android 4.3 / IOS7.0 version and above.
We suggest family members or tenants downloading and installing the APP. - APP connection
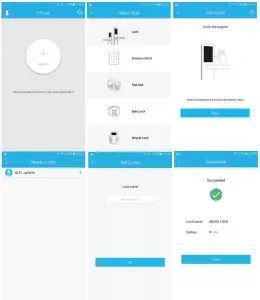
2.1 Turn on the Bluetooth on your phone.
2.2 Open the APP. Then click “Add Lock” and “Lock”.
2.3 Touch the touch screen button of the smart lock, the number keys indicator light will be bright and Click “Next” on the APP.
2.4 Find the smart lock name which starts with “xx_xxx” and click “+”.
2.5 Rename the name of smart lock and click “OK”.
2.6 Click “Finish”
- APP Operation Instruction
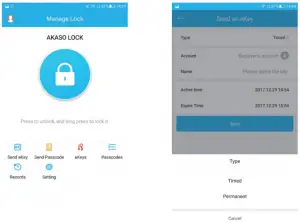
3.1 Send eKey
eKey is a function for you to authorize the Admin rights to other family members, who has download the same APP in their own phones. All the people who holds can control the smart lock.
eKey is highly suggested to be ONLY applied among family members
3.2 Send Passcode
The passcode receiver can unlock the smart by entering the passcode manually. The passcode can be set as different type: Permanent / Timed / One-time(6 hours) / Erase(24 hours) / Customized / Cyclic . All passcodes generated can be sent to those in need by mail and chatting tools
3.3 eKeys
A file to manage the status and history of eKeys.
3.4 Passcodes
A file to manage the status and history of Passcodes.
3.5 Records
View locking and unlocking information to check when and who used it.
3.6 Setting
3.6.1. Display the Lock ID.
3.6.2. Display the battery power.
3.6.3. Display the name of the Lock.
You can manually change name of the door.
3.6.4. Group: the administrator can add multiple locks for grouping, which is suitable for rental housing.
It is more convenient for group management of personnel.
3.6.5. Admin passcode: the default passcode is the unlock passcode of
the administrator, which can be manually changed to a custom
passcode.
3.6.6. Auto Lock: Auto Lock: off-by-default. Open the app-click Setting
-click Auto Lock-turn on and set time 5 to 120 seconds you need
-click OK. When the setup is completed, it will be automatically locked after unlocking (for example, it will be automatically locked 5 seconds after unlocking if the time is set as 5 seconds).
3.6.7. Lock Upgrade: to check whether there is any update version.
3.6.8. Unlocking alert: off-by-default. If turn on it, the administrator’s phone will receive the unlocking information when someone who assigned with a key unlocks the door with the APP
3.6.9. Fault Diagnosis.
3.7. System Settings V. Operation Instructions for Different Functions
3.7.1. Pattern Passcode: off-by-default, you can manually open it to set your favorite pattern passcode to unlock the APP.
3.7.2. Touch to Unlock: on-by-default, this function is invalid when the “ttlock” APP is turned off or running on the background of your phone. When the APP is open and connect within 10 meters from the lock, any family members can unlock the door by pressing the touch screen button. It is recommended to close the option if you do not need it.
3.7.3. Manage Groups: the administrator can add multiple locks for grouping, which is suitable for rental housing. It is more convenient for achieving group management of personnel.
It can be modified or deleted if not needed.
3.7.4. Security Setting: set and check the verification options. (Reset lock / Send ekey / Send passcode / Delete Admin ekey / Change management passcode / Authorize Verification).
All operations must be verified by account passcode to ensure the security.
3.7.5. My Reminders: to receive system information tips.
3.7.6. Transfer locks: This function is use to transfer the administrator
rights. Once transferred, you will not the administrator again.
Operation Instructions for Different Functions
- Unlock
1.1. Unlock with APP: Turn on the app and click the lock icon in the interface to unlock it. (The phone is within 10 meters from the door lock).
1.2. Unlock with administrator passcode: enter the numeric passcode of the Admin Passcode option in the APP setting and then press the # key to confirm the unlocking.
1.3. Unlock by touching the keypad: Open the APP, then turn on the “Touch to Unlock option” in the System Settings. Touch the keypad to unlock the door (The phone is required to be connected to WiFi or mobile data network and within 10 meters from the door lock).
1.4. Unlock by key: use a pointed object to open the circular keyhole which is under the touch screen button then insert the key to unlock it.
1.5. Unlock manually: manually twist the knob on the Back panel to unlock it. - Lock
2.1. Lock with APP: Turn on the App, press and hold the lock icon for 5 seconds to lock it. (The phone is within 10 meters from the door lock).
2.2. Auto Lock: When you turn on the “Auto Lock” option in the APP, the smart lock will be locked automatically after you unlock the door.
2.3. Lock with the # key: press and hold the # key on the panel keypad for 3 to 5 seconds to lock.
2.4. Lock by key: use a pointed object to open the circular keyhole which is under the touch screen button then insert the key to unlock it.
2.5. Lock manually: manually twist the knob on the Back panel to lock it. - Modify the Administrator’s Unlocking Passcode
Open the APP-click Setting-click Admin Passcode- enter the new passcode with 4-9 numerical digits-Click OK (The phone is required to be connected to WiFi or mobile data network and within 10 meters from the lock) - Switch Administrator
4.1. Delete the Administrator right
Open the APP-click Setting-click Delete-enter your account password-click OK – Using a new phone to pair the lock again. A lock can only be paired with one administrator phone. Please stand within 10 meters away from the lock to open and connect the APP.
4.2. Switch through the Transfer locks function.
Turn on the APP-click System Settings-click Transfer Locks-Select Locks-click Next-enter the recipient’s APP account and the verification code-click Next-Finish (The phone is required to be connected to WiFi or mobile data network and within 10 meters from the lock ). - Remote Authorization of ekey
Turn on the APP-click Send eKey-select the ekey type as “Timed” or “Permanent”-Enter the APP account of the recipient-click Send button. (The phone is required to be connected to WiFi or mobile data network). - Freeze / Delete / Authorize / Name / Operate Already Sent eKeys
by Administrator Turn on the APP-lick eKeys-click the ekey that has
been sent-click Name / validity / delete the eKey info you need-
clicking the menu on the upper right corner to conduct the freeze
/ authorization operation. (The phone is required to be connected
to WiFi or mobile data network.) - Remote Authorization of Passcode
Turn on the APP-click Send passcode-select the type of the
passcode (Permanent / Timed / One-time / Erase / Customized / Cyclic)-click Generate. Then it will be create a passcode. You can send the code to others by SMS, email and other chatting tools. (The phone is required to be connected to WiFi or mobile data network.) - Delete Already Sent Passcode by Administrator
Turn on the APP-click Passcodes-select the passcode that has been sent delete the passcode (The phone is required to be connected to WiFi or mobile data network and within 10 meters from the lock). - Passcode Touch Protection
If you enter the wrong 4-9 digits passcode for 5 times, the touch passcode key will be automatically locked for 5 minutes and cannot be operated to prevent others from pressing the passcode key repeatedly and maliciously. - Real-time Monitoring
The administrator can find the unlocking information who unlocking the door with APP or passcode (The phone is required to be connected to WiFi or mobile data network). - Anti-theft Alarm
If someone picks the lock, the smart lock will sound a beep alarm when the lock body got loose. - Low Voltage Alarm
When the battery is low, the smart lock will sound a low battery alarm. It is recommended to replace the battery as soon as possible. Just turn on the APP, and you can view the battery percentage in real-time.
Note: the latest battery percentage data can only be viewed when the phone is connected to WiFi or mobile data network and within 10 meters from the door lock. - Emergency Power Supply
Emergency power supply interface equipped on the smart lock: to unlock the door temporarily by connecting to the emergency power supply interface with a 9V backup battery. After unlocking, please replace the battery inside the lock immediately - System Reset
The restart button is behind the number 4 on the touchpad. Resetting your smart lock system will restore your lock to factory settings and delete all smartphones and fobs from the memory If you wish to perform a system reset, press and hold the Reset button on the back panel for 10 seconds until the lock beeps and the light ring lashes red. After a system reset, you will need to re-enroll and your Owner phone. You will still be able to send eKeys at no charge to anyone who previously had an active eKey at the time of reset.
FQA
Q: What devices are compatible with the AKASO smart lock?
A: The smart lock is compatible with Android and iOS devices.
Q: How can I reset my ttlock app account if I forgot my password?
ANS:
- Open the ttlock lock app.
- Click Forgot password.
- Enter the email address you registered for your ttlock account.
- Enter a new password.
- Check Get code. You should receive verification code in the email.
- Enter the verification code to reset your password.
- Use the new password to sign in the account
Q: Can I still use the smart lock when my phone is lost or turn off?
ANS:
- Yes. You can still use the traditional physical key or password to lock / unlock the door.
- Use a new phone to download the ttlock app, Sign in your ttlock account with the email and password. Enter the verification code, then you can use the new phone to unlock the door. Don’t forget to reset the door after you unlock it.
Q: The door won’t lock automatically when I close it.
ANS:
- Check if Auto Lock is set. If not, press and hold the # key on the panel keypad for 3 to 5 seconds to lock the door.
- If the door doesn’t lock automatically when Auto Lock is set, then the lock has been installed incorrectly.
- The Auto Lock function is not activated when the batteries are completely discharged. Check if the batteries are discharged.
Q: Lock configuration failed
ANS:
- Remove the mechanical key from the cylinder.
- Check that the door was closed properly or if lock operation was interfered.
Q: The smart lock has started beeping whenever I lock or unlock the door.
ANS: This is an indication your battery is low; it’s time to change the batteries.
Q: The “ttlock” app is disconnected from the door unit and / or I can’t find my lock on the app.
ANS:
- Close the app, turn your phone’s Bluetooth. Then turn Bluetooth back on, and open the app.
- Refresh the app.
- Only one phone can connect to “ttlock” at the same time. It’s possible that another user’s phone is already connected to ttlock.
If so, close the app on any other user’s phone.
Q: I’m unable to open the door from a distance of 10 meters / yards
ANS:
- The app works via a Bluetooth connection, which can be impacted by the environment.
- For both security and functionality reasons, try moving as close as possible to the lock.”
- The battery is low, use the emergency power supply for the door
Important Safeguards
- Read all instructions in their entirety.
- Familiarize yourself with all warning and caution statements.
- Remind all family members of safety precautions.
- Always have access to your lock’s standard key.
- If using the Lock with the # key or Auto-Lock features, make sure to have your smartphone, passcode or standard key with you to prevent locking yourself out.
- Replace low batteries immediately. Preventing Inadvertent Unlocking of Your Door.
WARNING:
Failure to follow these safeguards could result in your lock opening inadvertently.
- Avoid keeping and storing phones and fobs unnecessarily close to the lock when inside the home.
- Restrict access to your akaso lock’s back panel and routinely check your settings to ensure they have not been altered without your knowledge.
- Protect the password to your ttlock app and your account.
- When sending an eKey, always double-check that you are sending it to the correct recipient.
- Protect and restrict access to your smartphone so that your app settings cannot be altered without your knowledge.
- When sending eKeys, be aware of the difference between an Admin user and other users in the system. The Admin user can send, disable and delete eKeys.
- If your smartphone is lost or stolen, reset your lock. Resetting your smart lock system will restore your lock to factory settings and delete all smartphones and fobs.
Contact US
For any inquiries, issues or comments concerning our products, please send E mail to the address below, and we will respond as soon as possible.
E-mail: [email protected]
US customer service line: (301)670-7335

WHAT’S IN THE BOX

How to use all sorts of accessories of action camera?
Scan the following QR code or enter the website to watch the video.
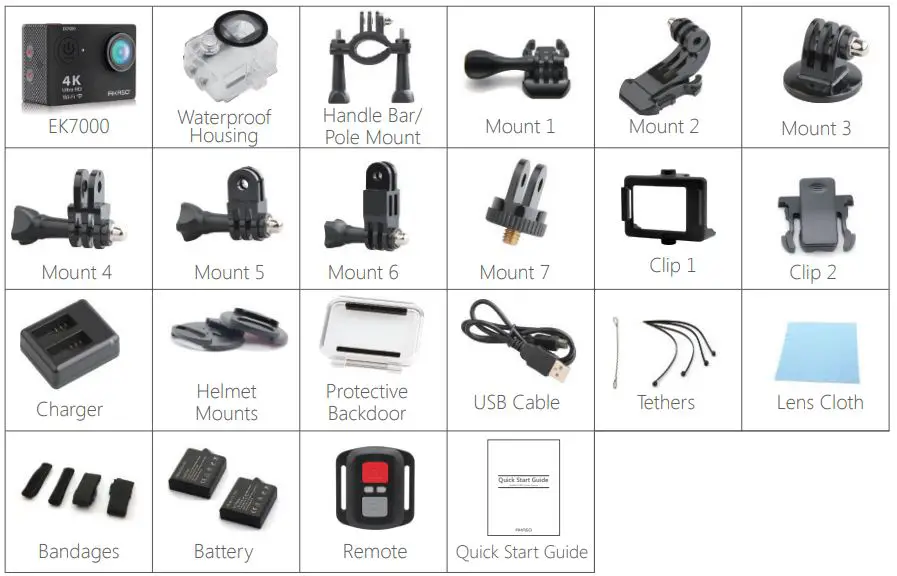

Unboxing00:00-00:19
How to remove the camera from the box it’s mounted on? : 00:20-00:31
How to remove the camera from the waterproof case? : 00:32-01:05
How to mount the camera to a tripod? : 01:17-01:49
How to mount the camera to your body? : 01:50-02:08
How to mount the camera to a self stick? : 02:09-02:55
How to mount the camera to a bike? : 02:56-04:34
How to mount the protective backdoor? : 04:35-04:59
How to mount the camera to a helmet? : 05:03-11:16
YOUR EK7000


- Shutter/Select Button
- Working/WIFI Indicator
- Power/Mode/Exit Button
- Charging Indicator
- microSD Slot
- Micro USB Port
- Micro HDMI Port
- Lens
- Screen
- Up Button
- Down/WIFI Button
- Battery Door
Note: Camera does not record sound when it is in the waterproof case.
GETTING STARTED
Welcome to your new EK7000. To capture video and photos, you need a microSD card (sold separately).
MICROSD CARDS
Use brand name memory cards that meet these requirements:
- MicroSD, micro SDHC, or microSDXC
- Class 10 or UHS-I rating
- Capacity up to 32GB (FAT32)
Note: Please format the microSD card first in this camera before using. To keep your microSD card in good condition, reformat it on a regular basis. Reformatting erases all of your content, so be sure to offload your photos and videos first.
POWERING ON + OFF
To Power On: Press and hold the Mode button for three seconds. The camera beeps while the camera status light is on. When information appears on the LCD display or the camera status screen, your camera is on.
To Power Off: Press and hold the Mode button for three seconds. The camera beeps while the camera status light is off.
SWITCHING MODE
To Switch Mode: Press the Mode button to switch the mode.
EXITING MODE To Exit Mode: Press the Mode button to exit mode.
OVERVIEW OF MODES
There are 5 modes: Video, Photo, Burst Photo, Time Lapse, Setting.
Video Mode
Video Mode is the default mode when you turn on the camera. In Video Mode, press Shutter button, the camera starts recording video. Press Shutter button to stop recording video.
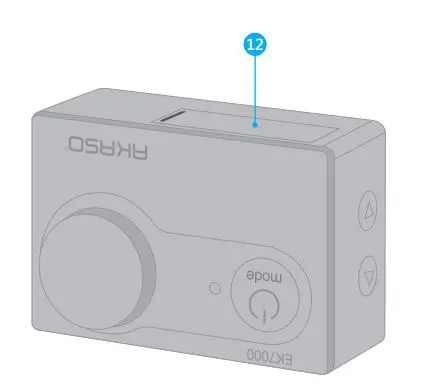
Photo Mode
Press Mode button once to switch to Photo Mode after you turn on camera. In Photo Mode, press Shutter button, the camera takes a photo.

Burst Photo Mode
Press Mode button several times to switch to Burst Photo Mode. In Burst Photo Mode, press Shutter button, the camera takes 3 photos per second.
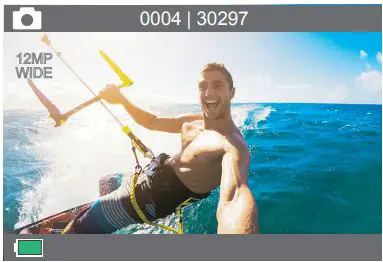
Time Lapse Photo Mode
Press Mode button several times to switch to Time Lapse Photo Mode. In Time Lapse Photo Mode, press Shutter button, the camera takes a serials of photos at 3s/5s/10s intervals.

Settings
Press Mode Button several times to switch to settings mode. Press UP or Down button to cycle through options and press Shutter Button to select desired option.
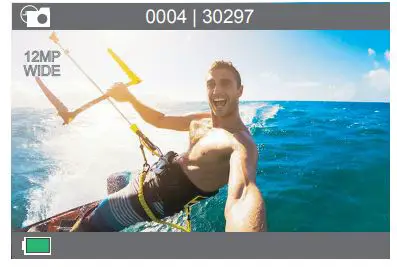
Settings
- Video Resolution: 4K 25FPS, 2.7K 30FPS, 1080P 60FPS, 1080P 30FPS, 720P 120FPS, 720P 60FPS Default setting is 1080P 60FPS.
- Loop Recording: Off/1minute/3 minutes/5 minutes Default setting is off. Using Loop Recording, you can continuously record video, but save only the moments that you want. For example, if you select a 5-minute interval, only the previous 5 minutes are saved when you press the Shutter button to stop recording. If you record for 5 minutes and do not press the Shutter button to stop recording and save, the camera records a new 5-minute interval by recording over your previous 5 minutes of footage. When the microSD card is full, the new files will cover the old one if loop recording is on.
- Recording Sound: OFF/ON Default setting is on. Turn off Recording Sound, the camera does not record sound when you record video.
- Photo Resolution: 12M/8M/5M/4M Default setting is 12M.
- Time Lapse: 3S/5S/10S Default setting is 3S. Time Lapse Photo captures a series of photos at specified intervals. Use this mode to capture photos of any activity, then choose the best ones later.
- Continuous Lapse: OFF/ON Default setting is off. Turn on Continuous Lapse, this camera takes continuous lapse photo.
- Burst Photo: 3P/S Burst captures up to 3 photos in 1 second, so it is perfect for capturing fast-moving activities.
- Exposure: -3, -2, -1, 0, 1, 2, 3 Default setting is 0. By default, your camera uses the entire image to determine the appropriate exposure level. However, Exposure lets you select an area that you want the camera to prioritize when determining exposure. This setting is particularly useful in shots where an important region might otherwise be over- or underexposed. When you change this setting, the LCD display immediately shows you the effect on your image. If you change modes, the camera returns to using the entire scene to determine the correct level of exposure.
- White Balance: Auto, Sunny, Cloudy, Incandescent Light, Fluorescent Light Default setting is Auto. White Balance lets you adjust the colour temperature of videos and photos to optimize for cool or warm lighting conditions. When you change this setting, the LCD display immediately shows you the effect on your image.
- Upside Down: OFF/ON Default setting is off. This setting determines the orientation of your video or photos to help you prevent upside down footage.
- Power Frequency: Auto, 50Hz, 60Hz Default setting is Auto.
- Screensaver: Off, 1 minute, 3 minutes, 5 minutes Default setting is 5 minutes. Turns off the LCD display after a period of inactivity to save battery life. To turn on the LCD display again, press any button on the camera.
- Auto Shutdown: Off, 1 minute, 3 minutes, 5 minutes Default setting is 3 minutes. Powers off your EK7000 after a period of inactivity to save battery life.
- Date Stamp: OFF/ON Default setting is on. If you turn on Date Stamp, this camera adds date stamp to the videos or photos you take.
- Volume: High, Middle, Low, Off Default setting is high. This option lets you adjust the volume.
- Beep: OFF/ON Default setting is on. Sets the volume of your EK7000’s alerts.
- Language: English, Japanese, Korean, German, French, Italian, Spanish Default setting is English.
- Date-Time: MM DD YYYY, HH MM SS
- Format To keep your microSD card in good condition, reformat it on a regular basis. Reformatting erases all of your content, so be sure to offload your photos and videos first. To reformat your card, press the mode button to enter system setting, then press down button several times to enter Format > Format Card? > Confirmation.
- Reset to Factory Settings: Confirm Reset to Factory Settings? Confirmation/Cancel This option resets all settings to their default values.
- Firmware Version You can check the model and updated time of your EK7000.
CONNECTING TO THE AKASO DV APP
The AKASO DV app lets you control your camera remotely using a smartphone or tablet. Features include full camera control, live preview, playback and sharing of content, and camera software updates.
- Download AKASO DV app to your mobile device from the Apple App Store or Google Play.
- Turn on the camera, then press Down button to turn on WIFI.
- Turn on WIFI of your mobile device, connect to the WIFI SSID `iMac-AKASO’.
- Enter the password: 1234567890.
- Open the app AKASO DV. Note: Press and hold Down button if you want to turn off WIFI.
PLAYING BACK YOUR CONTENT
You can play back your content on the camera’s LCD display, your computer, TV, or smartphone/tablet.
You can also play back content by inserting the microSD card directly into a device, such as a computer or compatible TV. With this method, playback resolution depends on the resolution of the device and its ability to play back that resolution.
VIEWING VIDEOS AND PHOTOS ON YOUR EK7000
- Turn on camera to enter Video or Photo mode.
- Press Up button in video or photo mode to enter playback mode. If you press Up button in playback mode, the camera will exit playback mode.
- Press Down button, then Shutter button to open video or photo in full-screen view.
- Press Up or Down button to playback photos. Press Up or Down button, then Shutter button to play videos.
- To exit the video or photo files, press Mode button.
Note: If your microSD card contains a lot of content, it might take a minute for it to load.
DELETING VIDEOS AND PHOTOS ON YOUR EK7000
- Turn on camera to enter Video or Photo mode.
- Press Up button in video or photo mode to enter playback mode. If you press Up button in playback mode, the camera will exit playback mode.
- Press Down button, then Shutter button to open video or photo in full-screen view.
- Press Up or Down button to locate the file you want to delete.
- Press and hold the Shutter button for 3 seconds. The screen shows `Delete this file? Confirmation Cancel’ .
- Press Down button, then Shutter button, the selected file will be deleted.
OFFLOADING YOUR CONTENT
OFFLOADING YOUR CONTENT TO A COMPUTER
To play back your video and photos on a computer, you must first transfer these files to a computer. Transferring also frees up space on your microSD card for new content.
To offload files to a computer using a card reader (sold separately) and your computer’s file explorer, connect the card reader to the computer, then insert the microSD card. You can then transfer files to your computer or delete selected files on your card. Note that you must use a card reader to offload photos or audio files.
OFFLOADING YOUR CONTENT TO SMARTPHONE OR TABLET
- Open the “AKASO DV” app.
- Tap “Folders” at the left corner of the bottom screen.
- Tap `Edit’ at the right corner of the top screen.
- Tap the files you want to save.
- Tap “Save” at the right corner of the bottom screen. The screen shows “Confirm Download”.
- Tap “Confirm Download”.
Note:
- If you cannot offload videos or photos to iPhone or iPad, please enter Setting -> Privacy -> Photos , find “AKASO DV” and select “Read and Write”.
- You cannot download 4K or 2.7K video to iPhone and iPad via WIFI app. Please offload 4K or 2.7K videos via card reader.

REFORMATTING YOUR MICROSD CARD
To keep your microSD card in good condition, reformat it on a regular basis. Reformatting erases all of your content, so be sure to offload your photos and videos first.
- Press and hold Mode button for 3 seconds to turn on the camera.
- Press Mode button four times, then Shutter button to enter Camera Setting.
- Press UP or Down button to locate the “Format” option.
- Press Shutter button, the screen shows “Format Card? Confirmation Cancel”.
- Press Down button then Shutter button. The screen shows “Format Complete”.
Then you format your microSD card successfully.
MAINTENANCE YOUR CAMERA
Follow these guidelines to get the best performance from your camera:
- For best audio performance, shake the camera or blow on the mic to remove debris from the microphone holes.
- To clean the lens, wipe it with a soft, lint-free cloth. Do not insert foreign objects around the lens.
- Don’t touch the lens with fingers.
- Keep the camera away from drops and bumps, which may cause damage to the parts inside.
- Keep the camera away from high temperature and strong sunshine to avoid being damaged.
MAXIMIZING BATTERY LIFE
If the battery reaches 0% while recording, the camera saves the file and powers off. To maximize battery life, follow these guidelines when possible:
- Turn off Wireless Connections
- Capture video at lower frame rates and resolutions
- Use Screen Saver setting.
BATTERY STORAGE AND HANDLING
The camera contains sensitive components, including the battery. Avoid exposing your camera to very cold or very hot temperatures. Low or high temperature conditions may temporarily shorten the battery life or cause the camera to temporarily stop working properly. Avoid dramatic changes in temperature or humidity when using the camera, as condensation may form on or within the camera.
- Do not dry the camera or battery with an external heat source such as a microwave oven or hair dryer. Damage to the camera or battery caused by contact with liquid inside the camera is not covered under the warranty.
- Do not store your battery with metal objects, such as coins, keys or necklaces. If the battery terminals come in contact with metal objects, this may cause a fire.
- Do not make any unauthorized alterations to the camera. Doing so may compromise safety, regulatory compliance, performance, and may void the warranty.
WARNING: Do not drop, disassemble, open, crush, bend, deform, puncture, shred, microwave, incinerate or paint the camera or battery. Do not insert foreign objects into the battery opening on the camera. Do not use the camera or the battery if it has been damaged – for example, if cracked, punctured or harmed by water. Disassembling or puncturing the battery can cause an explosion or fire.
REMOTE
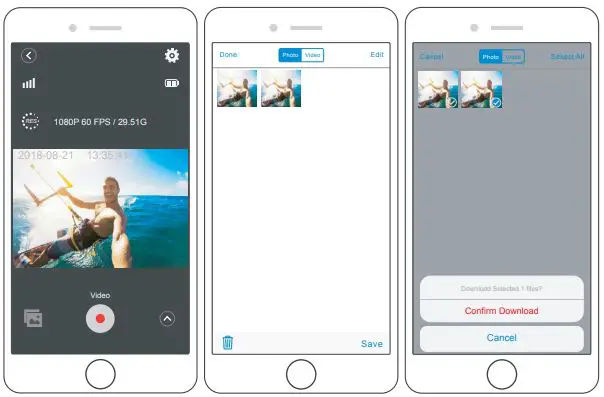
VIDEO
To record Video, verify the camera is in Video mode.
To start recording:
Press the Grey Video Button. The camera will emit one beep and the camera light will flash while recording.
To stop recording:
Press the Grey Video Button again. The camera will emit one beep and the camera light will stop flashing while recording.
PHOTO
To capture a photo, verify the camera is in Photo mode.
To take a photo:
Press the Red Photo Button. The camera will emit a camera shutter sound.
CR2032 BATTERY REPLACEMENT FOR EK7000 REMOTE
- Use a 1.8mm Phillips tip screwdriver to remove the 4 screws on the back cover of the remote, allowing you to open it.
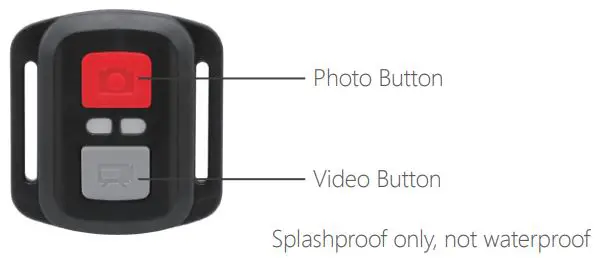
- Remove another 4 screws on PCB board.
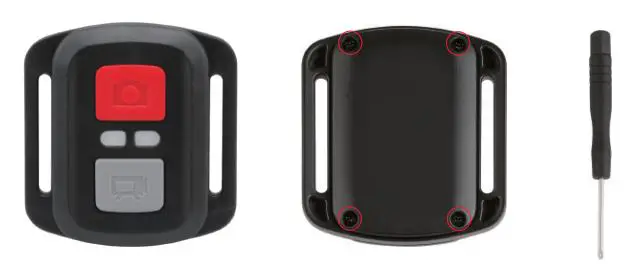
- Lift the PCB board and slide out the battery, as shown in the picture.
Note: Do NOT rotate the PCB board to avoid reversing the camera and video button functions.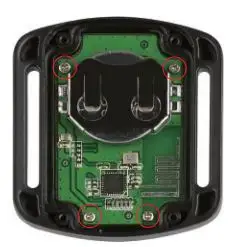
- Install the new battery, keeping the “+” pole facing up.
- Install all 4 screws back onto the PCB board.
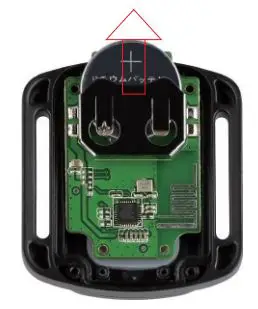
- Install all 4 screws back into the cover.
MOUNTING YOUR CAMERA
Attach your camera to helmets, gear and equipment.

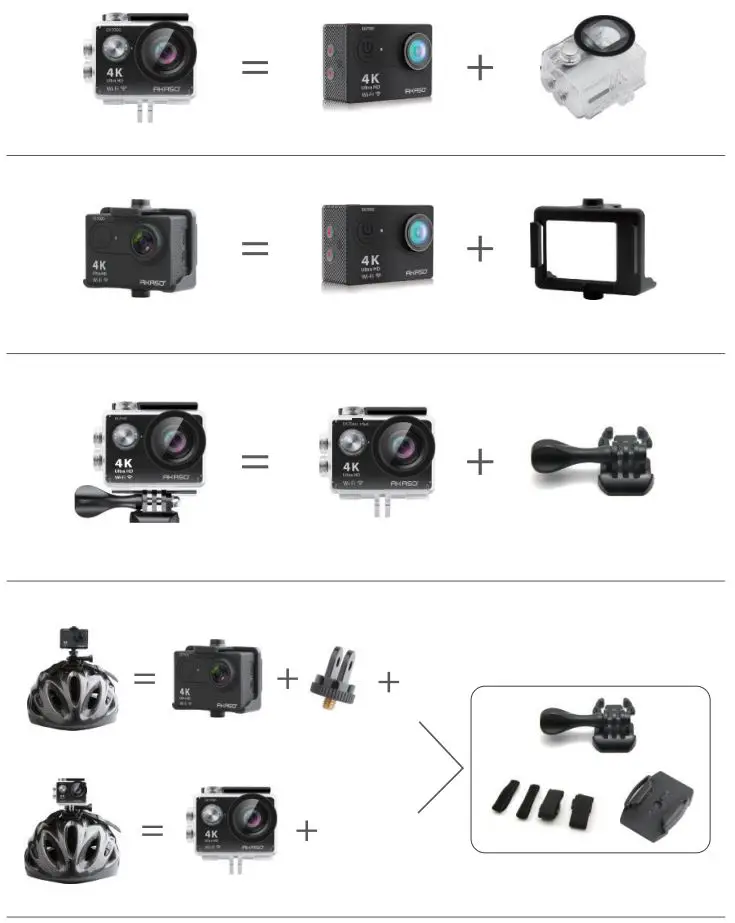
CONTACT US
For any inquiries with AKASO products, please feel free to contact us, we will respond within 24 hours.
E-mail: [email protected]
Tel: (888) 466-9222 (US) Mon-Fri (except holiday) 9am-5pm (EST)
Official website: www.akasotech.com
WHAT’S IN THE BOX
CAMERA INTRODUCTION

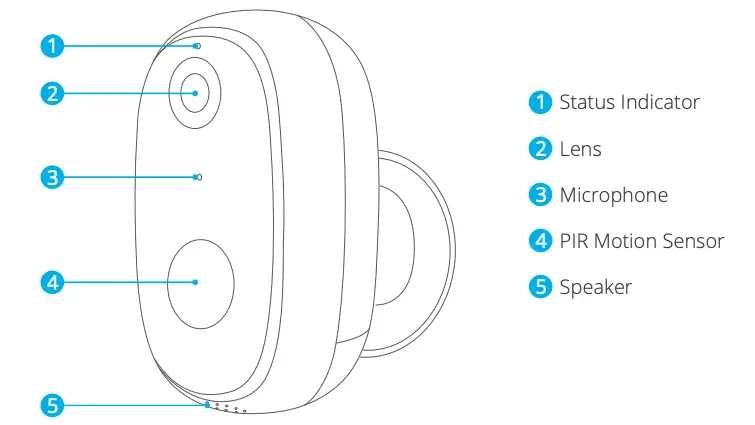
Note: (7) (8) (9) (10) are under the rubber plug and the rubber is for waterproof.

INSTALLATION
- Bracket Installation
Drill three holes on the wall or ceiling, insert bolt into the hole and tighten to fix the device. Put the camera on it and adjust the direction.

- Solar Panel Installation
Drill two holes and insert screws. Align the hole on the back of solar panel. The solar panel also can be placed on horizontal plane with two feet. Put the camera on it and adjust the direction.
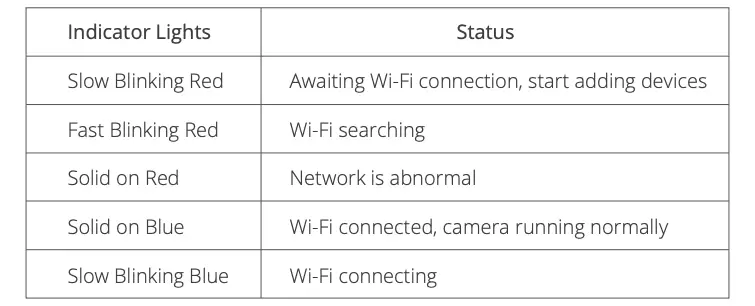
- Magnetitic Bracket Installation
Drill one hole and insert screw. Align the hole on the back of magnetitic bracket. Put the camera on it and adjust the direction.
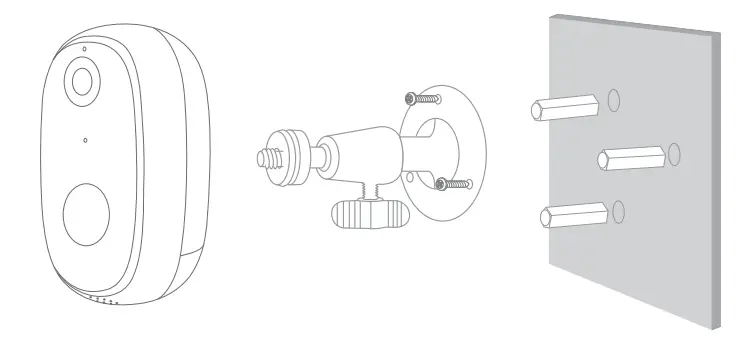
Note: Camera can be charged through both USB cable and polar panel.
SET-UP
- Install Phone App
Search for “Smart Life” app in App Store/Google play, or scan the QR code below to download.
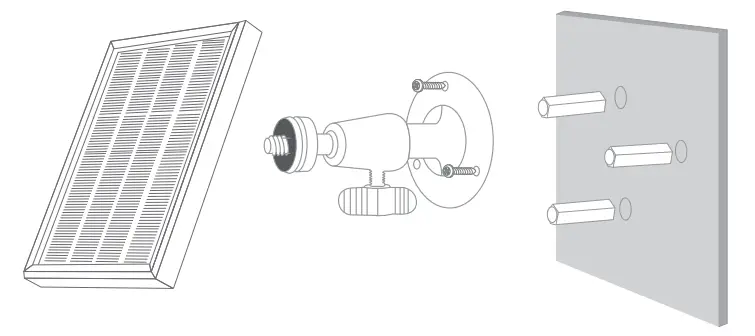
- Get a New Account
If you already have an account for Smart Life, please log in your account and skip to step 4.- Open “Smart Life” app to click “Register → Agree”. Choose country/region, fill in the mobile number or Email.
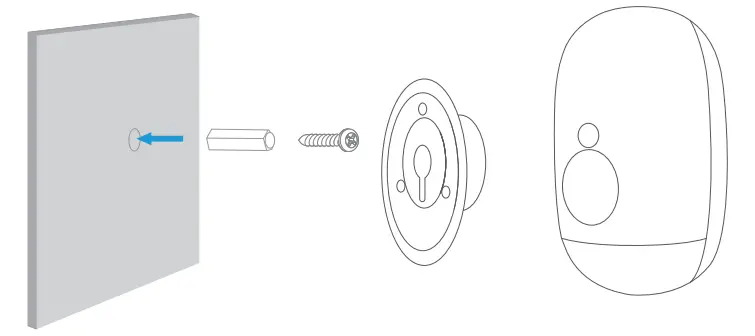
- Fill in email address or phone number, a verification code will be sent, please get it and fill it in.

- Then set password, click “Done”.
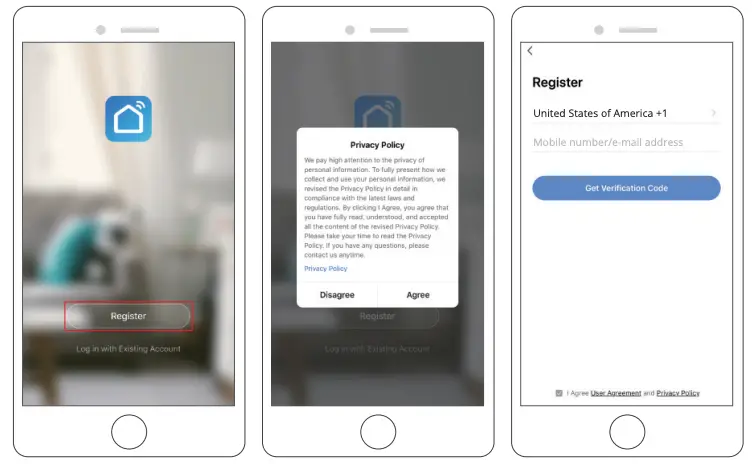
- After registering the account, you need to add home information, click
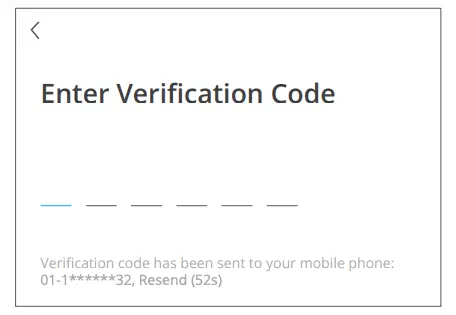 “(at the left bottom)”, enter the “Home Management”, click “Add Home” and fill in Home name, location, add rooms, then click “Save” to add successfully.
Note:- E-mail address or mobile phone number should be valid.
- The length of password must be within 6-20 characters, no special characters included.
- Please choose the same country in register and login.
- If you forgot the password, click “Forget Password” to reset it.
- Open “Smart Life” app to click “Register → Agree”. Choose country/region, fill in the mobile number or Email.
- Power on Camera
Press and hold the power button for 5 seconds to turn on camera. (If it cannot be power on, plug in DC5V 1A/2A power adapter to charge the camera for 15 mins first.) The camera is started successfully when the indicator light blinking slowly.
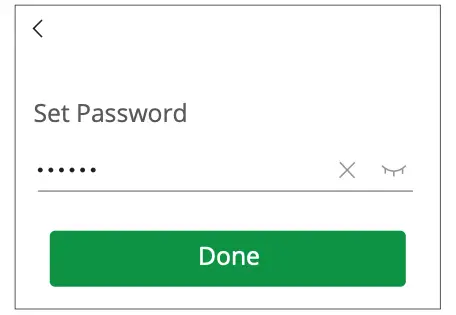
Note: DC5V 1A/2A power adapter is not included in packing list. - Add Your Camera
- Bring the camera and your phone to the router within 1 to 3 feet (30 to 100 cm) and connect Wi-Fi.

- Follow the instructions to ensure that the camera is activated. (The indicator light is turning red and flashing slowly.)
- Choose Room, click “Add Device → Video Surveillance → Smart Camera → next step → Enter Wi-Fi Password → Confirm → Continue”.
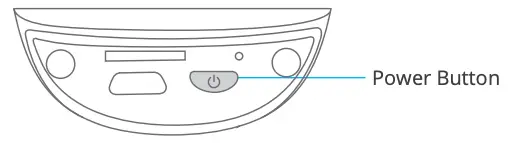

- A QR code will be shown, just face the phone to the camera, after hearing the beep, then click “I heard a Prompt”, see below picture.
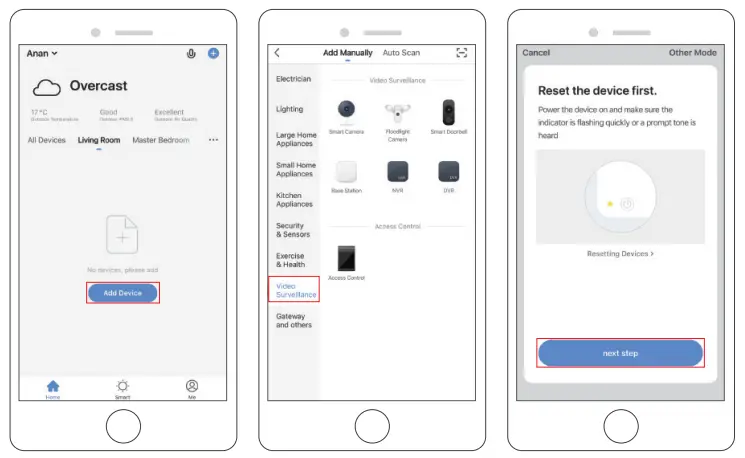
- Wait for the connection for about 30s, the device will be added successfully. Name your camera and click the room where it is, click “Done”.

- Click camera icon to preview camera live video.

- Bring the camera and your phone to the router within 1 to 3 feet (30 to 100 cm) and connect Wi-Fi.
USE THIRD PARTY DEVICES TO CONTROL
Note: If you have downloaded “Akaso Smart” to link your cameras, please remove cameras linked to Akaso Smart account and download “Smart Life” to link your cameras again. (More details, please refer to the procedure “SET-UP”.)
1. Use Amazon Echo To Control
a. Configure the Amazon Echo device
(If you have already configured Amazon Echo, you can skip this step. The following instructions are based on the iOS client.)
① Make sure your Amazon Echo device is powered on and connected to a Wi-Fi network.
② Open the Alexa app on your phone. After successful login, tap on the menu in the upper left corner of the Home page, select “Settings” and tap “Set Up A New Device” to set up the Amazon Echo.
③ Choose your Amazon Echo device type and language for connecting. Press and hold the small dot on the device until the light turns yellow. Then tap “Continue” to connect to the hotspot.
④ After connecting to the Amazon Echo hotspot, return to the page. At this point, the connection is successful. Tap “Continue” to proceed to the next step. Choose a Wi-Fi network to connect to. Amazon Echo will take a few minutes to try to connect to the network.
b. Key step – link Skill
① Tap on “Skills” in the Alexa app menu.

② Then search for “Smart Life”. Tap “Enable to use” to enable the Skill.

③ Enter the Smart Life APP account and password, then tap “Link Now” to link your Smart Life account to enable the Skill. Continue and tap “Discover the device” to add your camera into the list. Then you can start your smart home journey.
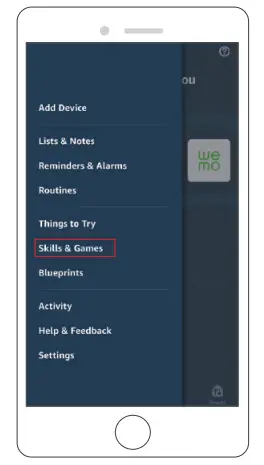
2. Use Google Assistant To Control
a. Configure Google Home device
(If you have already configured Google Home, you can skip this step. The following instructions are based on the iOS client)
① Make sure your Google Home device is powered on and connected to a Wi-Fi network.
② Open the Google Home app on your phone. After successful login, tap on the menu in the upper left corner and select “SET UP” to set up Google Home.
③ It will notify you with a sound to ensure that you are connected to the correct device. After you hear the sound, tap “YES” to proceed to the next step.
④ You can choose to differentiate the room where Google Home is located from other Google devices. Then, select the Wi-Fi network and language, wait for the system to complete the configuration, and tap “next”.
⑤ According to the page prompts, choose whether to agree to the corresponding operation. When the page displays “Google Home is ready”, select “continue” to continue to the next step.
⑥ Next is the voice control guide tutorial. Once you’re done listening, tap “FINISH SET UP.” At this point, Google Home setup is comple.
b. Key step – link Action
① On the main page of the Google Home app, tap the sidebar menu in the top left corner and select “Set up device”.

② Then tap the bottom “Have something already set up?” and search for “Smart Life”.

③ Find Smart Life on the list and open it, select the country where your Smart Life app account is located, enter your Smart Life app account and password, and tap “Link Now”.

④ Enter the Smart Life app account and password, then tap “Link Now” to link your Smart Life account. Choose the room where your device is located, and then the skill will appear on the Home Control Devices list. Now you can begin your smart home journey.
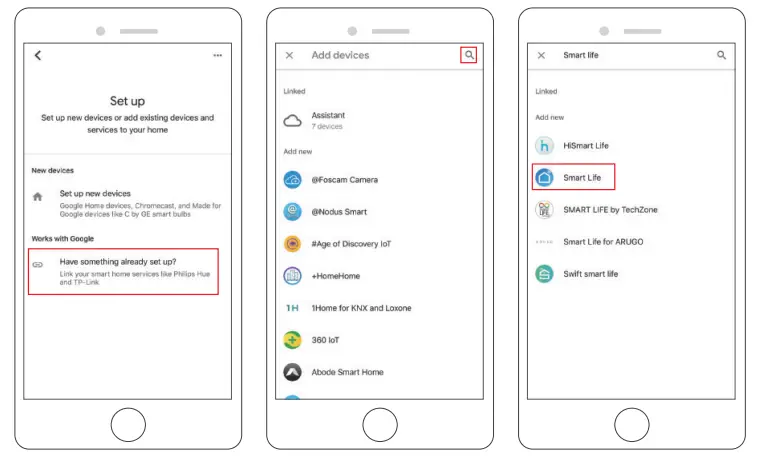
ADJUST PIR DETECTION DISTANCE
PIR “Body Detection” is on by default and the default sensitivity is “Mid”, but it is adjustable. “My Device” – The detecting distance is 6 meters (20 feet).

Note: Higher sensitivity offers longer detecting distance, but it would lead to more false alarms. You are advised to set up the sensitivity level to “Low” or “Medium” when you install the camera outdoors.
ALARM PUSH NOTIFICATION AND PLAYBACK
Battery camera with PIR sensor is not designed for 7*24 all day recording, but aims at pushing alarm message notification to app and record video to microSD card when PIR sensor detected human body motion events, then you can playback the motion videos wherever you are via Smart Life.
When PIR triggered, camera and system actions:
- Alarm Sound in App (please open permission for Smart Life notification in mobile setting and turn mobile volume on).
- Alarm Message Notification (Please enable Smart Life notification in mobile setting).

- Alarm snapshot and video will be recorded on microSD card (please insert microSD card) or Cloud storage.
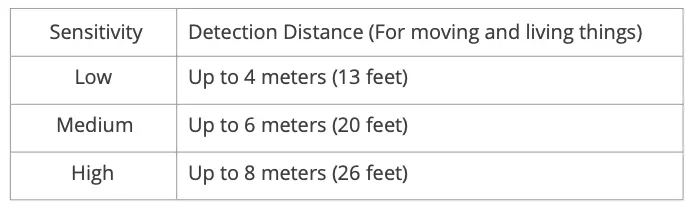
BATTERY MANAGEMENT
- If the battery capacity is less than 20%, the app will send an alarm message to remind you to charge in time.
- You can charge the camera with DC 5V/1A power adapter
- If your battery is consumed too quickly, the possible cause is that the camera is woken up too frequently. It is recommended to lower down the “Body Detection” sensitivity or turn it off occasionally.
IMPORTANT NOTES FOR REDUCING FALSE ALARMS
- Do not install the camera in a position facing any objects with bright lights, including sunshine, bright lamp lights, etc.
- Do not place the camera too close to a place where there are frequently moving vehicles. Based on numerous tests, the recommended distance between the camera and vehicle is 15 meters (55 feet.).
- Stay away from the outlets, including air conditioner vents, humidifier outlets, the heat transfer vents of the projects, etc.
- Do not let the camera facing the mirror.
- Keep the camera at least 1 meter away from any wireless devices in order to avoid wireless interference, including Wi-Fi router and phones.
- When installing the camera, it’s not suggested to make the PIR sensor vertically face the moving objects, otherwise it may not detect the motion event. It is suggested to make the angular between PIR sensor and detected object larger than 10 degree.
SPEC DATA
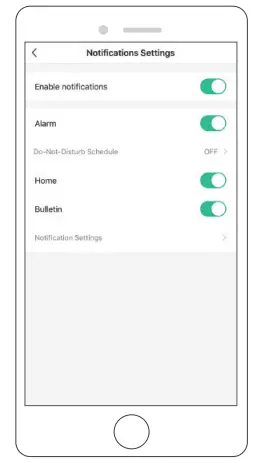
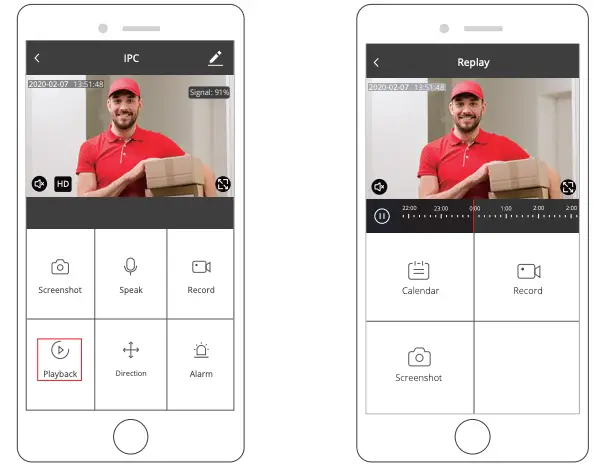
TROUBLESHOOTING SHEET
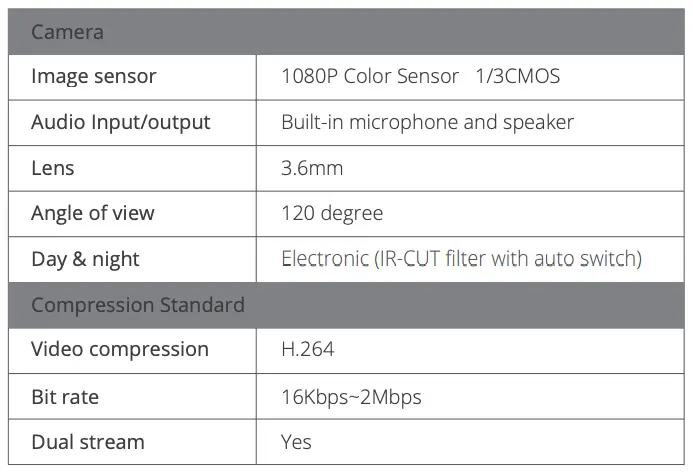
CONTACT US
For any inquiries with AKASO products, please feel free to contact us, we will respond within 24 hours.
E-mail: [email protected]
Tel: (888) 466-9222 (US) Mon-Fri (except holiday) 9am-5pm (EST)
Official website: www.akasotech.com
]]>H Band 2 Fitness Tracker
CHARGE MODE
![]()
Note:
1. When you use it for the first time, please fully charge it.
2. The metal part of the plug needs to be aligned with the two metal plates on the fitness tracker.
3. Remember to follow the correct charging method, if the charging method is incorrect, the battery will be short-circuited.
DOWNLOAD APP
Download APP by scanning the below QR code or searching for “H Band” in APP Store /Google Play, etc., the APP will lead you to register an account. (The language of ‘H Band’ APP will automatically switch depending on your smartphone’s language.)
 http://120.25.211.226/HBandDownload.html
CONNECTING DEVICE
After full charge, turn on the fitness tracker by pressing the touch area for 3 seconds, activate the Bluetooth of your mobile phone. When you first open the “H Band” APP, the APP will lead you to bind the fitness tracker, or “Click to connect device” on the main interface of the APP.
![]()
Note:
If you cannot connect your device, please refer to “NORMAL PROBLEMS”.
APP INTERFACE INTRODUCTION
1. Click on the top-right icon to view your History Data.
![]() 2. Click “Sport”, “Sleep”, “Heart rate” and “Female”(if you are female) respectively to see the detailed data of each section.
2. Click “Sport”, “Sleep”, “Heart rate” and “Female”(if you are female) respectively to see the detailed data of each section.
![]()
3. Click “Running” and enter into running mode.
![]()
![]()
Press the start key to start recording the track diagram. When you move around, it will automatically record your track. If you need to pause, please pull down the Pause key.
4. Click “Setting” and enter the settings interface, then Click “H Band 2” ton enter the Function Settings Interface.
![]()
LIGHTEN UP THE FITNESS TRACKER
Press the touch area, or activate the “Turn the wrist” Function in the APP Function Settings, then turn over the wrist and the fitness tracker brightens automatically. (The sensitivity of “Turn the wrist” is adjustable: APP Setting > My device (H-Band 2) >Turn the wrist)
![]()
Note: If you adjust the sensitivity to the highest level, it will consume a lot of power.
FITNESS TRACKER FUNCTION INTRODUCTION
1. Introduction of equipment functional interfaces
Press the touch area and you can change between multiple functional interfaces.
![]()
Tips: “Find Phone”, the “Countdown” and the “Stopwatch” interfaces are closed by default. You need to restart those functions through APP Setting > My device (H-Band 2) > Switch settings / Countdown.
2. Running Mode
On the Running Interface, press the touch area for 3 seconds to enter the Running Mode. While in running mode, you can press the touch area to change between “Running Data”, “Pause” and “Exit” Interfaces. “Running Data” Interface display running time, heart rate, running distance, calories, and steps in real-time. While in the pause or exit Interfaces, press the touch area for 3 seconds to pause or exit Running Mode.
![]()
3. Heart Rate Mode
To measure your heart rate, you need to wait for approximately 10 seconds, then the data will appear. In order to ensure the accuracy of the Heart Rate test, you can wait for about 30 seconds.
![]()
4. Call and message reminder
Enter the Function Settings Interface, then click “Message notification”, you can activate the Phone call / SMS / Facebook / Twitter / Line, etc. reminders.
![]()
When you have a Phone call or other information (SMS / Facebook / Twitter / Line, etc.), the fitness tracker will vibrate to remind you. When you receive the message, press the touch area to switch pages and view the complete information.
![]()
5. Alarm Clock and Events Reminder
Multiple events reminders can be set through APP Setting > My device (H-Band 2) > Alarm setting. This function can also add alarm clock label for important thing, such as “Sleep”, “Go to work”, “Coffee”, “Meeting”, etc.
![]()
When the set time arrives, the device will vibrate and display the alarm clock label.
![]()
6. Sedentary Reminder
This function can be turned on through APP Setting > My device (H-Band 2)> Sedentary setting. You can set a time value for the warning. When the device detects that the user has sat or kept still for the set time limit, the device will vibrate to remind you to move around.
![]()
7. Remote Photograph
![]()
To use the device to take a remote photograph, you can turn on the Camera Mode through APP Setting > My device (H-Band 2) > Take Photo, then quickly shaking the fitness tracker.
8. Turn off the fitness tracker
![]()
Switch to Device Shutdown Interface and shutdown the device by ressing the touch area for 3 seconds.
PARAMETER
| Application | H Band |
| Waterproof | IP67 |
| Screen Size | 0.96 Inch OLED |
| G-Sensor | 3-Axis Sensor |
| Weight | 19.8g |
| Main Part Material | PC+ ABS |
| Strap Material | TPU |
| Battery Capacity | 90mAh |
| Charging Time | 1-2hour |
| Usage Time | 5-7 days |
| Standby Time | 7-10 days |
| Fitness Tracker Size | 9.96*0.75*0.49 Inches / 250*19*12.5mm |
| Device System | Android 4.4, IOS 8.0 and Above |
| APP Support Language | Chinese, English, Japanese, Korean,
German, Russian, Spanish, Italian, French, Vietnamese, Portuguese |
| Fitness Tracker
Support Language |
Chinese, English |
| Mileage Unit | Metric / Imperial |
NORMAL PROBLEMS
1. Unable to connect the fitness tracker?
① Please confirm that the Bluetooth of your mobile phone is activated, the mobile phone support Bluetooth 4.0 and your device system is Android 4.4, IOS 8 or above.
② Please confirm that the fitness tracker and mobile is within the Bluetooth connection distance (10 meters).
③ Please check whether the fitness tracker is out of charge. If this problem still appears after charging, please contact us.
2. Why sometimes the Bluetooth cannot be connected?
① Some mobile phones’ Bluetooth will appear abnormal occurrence when it is restarted, which leads this kind situation.
② Usually, you can delete your previous paired Bluetooth record, restart Bluetooth or your mobile phone to solve this problem.
3. Why the fitness tracker cannot receive the notifications?
① Activate the right of fitness tracker reading notifications in the setting of your Mobile phone.
② Re-connect the Bluetooth, Turn on the APP to synchronize data, and ensure the notification pushing function activated.
4. Why the fitness watch don’t track my sleep?
① Activate the Wear Detection on the APP. [APP Setting-My device(H Band 2)-Switch setting-Wear Detection]
② Please wear this fitness tracker when you sleep.
③ You should turn on the bluetooth on the next morning,then the sleep record will come up on the app after about 10-20 minutes.
NOTE
① Don’t tear down the fitness tracker case.
② Don’t put the fitness tracker into the dish-washing machine, washing machine or drying machine.
③ Don’t expose the fitness tracker under extremely high or low temperatures.
④ Don’t wear the fitness tracker in sauna bathroom or steam bathroom, don’t soak the fitness tracker in hot spring, the sea or other chemical liquid for a long time.
⑤ Don’t put the fitness tracker into fire or the battery may explode.
⑥ Don’t use detergent to clean the fitness tracker.
⑦ Please charge the fitness tracker with computer or standard USB power adapter.
⑧ Don’t charge the fitness tracker before it totally dry.
⑨ During charging, if the fitness tracker’s temperature is too high, please stop charging.
⑩ Don’t check the information on the fitness tracker screen during driving or risk situation, otherwise it may cause distractions.
CARE AND WEAR TIPS
① Clean and dry the fitness tracker regularly, especially the place contacts with the skin.
② Wear the fitness tracker correctly and make the fitness tracker close to your skin to realize the heart rate monitoring.
③ Take down the fitness tracker occasionally to clean the fitness tracker.
ATTENTION
The heart rate monitoring data is just for reference. This fitness tracker does not apply to diagnose, treatment, recovery, prevent, and reduce the disease or other situations. It also
does not apply to clinical medical usage.
CONTACT US
For any inquiries, issues or comments concerning our products, please send an E-mail to the address below or call us. We will respond as soon as possible.
Email: [email protected]